background image

English

   - 13 -

If “

USB disk writing speed too slow to record

” 

message is displayed on the screen while starting a 

recording, try restarting the recording. If you still get 

the same error, it is possible that your USB disk does 

not meet the speed requirements. Try connecting 

another USB disk.

Media Browser Menu

You can play photo, music and movie files stored on a 

USB disk by connecting it to your TV. Connect a USB 

disk to one of the USB inputs located on the side of 

the TV. Pressing the 

Menu

 button while in the 

Media 

Browser

 mode will access the 

Picture

Sound

 and 

Settings

 menu options. Pressing the 

Menu

 button 

again will exit from this screen.


You can set your 

Media


Browser

 preferences by using the 

Settings

 menu.

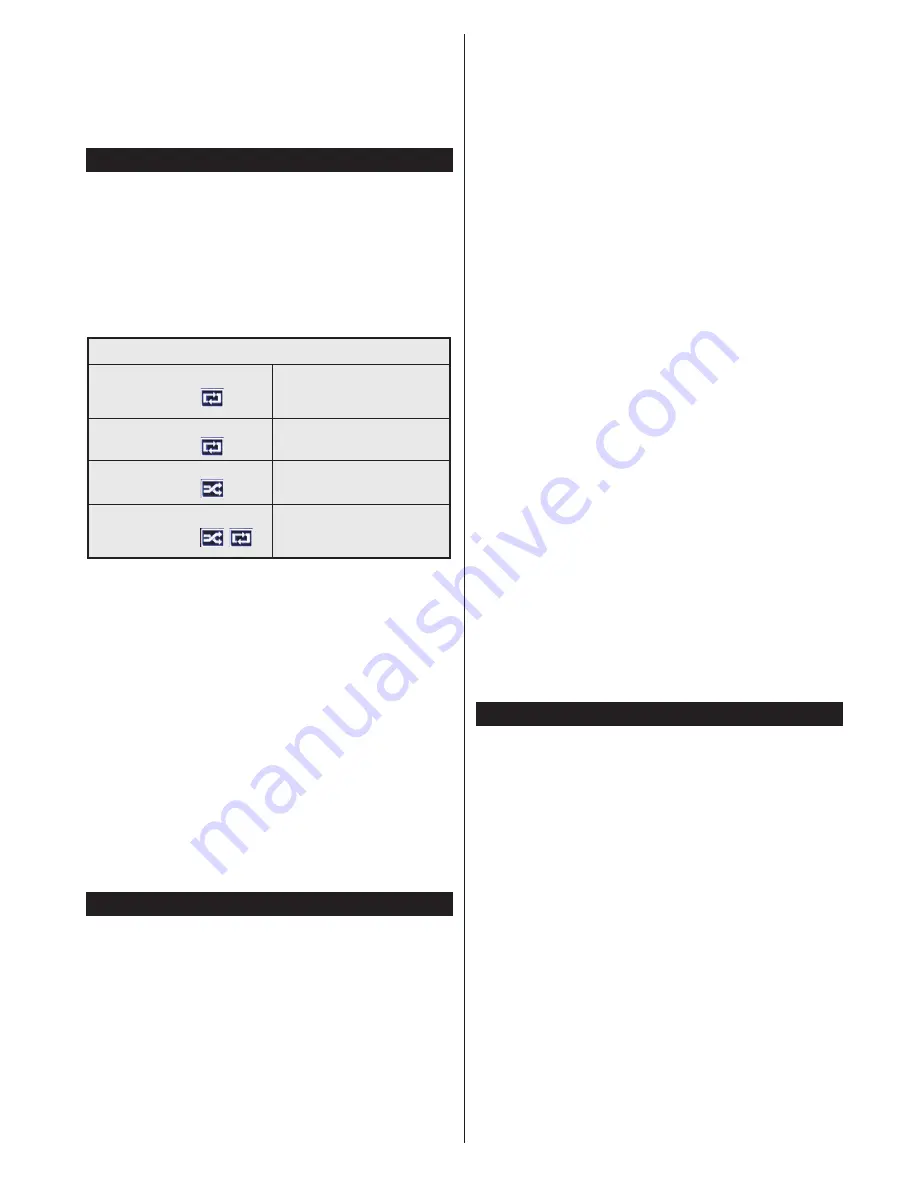
Loop/Shuffle Mode Operation

Start playback with the 

Play 

button and activate 

All files in the list will be 

continuously played in original 

order

Start playback with the 

OK 

button and activate 

The same file will be played 

continuously (repeat)

Start playback with the 

Play


button and activate 

All files in the list will be 

played once in random order

Start playback with the 

Play


button and activate 

All files in the list will be 

continuously played in the 

same random order.

Custom Boot Up Logo

You can personalize your TV and see your favorite 

image or photo on the screen each time your TV boots 

up. To do this, copy your favorite image files into a USB 

disk and open them from the 

Media Browser

 menu. 

When you have chosen the desired image, highlight it 

and press 

OK

 to view it in full screen. Press 

OK

 again 

to choose the image as custom logo. A confirmation 

message will be displayed. Select 

Yes

 and press 

OK


again. If the image is suitable

(*)

 you will see it on the 

screen during the TV’s next boot up.

Note:

 If you perform a First Time Installation the TV will return 

to using the default logo, if any.

(*) 

Images must have an aspect ratio between 4:3 to 16:9 

and they must be in .jpeg, .jpg or .jpe file formats. The image 

cannot be set as boot logo, which’s resolution doesn’t appear 

on the info banner.

CEC and CEC RC Passthrough

This function allows to control the CEC-enabled 

devices, that are connected through HDMI ports by 

using the remote control of the TV.
The 

CEC

 option in the 

System>

Settings

>More

 menu 

should be set as 

Enabled

 at first. Press the 

Source


button and select the HDMI input of the connected 

CEC device from the 

Sources List

 menu. When 

new CEC source device is connected, it will be listed 

in source menu with its own name instead of the 

connected HDMI ports name(such as DVD Player, 

Recorder 1 etc.).

The TV remote is automatically able to perform the 

main functions after the connected HDMI source has 

been selected.
To terminate this operation and control the TV via 

the remote again, press 

Quick Menu

 button on the 

remote, highlight the 

CEC RC Passthrough

 and 

set as 

Off

 by pressing Left or Right button. This 

feature can also be enabled or disabled under the 

System>

Settings

>More

 menu.

The TV supports also ARC(Audio Return Channel) 

feature. This feature is an audio link meant to replace 

other cables between the TV and the audio system 

(A/V receiver or speaker system).
When ARC is active, TV does not mute its other audio 

outputs automatically. So you need to decrease TV 

volume to zero manually, if you want to hear audio 

from connected audio device only (same as other 

optical or co-axial digital audio outputs). If you want 

to change connected device’s volume level, you 

should select that device from the source list. In that 

case volume control keys are directed to connected 

audio device.

Note:

 ARC is supported only via the HDMI3 input.

System Audio Control

Allows an Audio Amplifier/Receiver to be used with 

the TV. The volume can be controlled using the 

remote control of the TV. To activate this feature set 

the 

Speakers

 option in the 

System>

Settings

>More


menu as 

Amplifier

. The TV speakers will be muted 

and the sound of the watched source will be provided 

from the connected sound system.

Note:

 The audio device should support System Audio Control 

feature and 

CEC

 option should be set as 

Enabled

.

E-Manual

You  can  find  instructions  for  your TV’s  features  in 

the E-Manual. 

To use E-Manual, press to the 

Info 

button while main 

menu is displayed on the screen or press 

Quick Menu


button, select 

Information


Booklet

 and press 

OK

.

By using the directional buttons select a desired 

category. Every category includes different topics. 

Select a topic and press 

OK

 to read instructions.

To close the E-Manual screen press the 

Exit

 or 

Menu


button.

Note:

 The contents of the E-Manual may vary according to 

the model.

Содержание 40U7653DB

Страница 1: ...OPERATING INSTRUCTIONS 40U7653DB COLOUR TELEVISION WITH REMOTE CONTROL ...

Страница 2: ...Programmes 12 Recording Configuration 12 Media Browser Menu 13 CEC and CEC RC Passthrough 13 E Manual 13 TV Menu Contents 14 General TV Operation 18 Using the Channel List 18 Configuring Parental Settings 18 Electronic Programme Guide EPG 18 Teletext Services 19 Software Upgrade 19 Troubleshooting Tips 20 PC Input Typical Display Modes 21 AV and HDMI Signal Compatibility 21 Supported DVI Resolutio...

Страница 3: ...by qualified personnel before operating it any further Do not expose the TV to direct sunlight open flames or place it near intense heat sources such as electric heaters Listening in excessive volumes from earphones and headphones may cause hearing loss Ensure that no open flame sources such as lit candles are placed on top of the TV To prevent injuries this TV must be securely attached to a wall ...

Страница 4: ...the television set or its controls If your existing television set is being retained and relocated the same considerations as above should be applied Environmental Information This television is designed to be environment friendly To reduce energy consumption you can follow these steps If you set the Energy Saving to Minimum Medium Maximum or Auto the TV will reduce the energy consumption accordin...

Страница 5: ...at the product was placed on the market after August 13 2005 By participating in separate collection of products and batteries you will help to assure the proper disposal of products and batteries and thus help to prevent potential negative consequences for the environment and human health For more detailed information about the coIIection and recycling programmes available in your country please ...

Страница 6: ...CH in a concentration above 0 1 weight by weight EU Conformity Statement This product is carrying the CE Mark in accordance with the related European Directives ResponsibleforCE MarkingisCompalElectronicsEuropeSp z o o ul Pokoju1 BiskupicePodgórne 55 040 Kobierzyce Poland This product is labeled with the CE Mark in accordance with the related European Directives notably Low Voltage Directive 2006 ...

Страница 7: ... Accessories Included Remote Control Batteries 2 x AAA Instruction Book Quick Start Guide Side AV Connection Cable Mini Scart Adapter Cable Standby Notifications If the TV does not receive any input signal e g from an aerial or HDMI source for 5 minutes it will go into standby When you next switch on the following message will be displayed TV switched to stand by mode automatically because there w...

Страница 8: ...NT The terms HDMI and High Definition Multimedia Interface and the HDMI Logo are trademarks or registered trademarks of HDMI Licensing LLC in the United States and other countries Manufactured under license from Dolby Laboratories Dolby and the double D symbol are trademarks of Dolby Laboratories YouTube and the YouTube logo are trademarks of Google Inc Specification TV Broadcasting PAL BG I DK LL...

Страница 9: ... Turns subtitles on and off where available 20 Stop Stops the media being played 21 Rapid advance Moves frames forward in media such as movies 22 Screen Changes the aspect ratio of the screen 23 My button 2 24 Text Displays teletext where available press again to superimpose the teletext over a normal broadcast picture mix 25 Media browser Opens the media browsing screen 26 Exit Closes and exits f...

Страница 10: ...en receiving DTV channels Mpeg4 H 264 or while in Media Browser mode output will not be available via the scart socket When using the wall mounting kit available from third party in the market if not supplied we recommend that you plug all your cables into the back of the TV before mounting on the wall Insert or remove the CI module only when the TV is SWITCHED OFF You should refer to the module i...

Страница 11: ... finished press OK to continue You can activate Store Mode option at this point This option will configure your TV s settings for store environment and depending on the TV model being used the supported features of it may be displayed on the top of the screen as an info banner This option is intended only for store use It is recommended to select Home Mode for home use This option will be availabl...

Страница 12: ...op button to stop timeshift recording and return to the live broadcast Timeshift cannot be used while in radio mode You cannot use the timeshift fast reverse feature before advancing the playback with the fast forward option Instant Recording Press Record button to start recording an event instantly while watching a programme You can press Record button on the remote control again to record the ne...

Страница 13: ...he TV The CEC option in the System Settings More menu should be set as Enabled at first Press the Source button and select the HDMI input of the connected CEC device from the Sources List menu When new CEC source device is connected it will be listed in source menu with its own name instead of the connected HDMI ports name such as DVD Player Recorder 1 etc The TV remote is automatically able to pe...

Страница 14: ...warmth or coolness of the picture by pressing Left or Right buttons Picture Zoom Sets the desired image size format Film Mode Films are recorded at a different number of frames per second to normal television programmes Turn this feature on when you are watching films to see the fast motion scenes clearly Skin Tone Skin tone can be changed between 5 and 5 Colour Shift Adjust the desired colour ton...

Страница 15: ...orts AVL Automatic Volume Limiting Sets the sound to obtain fixed output level between programmes Headphone Lineout When you connect an external amplifier to your TV using the headphone jack you can select this option as Lineout If you have connected headphones to the TV set this option as Headphone Please ensure before using headphones that this menu item is set to Headphone If it is set to Lineo...

Страница 16: ... the TV Hard of Hearing Enables any special feature sent from the broadcaster Audio Description A narration track will be played for the blind or visually impaired audience Press OK to see all available Audio Description menu options This feature is available only if the broadcaster supports it Note Audio description sound feature is not available in recording or time shifting mode Netflix If this...

Страница 17: ...stations Analogue Searches and stores analogue stations Manual channel scan This feature can be used for direct broadcast entry Network channel scan Searches for the linked channels in the broadcast system Digital Aerial Searches for aerial network channels Digital Cable Searches for cable network channels Analogue fine tune You can use this setting for fine tuning analogue channels This feature i...

Страница 18: ...tion is set as France Italy or Austria Maturity Lock s value will be set to 18 as default Child Lock If this option is set to ON the TV can only be controlled by the remote control In this case the control buttons on the TV will not work Internet Lock If this option is set to ON the open browser application in the portal will be disabled Set to OFF to release the application again Set PIN Defines ...

Страница 19: ...ve recording or timer on the current channel It is not possible to set timer or record timer for two or more individual events at the same time interval Teletext Services Press the Text button to enter Press again to activate mix mode which allows you to see the teletext page and the TV broadcast at the same time Press once more to exit If available sections in the teletext pages will become colou...

Страница 20: ...increase the volume to check Sound may be coming from only one speaker Check the balance settings from Sound menu Remote control no operation The batteries may be exhausted Replace the batteries Input sources can not be selected If you cannot select an input source it is possible that no device is connected If not Check the AV cables and connections if you have tried to connect a device Check the ...

Страница 21: ...900 75Hz 27 1600x1200 60Hz 28 1680x1050 59Hz 29 1680x1050 60Hz 30 1920x1080 60Hz AV and HDMI Signal Compatibility Source Supported Signals Available EXT SCART PAL O SECAM O NTSC4 43 O NTSC3 58 RGB 50 60 O Side AV PAL O SECAM O NTSC4 43 O NTSC3 58 O YPbPr 480i 480p 60Hz O 576i 576p 50Hz O 720p 50Hz 60Hz O 1080i 50Hz 60Hz O HDMI 480i 60Hz O 480p 60Hz O 576i 576p 50Hz O 720p 50Hz 60Hz O 1080i 50Hz 60...

Страница 22: ...nnectors by using DVI converter cable DVI to HDMI cable not supplied you can refer to the following resolution information 56Hz 60Hz 66Hz 70Hz 72Hz 75Hz 640x480 þ þ 800x600 þ þ þ 1024x768 þ þ þ 1280x768 þ þ 1280x960 þ 1360x768 þ 1366x768 þ 1280x1024 þ þ þ 1400x1050 þ 1600x900 þ ...

Страница 23: ...with your doctor before watching 3D TV It is possible that some viewers may experience a seizure or epilepsy when exposed to certain conditions including flashing lights or images in TV or video games Sometimes certain symptoms can occur in unspecified conditions even if you do not have any previous history In such a case if you experience any of the following symptoms immediately stop watching th...

Страница 24: ... TV should be in 3D mode Press the 3D button on the remote if available to open 3D Settings menu quickly Select 2D Only option in the 3D Settings menu using the Up or Down buttons Press Left or Right buttons to set 2D mode as Left Right or Off Watching 2D images in 3D format Press the 3D button on the remote if available to open 3D Settings menu quickly Select Virtual 3D option in the 3D Settings ...

Страница 25: ...nel width C1 is supported SBS Side By Side TB Top Bottom MBP Media Browser Picture MBV Media Browser Video DTV Digital TV Source ATV Analog TV Source FC Frame Compatible FP Frame Packed Connectivity Wired Connectivity To Connect to a Wired Network You must have a modem router connected to an active broadband connection Ensure that Nero Media Home software is installed to your PC for Audio Video Sh...

Страница 26: ...en the transmission products the configuration of these products the radio wave conditions the line traffic and the products that you use The transmission may also be cut off or may get disconnected depending on the radio wave conditions DECT phones or any other WiFi 11b appliances The standard values of the transmission speed are the theoretical maximum values for the wireless standards They are ...

Страница 27: ... from the list and press the OK button to connect If Device connected message is displayed the connection is successfully established If the connection fails try it again Note Wireless devices may operate within the same radio frequency range and may interfere with one another To improve the performance of your wireless device place it at least 1 meter away from any other wireless devices Connecti...

Страница 28: ... then perform the network selection again Or press the Blue button to switch to next media type quickly without changing the network Refer to the Media Browser menu section for further information on file playback Subtitle files do not work if you watch videos from your network through Audio Video Sharing feature You can connect only one television to the same network If a problem occurs with the ...

Страница 29: ...he initial screen of the browser the thumbnails of the predefined if any links to web sites available will be displayed as Speed Dial options along with the Edit Speed Dial and the Add to Speed Dial options To navigate the web browser use the directional buttons on the remote or a connected mouse To see the browser options bar move the cursor to the top of the page or press the Back Return button ...

Страница 30: ... can view your active recordings if available and reminders through this tab To delete any item simply press on the delete icon found on each row EPG You can view the broadcast schedules of selected channel lists through this tab You can also navigate through channels by pressing on the selected channel on the EPG grid Please note that updating refreshing the EPG information may take a while depen...

Страница 31: ...of the screen Voice Recognation You can tap on the Microphone widget and manage your application giving voice commands such as Portal Volume Up Down Programme Up Down Note This feature is only for android based devices available Keyboard Page The keyboard page can be opened in two ways by pressing the Keyboard widget on the application screen or automatically by receiving a command from the TV Req...

Страница 32: ...DB Energy efficiency class A Visible screen size diagonal approx inch cm 40 inches 102 cm On mode average power consumption Watt 63 0 W Annual energy consumption kWh annum 91 0 kWh Standby power consumption Watt 0 50 W Off mode power consumption Watt NA Display resolution px 3840 x 2160 ...

Страница 33: ...you want to view advanced functions and download the latest version of firmware of your TV you can do so by visiting http tveu compal toshiba com Helpline 0845 094 3756 Email Toshibaservice TV assist co uk ...

Отзывы: