background image

English

   - 14 -

Watching Recorded Programmes 

Select the 

Recordings 

from the 

Media Browse

menu. Select a recorded item from the list (if 

previously recorded). Press the 

OK

 button to 

view the  

Play Options

. Select an option then 

press 

OK

 button.

Press the 

Stop

 button to stop a playback and 

return to the 

Recordings

.

Slow Forward

If you press 

Pause

 button while watching 

recorded programmes, the slow forward feature 

will be available. You can use 

Rapid advance


button to slow forward. Pressing 

Rapid advance


button consecutively will change slow forwarding 

speed.

Note:

 Viewing main menu and menu items will not be 

available during the playback. 

Recording Configuration

Select the 

Recording Settings

 item in the 

Media Browser>Settings

 menu to configure the 

recording settings. 

Format Disk:

 You can use the 

Format Disk


feature for formatting the connected USB disk. 

Your PIN is required to use the 

Format Disk


feature.

Note:

 Default PIN can be set to 

0000

 or 

1234

. If you 

have defined the PIN(is requested depending on the 

country selection) during the 

First Time Installation


use the PIN that you have defined.

IMPORTANT:

 Formatting your USB drive will 

erase ALL the data on it and it’s file system will 

be converted  to FAT32. In most cases operation 

errors will be fixed after a format but you will lose 

ALL your data.
If “

USB disk writing speed too slow to record

” 

message is displayed on the screen while starting 

a recording, try restarting the recording. If you still 

get the same error, it is possible that your USB 

disk does not meet the speed requirements. Try 

connecting another USB disk.

Media Browser Menu

You can play photo, music, and movie files 

stored on a USB disk by connecting it to your 

TV. Connect a USB disk to one of the USB inputs 

located on the side of the TV. Pressing the 

Menu


button while in the 

Media Browser

 mode will 

access the 

Picture

Sound

 and 

Settings

 menu 

options. Pressing the 

Menu

 button again will 

exit from this screen.


You can set your 

Media


Browser

 preferences by using the 

Settings


Menu.

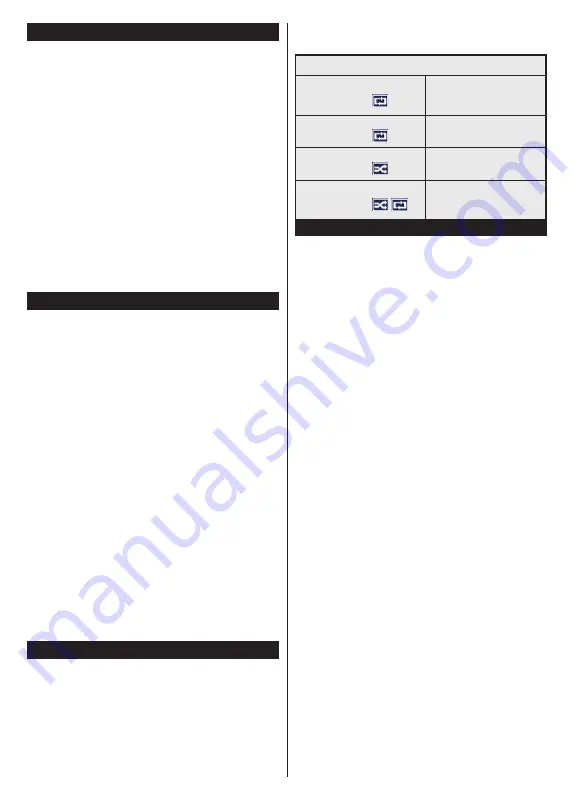
Loop/Shuffle Mode Operation

Start playback with the 

Play 

button and activate 

All files in the list will be 

continuously played in original 

order

Start playback with the 

OK 

button and activate 

The same file will be played 

continuously (repeat)

Start playback with the 

Play


button and activate 

All files in the list will be 

played once in random order

Start playback with the 

Play


button and activate 

All files in the list will be 

continuously played in the 

same random order.

CEC and CEC RC Passthrough

This function allows to control the CEC-enabled 

devices, that are connected through HDMI ports 

by using the remote control of the TV.
The 

CEC

 option in the 

System>Settings>More


menu should be set as 

Enabled

 at first. Press 

the 

Source

 button and select the HDMI input of 

the connected CEC device from the 

Sources 

List

 menu. When new CEC source device is 

connected, it will be listed in source menu with its 

own name instead of the connected HDMI ports 

name(such as DVD Player, Recorder 1 etc.).
The TV remote is automatically able to perform 

the main functions after the connected HDMI 

source has been selected.
To terminate this operation and control the TV via 

the remote again, press 

Quick Menu

 button on 

the remote, highlight the 

CEC RC Passthrough


and set as 

Off

 by pressing Left or Right button. 

This feature can also be enabled or disabled 

under the 

System>Settings>More

 menu.

The TV supports ARC (Audio Return Channel). 

This feature is an audio link meant to replace 

other cables between the TV and an audio system 

(A/V receiver or speaker system).
When ARC is active, the TV does not mute its 

other audio outputs automatically. You will  need 

to decrease TV volume to zero manually if you 

wish to hear the ARC audio only (same as optical 

or co-axial digital audio outputs). If you want to 

change connected device’s volume level, you 

should select that device from the source list. 

In that case volume control keys are directed to 

connected audio device.

Note:

 ARC is supported only via the HDMI1 input.

Содержание 32W1753DB

Страница 1: ...OPERATING INSTRUCTIONS 32W1753DB COLOUR TELEVISION WITH REMOTE CONTROL ...

Страница 2: ...me Installation 12 Media Playback via USB Input 12 Recording a Programme 13 Timeshift Recording 13 Instant Recording 13 Watching Recorded Programmes 14 Recording Configuration 14 Media Browser Menu 14 CEC and CEC RC Passthrough 14 General TV Operation 20 Using the Channel List 20 Configuring Parental Settings 20 Electronic Programme Guide EPG 20 Teletext Services 21 Software Upgrade 22 Troubleshoo...

Страница 3: ...cord plug with wet hands as this could cause a short circuit or electric shock Never make a knot in the power cord or tie it with other cords When damaged it must be replaced this should only be done by qualified personnel Do not expose the TV to dripping or splashing of liquids and do not place objects filled with liquids such as vases cups etc on or over the TV e g on shelves above the unit Do n...

Страница 4: ...en If the battery compartment does not close securely stop using the product and keep it away from children If you think batteries might have been swallowed or placed inside any part of the body seek immediate medical attention i CLASS 1 LASER PRODUCT WARNING Never place a television set in unstable or inclined locations A television set may fall causing serious personal injury or death Many injur...

Страница 5: ...ough a device providing electrical isolation below a certain frequency range galvanic isolator see EN 60728 11 Using the special functions to change the size of the displayed image i e changing the height width ratio for the purposes of public display or commercial gain may infringe on copyright laws The LCD display panels are manufactured using an extremely high level of precision technology howe...

Страница 6: ...dust bin symbol indicates that products must be collected and disposed of separately from household waste Integrated batteries and accumulators can be disposed of with the product They will be separated at the recycling centres The black bar indicates that the product was placed on the market after August 13 2005 By participating in separate collection of products and batteries you will help to as...

Страница 7: ...formity Statement This product is carrying the CE Mark in accordance with the related European Directives Responsible for CE Marking is Vestel UK Langley Berkshire SL3 6EZ This product is labeled with the CE Mark in accordance with the related European Directives notably RoHS Directive 2011 65 EU Furthermore the product complies with the Ecodesign Directive 2005 32 EC EuP and 2009 125 EC ErP and i...

Страница 8: ...ue If the TV is on and it isn t being operated for a while it will go into standby When you next switch on the following message will be displayed TV switched to stand by mode automatically because no operation was made for a long time Press OK to continue TV Control Switch Operation 1 Up direction 2 Down direction 3 Volume Info Sources List selection and Standby On switch The Control button allow...

Страница 9: ...emperature before you connect the set to the mains Plug the power cable to the mains socket outlet Antenna Connection Connect the aerial or cable TV plug to the AERIAL INPUT ANT socket located on the back of the TV If you want to connect a device to the TV make sure that both the TV and the device are turned off before making any connection After the connection is done you can turn on the units an...

Страница 10: ...e devices may not operate properly with the television Specification TV Broadcasting PAL B G D K K I I Receiving Channels VHF BAND I III UHF BAND U HYPERBAND Digital Reception Fully integrated digital terrestrial cable TV DVB T C DVB T2 compliant Number of Preset Channels 1 000 Channel Indicator On Screen Display RF Aerial Input 75 Ohm unbalanced Operating Voltage 220 240V AC 50Hz Audio Dolby Audi...

Страница 11: ...ift recording 18 Play Starts to play selected media 19 Subtitles Turns subtitles on and off where available 20 Stop Stops the media being played 21 Rapid advance Moves frames forward in media such as movies 22 Screen Changes the aspect ratio of the screen 23 My button 2 24 Text Displays teletext where available press again to superimpose the teletext over a normal broadcast picture mix 25 EPG Elec...

Страница 12: ... Side AV connection cable s RED and WHITE inputs If an external device is connected via the SCART socket the TV may automatically switch to EXT1 mode When receiving DTV channels Mpeg4 H 264 or while in Media Browser mode output will not be available via the scart socket When using the wall mounting kit available from a third party in the market if not supplied we recommend that you plug all your c...

Страница 13: ...ast search option is turned on the TV will search for analogue broadcasts after other initial settings are completed Additionally you can set a broadcast type as your favourite one Priority will be given to the selected broadcast type during the search process and the channels of it will be listed on the top of the Channel List When finished press OK to continue You can activate Store Mode option ...

Страница 14: ...ammes are split into 4GB partitions If the writing speed of the connected USB disk is not sufficient the recording may fail and the timeshifting feature may not be available It is recommended to use USB hard disk drives for recording HD programmes Do not pull out the USB HDD during a recording This may harm the connected USB HDD Multipartition support is available A maximum of two different partit...

Страница 15: ...n again will exit from this screen You can set your Media Browser preferences by using the Settings Menu Loop Shuffle Mode Operation Start playback with the Play button and activate All files in the list will be continuously played in original order Start playback with the OK button and activate The same file will be played continuously repeat Start playback with the Play button and activate All f...

Страница 16: ...e control of the TV To activate this feature set the Speakers option in the System Settings More menu as Amplifier The TV speakers will be muted and the sound of the watched source will be provided from the connected sound system Note The audio device should support System Audio Control feature and CEC option should be set as Enabled ...

Страница 17: ...uttons Picture Zoom Sets the desired image size format Film Mode Films are recorded at a different number of frames per second to normal television programmes Turn this feature on when you are watching films to see the fast motion scenes clearly Skin Tone Skin tone can be changed between 5 and 5 Colour Shift Adjust the desired colour tone RGB Gain Optional You can configure the colour temperature ...

Страница 18: ...supports AVL Automatic Volume Limiting Sets the sound to obtain fixed output level between programmes Headphone Lineout When you connect an external amplifier to your TV using the headphone jack you can select this option as Lineout If you have connected headphones to the TV set this option as Headphone Please ensure before using headphones that this menu item is set to Headphone If it is set to L...

Страница 19: ...ports it Note Audio description sound feature is not available in recording or time shifting mode More Displays other setting options of the TV Menu Timeout Changes timeout duration for menu screens Software Upgrade Ensures that your TV has the latest firmware Press OK to see the menu options Application Version Displays current software version Subtitle Mode This option is used to select which su...

Страница 20: ... setting for fine tuning analogue channels This feature is not available if no analogue channels are stored Installation Settings Optional Displays installation settings menu Standby Search Your TV will search for new or missing channels while in standby Any new found broadcasts will be shown Clear Service List Use this setting to clear channels stored This setting is visible only when the Country...

Страница 21: ...users from viewing of certain programmes channels and using of menus These settings are located in the System Settings Parental menu To display parental lock menu options a PIN number should be entered After coding the correct PIN number Parental Settings menu will be displayed Menu Lock This setting enables or disables access to all menus or installation menus of the TV Guidance This setting enab...

Страница 22: ... recording Event Options Use the directional buttons to highlight an event and press OK button to display Event Options menu The following options are available Select Channel Using this option you can switch to the selected channel Record Delete Rec Timer Select the Record option and press the OK button If the event is going to be broadcasted at a future time it will be added to Timers list to be...

Страница 23: ...lease check antenna connections Check if you have entered the correct channel frequency if you have performed manual tuning No picture TV is not receiving any signal Make sure the correct source has been selected Is the antenna connected properly Is the antenna cable damaged Are suitable plugs used to connect the antenna If you are in doubt consult your dealer No sound Check if the TV sound is mut...

Страница 24: ...Signal Compatibility Source Supported Signals Available EXT SCART PAL 50 60 O NTSC 60 O RGB 50 O RGB 60 O Side AV PAL 50 60 O NTSC 60 O PC YPbPr 480I 480P 60Hz O 576I 576P 50Hz O 720P 50Hz 60Hz O 1080I 50Hz 60Hz O 1080P 50Hz 60Hz O HDMI 480I 60Hz O 480P 60Hz O 576I 576P 50Hz O 720P 50Hz 60Hz O 1080I 50Hz 60Hz O 1080P 24Hz 25Hz 30Hz 50Hz 60Hz O X Not Available O Available In some cases a signal on ...

Страница 25: ...05kHz 24kHz 8kHz 11 025kHz 12kHz Sampling rate works only with video files AC3 32Kbps 640Kbps Bit rate 32kHz 44 1kHz 48kHz Sampling rate AAC 16Kbps 576Kbps Bit rate 48kHz 44 1kHz 32kHz 24kHz 22 05kHz 16kHz 12kHz 11 025kHz 8kHz Sampling rate EAC3 32Kbps 6Kbps Bit rate 32kHz 44 1kHz 48kHz Sampling rate LPCM Unsigned 8bit PCM Signed Unsigned 16bit PCM big little endian 24bit PCM big endian DVD LPCM 1...

Страница 26: ...z 66Hz 70Hz 72Hz 75Hz 640x400 þ 640x480 þ þ þ þ 800x600 þ þ þ þ þ 832x624 þ 1024x768 þ þ þ þ þ 1152x864 þ þ þ 1152x870 þ 1280x768 þ þ 1360x768 þ 1280x960 þ þ 1280x1024 þ þ 1400x1050 þ þ 1440x900 þ þ 1600x1200 þ 1680x1050 þ 1920x1080 þ Find out all you need to know about the latest trend setting TV technology on our website www toshiba tv com You can review your TV user manual online or download as...

Страница 27: ...n change the IP and DNS settings of the TV Highlight the desired one and press Left or Right button to change the setting from Automatic to Manual Now you can enter the Manual IP and or Manual DNS values Select the related item in the drop down menu and enter the new values using the numeric buttons of the remote Press the OK button to save settings when complete Other Information The status of th...

Страница 28: ...MONTAGE METINGEN Grootte booropening mm Schroefgroote Lengte X Draad Y Suomi VESA SEINÄASENNUKSEN MITAT Reikäkuvion koot mm Ruuvinkoot Pituus x Kierre Y Norsk VESA VEGGMONTERINGSMÅL Hullmønster størrelser mm Skruestørrelser Lengde x Tråd Y Dansk VESA VÆGMONTERINGS MÅL Hulmønster størrelser mm Skruestørrelser Længde X Tråd Y Русский РАЗМЕРЫ НАСТЕННОГО КРЕПЛЕНИЯ VESA Размеры системы отверстий Размер...

Страница 29: ......

Отзывы: