background image

66

Copyright © 2005 TOSHIBA CORPORATION. All rights reserved.

(E) 27HLV95 *Web 213 : 276

A B C D E F G - - - - - - - - - - - - - - - - 

A B C D E F G - - - - - - - - - - - - - - - - - - - - - - - - - - 

A B C D E F G - - - - - - - - - - - - - - - - 

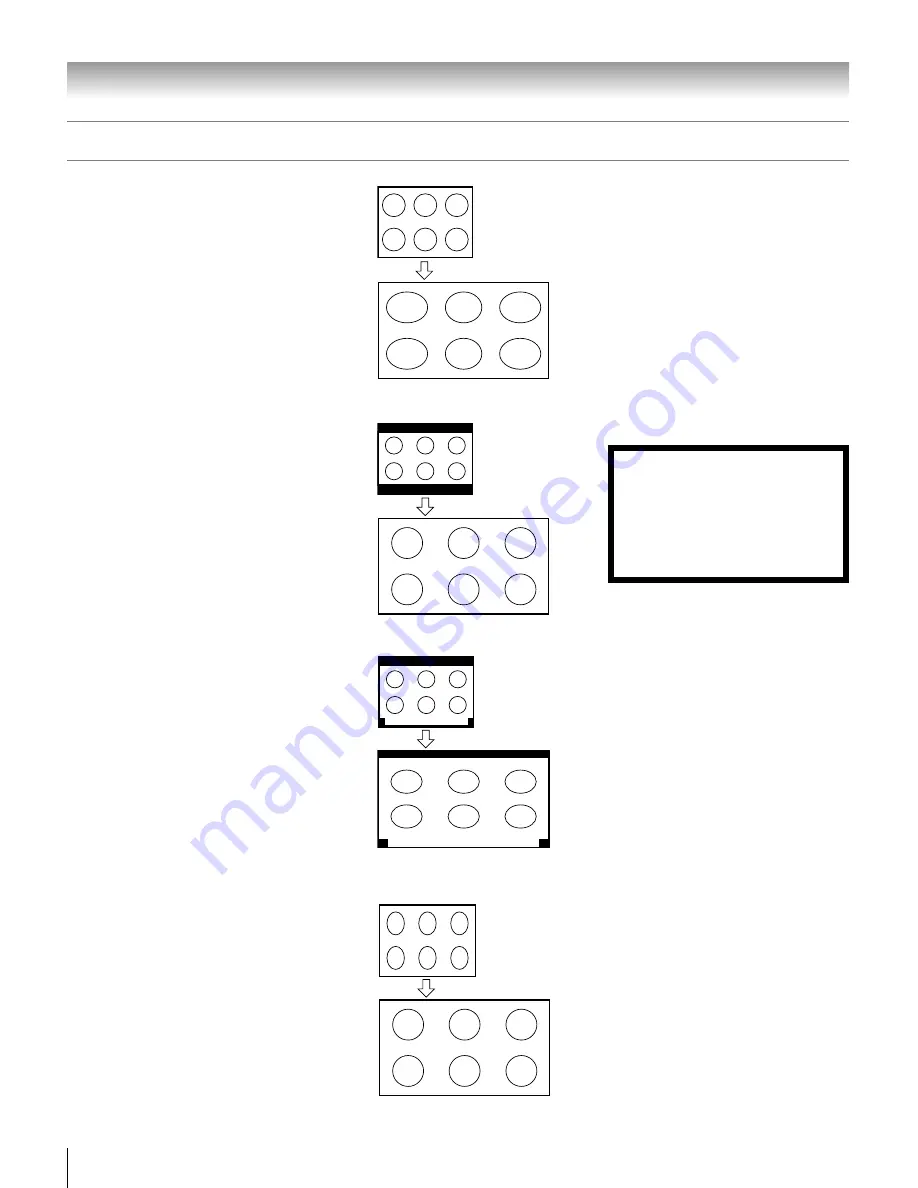
TheaterWide 1 picture size (For 4:3 format
program)

• The center of the picture remains close to its

original proportion, but the left and right
edges are stretched wider to fill the screen.

TheaterWide 2 picture size (for letter box
programs)

• The picture is stretched wider to fill the width

of the screen, but only slightly stretched taller.

• The top and bottom edges of the picture are

hidden. To view the hidden areas, see
“Scrolling the TheaterWide

®

 picture” on page

67.

TheaterWide 3 picture size (for letter box
programs with subtitles)

• The picture is stretched wider to fill the width

of the screen, but only slightly stretched taller.

• The top and bottom edges are hidden. To view

the hidden areas (such as subtitles or captions),
see “Scrolling the TheaterWide

®

 picture” on

page 67.

Full picture size (for 16:9 [480i, 480p] source
programs only)

• If receiving a squeezed 4:3 format program, it

is stretched wider to fill the width of the
screen, but not stretched taller.

• None of the picture is hidden.

Chapter 8: Using the TV’s features

To select the picture size, press PIC SIZE on the
remote control.

Note:

• If you select one of the TheaterWide picture

sizes, the top and bottom edges of the
picture (including subtitles or captions) may
be hidden. To view the hidden edges, either
scroll the picture (TheaterWide 2 and 3 only)
or try viewing the program in Full or Natural
picture size.

• When selecting the picture size, the way

the image displays will vary depending on
currently watching.

Selecting the picture size 

(continued)

TheaterWide 2 picture size example

Full picture size example

Using these functions to change the
picture size (i.e., changing the height/
width ratio) for any purpose other than
your private viewing may be prohibited
under the Copyright Laws of the United
States and other countries, and may
subject you to civil and criminal liability.

TheaterWide 1 picture size example

TheaterWide 3 picture size example

#01E_060-068_27HLV95

05.10.6, 11:01 AM

66

Black

Содержание 27HLV95

Страница 1: ...INITION TELEVISION For an overview of steps for setting up and using your new TV see page 11 DIGITAL VIDEO Because your TV has an integrated High Definition digital tuner a separate High Definition tuner is not needed however to display a High Definition picture the TV must be receiving a High Definition signal such as an over the air High Definition TV broadcast a High Definition digital cable pr...

Страница 2: ...ongratulations on your purchase As you enjoy your new TV keep these safety tips in mind The Issue If you are like most consumers you have a TV in your home Many homes in fact have more than one TV The home theater entertainment experience is a growing trend and larger TVs are popular purchases however they are not always supported on the proper TV stands Sometimes TVs are improperly secured or ina...

Страница 3: ...th dry cloth 7 Do not block any ventilation openings Install in accordance with the manufacturer s instructions 8 Do not install near any heat sources such as radiators heat registers stoves or other apparatus including amplifiers that produce heat 9 Do not defeat the safety purpose of the polarized or grounding type plug A polarized plug has two blades with one wider than the other A grounding ty...

Страница 4: ...ea or ask a qualified service technician to properly dispose of the TV Note The lamp unit contains mercury the disposal of which may be regulated due to environmental considerations For disposal or recycling information contact your local authorities or the Electronics Industries Alliance www eiae org Installation cont from previous page 25 Always make sure the antenna system is properly grounded ...

Страница 5: ...ns VIBRATION Vibration or shock may disrupt DVD playback or cause scratches on the disc Do not move or tilt or otherwise jolt the set when a disc is loaded The playback sound may skip if the TV is dropped from a height of 4 cm or more or if the set is installed at a greater angle than recommended Notes on moisture condensation Moisture condensation occurs for example when you pour a cold drink int...

Страница 6: ...ns for using the internal DVD player Some DVDs are produced in a manner that allows specific or limited operation during playback As such the DVD player may not respond to all operating commands This is not a defect in the DVD player Refer to the instructions provided with your DVDs If the symbol appears on screen during DVD operation it means that the operation or feature is not permitted or avai...

Страница 7: ... chapter 1 Subchapter J applicable At date of manufacture CAUTION VISIBLE AND INVISIBLE LASER RADIATION WHEN OPEN DO NOT STARE INTO BEAM OR VIEW DIRECTLY WITH OPTICAL INSTRUMENTS RMC RL SL2003 Raymedia Co Ltd 65 Youngchun ri Dongtan myun Hwasung Si Gyeonggi do 445 813 Korea S N FBCF500 F W KF10 200 LASER CLASS I PRODUCT CLASS I LASER PRODUCT Because of problems and errors that can occur during the...

Страница 8: ...matic display feature 38 Chapter 6 Setting up your TV 39 Selecting the menu language 39 Configuring the antenna input sources 39 Programming channels into the TV s channel memory 40 Programming channels automatically 40 Manually adding and deleting channels in the channel memory 41 Programming your favorite channels 42 The Toshiba 27HLV95 LCD Color Televisions comply with Part 15 of the FCC rules ...

Страница 9: ...0 Using MPEG noise reduction 71 Using dynamic contrast 71 Using the closed caption mode 72 Advanced closed captions 72 Digital closed captions 73 Adjusting the audio 74 Muting the sound 74 Using the digital audio selector 74 Selecting stereo SAP broadcasts 74 Contents Continued from previous page Adjusting the audio quality 75 Using the StableSound feature 75 Using the SRS WOW surround sound featu...

Страница 10: ...star TV Guide International Inc and or one of its affiliates In Canada TV GUIDE is a registered mark of Transcontinental Inc and is used under license by Gemstar TV Guide International Inc The TV Guide On Screen system is manufactured under license from Gemstar TV Guide International Inc and or one of its affiliates The TV Guide On Screen system is protected by one or more of the following issued ...

Страница 11: ...Learning about the remote control page 25 for an overview of the buttons on the remote control 9 Program the remote control to operate your other device s pages 29 30 10 AFTER connecting all cables and devices plug in the power cords for your TV and other devices Now Booting will be displayed on the screen until the picture appears or the green LED will blink until the TV goes into standby mode Wh...

Страница 12: ... the channel programmed channels only see page 40 When a menu is on screen these buttons function as up down menu navigation buttons 9 VOLUME x When no menu is on screen these buttons adjust the volume level When a menu is on screen these buttons function as left right menu navigation buttons 0 GUIDE Press to access the TV Guide On Screen program guide See page 46 for details on using the program ...

Страница 13: ...d analog audio outputs for connecting a VCR for editing and dubbing See page 20 for details 5 DIGITAL AUDIO OUT Optical audio output in Dolby Digital Surround or PCM pulse code modulation format for connecting an external Dolby Digital decoder amplifier A V receiver or home theater system with optical audio input See page 22 6 G LINK For use with one of the enclosed IR blaster G LINK cables to ena...

Страница 14: ...h video devices with component video output ColorStream is Toshiba s brand of component video These cables are typically color coded red green and blue Separate audio cables are required for a complete connection Note Component video cables provide better picture performance than a standard composite video or S video cable HDMI cable is for use with devices with HDMI High Definition Multimedia Int...

Страница 15: ...nal information From digital Cable service connect to ANT 1 only ________ CableCARD is a trademark of Cable Television Laboratories Inc Note Always use EJECT to remove the CableCARD Never remove the CableCARD by hand Never insert any object or card including without limitation a PCMCIA card other than a CableCARD into the CableCARD slot Always make sure the CableCARD is facing the correct directio...

Страница 16: ...You will need one set of standard A V cables If you have a camcorder with S video you can use an S video cable instead of a standard video cable for better picture performance Plug the S video and standard audio cables into the VIDEO 1 IN inputs on the upper back panel of the TV instead of the inputs on the side panel To view the camcorder video Select the VIDEO 2 video input source or the VIDEO 1...

Страница 17: ...e VIDEO 1 video input source on the TV Note A VIDEO 1 connection with an S Video cable instead of a standard video cable will provide better picture performance as mentioned in the first bulleted item at the top of this page _____________ To select the video input source press INPUT on the remote control see page 60 To program the TV remote control to operate other devices see Chapter 3 From Cable...

Страница 18: ...CR Tune the VCR to the channel you want to watch Select the VIDEO 1 video input source on the TV _____________ To select the video input source press INPUT on the remote control see page 60 To program the TV remote control to operate other devices see Chapter 3 From antenna From satellite dish Satellite receiver TV lower back panel Stereo VCR Note The VIDEO AUDIO OUT terminals output signals from ...

Страница 19: ...ut source on the TV To view the DVD player Turn ON the DVD player Select the ColorStream HD video input source on the TV To view the VCR Turn ON the VCR Select the VIDEO 1 video input source on the TV To record a TV program while watching a DVD Turn ON the VCR Tune the VCR to the channel to record Select the ColorStream HD video input source on the TV to view the DVD _____________ To select the vi...

Страница 20: ...tribution or revision of television programs videotapes DVDs and other materials is prohibited under the Copyright Laws of the United States and other countries and may subject you to civil and criminal liability Note The VIDEO AUDIO OUT terminals output signals from the ANT 1 ANT 2 VIDEO 1 and VIDEO 2 terminals when the appropriate input mode is selected The playing disc s contents by the DVD sec...

Страница 21: ...ly it is recommended that you follow these procedures When turning on your electronic components turn on the TV first and then the HDMI or DVI device When turning off your electronic components turn off the HDMI or DVI device first and then the TV To connect a DVI device you will need one HDMI to DVI adapter cable HDMI type A connector per DVI device For proper operation the length of an HDMI to D...

Страница 22: ...not be compatible with Dolby Digital bitstream signals Older audio systems that are not compatible with standard optical out signals may not work properly creating a high noise level that may damage your hearing speakers or headphones THIS DAMAGE IS NOT COVERED BY YOUR WARRANTY Note The DIGITAL AUDIO OUT terminal may not output some digital audio sources because of copy restrictions The DIGITAL AU...

Страница 23: ...th your VCR If you cannot locate the device s infrared sensor 1 Turn OFF the device 2 Starting at the lower left corner of the device place the end of the device s remote control with the infrared emitter so it touches the front of the device and press POWER Do not use the TV s remote control for this step 3 If the device turns on the point at which the remote control touched the device is the loc...

Страница 24: ...ly To display the optimum picture use the PC setting feature see Using the PC setting feature on page 78 TV lower back panel Note Some PC models cannot be connected to this TV An adapter is not needed for computers with a DOS V compatible mini D sub 15 pin terminal Depending on the DVD s title and the specifications of the PC on which you are playing the DVD Video some scenes may be skipped or you...

Страница 25: ...On Screen system Chapter 7 TV GUIDE opens the TV Guide On Screen system Chapter 7 INFO provides detailed information on highlighted items in theTV Guide On Screen system Chapter 7 HOME accesses the home function of the Channel Browser feature page 63 PIC MODE selects the picture mode page 69 ENTER activates highlighted items in the main menu system and the TV Guide On Screen system Arrow buttons y...

Страница 26: ...udio receiver 6 AUDIO2 Pioneer LD Using the remote control MODE button to control your other devices To install the remote control batteries CAUTION Always dispose of batteries in a designated disposal location Never throw batteries into a fire 1 Slide the battery cover off the back of the remote control 2 Install two AA size alkaline batteries Match the and symbols on the batteries to the symbols...

Страница 27: ...Aux Digit 9 Digit 9 0 Digit 0 Digit 0 Digit 0 Digit 0 Digit 0 Digit 0 Digit 0 100 10 sub X sub X 100 10 channel channel INPUT TV Video TV TV TV TV TV TV TV select PIC SIZE Selects the TV TV TV TV TV TV TV image shape MENU Menu Action Menu Menu ACTION Guide Menu Menu TV GUIDE SETUP TV Guide Guide DVD setup Advance INFO Guide Info INFO Top menu INFO TOP MENU HOME HOME PIC MODE PIC MODE TV TV TV TV T...

Страница 28: ... X Disc shift AM FM Disc shift Replay STOP Stop Stop Stop Stop Stop REC REC Menu Record Record Single Click Double Click Double Click FAV CH yz FAV channel up down ANGLE Angle Angle SUBTITLE Subtitle Subtitle AUDIO Audio Audio A B REPEAT A B Repeat A B Repeat SEARCH Search Search FREEZE Freeze TV TV TV TV TV TV TV Notes key does not send a signal in that remote control mode TV key will affect the ...

Страница 29: ... your device If more than one code is listed try each one separately until you find the one that works 2 Press MODE until the Mode indicator for the device CBL SAT VCR PVR DVD AUDIO1 AUDIO2 lights up 3 While holding down RECALL press the Channel Number buttons to enter the four digit code for your brand of device If a valid code is entered the mode indicator will blink twice If an invalid code is ...

Страница 30: ...use and blink two more times Using the volume lock feature 8000 For the TV CABLE SAT VCR and DVD modes the volume controls VOL yz and MUTE can be locked to the selected device mode This feature does not apply to the AUDIO1 and AUDIO2 modes To lock the volume controls to always control the CABLE SAT device volume for example 1 Repeatedly press MODE to select CABLE SAT mode 2 While holding down RECA...

Страница 31: ...0100 0123 0124 0131 0146 0101 0102 0170 0172 0174 0176 0183 REALISTIC 0124 0105 0136 0109 0140 0127 Replay TV 7102 SAMSUNG 0137 0102 0104 0133 SAMTRON 0163 SANSUI 0139 0126 0120 0152 SANYO 0105 0109 0113 SCOTT 0101 0102 0104 0109 0138 0140 0147 0148 0126 SEARS 0105 0106 0107 0108 0100 SHARP 0135 0136 0167 0162 SHINTOM 0117 SIGNATURE 2000 0127 0135 SINGER 0117 SONY 0128 0129 0130 0153 0154 0155 710...

Страница 32: ...4 PANASONIC 5104 5105 5106 5115 PHILIPS 5111 PIONEER 5114 PROSCAN 5114 QUASAR 5104 5105 5106 5115 RCA 5114 SAMSUNG 5112 SANYO 5114 5117 SHARP 5113 5116 SONY 5107 5108 5109 5110 TEAC 5114 TOSHIBA 5114 YAMAHA 5101 ADMIRAL 4120 AIWA 4125 4126 4146 DENON 4134 4135 4136 4143 FISHER 4104 GARRARD 4113 HARMAN KARDON 4115 4123 4145 JENSEN 4129 JVC 4132 4133 4140 4144 KENWOOD 4100 4108 4141 4142 4147 MAGNAV...

Страница 33: ... Audio Settings Window Audio Advanced Audio Settings Advanced Audio Settings Window Audio Setup Audio Setup Window Favorite Channels Favorite Channels Edit Window Preferences Closed Caption Mode Off CC1 CC2 CC3 CC4 T1 T2 T3 T4 Closed Caption Advanced Advanced Closed Captions Window Input Labeling Input Labeling Edit Window Menu Language English Français Español Home CH Setup Home CH Setup Window E...

Страница 34: ...s close automatically if you do not make a selection within 60 seconds except the signal meter menu which closes automatically after 5 minutes To close a menu instantly press EXIT Setup Installation menu layout To open the Installation menu illustrated below press MENU on the remote control or TV top panel open the Setup menu select Installation and press ENTER From Main Menu Setup menu select Ins...

Страница 35: ...e TV Guide On Screen system in your TV is a no fee interactive program guide that uses the information you enter during the following setup process to provide you with a channel lineup and program listings for your area The listings are automatically updated several times a day Note You must first set up your TV according to the applicable connection instructions in Chapter 2 1 Press MENU and open...

Страница 36: ...de for your brand of Cable box tune your Cable box to channel 02 leave the Cable box and TV ON and then press ENTER Screen 10 appears Screen 10 The TV Guide On Screen system will test the code for the brand of Cable box you selected Do not press any keys on the TV remote control or Cable box until the testing process is completed When testing is completed screen 11 appears Screen 11 If your Cable ...

Страница 37: ...n Screen service Press ENTER to display screen 15 Screen 15 Is a VCR connected If you select Yes screen 16 appears If you select No screen 21 appears Screen 16 The on screen diagram shows the correct way to connect your VCR to the G LINK terminal on the TV Make sure the G LINK cable is installed properly For additional details see page 23 Press ENTER to display screen 17 Screen 17 Select your VCR ...

Страница 38: ...deo signal In order to receive regular program listing updates remember to do the following 1 Leave the TV in standby mode when it is not in use by turning it OFF but leaving the power cord plugged in 2 If you have a Cable box connected leave it ON 3 If you have a VCR connected turn it OFF when not in use Do not unplug the power cord See page 16 for VCR connection instructions 4 If you have more t...

Страница 39: ...rrestrial menu may not be accessible items will be grayed out in some instances for example if a cable box is connected to the ANT 1 input or if one of the VIDEO modes is the current input during TV Guide On Screen setup Terrestrial Input Configuration Channel Program Channel Add Delete Signal Meter Navigate Select Back Exit CH RTN EXIT 4 Press x to select the input source Cable or Antenna for the...

Страница 40: ...not have to repeat the programming process again unless your Cable TV service lineup changes significantly If you have a CableCARD inserted page 15 channel programming for ANT 1 is disabled because the CableCARD automatically loads the Cable channel list into the TV s channel memory To program channels automatically 1 Make sure you have configured the antenna input sources See page 39 for details ...

Страница 41: ...og ANT 1 ANT 2 Cable Box Analog Analog Analog Analog Analog Analog Analog Analog Analog 2 3 4 5 6 7 8 9 10 Cable Box Reset Cancel Done Programming channels into the TV s channel memory continued To add a channel to the channel memory Highlight the unchecked box next to the channel number you want to add and then press ENTER to check the box To manually add digital subchannels on a physical channel...

Страница 42: ...lete Uncheck a channel before you can add another When done highlight Done and press ENTER To program favorite channels for another input Either Highlight ANT 1 ANT 2 or Cable Box which will change the favorite channel settings in the selected input This will not change the TV s current input Or Press INPUT to select ANT 1 ANT2 or Cable Box and then repeat steps 1 4 Note Cable Box will appear only...

Страница 43: ...sequence will start and the time and date will be set automatically Cancel Time And Date Manual TV Guide On Screen Your TV Guide On Screen system can provide accurate time and date information It is recommended you set up TV Guide On Screen first and use it to obtain the time and date If you have already set up the TV Guide On Screen system or if you have not set up the time the time and date sett...

Страница 44: ... digital stations Signal Meter Antenna 1 Physical Digital Channel 13 Virtual Digital Channel Done N A Signal Locked 0 0 Peak To close the screen and return to the Terrestrial menu Highlight Done and press ENTER To return to normal viewing Press EXIT Viewing the CableCARD menu A CableCARD enables you to view encrypted digital channels See page 15 for connection and subscription information After th...

Страница 45: ... System Information Done 0 8 2 Jun 13 2005 13 54 14 FW 1 41 Sub 41 Software Version To close the screen and return to the Installation menu Highlight Done and press ENTER To return to normal viewing Press EXIT Restore Factory Defaults To restore all settings and channels to their factory default values 1 Follow steps 1 3 above 2 Use x to scroll through the menu bar to select Factory Defaults Syste...

Страница 46: ...the instructions in Chapter 2 Search Search for shows by category keyword or alphabetically On screen help The TV Guide On Screen system contains on screen feature definitions and navigation instructions Setting up the TV Guide On Screen system Follow these instructions to set up the TV Guide On Screen system so it can receive current program data for your area Note If you move the TV to a differe...

Страница 47: ...ital separator REC PAGE UP DOWN Navigating the TV Guide On Screen system ENTER MENU While watching TV press TV GUIDE to enter the TV Guide On Screen system The LISTINGS screen will appear with the current show highlighted When in the TV Guide On Screen system if you press TV GUIDE from any screen the TV will tune to the show displayed in the Video Window Use the arrow keys on the remote control yz...

Страница 48: ... the command button and press ENTER To cancel any changes and close the panel menu press MENU or highlight Cancel and press ENTER If a panel menu contains more options than can be displayed in one panel the word more appears at the bottom of the menu To access the additional options either scroll down using z or the PAGE UP DOWN CH yz button Info Box Video Window When you open the TV Guide On Scre...

Страница 49: ...nger exists Remind Once Show is set to remind once Other frequencies are Daily manual reminding only Regularly and Weekly Remind Off Show is set to remind but reminder is currently Off show remains in schedule Remind Reminder is suspended due to a schedule conflict show remains in schedule Suspended Reminder resumes when the conflict no longer exists Info Box An Info Box contains information about...

Страница 50: ...LISTINGS to do the following View eight days of show listings Read show descriptions Tune directly to a show currently airing Set a show to Remind e g start time frequency automatic power ON auto tune TV Set a show to Record e g start end time frequency Lock and unlock the Video Window Access panel ads and channel ads Use the Number buttons on the remote control to jump to a specific channel s lis...

Страница 51: ...rganized by date and time 4 Highlight a show and press ENTER to watch if on now or press MENU to display the Episode Options panel menu See Episode Options panel menu on page 50 TV Guide On Screen Services continued SEARCH screen SEARCH allows you to find shows by keyword alphabetically or by category HDTV Movies Sports Children Educational News Variety Series With SEARCH highlighted in the Servic...

Страница 52: ...Screen Services continued 6 A list of all matching shows for that keyword is displayed 7 Highlight a show and press ENTER to display all airings Then highlight a specific listing and press ENTER to watch if on now or press MENU to display the Episode Options panel menu From the Episode Options menu you can choose to set a recording or reminder or tune to the channel See Episode Options panel menu ...

Страница 53: ...ngs for a show in LISTINGS SEARCH and SCHEDULE There are three ways to set a show to Record as described below 1 Set a show to Record using the REC key on the remote control Press REC on the remote control to record the show Once with current default settings start and end recording on time Each time you press REC you change the Record frequency but not the default settings among Once default Regu...

Страница 54: ...ording If no change is made within 3 minutes the notification banner will close automatically the channel will change to the one set to record and the recording will occur as scheduled If you want to cancel the recording select Don t change cancel recording in the notification banner and press ENTER Record features continued Record conflict A conflict message appears for the following reasons A sh...

Страница 55: ...lt Note You can change the default values of the Remind Options panel menu fields See Change default options on page 58 for details 6 Highlight the WHEN field to set a time for displaying the reminder screen and press x to choose in the range from 15 minutes early to 15 minutes late or On Time default 1 minute early 7 Press ENTER to highlight SCHEDULE REMINDER and press ENTER again to close the me...

Страница 56: ...Reminder has the same start time as an existing auto tune Reminder A show set with an auto tune Reminder overlaps with a scheduled Recording Select one of these options Auto Tune Anyway This show will override an existing show set to auto tune Proceed No Auto Tune Set the show as a Reminder but do not auto tune Don t Set This Reminder Cancels the Reminder Remind features continued Remind icons Fol...

Страница 57: ...options Highlight a choice press ENTER and follow the on screen instructions With SETUP highlighted in the Service Bar press INFO to display a help screen Press INFO again to close the screen Change system settings This option appears only after you have completed the initial TV Guide On Screen setup process as described in Chapter 5 1 From the SETUP screen highlight CHANGE SYSTEM SETTINGS and pre...

Страница 58: ...et the AUTO GUIDE to Off if you do not want the TV Guide On Screen system to open every time you turn on the TV 4 When finished press ENTER to highlight DONE and press ENTER again to close the menu and accept the changes or highlight CANCEL to close the menu with no changes SETUP screen continued Change channel display This option allows you to edit channel information that appears in LISTINGS inc...

Страница 59: ...these fields 4 When finished press ENTER to highlight DONE and press ENTER again to close the menu and accept the changes or highlight CANCEL to close the menu with no changes Remind defaults 1 From the SETUP screen highlight CHANGE DEFAULT OPTIONS and press ENTER 2 Highlight REMIND DEFAULTS and press MENU to display the Remind Defaults panel menu 3 Enter the required information in the panel menu...

Страница 60: ... 1 Video 2 ColorStream HD HDMI PC ANT 2 to Select INPUT 0 0 1 2 3 4 5 6 7 7 Note When the Input Selection screen is open you also can use yz on the remote control or the CH yz on the top panel to change the input You can repeatedly press INPUT on the remote control or TV VIDEO on the TV top panel to change the input You can label the video input sources according to the specific devices you have c...

Страница 61: ...deo 1 Video 2 ColorStream HD HDMI PC ANT 2 to Select INPUT 0 0 1 2 3 4 5 6 7 7 Input Selection ANT 1 ANT 1 ANT 1 Built in DVD VCR Cable ColorStream HD Hidden DTV PC ANT 2 to Select INPUT 0 0 1 2 3 4 5 6 7 7 Input Selection screen Input Selection screen with with no inputs labeled all inputs labeled except input 4 which has been hidden To clear the input labels 1 Press MENU and open the Preferences...

Страница 62: ...o a previous channel or forward to the next channel in the channel history In Select mode when you stop on a channel number in the browser banner it will be highlighted with a yellow background but the TV will not automatically tune to the channel 2 Press ENTER to tune the TV to the highlighted channel 3 Press EXIT to close the Channel Browser banner To open the Channel Browser banner Press x or E...

Страница 63: ...puts Setting a channel as the Home channel for an input To set a channel as Home using the remote control 1 Tune the TV to the channel you would like to set as the Home channel for the current antenna input 2 Press and hold the HOME button on the remote control for 3 seconds When the Home channel is saved the Channel Browser banner will appear at the bottom of the screen with the home icon flashin...

Страница 64: ...Tuning channels continued Switching between two channels using Channel Return The Channel Return feature allows you to switch between two channels without entering an actual channel number each time 1 Select the first channel you want to view 2 Select a second channel using the Channel Number buttons and the dash button if selecting a digital channel 3 Press CH RTN on the remote control The previo...

Страница 65: ...erWide 2 2 TheaterWide 3 3 Full 4 4 to Select PIC SIZE Note You also can repeatedly press PIC SIZE to select the desired picture size or press yz on the remote control while the Picture Size screen is open Full may not be available for some program formats will be grayed out in the Picture Size screen Natural picture size The image is displayed close to its originally formatted proportion Some pro...

Страница 66: ...0i 480p source programs only If receiving a squeezed 4 3 format program it is stretched wider to fill the width of the screen but not stretched taller None of the picture is hidden Chapter 8 Using the TV s features To select the picture size press PIC SIZE on the remote control Note If you select one of the TheaterWide picture sizes the top and bottom edges of the picture including subtitles or ca...

Страница 67: ...e Select Off in step 3 above You can set separate scroll settings for the TheaterWide 2 and TheaterWide 3 modes for each input To set the scroll settings 1 Press INPUT on the remote control or TV VIDEO on the TV to select the input for which you want to set the picture size and scroll settings 2 Press MENU and open the Video menu 3 Highlight Theater Settings and press ENTER Picture Settings Advanc...

Страница 68: ...Settings Picture Size Natural Picture Scroll 1 Cinema Mode Auto Aspect Ratio On Film 4 To save the new settings highlight Done and press ENTER To revert to the factory defaults highlight Reset and press ENTER To set the Cinema Mode to Video Select Video in step 3 above Using the FREEZE feature 1 When viewing the TV press FREEZE to make the picture a still picture 2 To return to the moving picture ...

Страница 69: ... then change a picture quality setting for example increase the contrast or change the color temperature the picture mode automatically changes to Preference in the Picture Settings menu Adjusting the picture quality You can adjust the picture quality contrast brightness color tint and sharpness to your personal preferences To adjust the picture quality 1 Press MENU and open the Video menu 2 Highl...

Страница 70: ...R To revert to the factory defaults highlight Reset and press ENTER Adjusting the picture continued Selecting the color temperature You can change the quality of the picture by selecting from three preset color temperatures cool medium and warm as described below To select the color temperature 1 Press MENU and open the Video menu 2 Highlight Advanced Picture Settings and press ENTER 3 Press z to ...

Страница 71: ...R To revert to the factory defaults highlight Reset and press ENTER Note The Color Temperature Back Lighting Dynamic Contrast adjustments in the Advanced Picture Settings menu are automatically saved in the Preference mode see Selecting the picture mode on page 69 Using MPEG noise reduction The MPEG noise reduction feature allows you to reduce visible interference caused by MPEG compression Choice...

Страница 72: ...losed Caption Advanced Preferences Off Closed Caption Mode Off CC1 CC2 CC3 CC4 T1 T2 Navigate Select Back Exit CH RTN EXIT To view captions Highlight CC1 CC2 CC3 or CC4 CC1 displays translation of the primary language in your area Note If the program or video you selected is not closed captioned no captions will display on screen To view text Highlight T1 T2 T3 or T4 Note If text is not available ...

Страница 73: ...ot available the Digital CC Audio selector presents a default list of services If the selected service is not available the next best service will be used instead To select digital closed captions 1 Press MENU and open the Applications menu 2 Highlight Digital CC Audio Selector and press ENTER Applications TV Guide On Screen Digital CC Audio Selector CableCARD Navigate Select Back Exit CH RTN EXIT...

Страница 74: ...e TV in Stereo mode because it automatically outputs the type of sound being broadcast stereo or monaural If the stereo sound is noisy select Mono to reduce the noise To listen to an alternate language on an ATSC digital station if available Highlight the Language field in step 3 above and then press x to select the language you prefer To listen to a second audio program on an analog station if av...

Страница 75: ...tion returns your audio adjustments to the following factory settings Bass center 50 Treble center 50 Balance center 0 StableSound Off To turn off the StableSound feature Select Off in step 3 above Adjusting the audio continued Adjusting the audio quality You can adjust the audio quality by adjusting the bass treble and balance To adjust the audio quality 1 Press MENU and open the Audio menu 2 Hig...

Страница 76: ...you connect an audio system to your TV see Connecting a digital audio system on page 22 To turn off the built in speakers 1 Press MENU and open the Audio menu 2 Highlight Audio Setup and press ENTER Audio Settings Advanced Audio Settings Audio Setup Audio 3 Press z to highlight the Speakers field and then press x to select Off Done Audio Setup MTS Language Reset Stereo Optical Output Format Dolby ...

Страница 77: ...P Note A message will display on screen when there is one minute remaining on the sleep timer Setting the On Off timer You can use the On Off timer to turn the TV on and off at a preset time on a recurring basis Note You must first set the time see page 43 To set the On Off Timer 1 Press MENU and open the Setup menu 2 Highlight On Off Timer and press ENTER Navigate Select Back Exit CH RTN EXIT Ins...

Страница 78: ...djusts picture left right and up down The adjustment range is within 5 from center The adjustable range may vary depending on the input mode Horizontal Width Vertical Height Adjusts picture width of Horizontal and picture height of Vertical The adjustment range is within 5 from center Clock Phase This function is to reduce noise and sharpen the picture The adjustment range is within 15 from center...

Страница 79: ...affect video being viewed in 16 9 aspect ratio When receiving a signal that has sidebars e g 4 3 aspect ratio video over a 1080i or 720p signal the gray level feature will not be applied to the sidebars STEREO Tuner Hold On 5 32pm CABLE 81 1 ANT 1 NC 17 On Timer Weekdays 12 00pm Sleep Timer 18 min Game Timer 28 min Natural 1080i Sample RECALL screen Displaying TV setting information on screen usin...

Страница 80: ...Select Back Exit CH RTN EXIT Enable Rating Blocking Edit Rating Limits Channels Block Input Lock Off Off Off Off Front Panel Lock Game Timer New PIN Code Locks Using the Locks menu 9 The Locks menu includes the Enable Rating Blocking Edit Rating Limits Channels Block Input Lock Front Panel Lock Game Timer and New PIN Code features You can use these features after entering the correct PIN code If y...

Страница 81: ...ocking TV programs and movies by rating V Chip Ratings Description and content themes TV MA Mature Audience Only This program is specifically designed to be viewed by adults and therefore may be unsuitable for children under 17 L Crude or indecent language S Explicit sexual activity V Graphic violence TV 14 Parents Strongly Cautioned This program contains some material that many parents would find...

Страница 82: ...t the channel you want to block then press ENTER which puts an X in the box next to that channel 7 Repeat step 6 for other channels you want to block 8 Highlight Done and press ENTER To unblock individual channels In step 6 above press yz to highlight the channel you want to unblock and then press ENTER to remove the X from the box and highlight Done and then press ENTER To block all channels at o...

Страница 83: ...n when 10 minutes 3 minutes and 1 minute remain on the GameTimer If the TV loses power with time remaining on the GameTimer when power is restored the TV will enter VIDEO LOCK mode as if the GameTimer has expired and you will have to deactivate the video lock as described above Using the panel lock feature You can lock the top panel buttons to prevent your settings from being changed accidentally ...

Страница 84: ...ntal Lock screen appears after loading a disc and you try to unblock the blocking status following the screen menu the DVD player will stop and the DVD startup screen will appear Although the disc will be ejected leave as it is If so set the Enable Rating Blocking in the Locks menu page 81 to Off Press PLAY to load the disc After enjoying the DVD movie reset the Enable Rating Blocking to On if nec...

Страница 85: ... slot remove the disc once and try to load the disc again Do not put any objects other than discs in the disc slot Doing so may cause the TV to malfunction When you press a button there may be a slight delay before the function activates To pause playback still playback DVD VCD CD 1 Press PAUSE during playback To resume normal playback Press PLAY Note The sound is muted during still playback Playi...

Страница 86: ...en the disc is loaded Depending on the DVD a chapter menu may be displayed after you select a title Locating a chapter or track DVD VCD CD 1 Press SKIP or repeatedly to select the chapter or track you want Playback starts from beginning of the selected chapter or track TITLE 01 06 CHAPTER 007 032 Note A Prohibition symbol may appear at the upper left of the screen This symbol means either the feat...

Страница 87: ...ack language is cancelled when you eject the disc The initial default language or available language will be heard if the disc is played back again If you select DTS in playing DTS encoded disc no sound will be heard from the TV s speakers Subtitles DVD When playing back a disc recorded with subtitles you can select the subtitle language or turn the subtitle off 1 Press SUBTITLE repeatedly during ...

Страница 88: ...opped point Press PLAY to resume playback from the scene point If you press STOP again or unload the disc the TV will clear the stopped point To turn off the PBC VCD 1 Press number button 1 in the stop mode then press ENTER MP3 JPEG CD operation This TV can play MP3 JPEG data which has been recorded on CD R or CD RW To produce MP3 JPEG data you need a Windows PC with CD R RW drive and MP3 JPEG enc...

Страница 89: ...icture menu is displayed when the FUJICOLOR CD or the Kodak Picture CD are played To display the file menu press TOP MENU MP3 file on the Kodak Picture CD is not recognized on this TV When displaying the SMART NAVI use the Natural or Full picture size see page 65 Chapter 10 DVD Playback JPEG CD playback CD You can select your desired JPEG file on the file menu The slide show enables you to view pi...

Страница 90: ...signals If you cannot view signals from external devices connected to VIDEO 1 VIDEO 2 or ColorStream or or channel 3 or 4 from channels 3 or 4 make sure the Input Lock is set to Off page 82 Black box on screen Set the Closed Caption feature to Off page 72 Poor color or no color The station may have broadcast difficulties Try another channel Adjust the Tint and or Color page 69 When the ColorStream...

Страница 91: ...rocedure as described on page 45 Closed caption problems If the program or video you selected is not closed captioned no captions will display on screen page 72 If text is not available a black rectangle may appear on screen If this happens turn off the closed caption feature page 72 A closed caption signal may not display correctly in the following situations a when a videotape has been dubbed b ...

Страница 92: ...n the special playback mode Picture is distorted during fast The picture will be distorted occasionally reverse forward playback Stopping playback search Some discs may not perform certain functions slow motion play A B repeat play or changing angles etc cannot be performed No surround sound The setup may not match your stereo system The TV or remote operation key Turn off the TV and unplug the AC...

Страница 93: ...be left ON for the TV Guide On Screen system to receive channel line up information 8 Q How do I connect the G LINK IR blaster cable to the G LINK input on the TV A See Chapter 2 Connecting your TV in this manual You also can refer to the TV Guide On Screen prompts during VCR or Cable box setup 9 Q When will I be able to view my TV program listings and use other TV Guide On Screen system features ...

Страница 94: ...te download Show information is updated on a daily basis 19 Q I have seen the word download in reference to the TV Guide On Screen system What does that mean A Download refers to the times throughout the day when the TV Guide On Screen system is receiving channel and listings information from your Cable or over the air antenna transmission 20 Q After some show titles I have noticed from 1 to 4 sta...

Страница 95: ...re hooked up incorrectly Refer to your VCR owner s manual or contact your Cable TV company for proper wiring procedures 32 Q Is Help available in the TV Guide On Screen system If so how do I find it A Yes Highlight any of the four main Services Listings Schedule Setup Search and press INFO on the remote control An expanded Info Box displays additional help information Press INFO again to close the...

Страница 96: ... 20 24 bits per sample Appendix 12 Video Audio Terminals continued PC input 15 pin D sub Analog RGB VIDEO AUDIO OUTPUT also for recording VIDEO 1 V p p 75 ohm negative sync AUDIO 150 mV rms 30 modulation equivalent 2 2 k ohm or less G LINK OUTPUT 3 V p p 3 5 mm mono socket IR blaster cables supplied DIGITAL AUDIO OUTPUT Optical type Headphone jack 3 5 mm stereo DVD CD Player DVD signal system NTSC...

Страница 97: ...charges for set installation setup adjustment of customer controls and installation or repair of antenna systems are not covered by this warranty Reception problems caused by inadequate antenna systems misaligned satellite dishes cable television distribution VCRs DVD players recorders personal computer level IEEE 1394 devices and any other connected signal source device are your responsibility 5 ...

Страница 98: ...DVD Combination or parts that have been lost or discarded by you or to damage to the LCD TV DVD Combination or parts caused by fires misuse accident Acts of God such as lightning or fluctuations in electric power improper installation improper maintenance or use in violation of instructions furnished by TCL use or malfunction through simultaneous use of this product and connected equipment or to u...

Страница 99: ...THE OpenSSL PROJECT AS IS AND ANY EXPRESSED OR IMPLIED WARRANTIES INCLUDING BUT NOT LIMITED TO THE IMPLIED WARRANTIES OF MERCHANTABILITY AND FITNESS FOR A PARTICULAR PURPOSE ARE DISCLAIMED IN NO EVENT SHALL THE OpenSSL PROJECT OR CONTRIBUTORS BE LIABLE FOR ANY DIRECT INDIRECT INCIDENTAL SPECIAL EXEMPLARY OR CONSEQUENTIAL DAMAGES INCLUDING BUT NOT LIMITED TO PROCUREMENT OF SUBSTITUTE GOODS OR SERVI...

Страница 100: ...re TV factory 45 Digital Audio Out 22 Digital signal meter 44 DNR Digital Noise Reduction 70 Dolby Digital 22 76 DVD DVD player connection 19 playback 84 fast reverse 85 fast forward 85 frame by frame 85 A B repeat playback 86 DVI connection 21 Dynamic Contrast 71 F G H I J EIA 775 21 Factory defaults restore TV 45 Favorite channels 42 Features TV 10 Focus SRS WOW 76 FREEZE 68 Front of the TV 12 G...

Страница 101: ...tons 25 Programming 29 Searching and sampling the code 29 Restore TV factory defaults 45 Index continued S Safety care installation and service 2 4 SAP sound 74 Satellite receiver connection 18 Scrolling the TheaterWide picture 67 Service 4 Setup TV 11 15 24 39 Setup TV Guide On Screen system 35 Sleep timer 77 Sound quality adjustments 75 Specifications 96 SRS 3D 76 SRS WOW 76 StableSound 75 Stere...

Страница 102: ...NJ 07470 U S A NATIONAL SERVICE DIVISION 1420 B TOSHIBA DRIVE LEBANON TN 37087 U S A TOSHIBA OF CANADA LTD HEAD OFFICE 191 McNABB STREET MARKHAM ONTARIO L3R 8H2 CANADA TEL 905 470 5400 SERVICE CENTERS TORONTO 191 McNABB STREET MARKHAM ONTARIO L3R 8H2 CANADA TEL 905 470 5400 MONTREAL 18050 TRANS CANADA KIRKLAND QUEBEC H9J 4A1 CANADA TEL 514 390 7766 VANCOUVER 22171 FRASERWOOD WAY RICHMOND B C V6W 1...

Отзывы: