background image

16

Getting started

Setting the programmes

Note: When the Channel Block is activated, a 4-digit 

password is needed to enter the 

Channels submenu 

under 

SETUP


menu.

Auto Scan

The 

Auto Scan 

will completely re-tune the television and 

update the channel list.

It is recommended that Auto Scan is run periodically 

to ensure that all new services are added.

Note: All the programmes and settings that were 

previous saved will be lost.

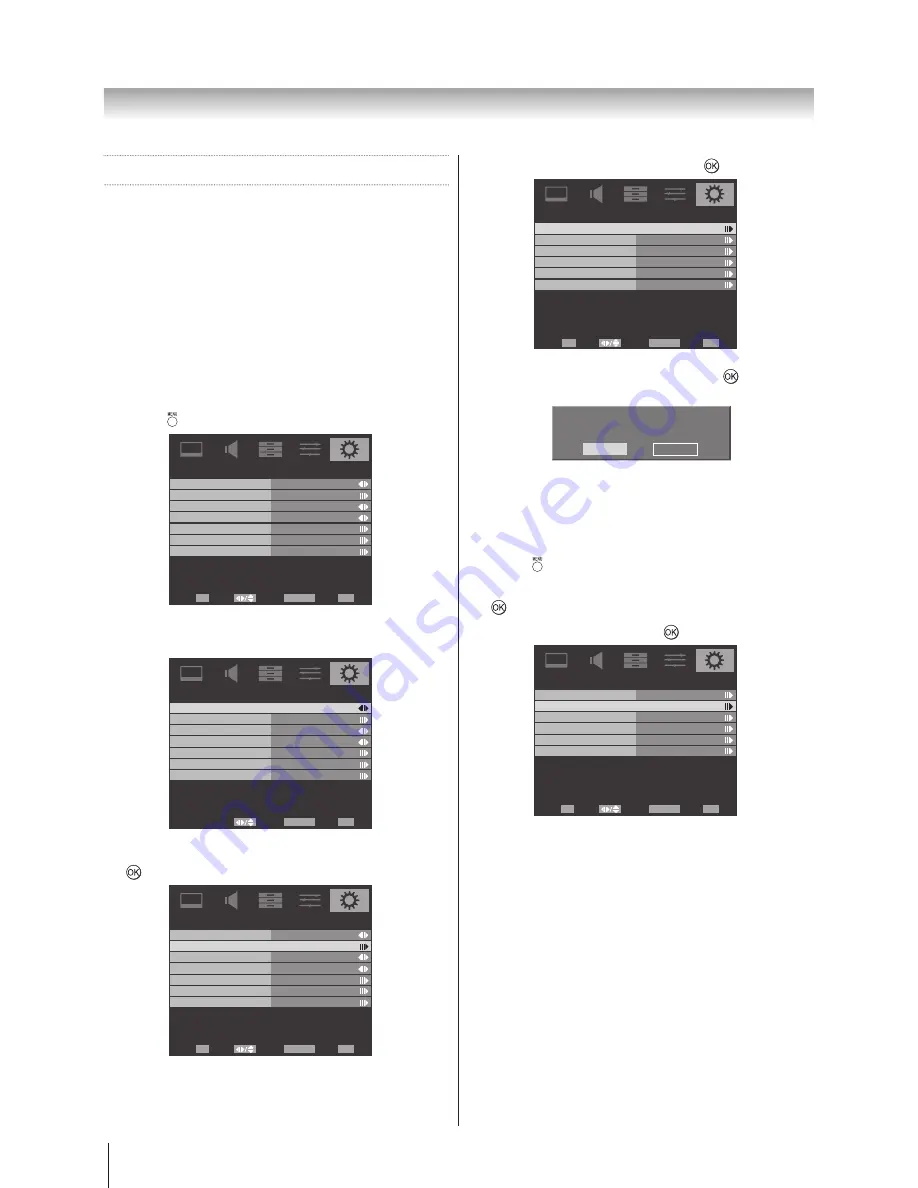
1.  Press   and use ◄ or ► to select 

SETUP

.

OSD Language

Channels

Automatic Power Down

Location

System Information

Parental

SETUP

Home

On

English

Select

Back

Exit

EXIT

Enter

OK

RETURN

Reset TV

2.  Press ▲ or ▼ to highlight 

OSD Language

 and 

press ◄ or ► to select your language.

OSD Language

Channels

Automatic Power Down

Location

System Information

Parental

SETUP

Home

On

English

Select

Back

Exit

EXIT

RETURN

Reset TV

3.  Press ▲ or ▼ to highlight 

Channels

. Press ► or 


to enter.

OSD Language

Channels

Automatic Power Down

Location

System Information

Parental

SETUP

Home

English

Select

Back

Exit

EXIT

Enter

OK

RETURN

Reset TV

On

4.  Select 

Auto Scan

 and press ► or  .

Auto Scan

Update Scan

Single RF Scan

Channel Skip

Channel Sort

Channel Edit

Select

Back

Exit

EXIT

Scan

OK

RETURN

Channels

5.  Press Cancel for no change, or press 


to start 

Auto Scan.

Previous settings will be lost! Press 

Cancel for no change, Press OK to start 

Auto scan.

OK

Cancel

Update Scan

Search the new channels that are not in the programme 

list.

1.  Press   and then press ◄ or ► to select 

SETUP

.

2.  Press ▲ or ▼ to highlight 

Channels

. Press ► or 


to enter.

3.  Select 

Update Scan

. Press 


to start Update Scan.

Auto Scan

Update Scan

Single RF Scan

Channel Skip

Channel Sort

Channel Edit

Channels

Select

Back

Exit

EXIT

Enter

OK

RETURN

Note: This option is available for DVB_T only.

Содержание 22SL700A

Страница 1: ...Video Broadcasting Project 2010 TOSHIBA CORPORATION All Rights Reserved Owner s Record You will find the model number and serial number on the back of the TV Record these numbers in the spaces provided below Refer to them whenever you call upon your TOSHIBA dealer regarding this product Modelnumber Serialnumber ...

Страница 2: ...23 Blue Screen 24 3D Colour Management 24 Base Colour Adjustment 24 ClearFrame 100Hz 24 H V Position 24 PC 24 HDMI RGB Range 25 Sound Adjustment 25 Volume 25 Sound Mute 25 Balance Bass Treble 25 Surround Sound 25 Stable Sound 25 Bass Boost 25 Bass Boost Level 25 PC HDMI1 Audio 25 HDMI1 Audio 26 Lip Sync 26 SPDIF Type 26 Audio Mode 26 Selecting the stereo programmes 26 Selecting the bilingual progr...

Страница 3: ... Connecting an HDMI device 39 Connecting a DVI device 39 REGZA LINK Connections 40 Connecting a computer 40 Using the PC setting 41 Adjusting the picture settings 41 PC of the Auto Adjust 41 Acceptable Video signals through HDMI terminals 42 Acceptable PC signals through HDMI D SUB terminals 42 Reference section Troubleshooting 43 Symptom and solution 43 Symptom and solution digital only 43 Specif...

Страница 4: ...on The TV may drop or fall off which may cause injury or damage 4 Never block or cover the slots and openings in the cabinet Never place the TV so that it is facing upward or on its side Never place the TV in a closet bookcase or other similar area where the ventilation is poor Never drape a newspaper tablecloth or curtain on the TV When installing the TV against a wall always keep the TV at least...

Страница 5: ...r other electric light or power circuits If the antenna falls down or drops it may cause injury or electric shock Use 1 Never place hot objects or open flame sources such as lighted candles or nightlights on or close to the TV High temperatures can melt plastic and lead to fires 2 The apparatus shall not be exposed to dripping or splashing and that no objects filled with liquids such as vases shal...

Страница 6: ...suffer an electric shock Service 1 Never repair modify or disassemble the TV by yourself It may cause a fire or an electric shock Consult a service technician for inspection and repairs 2 When a malfunction occurs or if smoke or an unusual odour comes from the TV turn off the TV and remove the power plug from the outlet immediately Make sure that the smoke or smell has stopped then contact a servi...

Страница 7: ...l be damaged Be aware of locating the TV in the place such as window side or outside of the room 2 About cabinet and LCD screen Never spray volatile compounds such as insecticide on the cabinet and LCD screen This may cause a discolouration or damage the cabinet and LCD screen 3 Some pixels of the screen do not light up The LCD display panel is manufactured using an extremely high level of precisi...

Страница 8: ...enna adaptor not supplied Plug not supplied 300 Ω coaxial cable Exploring your new TV Installing the remote control batteries Remove the battery cover Insert two R03 AAA batteries matching the polarities of the battery to the marks inside the battery compartment Cautions Dispose of batteries in a designated disposal area Never throw batteries into a fire Attention should be drawn to the environmen...

Страница 9: ...ur TV page 36 Connecting your TV 22SL700A RED LED Standby GREEN LED On Timer EPG Timer On GREEN LED Power on IR SENSOR Power Programme up Programme down Volume up Volume down Menu Input R L MONO Video USB VIDEO INPUT Headphone 26SL700A 32SL700A RED LED Standby GREEN LED On Timer EPG Timer On GREEN LED Power on IR SENSOR Power Programme up Programme down Volume up Volume down Menu Input R L MONO Vi...

Страница 10: ...no menu is on the screen press to select the input source page 27 Input Selection IR Sensor Point your remote control at this area when selecting programme position or adjusting the volume level etc Timer LED Green LED On Timer EPG Timer On Power LED Red LED Standby Green LED Power On AV terminal Standard composite video and standard audio inputs USB port Connect your USB storage device for multim...

Страница 11: ... connections Before connecting any external equipment turn off all main power switches If there is no switch remove the mains plug from the wall socket 22SL700A LOCK UNLOCK AC IN 6 3 4 2 8 1 7 5 26SL700A 32SL700A AC IN 7 5 3 2 1 8 6 4 ...

Страница 12: ...na 4 Composite input terminals For use when connecting a composite video device 5 TV output terminals For use when connecting an ATV DTV video recorder with standard video and standard audio input 6 Digital Audio optical output terminal For use when connecting an amplifier with optical type digital audio input page 37 Connecting an amplifier equipped with a Dolby Digital decoder page 37 Connecting...

Страница 13: ... To access index page 13 To mute the sound 14 To display Quick access menu 15 To exit menus 16 To display the programme guide 17 To return to the previous level of the on screen menu 18 To display the on screen menu 19 To move Up down left or right in the on screen menu OK To confirm the selection 20 Colour button Text control buttons To reveal concealed text To hold a wanted page To enlarge text ...

Страница 14: ... Boost SOUND 50 Advanced Audio On Off Off Select Back Exit EXIT Enter OK RETURN Bass Boost Level Balance 0 0 0 Bass Treble Surround Sound Stable Sound Bass Boost SOUND 50 Advanced Audio On Off Off Bass Boost Level Select Back Exit EXIT RETURN RETURN APPLICATIONS menu APPLICATIONS Off Media Player Time Setup Sleep Timer APPLICATIONS Off Select Back Exit EXIT Enter OK RETURN Select Enter OK Back Exi...

Страница 15: ...ck Select Next Exit EXIT English Language 中文 Français 3 Press or to select the Energy Saving Mode and press to the next step Initial Setup To use this TV for displaying in a store showroom please select Store Home mode is recommended for normal use Back Select Next Exit EXIT Home Engrgy Saving Mode Store 4 Press or to select the Province State and press to the next step Initial Setup Province Stat...

Страница 16: ...rental SETUP Home On English Select Back Exit EXIT RETURN Reset TV 3 Press or to highlight Channels Press or to enter OSD Language Channels Automatic Power Down Location System Information Parental SETUP Home English Select Back Exit EXIT Enter OK RETURN Reset TV On 4 Select Auto Scan and press or Auto Scan Update Scan Single RF Scan Channel Skip Channel Sort Channel Edit Select Back Exit EXIT Sca...

Страница 17: ...ter the Start Frequency Press or to select Scan Up or Scan Down Press or to start scanning Press RETURN to stop scanning Analogue Manual Scan Back Exit EXIT RETURN Search for analogue channels Start Frequency MHz 175 25 Scan Up Scan Down Channel Skip To prevent certain programmes from being viewed the programme position can be skipped The remote control must be removed as the channels will still b...

Страница 18: ...In the SETUP menu press or to highlight Channels and press or to select 2 Press or to highlight Analogue Channel Fine Tune and press to select 3 Highlight and press to select the channel 4 Press or to adjust the frequency Press to decrease and to increase the frequency Analogue Channel Fine Tune 1 2 3 4 5 6 7 8 9 BBC 1 RTP1 10 687 25 MHz 175 25 MHz 55 85 MHz 209 25 MHz 223 2 MHz 572 3 MHz 590 25 M...

Страница 19: ...ilingual Bilingual transmissions are rare If they are transmitted the word Dual will display Choose the required programme number and if the word Dual appears press to select Dual 1 Dual 2 or Mono Time Display The time display facility allows the current broadcasted time to be seen on the television screen Press on the remote control while watching a normal television broadcast to see the time dis...

Страница 20: ...ng will eliminate or reduce the black bars at all sides of the screen by zooming in and selecting the image without distortion Native This setting will enlarge a 4 3 image to fit the screen by stretching the image horizontally and vertically holding better proportions at the centre of the image Some distortion may occur Super Live This setting is available when watching video signal source via HDM...

Страница 21: ...9 broadcast Press QUICK to display the Quick access menu and use or to select the Picture Size and press or You can choose the picture size from Wide 4 3 Super Live Cinema Subtitle 14 9 Native PC Wide PC Normal or Dot by dot Using the special functions to change the size of the displayed image i e changing the height width ratio for the purposes of public display or commercial gain may infringe on...

Страница 22: ...ress or to select Tint 2 Using or to adjust your preference Note This function does not work in PC mode Sharpness This function increase or decrease the sharpness of the picture The picture shows the clear edge when you increase the values 1 In the PICTURE menu press or to select Sharpness 2 Using or to adjust your preference Back Light Adjusting the Back Light can improve the clarity of the scree...

Страница 23: ...ect DNR Press or to select Low Middle High Auto or Off NR Select Back Exit EXIT RETURN Auto Low DNR MPEG NR MPEG NR If the receiving signal of MPEG is a grained noise depending on the compression and conversion the noise may be reduced when using this function 1 In the PICTURE menu press or to highlight Advanced Video press or to select 2 Press or to highlight NR and then press or to select 3 Sele...

Страница 24: ...een Blue Yellow Magenta Cyan Base Colour Adjustment Select Back Exit EXIT Enter OK RETURN Reset Note To return to the original factory settings select Reset and press ClearFrame 100Hz The new ClearFrame 100Hz anti blur technology doubles the frame rate from 50 frames per second to 100 frames per second virtually eliminating motion blur without adding flicker or reducing image brightness 7 Advanced...

Страница 25: ...nd deepening the sound quality 1 In the SOUND menu press or to select Surround Sound 2 Using or to switch function On or Off Stable Sound Stable Sound reduces the volume level differences between channels It automatically remains on the same volume level when you change channels 1 In the SOUND menu press or to select Stable Sound 2 Using or to switch function On or Off Bass Boost Bass Boost enhanc...

Страница 26: ...l does not contain any MPEG audio track then the first available Dolby Digital audio track will be selected Note Manufactured under license from Dolby Laboratories Dolby and the double D symbol are trademarks of Dolby Laboratories Selecting the stereo programmes 1 When a stereo programme is received Stereo appears 2 Press to select the Auto Mono mode Stereo and Mono appear cyclically on the screen...

Страница 27: ...ower Off Timer function switches the TV off automatically at a preset time Sleep Timer The television can be set to turn itself Off after time 1 Use or to highlight Sleep Timer in the APPLICATIONS menu 2 Use or to set the timer from Off 10 20 30 40 50 60 90 or 120 Minutes APPLICATIONS Off Select Back Exit EXIT RETURN Media Player Time Setup Sleep Timer Note To cancel the Sleep Timer set this optio...

Страница 28: ...2 The REGZA LINK icon appears automatically after detected with REGZA LINK compatible equipment Press to highlight the input source shown with the REGZA LINK icon Main TV 1 2 3C HDMI 1 HDMI 2 HDMI 3 HDMI 4 PC 4C REGZA LINK 3 Press A second selection screen will appear showing all connected REGZA LINK equipment 4 Press or to highlight an input source and then press to select Note 1 When the televis...

Страница 29: ...A LINK setup menu Note When the AV Amplifier is switched on its input source changed or the volume adjusted the sound will be output from the AV Amplifier s speakers even if TV Speakers has been selected Turn the television off then on again to output the sound from the TV s speakers The full function may not work and is dependent on the Amplifier being used PC Link This feature automatically adju...

Страница 30: ...ast viewed source Menu Enter menu option The options are Sort Media Type and Thumbnail Size Size Decides to show the Multi View by Small Middle or Large thumbnail size Sort Decides to sort the photo files by File Date or Name Browser Menu Decides to browse photos by thumbnail or list mode Amplifier Control When the Amplifier Control is enabled REGZALINK allows some of the amplifier features to be ...

Страница 31: ... move through the music files If there are too many music files for the screen pressing on the top left file will show the previous page moving the highlight to the bottom right file Alternatively pressing on the bottom right file will show the next page moving the highlight to the top left file If there is more than one page of images within the folder pressing P and P will move through the pages...

Страница 32: ... Dual2 or Mono Auto Format When the television receives a true Widescreen picture and Auto Format is On it will automatically be displayed in Widescreen format irrespective of the television s previous setting 1 In the PREFERENCES menu press to highlight Auto Format 2 Use or to select On or Off 4 3 Stretch If the 4 3 Stretch is On the picture size will auto stretch to 4 3 aspect ratio in Widescree...

Страница 33: ...rding to information from the broadcasting station Therefore if the signal has no information this function does not operate 1 Highlight the Parental in the SETUP menu and press or to select 2 Enter the 4 digit password 3 Use or to highlight the Programme Block and press or to select Parental Select Back Exit EXIT Enter OK RETURN Channel Block Programme Block Input Block Change Password Panel Lock...

Страница 34: ...mote control Factory Default Selecting Factory Default will reset all TV settings including stored channels to their original factory values 1 Highlight the Parental in the SETUP menu and press or to select 2 Enter the 4 digit password 3 Use or to highlight the Factory Default and press or to select Note After factory default is completed the initial setup screen will appear Programme Guide The pr...

Страница 35: ...letext Select Back Exit EXIT RETURN Digital Teletext Language Decoding Page Language WEST EUR English Text Information The first text page shown will be the index page Any text page can be accessed by entering the 3 digit page number using the numbered buttons pressing the coloured buttons or pressing P to advance to the next page and P to go back to the previous page Control buttons Below is a gu...

Страница 36: ...sound by connecting the TV to an audio system Notes DO NOT connect the DIGITAL AUDIO output terminal to the AC 3 RF input of a Dolby Digital Receiver with a built in Dolby Digital decoder Connect the DIGITAL AUDIO output terminal to the Optical or Coaxial input of a Receiver or Processor Refer to the owner s manual of the connected equipment as well When you connect the TV to other equipment be su...

Страница 37: ...equipped with a Dolby Digital decoder or Dolby Digital processor When using this setup select Dolby Digital in Audio Mode Connecting an amplifier equipped with an MPEG decoder LOCK UNLOCK Front speaker Surround speaker Sub woofer Centre speaker Signal flow Amplifier equipped with MPEG decoder To Digital Audio output terminal For 22 Only To Optical Type digital audio input Optical digital cable not...

Страница 38: ... audio input Optical digital cable not supplied You can enjoy dynamic sound of 2 channel digital stereo by connecting the TV to an amplifier equipped with a digital audio optical or coaxial input and speaker system right and left front speakers When using this setup select PCM in SPDIF Type under SOUND menu Side Connections Connection example TV side view 26SL700A 32SL700A 42SL700A 22SL700A Mini S...

Страница 39: ...20p and 1080p signals HDMI High Definition Multimedia Interface DVI Digital Video Interface HDCP High bandwidth Digital Content Protection EIA CEA 861 861B compliance covers the transmission of uncompressed digital video with high bandwidth digital content protection which is being standardized for reception of high definition video signals Because this is an evolving technology it is possible tha...

Страница 40: ...incorporating Toshiba s REGZA LINK However Toshiba is not liable for those operations Refer to individual instruction manuals for compatibility information Connecting a computer An analogue RGB 15 pin computer cable can be connected TV back view Mini D sub 15 pin Conversion adapter if necessary Computer RGB PC cable Audio cable for PC to TV connection Connect a PC cable from the computer to the RG...

Страница 41: ...able for some signal or if no signal is received The optimum points of the clock phase and sampling clock adjustments may be incomprehensible according to the input signals Adjusting the picture settings 1 Press and use or to select PICTURE 2 Use and to select PC and press or 3 Use or to select an option and press or to adjust the setting as required PC of the Auto Adjust Adjust Horizontal Positio...

Страница 42: ...HDMI D SUB terminals Format Resolution V Frequency H Frequency Pixel Clock Frequency VGA 640x480 59 940Hz 31 469kHz 25 175MHz VGA 640x480 72 809Hz 37 861kHz 31 500MHz VGA 640x480 75 000Hz 37 500kHz 31 500MHz VGA 720x400 70 087Hz 31 469kHz 28 322MHz SVGA 800x600 56 250Hz 35 156kHz 36 000MHz SVGA 800x600 60 317Hz 37 879kHz 40 000MHz SVGA 800x600 72 188Hz 48 077kHz 50 000MHz SVGA 800x600 75 000Hz 46 ...

Страница 43: ...ay be missing picture elements or have luminous spots This is not a sign of a malfunction The picture brightness varies when you switch the TV on If you switch the TV on at 0 C and under wait until the warms up The brightness of the screen comes down or flickers of the screen are caused or some parts of the screen do not light up When you just buy and start to use this TV a flickering may be cause...

Страница 44: ...ies e g from Melbourne to Sydney Refer to page 18 Reset TV to reset data Weak signal appears on one channel but not the other but these channels have the same logical number Please make sure that you do not keep duplicate channels i e channels with the same logical channel number but different physical numbers see page 18 Channel Edit If you do please delete the duplicate ones and keep only one ch...

Страница 45: ... Hz 1080i 1080p 50 60 Hz These signal formats are converted to match the number of pixels of the LCD panel Composite colour system analogue TV system PAL SECAM NTSC 3 58 4 43 Aspect ratio 16 9 Visible size diagonal 22SL700A 54 8cm 26SL700A 66 1cm 32SL700A 80 0cm 42SL700A 106 7cm Number of pixels 22SL700A 26SL700A 32SL700A 1366 H x 768 V dots 42SL700A 1920 H x 1080 V dots Sound output at 10 distort...

Страница 46: ... free of charge and therefore not covered by any warranty within the scope of the applicable laws These software components are provided in as is condition without any warranty whether express or implied Warranty here includes but not limited to an implied warranty for marketability or fitness for specific uses All risks associated with the quality or performance of these software components are a...

Страница 47: ...LL THE COPYRIGHT HOLDER OR HOLDERS INCLUDED IN THIS NOTICE BE LIABLE FOR ANY CLAIM OR ANY SPECIAL INDIRECT OR CONSEQUENTIAL DAMAGES OR ANY DAMAGES WHATSOEVER RESULTING FROM LOSS OF USE DATA OR PROFITS WHETHER IN AN ACTION OF CONTRACT NEGLIGENCE OR OTHER TORTIOUS ACTION ARISING OUT OF OR IN CONNECTION WITH THE USE OR PERFORMANCE OF THIS SOFTWARE Except as contained in this notice the name of a copy...

Страница 48: ......

Отзывы: