
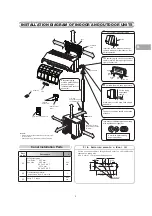


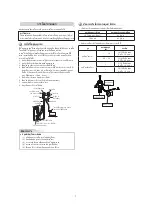


4 mm
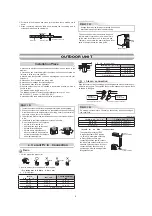
o to remove the drain ca
Clip t e drain cap by needle-nose
pliers and pull out.
o to remove the drain hose
T e drain ose can be removed by removing t e
screw securing t e drain ose and t en pulling out
t e drain ose.
W en removing t e drain ose be careful of any
s arp edges of steel plate. T e edges can in uries.
To install t e drain ose insert t e drain ose
fi
rmly until t e connection part contacts wit eat
insulator and t en secure it wit original screw.
o to
fi
the drain ca
1 Insert exagon wrenc 4 mm
in a center ead.
2 Firmly insert t e drain cap.
Firmly insert t e drain ose and drain cap ot erwise water may leak.
CAU I N
Do not apply lubricating oil
refrigerant mac ine oil w en
inserting t e drain cap. Application
causes deterioration and drain
leakage of t e plug.
Insert a exagon
wrenc 4 mm .
No gap
Drain ose
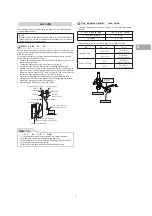
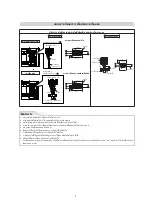
e t hand connection ith i in
Bend t e connecting pipe so t at it is laid wit in 43 mm above t e wall
surface. If t e connecting pipe is laid exceeding 43 mm above t e wall
surface t e indoor unit may unstably be set on t e wall.
W en bending t e connecting pipe make sure to use a spring bender so
as not to crus t e pipe.
end the connectin i e ithin a radi s o
mm.
To connect t e pipe after installation of t e unit
fi
gure
80
260 mm
210 mm
43 mm
Li uid side
Gas side
To t e forefront of
fl
are
Outward form of indoor unit
R 30 mm Use polisin polyet ylene
core or t e like for bending pipe.
Use t e andle of screwdriver etc.
N
If t e pipe is bent incorrectly t e indoor unit may unstably be set on t e wall.
After passing t e connecting pipe t roug t e pipe ole connect t e
connecting pipes to t e auxiliary pipes and wrap t e facing tape around
t em.
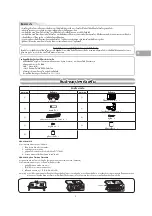
In case o ri ht or le t i in
After scribing slits of t e back body
wit a knife or a making-off pin cut
t em wit a pair of nippers or an
e uivalent tool.
In case o bottom ri ht or bottom le t i in
After scribing slits of t e back body
wit a knife or a making-off pin cut
t em wit a pair of nippers or an
e uivalent tool.
Slit
Slit
CAU I N
Bind t e auxiliary pipes two and connecting cable wit facing tape
tig tly. In case of leftward piping and rear-leftward piping bind t e
auxiliary pipes two only wit facing tape.
Indoor unit
Connecting cable
Auxiliary pipes
Installation plate
Carefully arrange pipes so t at any pipe does not stick out of t e rear
plate of t e indoor unit.
Carefully connect t e auxiliary pipes and connecting pipes to one
anot er and cut off t e insulating tape wound on t e connecting pipe to
avoid double-taping at t e oint moreover seal t e oint wit t e vinyl
tape etc.
Since dewing results in a mac ine trouble make sure to insulate bot
connecting pipes. Use polyet ylene foam as insulating material.
W en bending a pipe carefully do it not to crus it.
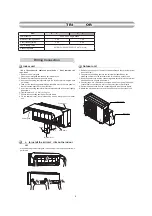
Do not form t e
drain ose
into
a wavy s ape.
Do not rise t e
drain ose.
50 mm
or more
Do not put t e
drain ose
end
into water.
Do not put t e
drain ose
end
in t e drainage ditc .
Press
un ook
Indoor Unit Fi in
For detac ing t e indoor unit from
t e installation plate pull t e indoor
unit toward you w ile pus ing its
bottom up at t e speci
fi
ed parts.
1. Pass t e pipe t roug t e ole in t e wall and ook t e indoor unit on t e
installation plate at t e upper ook.
2. Swing t e indoor unit to rig t and left to con
fi
rm t at it is
fi
rmly ooked up on
t e installation plate.
3. W ile pressing t e indoor unit onto t e wall ook it at t e lower part on t e
installation plate. Pull t e indoor unit toward you to con
fi
rm t at it is
fi
rmly
ooked up on t e installation plate.
raina e
1. Run t e drain ose sloped downwards.
N
T e ole s ould be made at a slig t downward slant on t e outdoor side.
+RRNKHUH
,QVWDOODWLRQSODWH
+RRN
3XVK
3XVK
5
EN
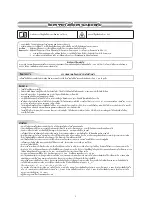
Содержание 13P ASG -T
Страница 24: ...11 R410A R410A R32 R410A R22 R32 R410A R32 R410A ...
Страница 25: ...MEMO ...
Страница 26: ...MEMO ...
Страница 27: ...MEMO ...
Страница 28: ...1118350129 ...


