background image

DANGER

Wheels dropping over edges can cause rollovers,
which may result in serious injury, death, or
drowning.

Do not operate the machine near drop-offs.

DANGER

Operating the machine while the roll bar is down
may lead to serious injury or death in the event of a
rollover.

Always keep the roll bar in the fully raised and
locked position and use the seat belt.

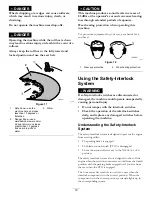
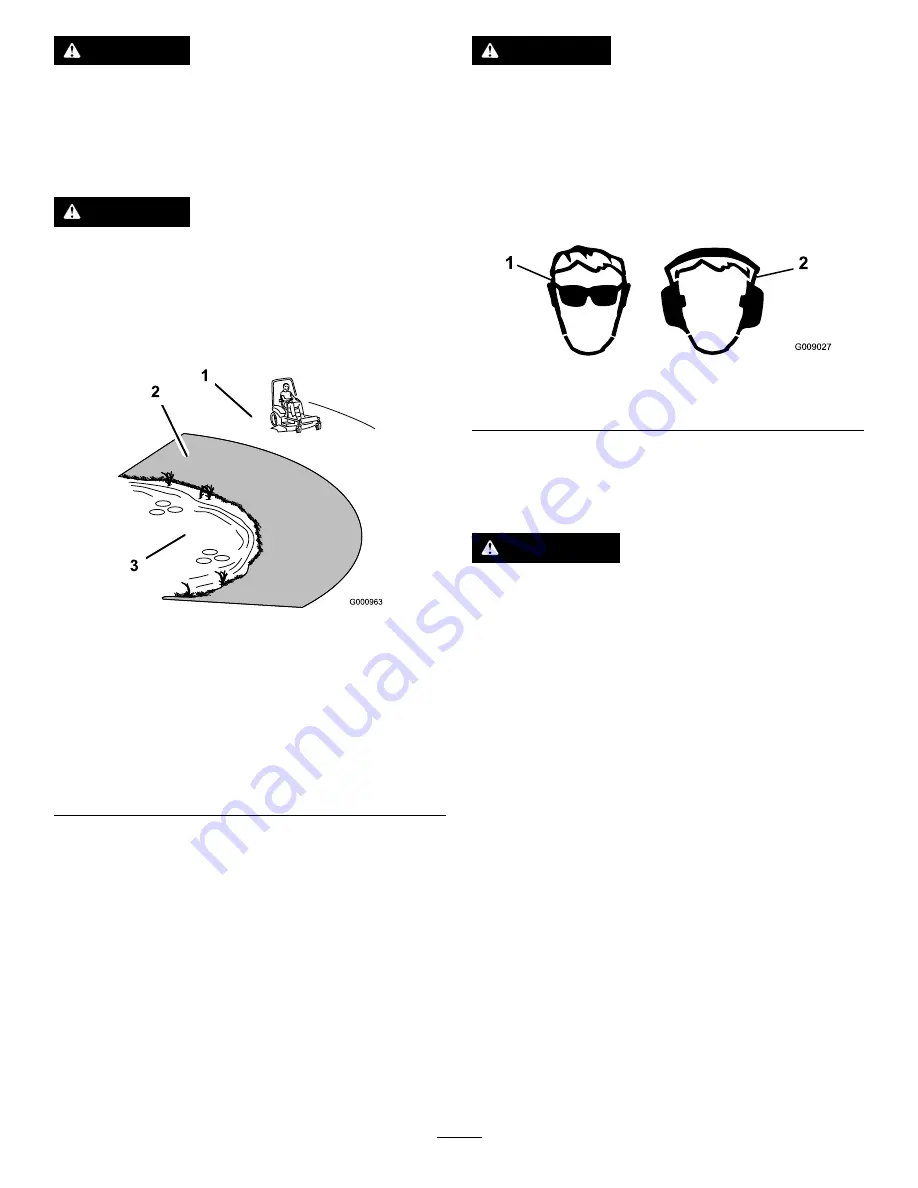
g000963

Figure 11

1.

Safe Zone—use the
machine here on slopes
less than 15 degrees or
flat areas.

3.

Water

2.

Danger Zone—use a
walk-behind mower and/or
a hand trimmer on slopes
greater than 15 degrees
and near drop-offs or
water.

CAUTION

This machine produces sound levels in excess of
85 dBA at the operator’s ear and can cause hearing
loss through extended periods of exposure.

Wear hearing protection when operating this
machine.

Use protective equipment for your eyes, ears, hands, feet,
and head.

G009027

1

2

g009027

Figure 12

1.

Wear eye protection.

2.

Wear hearing protection.

Using the Safety-Interlock
System

WARNING

If safety-interlock switches are disconnected or
damaged, the machine could operate unexpectedly
causing personal injury.

Do not tamper with the interlock switches.

Check the operation of the interlock switches
daily, and replace any damaged switches before
operating the machine.

Understanding the Safety-Interlock
System

The safety-interlock system is designed to prevent the engine
from starting unless:

The parking brake is engaged.

The blade-control switch (PTO) is disengaged.

The motion-control levers are in the N

EUTRAL

-

LOCK

position.

The safety-interlock system also is designed to shut off the
engine when the traction controls are moved from the locked
position with the parking brake engaged or if you rise from
the seat when the PTO is engaged.

The hour meter has symbols to notify the user when the
interlock component is in the correct position. When the
component is in the correct position, a triangle lights up in
the corresponding square.

19


Содержание Z593-D Z Master 74264TE

Страница 1: ...fessional 7000 Series Riding Mower With 132cm or 152cm TURBO FORCE Side Discharge Mower Model No 74264TE Serial No 400000000 and Up Model No 74265TE Serial No 400000000 and Up Register at www Toro com Original Instructions EN 3412 319 A ...

Страница 2: ...ssory information help finding a dealer or to register your product Whenever you need service genuine Toro parts or additional information contact an Authorized Service Dealer or Toro Customer Service and have the model and serial numbers of your product ready Figure 1 identifies the location of the model and serial numbers on the product Write the numbers in the space provided g000935 Figure 1 1 ...

Страница 3: ...ain 36 Removing the Sheet Metal Guard 37 Lubrication 37 Adding Light Oil or Spray Lubrication 37 Greasing the Machine 38 Greasing the Front Caster Pivots 38 Adding Grease 38 Greasing the Mower Deck and Belt Idlers 38 Lubricating the Caster Wheel Hubs 39 Engine Maintenance 40 Engine Safety 40 Servicing the Air Cleaner 40 Servicing the Engine Oil 41 Fuel System Maintenance 46 Servicing the Fuel Filt...

Страница 4: ...achine without all guards and other safety protective devices in place and working on the machine Keep clear of any discharge opening Keep bystanders a safe distance away from the machine Keep children out of the operating area Never allow children to operate the machine Stop the machine and shut off the engine before servicing fueling or unclogging the machine Improperly using or maintaining this...

Страница 5: ...s 15 degrees Use the slope chart to determine the degree of slope of hills before operating Do not operate this machine on a slope greater than 15 degrees Fold along the appropriate line to match the recommended slope 2 Align this edge with a vertical surface a tree building fence pole etc 3 Example of how to compare slope with folded edge 5 ...

Страница 6: ...n object hazard mower keep the deflector in place 3 Cutting dismemberment of hand or foot stay away from moving parts decal93 7818 93 7818 1 Warning read the Operator s Manual for instructions on torquing the blade bolt nut to 115 to 149 N m 85 to 110 ft lb decal93 8069 93 8069 1 Hot surface burn hazard stay a safe distance away from the hot surface decal98 1977 98 1977 1 Entanglement hazard belt ...

Страница 7: ... keep the roll bar in the raised and locked position and wear the seat belt Lower the roll bar only when absolutely necessary do not wear the seat belt when the roll bar is down 3 Read the Operator s Manual drive slowly and carefully decal107 3961 107 3961 1 Height of cut in millimeters decal107 3962 107 3962 1 Height of cut in millimeters 7 ...

Страница 8: ...efore working under the mower decal107 7719 107 7719 1 Cutting dismemberment hazard fan and entanglement hazard belt stay away from moving parts 2 Before starting the engine clean grass and debris from the mower belt and pulleys insert the ignition key and start the engine decal108 5955 108 5955 decal108 5957 108 5957 decal108 5981 108 5981 decal110 2067 110 2067 decal110 2068 110 2068 1 Read the ...

Страница 9: ...ls the user that engine is overheating decal110 3853 110 3853 1 Cutting dismemberment hazard fan and entanglement hazard belt 2 Remove the ignition key and read the instructions before servicing or performing maintenance decal112 9028 112 9028 1 Warning stay away from moving parts keep all guards in place decal114 9600 114 9600 1 Read the Operator s Manual decal115 4212 115 4212 1 Hydraulic fliud ...

Страница 10: ...62 1 Push to start 4 Variable speed control 2 Read the Operator s Manual for more information on preheating the engine 5 Fast 3 Slow decal126 2055 126 2055 1 Wheel lug nut torque 129 N m 95 ft lb 4x 2 Wheel hub nut torque 319 N m 235 ft lb 3 Read and understand the Operator s Manual before performing any maintenance check torque after first 100 hours then every 500 hours thereafter 10 ...

Страница 11: ...ls Some or all of these symbols are on your battery 1 Explosion hazard 6 Keep bystanders a safe distance away from the battery 2 No fire open flame or smoking 7 Wear eye protection explosive gases can cause blindness and other injuries 3 Caustic liquid chemical burn hazard 8 Battery acid can cause blindness or severe burns 4 Wear eye protection 9 Flush eyes immediately with water and get medical h...

Страница 12: ...l and receive training 4 Warning wear hearing protection decal110 0820 110 0820 1 Fast 5 Warning read the Operator s Manual 2 Slow 6 Poison and caustic liquid chemical burn hazard keep children a safe distance from the battery 3 Neutral 7 Explosion hazard no fire open flames or smoking avoid sparks 4 Reverse 8 To unlock the traction drive turn the bypass valve 1 complete revolution counterclockwis...

Страница 13: ...chine on slopes greater than 15 degrees do not make sudden tight turns make slow wide turns 2 Ramp hazard when loading onto a trailer do not use dual ramps only use a singular ramp wide enough for the machine back up the ramp in reverse and drive forward off the ramp 13 ...

Страница 14: ...here are symbols on the hour meter and they indicate with a black triangle that the interlock component is in the correct position Figure 5 Battery Indicator Light When the ignition key is initially turned to the RUN position for a few seconds the battery voltage is displayed in the area where the hours are normally displayed The battery light turns on when the ignition is turned on and when the c...

Страница 15: ...esponsible for training all operators and mechanics Become familiar with the safe operation of the equipment operator controls and safety signs Know how to stop the machine and shut off the engine quickly Check that operator presence controls safety switches and shields are attached and functioning properly Do not operate the machine unless they are functioning properly Evaluate the terrain to det...

Страница 16: ...ng chances of chemical separation of the fuel due to lower temperatures wax appearance which may plug filters Using summer grade diesel fuel above 7 C 20 F contributes toward longer life of the pump components Important Do not use kerosene or gasoline instead of diesel fuel Failure to observe this caution will damage the engine Biodiesel Ready This machine can also use a biodiesel blended fuel of ...

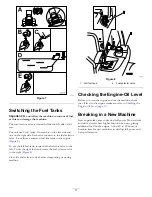
Страница 17: ...left To use the right fuel tank rotate the fuel selector valve to the right Figure 8 Close the fuel selector valve before transporting or storing machine g000962 Figure 8 1 Left fuel tank 2 Fuel selector valve Checking the Engine Oil Level Before you start the engine and use the machine check the oil level in the engine crankcase refer to Checking the Engine Oil Level page 17 Breaking in a New Mac...

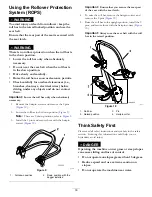
Страница 18: ...re are 2 down positions refer to Figure 9 3 Install the 2 pins and secure them with the hairpin cotters Figure 10 g004954 Figure 9 1 Full down position 2 Down position with the bagger installed Important Ensure that you secure the rear part of the seat with the seat latch 4 To raise the roll bar remove the hairpin cotters and remove the 2 pins Figure 10 5 Raise the roll bar to the upright position...

Страница 19: ... 2 g009027 Figure 12 1 Wear eye protection 2 Wear hearing protection Using the Safety Interlock System WARNING If safety interlock switches are disconnected or damaged the machine could operate unexpectedly causing personal injury Do not tamper with the interlock switches Check the operation of the interlock switches daily and replace any damaged switches before operating the machine Understanding...

Страница 20: ...ge the parking brake engage the blade control switch PTO and rise slightly from the seat the engine should shut off 4 Sitting on the seat engage the parking brake move the blade control switch PTO to the OFF position and move the motion control levers to the NEUTRAL LOCK position Now start the engine While the engine is running center either motion control and move forward or reverse the engine sh...

Страница 21: ...gine Keep your hands and feet away from the cutting units Keep clear of the discharge opening at all times Look behind and down before backing up to be sure of a clear path Use care when approaching blind corners shrubs trees or other objects that may obscure your vision Do not mow near drop offs ditches or embankments The machine could suddenly roll over if a wheel goes over the edge or if the ed...

Страница 22: ...t Replace a damaged roll bar Do not repair or alter it Slope Safety Slow down the machine and use extra care on hillsides Travel up and down on hillsides Turf conditions can affect the stability of the machine Avoid turning the machine on slopes If you must turn the machine turn it slowly and gradually downhill if possible Do not turn the machine sharply Use care when reversing the machine Use ext...

Страница 23: ...s use the FAST position when turning on the mower deck with the blade control switch PTO G008946 g008946 Figure 21 Operating the Ignition Switch 1 Turn the ignition key to the START position Figure 22 Note When the engine starts release the key Important Do not engage the starter for more than 5 seconds at a time If the engine fails to start wait 15 seconds between attempts Failure to follow these...

Страница 24: ...or the first time after the fuel system has been completely without fuel g032593 Figure 23 Starting the Engine in Cold Weather Below 23 F or 5 C Use the correct engine oil for the starting temperature refer to Servicing the Engine Oil page 41 Important Use starting cycles of no more than 30 seconds per minute to avoid overheating the starter motor Note Do not use fuel left over from the summer Use...

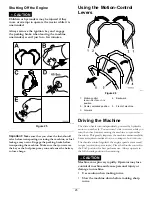
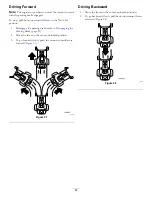
Страница 25: ...ol lever NEUTRAL LOCK position 4 Backward 2 Center unlocked position 5 Front of machine 3 Forward Driving the Machine The drive wheels turn independently powered by hydraulic motors on each axle You can turn 1 side in reverse while you turn the other forward causing the machine to spin rather than turn This greatly improves the machine maneuverability but may require sometime for you to adapt to h...

Страница 26: ...he parking brake refer to Disengaging the Parking Brake page 22 2 Move the levers to the center unlocked position 3 To go forward slowly push the motion control levers forward Figure 27 G008952 g008952 Figure 27 Driving Backward 1 Move the levers to the center unlocked position 2 To go backward slowly pull the motion control levers rearward Figure 28 G008953 g008953 Figure 28 26 ...

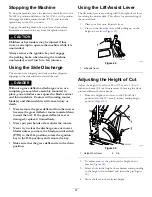
Страница 27: ...turf If the grass deflector is ever damaged replace it immediately Never put your hands or feet under the mower Never try to clear the discharge area or mower blades unless you move the blade control switch PTO to the OFF position rotate the ignition key to the OFF position and remove the key Make sure that the grass deflector is in the down position Using the Lift Assist Lever The lift assist lev...

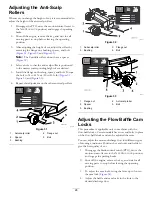
Страница 28: ...stment on the other anti scalp rollers g001102 Figure 31 1 Anti scalp roller 4 Flange nut 2 Spacer 5 Bolt 3 Bushing g001101 Figure 32 1 Anti scalp roller 3 Flange nut 2 Bushing 4 Bolt g001100 Figure 33 1 Flange nut 4 Anti scalp roller 2 Spacer 5 Bolt 3 Bushing Adjusting the Flow Baffle Cam Locks This procedure is applicable only to machines with the flow baffle locks Certain models have nuts and b...

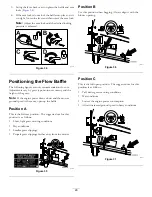
Страница 29: ... power draws down and the mower ground speed is the same open up the baffle Position A This is the full rear position The suggested use for this position is as follows Short light grass mowing conditions Dry conditions Smaller grass clippings Propels grass clippings farther away from the mower g005832 Figure 35 Position B Use this position when bagging Always align it with the blower opening g0058...

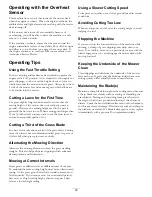
Страница 30: ...hen grass grows more slowly Alternating the Mowing Direction Alternate the mowing direction to keep the grass standing straight This also helps disperse clippings which enhances decomposition and fertilization Mowing at Correct Intervals Grass grows at different rates at different times of the year To maintain the same cutting height mow more often in early spring As the grass growth rate slows in...

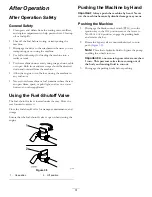
Страница 31: ...nces Using the Fuel Shutoff Valve The fuel shutoff valve is located under the seat Move the seat forward to access it Close the fuel shutoff valve for transport maintenance and storage Ensure that the fuel shutoff valve is open when starting the engine G008948 1 2 g008948 Figure 38 1 On position 2 Off position Pushing the Machine by Hand Important Always push the machine by hand Never tow the mach...

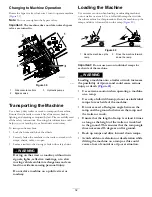
Страница 32: ...ine on a public street or roadway Loading the Machine Use extreme caution when loading or unloading machines onto a trailer or a truck Use a full width ramp that is wider than the machine for this procedure Back the machine up the ramp and drive it forward down the ramp Figure 40 g028043 g028043 Figure 40 1 Back the machine up the ramp 2 Drive the machine forward down the ramp Important Do not use...

Страница 33: ...ly for cleaning the mower and removing the blades Do not keep the machine on the Z Stand for extended periods of time Always turn the engine off set the parking brake and remove the key before performing any maintenance to the mower Driving up onto the Z Stand Important Use the Z Stand on a level surface 1 Raise the mower to the TRANSPORT position 2 Remove the bracket pin Figure 42 g001811 Figure ...

Страница 34: ...g brake may not hold the machine that is parked on the Z Stand and could cause personal injury or property damage Do not park on the Z Stand unless wheels are chocked or blocked 10 Perform the maintenance on the machine Driving off the Z Stand 1 Remove the chocks or blocks 2 Raise the latch to the UNLOCKED position Figure 44 g001813 Figure 44 1 Z Stand 3 LOCKED position 2 Latch 4 UNLOCKED position...

Страница 35: ...y 40 hours Drain the water separator Every 50 hours Check the tire pressure Check the PTO drive belt Check the pump drive belt Check the alternator belt Every 100 hours Lubricate the mower deck lift pivots Replace the engine oil Change the engine oil Check the gearbox oil level Check the engine cooling system hoses Inspect the belts for cracks and wear Check the hydraulic hoses Every 200 hours Cha...

Страница 36: ...ive terminal first and the positive terminal last Connect the positive terminal first and negative last Use care when checking the blades Wrap the blade s or wear thickly padded gloves and use caution when servicing them Only replace blades do not straighten or weld them Keep your hands and feet away from moving parts If possible do not make adjustments with the engine running Keep all parts in go...

Страница 37: ...e blade control switch PTO move the motion control levers to the NEUTRAL LOCK position and engage the parking brake 2 Shut off the engine remove the key and wait for all moving parts to stop before leaving the operating position 3 Clean the grease fittings with a rag Note Make sure that you scrape any paint off the front of the fitting s 4 Connect a grease gun to the fitting 5 Pump grease into the...

Страница 38: ... fitting until it oozes out around the top bearing 5 Remove the grease fitting from the hole Install the hex plug and cap Adding Grease Lubricate the grease fittings as shown on the Check Service Reference Aid decal Figure 48 decal136 5510 Figure 48 1 Remove the key and read the Operator s Manual before performing maintenance 3 Hour interval 2 Grease point Greasing the Mower Deck and Belt Idlers S...

Страница 39: ...move the axle with the other spacer nut still assembled to it from the wheel assembly 7 Pry out seals and inspect bearings for wear or damage and replace if necessary 8 Pack the bearings with a general purpose grease 9 Insert 1 bearing and 1 new seal into the wheel Note Replace the seals 10 If the axle assembly is missing both spacer nuts apply a thread locking adhesive to 1 spacer nut and thread ...

Страница 40: ...t off the engine before checking the oil or adding oil to the crankcase Servicing the Air Cleaner Note Check the filters more frequently if operating conditions are extremely dusty or sandy Removing the Air Filter Service Interval Every 250 hours more often in dirty or dusty conditions 1 Disengage the blade control switch PTO move the motion control levers to the NEUTRAL LOCK position and engage t...

Страница 41: ...n the outer rim of the filter while installing it Important Do not press on the soft inside area of the filter 3 Install the air cleaner cover and secure the latches Figure 53 g001048 Figure 53 1 Air filter body 3 Air cleaner cover 2 Air filter 4 Latches Servicing the Engine Oil Oil Type High quality detergent oil classified API Service CJ 4 or higher for diesel engines Do not use special additive...

Страница 42: ...king the Engine Oil Level Service Interval Before each use or daily Note Check the oil when the engine is cold 1 Disengage the blade control switch PTO move the motion control levers to the NEUTRAL LOCK position and engage the parking brake 2 Shut off the engine remove the key and wait for all moving parts to stop before leaving the operating position 3 Check the engine oil level Figure 56 g032601...

Страница 43: ...urs 1 Start the engine and let it run for 5 minutes Note This warms the oil so it drains better 2 Park the machine on a level surface disengage the blade control switch PTO move the motion control levers to the NEUTRAL LOCK position and engage the parking brake 3 Shut off the engine remove the key and wait for all moving parts to stop before leaving the operating position g032646 g032642 Figure 58...

Страница 44: ...better 2 Park the machine on a level surface 3 Disengage the blade control switch PTO move the motion control levers to the NEUTRAL LOCK position and engage the parking brake 4 Shut off the engine remove the key and wait for all moving parts to stop before leaving the operating position 5 Place a pan below the oil drain Remove the drain plug and let the oil drain completely Figure 60 6 Remove the ...

Страница 45: ...163 Figure 63 1 Engine oil 2 Funnel and hose Important Add the oil very slowly and do not block the opening of the filler hole Figure 64 If you add oil too fast or block the hole the oil could back up and foul the air intakes causing engine damage g000955 Figure 64 1 Note the clearance left in the filler opening 5 Replace the dipstick and install the front engine panel 6 Start the engine and run i...

Страница 46: ...er contaminates to drain Figure 65 7 Close the drain valve when only diesel fuel comes out Figure 65 g007169 Figure 65 1 Drain valve 3 Back of machine 2 Water separator Changing the Fuel Filter Never install a dirty fuel filter if it is removed from the fuel line 1 Allow the machine to cool down 2 Disengage the blade control switch PTO move the motion control levers to the NEUTRAL LOCK position an...

Страница 47: ...inals and related accessories contain lead and lead compounds chemicals known to the State of California to cause cancer and reproductive harm Wash hands after handling Servicing the Battery DANGER Battery electrolyte contains sulfuric acid which is fatal if consumed and causes severe burns Do not drink electrolyte and avoid contact with skin eyes or clothing Wear safety glasses to shield your eye...

Страница 48: ...tery Note Position the battery in the tray with the terminal posts opposite from the hydraulic tank g032751 Figure 68 Charging the Battery WARNING Charging the battery produces gasses that can explode Never smoke near the battery and keep sparks and flames away from battery Important Always keep the battery fully charged 1 265 specific gravity This is especially important to prevent battery damage...

Страница 49: ...enance however if a fuse blows check component circuit for malfunction or short 1 Unlatch the engine hood and raise the engine hood to gain access to fuse holder Figure 70 2 To replace the fuses pull out on the fuse to remove it 3 Install a new fuse Figure 70 1 3 2 G012492 4 g012492 Figure 70 1 Ignition 30 A F1 3 Clutch 10 A F3 2 Radiator fan 50 A large heavy duty fuse 4 Left fuel tank 49 ...

Страница 50: ... of the machine from the normal operating position 4 To make the machine go right turn the knob toward the right of the machine refer to Figure 71 5 To make the machine go left turn the knob toward the left of the machine refer to Figure 71 6 Repeat adjustment until the tracking is correct g001070 Figure 71 1 Tracking knob 4 Turn this way to track right 2 Hydraulic tank 5 Turn this way to track le...

Страница 51: ...he preload on the bearings Figure 73 Important Make sure that the spring washers are installed correctly as shown in Figure 73 5 Install the dust cap Figure 73 g001297 Figure 73 1 Spring washers 3 Dust cap 2 Locknut Servicing the Gearbox Checking the Gearbox Oil Level Service Interval Every 100 hours Use SAE 75W 90 synthetic gear lube 1 Park the machine on a level surface 2 Disengage the blade con...

Страница 52: ... remove the clutch and key Figure 76 g007166 Figure 76 1 Clutch 4 Clutch center bolt 2 2 bolts and nuts for clutch strap 5 Electrical connection 3 Rubber clutch strap 9 Insert a 0 381 to 0 533 mm 0 015 to 0 021 inch feeler gauge through an inspection slot in the side of the assembly Figure 77 Note Make sure that it is between the armature and the rotor friction surfaces 10 Tighten the locknuts unt...

Страница 53: ...d surrounding parts that are hot DANGER The rotating shaft and fan can cause personal injury Do not operate the machine without the covers in place Keep your fingers hands and clothing clear of rotating fan and driveshaft Shut off the engine and remove the ignition key before performing maintenance CAUTION Swallowing engine coolant can cause poisoning Do not swallow engine coolant Keep out of reac...

Страница 54: ... 78 g001103 Figure 78 1 Antifreeze overflow bottle 2 Indicator line on side of overflow bottle Cleaning the Hydraulic Fluid Cooler and Radiator Screen Service Interval Before each use or daily Before each use check and clean the radiator screen and oil cooler Remove any buildup of grass dirt or other debris from the oil cooler and radiator screen with compressed air Figure 79 g001104 Figure 79 1 H...

Страница 55: ...e belt is rotating blades slipping when cutting grass frayed belt edges burn marks and cracks are signs of a worn mower belt Replace the mower belt if any of these conditions are evident Replacing the Mower Belt Squealing when the belt is rotating blades slipping when cutting grass frayed belt edges burn marks and cracks are signs of a worn mower belt Replace the mower belt if any of these conditi...

Страница 56: ...ion For 72in Mowers Only Service Interval After the first 8 hours Important To ensure proper mower belt tension which will result in a longer belt life check the mower belt tension after the 8 hours and every 8 hours thereafter 1 Disengage the blade control switch PTO move the motion control levers to the NEUTRAL LOCK position and engage the parking brake 2 Shut off the engine remove the key and w...

Страница 57: ...Disengage the blade control switch PTO move the motion control levers to the NEUTRAL LOCK position and engage the parking brake 2 Shut off the engine remove the key and wait for all moving parts to stop before leaving the operating position 3 Loosen the front engine panel knobs and remove the panel Figure 85 g001312 Figure 85 1 Knob 2 Front engine panel 4 Remove the spring from the idler arm Figur...

Страница 58: ...igure 87 5 Install the PTO drive belt 6 Install the spring to the idler arm Figure 87 g007177 Figure 87 1 Clutch 3 Spring 2 Pump drive belt 4 Spring loaded idler pulley Replacing and Tensioning the Alternator Belt Replacing the Alternator Belt Service Interval Every 50 hours Check the alternator belt If the alternator belt needs to be replace take your machine to an Authorized Service Dealer Tensi...

Страница 59: ... off the engine remove the key and wait for all moving parts to stop before leaving the operating position 3 Unlatch the seat and tilt the seat forward 4 Begin with either the left or right motion control lever 5 Move the lever to the neutral position but not locked Figure 89 6 Pull the lever back until the clevis pin on arm below pivot shaft contacts the end of the slot just beginning to put pres...

Страница 60: ...m Seek immediate medical attention if fluid is injected into skin Injected fluid must be surgically removed within a few hours by a doctor Servicing the Hydraulic System Hydraulic Fluid Type Toro HYPR OIL 500 hydraulic fluid or Mobil 1 15W 50 fluid Hydraulic System Fluid Capacity 3 9 L 132 oz Important Use the specified fluid Other fluids could cause system damage Checking the Hydraulic Fluid Leve...

Страница 61: ...tem Make sure that all hydraulic fluid hoses and lines are in good condition and all hydraulic connections and fittings are tight before applying pressure to hydraulic system Replacing the Hydraulic Filter and Fluid Service Interval After the first 25 hours Every 250 hours Change the hydraulic filter and hydraulic fluid when using Mobil 1 fluid Every 500 hours Change the hydraulic filter and hydra...

Страница 62: ... filter adapter then tighten the filter an additional 1 2 turn Figure 94 10 Clean up any spilled fluid 11 Add fluid to the cold level of the baffle in the hydraulic tank 12 Start the engine and let it run for about 2 minutes to purge air from the system 13 Shut off the engine and check for leaks Note If 1 or both wheels do not drive refer to Bleeding the Hydraulic System page 63 14 Check the fluid...

Страница 63: ...on and all hydraulic connections and fittings are tight before applying pressure to hydraulic system Setting the Hydraulic Pump Neutral Position Note Adjust the handle neutral first That needs to be correct before the following adjustment can be made This adjustment must be made with drive wheels turning DANGER Mechanical or hydraulic jacks may fail to support the machine and cause a serious injur...

Страница 64: ...while making any adjustments Note The front nut on the pump rod has left hand threads 3 Adjust the pump rod length by rotating double nuts on rod in the appropriate direction until wheel is still or slightly creeps in reverse Figure 96 4 Move the motion control lever forward and reverse then back to neutral The wheel must stop turning or slightly creep in reverse 5 Open the throttle to fast Make s...

Страница 65: ... level the mower Setting Up the Machine 1 Position mower on a flat surface 2 Disengage the blade control switch PTO move the motion control levers to the NEUTRAL LOCK position and engage the parking brake 3 Shut off the engine remove the key and wait for all moving parts to stop before leaving the operating position 4 Check tire pressure of the tires if needed adjust to 90 kPa 13 psi 5 Lower the m...

Страница 66: ... If the measurements at positions B or C are not correct loosen the bolt attaching the rear chain to the rear support arm Figure 98 g001040 Figure 98 1 Rear chain 5 Adjustment bolt 2 Rear support arm 6 Front swivel 3 Bolt 7 Front support arm 4 Jam nut 8 Loosen the jam nut under the rear support arm and adjust the adjustment bolt to get a measurement of 80 to 83 mm 3 1 8 to 3 1 4 inches refer to Fi...

Страница 67: ...he front swivel to lock the height 10 Check to make sure that there is equal tension on the chains and adjust again if needed Adjusting the Compression Spring 1 Raise the mower lift lever to the transport position 2 Check the distance between the 2 large washers it needs to be 28 2 cm 11 1 8 inches for 52 inch mower decks 26 7 cm 10 1 2 inches for 60 inch mower decks or 29 2 cm 11 1 2 inches for 7...

Страница 68: ... Before Inspecting or Servicing the Blades 1 Park the machine on a level surface disengage the blade control switch PTO and engage the parking brake 2 Shut off the engine remove the key and disconnect the spark plug wires from the spark plugs Inspecting the Blades Service Interval Before each use or daily 1 Inspect the cutting edges Figure 101 2 If the edges are not sharp or have nicks remove and ...

Страница 69: ...y result in nonconformance with safety standards 1 Hold the blade end using a rag or a thickly padded glove 2 Remove the blade bolt the curved washer and the blade from the spindle shaft Figure 103 g004536 Figure 103 1 Sail area of the blade 3 Curved washer 2 Blade 4 Blade bolt Sharpening the Blades 1 Use a file to sharpen the cutting edge at both ends of the blade Figure 104 Note Maintain the ori...

Страница 70: ...u install a cover plate a mulch plate or a grass chute and catcher Make sure that the grass deflector is in the down position 1 Remove the locknut bolt spring and spacer holding the deflector to the pivot brackets Figure 107 2 Remove the damaged or worn grass deflector 3 Place the spacer and spring onto the grass deflector Place the L end of the spring behind the deck edge Note Make sure that the ...

Страница 71: ...evers to the NEUTRAL LOCK position and engage the parking brake 2 Shut off the engine remove the key and wait for all moving parts to stop before leaving the operating position 3 Raise the mower to the transport position Waste Disposal Engine oil batteries hydraulic fluid and engine coolant are pollutants to the environment Dispose of these according to your state and local regulations 71 ...

Страница 72: ...Battery page 48 Scrape any heavy buildup of grass and dirt from the underside of the mower then wash the mower with a garden hose Note Run the machine with the blade control switch PTO engaged and the engine at high idle for 2 to 5 minutes after washing 5 Check the condition of the blades refer to Servicing the Cutting Blades page 68 Prepare the machine for storage when non use occurs over 30 days...

Страница 73: ...ct Clean the connector terminals thoroughly with electrical contact cleaner apply dielectric grease and connect 10 The relay or switch is broken 10 Contact an Authorized Service Dealer 11 The spark plug is faulty 11 Clean adjust or replace spark plug The engine does not start starts hard or fails to keep running 12 The spark plug wire is not connected 12 Check the spark plug wire connection 1 The ...

Страница 74: ...rp 1 Sharpen the blade s 2 The cutting blade s is are bent 2 Install new cutting blade s 3 The mower deck is not level 3 Level the mower deck from side to side and front to rear 4 The underside of mower is dirty 4 Clean the underside of the mower 5 The tire pressure is not correct 5 Adjust the tire pressure Mowing is resulting in uneven cutting height 6 The blade spindle bent 6 Contact an Authoriz...

Страница 75: ...Schematics g012068 g012068 Wire Diagram Rev A 75 ...

Страница 76: ...Notes ...

Страница 77: ...Notes ...

Страница 78: ...Notes ...

Страница 79: ...f these activities We will not sell your personal information to any other company We reserve the right to disclose personal information in order to comply with applicable laws and with requests by the appropriate authorities to operate our systems properly or for our own protection or that of other users Retention of your Personal Information We will keep your personal information as long as we n...

Страница 80: ... Toro distributor in your area 2 Bring the product and your proof of purchase sales receipt to the Service Dealer 3 If for any reason you are dissatisfied with the Service Dealer s analysis or with the assistance provided contact us at Toro Warranty Company 8111 Lyndale Avenue South Bloomington MN 55420 1196 001 952 948 4707 Owner Responsibilities You must maintain your Toro Product by following t...

Отзывы: