Understanding the Safety-Interlock
System
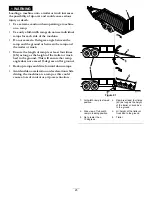
WARNING
If safety-interlock switches are disconnected or
damaged, the machine could operate unexpectedly
causing personal injury.
•
Do not tamper with the interlock switches.
•
Check the operation of the interlock switches
daily, and replace any damaged switches before
operating the machine.
The safety-interlock system is designed for the following:
•
To prevent the engine from starting unless the traction
pedal is in the neutral position.
•
To automatically ensure that the parking brake is engaged
and the PTO is off when starting.
•
To stop the engine whenever the traction pedal is not in
the neutral position and you rise from the seat.
•
To automatically engage the parking brake and disengage
the PTO, when you rise out of the seat with the traction
pedal in the neutral position.
•
To stop the engine whenever the parking brake is not
engaged and you rise from the seat.
Testing the Safety-interlock System
1.
While sitting on the seat, move the blade-control
switch to O
FF
.
2.
Turn the ignition key to the S
TART
position.
Note:
The starter should crank.
3.
Push the SmartPark switch to the O
FF
position.
Note:
The brake should disengage, and the brake light
should turn off.
4.
With brake disengaged and traction pedal in neutral,
turn the ignition switch to the S
TART
position.
Note:
The brake should automatically engage, the
engine should crank, and the brake light will turn on.
5.
Engage the PTO by pulling up on the blade-control
switch.
6.
Ensure the traction pedal is in neutral and turn ignition
switch to the S
TART
position.
Note:
The PTO should disengage and the engine
should crank.
7.
Ensure the traction control pedal is in the neutral
position and start the engine.
8.
Raise from the seat.
Note:
The engine should remain running.
9.
Return to the seat, disengage the parking brake by
pushing the SmartPark switch to the O
FF
position.
Note:
The engine should remain running.
10.
Raise from the seat.
Note:
The brake should automatically engage and the
engine should remain running.
11.
Return to the seat, engage the blades by pulling up on
the blade-control switch.
12.
Raise from the seat.
Note:
The blades should disengage and the engine
should remain running.
13.
Return to the seat, and pull the blade control switch up.
Note:
The blades should engage.
14.
Push down on the blade-control switch.
Note:
The blades should disengage.
15.
Engage the blades by pulling up on the blade-control
switch.
16.
Move traction pedal to reverse.
Note:
The blades should disengage.
17.
Engage the blades by pulling up on the blade-control
switch.
18.
Turn the Key Choice switch to O
N
and release.
Note:
The operating in reverse light should illuminate.
19.
Move the traction pedal to reverse.
Note:
The blades should remain engaged.
20.
Push the PTO switch to the O
FF
position.
Note:
The blades should turn off and the reverse
warning light should turn off.
21.
Engage the parking brake by pushing SmartPark switch
to the O
N
position.
Note:
The brake should engage and the brake light
should be on.
22.
Push and release the traction pedal in either the forward
or reverse direction.
Note:
The brake should disengage and the brake light
should turn off.
23.
Raise from the seat, and push the traction pedal to
either the forward or reverse direction.
Note:
The engine should kill.
18
Содержание TimeCutter SW3200
Страница 50: ...Schematics Electrical Diagram Rev A 50 ...

