background image

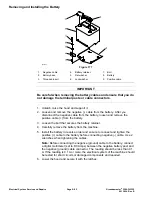
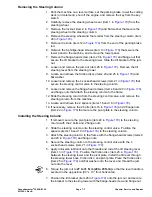
Removing and Installing the Battery

g227290

Figure 177

1.

Negative cable

4.

Battery retainer

7.

Bolt

2.

Battery base

5.

Flat washer

8.

Battery

3.

Threaded insert

6.

Lock washer

9.

Positive cable

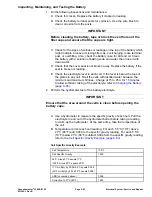
IMPORTANT

Be careful when removing the battery cables and ensure that you do
not damage the terminal posts or cable connectors.

1. Unlatch, raise the hood and support it.

2. Loosen and remove the negative (-) cable from the battery. After you

disconnect the negative cable from the battery, loosen and remove the
positive cable (+) from the battery.

3. Loosen the bolt that secures the battery retainer.

4. Carefully remove the battery from the machine.

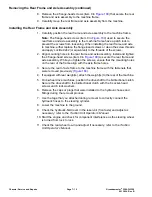
5. Install the battery in reverse order and ensure to connect and tighten the

positive (+) cable to the battery before connecting negative (-) cable. Use 2
wrenches when tightening the cables.

Note:

Before connecting the negative (ground) cable to the battery, connect

a digital multimeter (set to DC Amps) between the negative battery post and
the negative (ground) cable connector. The reading should be less than 0.1
A. If the reading is 0.1 A or more, the electrical system of the machine should
be tested for short circuits or damaged components and repaired.

6. Lower the hood and secure it with the latches.

Electrical System: Service and Repairs

Page 6–82

Groundsmaster

®

3280-D/3320

05138SL Rev B

Содержание Groundsmaster 3280-D

Страница 1: ...ev B Groundsmaster 3280 D 3320 Models 30307 30308 30309 30343 30344 and 30345 2018 The Toro Company 8111 Lyndale Avenue South Bloomington MN 55420 Original Instructions EN Contact us at www Toro com All Rights Reserved ...

Страница 2: ...on History Revision Date Description 2005 Initial Issue A 2007 Updated Hydraulic chapter B 2018 Updated all chapters and published in new format Revision History Page 2 Groundsmaster 3280 D 3320 05138SL Rev B ...

Страница 3: ...y we encourage user feedback Please comment on the completeness accuracy organization usability and readability of this manual by an e mail to servicemanuals toro com or Mail to Technical Publication Manager Commercial The Toro Company 8111 Lyndale Avenue South Bloomington MN 55420 1196 Phone 1 952 887 8495 Groundsmaster 3280 D 3320 Page 3 Revision History 05138SL Rev B ...

Страница 4: ...NOTES Revision History Page 4 Groundsmaster 3280 D 3320 05138SL Rev B ...

Страница 5: ...eans danger When you see this symbol carefully read the instructions that follow Failure to obey the instructions could kill or cause serious permanent injury or disability WARNING This safety symbol means warning When you see this symbol carefully read the instructions that follow Failure to obey the instructions can result in serious injury CAUTION This safety symbol means caution When you see t...

Страница 6: ...ning sequence component orientation that may not be obvious Critical Torque This icon is used to highlight an assembly torque requirement that is different than what is recommended in the Standard Torque Tables refer to Torque Specifications page 2 5 Fluid Specifications This icon is used to highlight fluid specifications and capacities that are less common and may not appear on the machine servic...

Страница 7: ...ms 5 19 Special Tools 5 39 Troubleshooting 5 44 Testing the Hydraulic System 5 47 Adjustments 5 75 Service and Repairs 5 77 Chapter 6 Electrical System 6 1 General Information 6 2 Special Tools 6 6 Troubleshooting 6 8 Electrical System Quick Checks 6 14 Adjustments 6 16 Testing the Electrical Components 6 19 Service and Repairs 6 75 Chapter 7 Chassis 7 1 Specifications 7 2 General Information 7 3 ...

Страница 8: ...s below 260000000 A 19 Wire Harness Drawing Main 3280 D Machine Serial Number 260000000 to 270000600 A 20 Wire Harness Diagram Main 3280 D Machine Serial Number 260000000 to 270000600 A 21 Wire Harness Drawing Main 3280 D Machine Serial Number 270000601 to 311000000 A 22 Wire Harness Diagram Main 3280 D Machine Serial Number 270000601 to 311000000 A 23 Wire Harness Drawing Main 3280 D Machine Seri...

Страница 9: ...hines Serial Number 315000000 and Up A 41 Additional Reference Materials BRIGGS AND STRATTON DAIHATSU REPAIR MANUAL FOR 3 CYLINDER LIQUID COOLED GASOLINE ENGINES KUBOTA 05 E2B SERIES WORKSHOP MANUAL KUBOTA 05 E3B SERIES WORKSHOP MANUAL KUBOTA 05 E4B SERIES WORKSHOP MANUAL DANFOSS DDC20 AXIAL PISTON PUMP SERVICE MANUAL DANFOSS SERIES 15 AXIAL PISTON PUMPS MOTORS AND TRANSMISSIONS REPAIR MANUAL DANF...

Страница 10: ...Preface Page 10 Groundsmaster 3280 D 3320 05138SL Rev B ...

Страница 11: ...s 1 2 Before Operating the Machine 1 2 While Operating the Machine 1 3 Maintenance and Service 1 4 Jacking Instructions 1 6 Raising the Front of the Machine 1 6 Raising the Rear of the Machine 1 6 Safety and Instructional Decals 1 6 Groundsmaster 3280 D 3320 Page 1 1 Safety 05138SL Rev B ...

Страница 12: ...Operating the Machine Review and understand the contents of the Operator s Manuals and Operator s Training DVD before starting and operating the machine Become familiar with the controls and know how to stop the machine and engine quickly Additional copies of the Operator s Manuals are available at www toro com Keep all the shields safety devices and decals in place If a shield safety device or de...

Страница 13: ...gine release the parking brake and keep foot off the traction pedal Ensure that the machine does not move Note If machine movement is evident the traction pedal linkage is adjusted incorrectly therefore shut off the engine and adjust the traction pedal linkage until the machine does not move when you release the traction pedal refer to the Operator s Manual CAUTION Running the engine causes the en...

Страница 14: ...grease grass leaves and dirt Clean the protective screen on the machine frequently If you must run the engine to perform maintenance or to make an adjustment keep your hands feet clothing and other parts of the body away from the cutting deck and other moving parts Keep bystanders away Do not overspeed the engine by changing the engine governor setting To ensure safety and accuracy check the maxim...

Страница 15: ...and regulations when recycling or disposing of waste At the time of manufacture the machine conformed to the safety standards for riding mowers To ensure the optimum performance and continued safety certification of the machine use genuine Toro replacement parts and accessories The replacement parts and accessories of other manufacturers can result in non conformance with the safety standards and ...

Страница 16: ...2 Position the jack securely under the frame not the axle just to the inside of the front wheel 3 Use a jack to raise the front of the machine 4 Position jack stands or hardwood blocks under the frame as close to the wheel as possible to support the machine Raising the Rear of the Machine 1 Set the parking brake and block the 2 front wheels with chocks to prevent the machine from moving 2 Position...

Страница 17: ...r 2 5 Calculating the Torque Values When Using a Drive Adapter Wrench 2 7 Standard Torque for Dry Zinc Plated and Steel Fasteners Inch Series 2 8 Standard Torque for Dry Zinc Plated and Steel Fasteners Metric Fasteners 2 9 Other Torque Specifications 2 10 Conversion Factors 2 10 Shop Supplies 2 11 Special Tools 2 13 Groundsmaster 3280 D 3320 Page 2 1 Specifications and Maintenance 05138SL Rev B ...

Страница 18: ...his chapter The maintenance procedures and recommended service intervals for Groundsmaster 3280 D and Groundsmaster 3320 are covered in the Operator s Manuals Refer to this publication when performing the regular equipment maintenance Several maintenance procedures have break in intervals identified in the Operator s Manual Refer to the Engine Operator s Manual for additional engine specific maint...

Страница 19: ...375 5 953 47 64 0 734375 18 653 1 4 0 2500 6 350 3 4 0 7500 19 050 17 64 0 265625 6 747 49 64 0 765625 19 447 9 32 0 28125 7 144 25 32 0 78125 19 844 19 64 0 296875 7 541 51 64 0 796875 20 241 5 16 0 3125 7 938 13 16 0 8125 20 638 21 64 0 328125 8 334 53 64 0 828125 21 034 11 32 0 34375 8 731 27 32 0 84375 21 431 23 64 0 359375 9 128 55 64 0 859375 21 828 3 8 0 3750 9 525 7 8 0 8750 22 225 25 64 0...

Страница 20: ...ubic Feet Cubic Meters 0 028 Volume Cubic Inches Cubic Centimeters 16 39 Tons Short Metric Tons 0 908 Pounds Kilograms 0 454 Weight Ounces Avdp Grams 28 349 Pounds Sq In Kilopascal 6 895 Pressure Pounds Sq In Bar 0 069 Foot pounds Newton Meters 1 356 Foot pounds Kilogram Meters 0 138 Work Inch pounds Kilogram Centimeters 1 152 Quarts Liters 0 946 Liquid Volume Gallons Liters 3 785 Liquid Flow Gall...

Страница 21: ...r or similar condition which affects the installation As noted in the following tables the torque values should be reduced by 25 for the lubricated fasteners to achieve the similar stress as a dry fastener The torque values must be reduced when the fastener is threaded into the aluminum or brass The specific torque value should be determined based on the aluminum or brass material strength fastene...

Страница 22: ...ener with a locking feature usually means there will be friction during initial installation and during removal Toro recommends replacing fasteners with a locking feature once they have been removed because the effectiveness of the locking feature diminishes with each reuse If it is necessary to reuse a fastener with a locking feature apply a thread locking compound Loctite for example to the fast...

Страница 23: ... wrench with a drive adapter wrench the calculated torque will be lower than the listed torque recommendation Example The measured effective length of the torque wrench distance from the center of the handle to the center of the square drive is 457 mm 18 inches The measured effective length of the torque wrench with the drive adapter wrench installed distance from the center of the handle to the c...

Страница 24: ...50 5 68 7 70 7 95 9 7 16 20 UNF 29 3 29 3 39 4 55 6 75 8 77 8 104 11 1 2 13 UNC 30 3 48 7 65 9 75 8 102 11 105 11 142 15 1 2 20 UNF 32 4 53 7 72 9 85 9 115 12 120 12 163 16 5 8 11 UNC 65 10 88 12 119 16 150 15 203 20 210 21 285 28 5 8 18 UNF 75 10 95 15 129 20 170 18 230 24 240 24 325 33 3 4 10 UNC 93 12 140 20 190 27 265 27 359 37 375 38 508 52 3 4 16 UNF 115 15 165 25 224 34 300 30 407 41 420 43...

Страница 25: ... M20 X 2 5 325 33 ft lb 440 45 N m 450 46 ft lb 610 62 N m Note Reduce the torque values listed in the table above by 25 for lubricated fasteners Lubricated fasteners are defined as threads coated with a lubricant such as engine oil or a thread sealant such as Loctite Note The torque values must be reduced when installing the fasteners into threaded aluminum or brass The specified torque value sho...

Страница 26: ...b 88 14 N m 1 2 20 UNF Grade 5 80 10 ft lb 108 14 N m M12 X 1 25 Class 8 8 80 10 ft lb 108 14 N m M12 X 1 5 Class 8 8 80 10 ft lb 108 14 N m For steel wheels and non lubricated fasteners Thread Cutting Screws Zinc Plated Steel Threads per Inch Thread Size Type A Type B Baseline Torque No 6 18 20 20 5 in lb No 8 15 18 30 5 in lb No 10 12 16 38 7 in lb No 12 11 14 85 15 in lb The hole size material ...

Страница 27: ...use of a shop supply may appear in figures that support a procedure Always refer to the written procedure for specific information regarding the type and the application of a shop supply IMPORTANT Always follow manufacturers instructions when using or storing shop supplies Groundsmaster 3280 D 3320 Page 2 11 Specifications and Maintenance Shop Supplies 05138SL Rev B ...

Страница 28: ...into housings or onto shafts When cured bearing and sleeve retaining compound fills the gap between mating parts with a hard resin that increases load distribution and protects against corrosion Adhesive Used to secure a variety of components immediately prior to assembly May be recommended for installing new components or when reusing a component that had a pre applied adhesive such as hood seals...

Страница 29: ...ponents for flow and pressure capacities The tester flow measurement maximum is 57 LPM 15 GPM This tester includes the following Inlet Hose This hose connects the system circuit to the inlet side of the hydraulic tester Load Valve Turn the valve to restrict the flow to create a simulated working load in the circuit Pressure Gauge A glycerine filled pressure gauge 0 to 34 500 kPa 0 to 5 000 psi to ...

Страница 30: ...a gauge rated at 20 to 150 LPM 4 to 40 GPM Note This tester does not include any hydraulic hoses or fittings refer to Hydraulic Hose Kit Toro Part No TOR6007 and Hydraulic Test Fitting Kit Tor Part No TOR4079 Hydraulic O Ring Kit Toro Part No 117 2727 This kit includes O rings in a variety of sizes for the face seal and port seal hydraulic connections To help prevent a hydraulic leak replace the O...

Страница 31: ... ORFS 11 16 16 TOR4079 18 8 ORFS 13 16 16 TOR4079 19 CAP 2 each 10 ORFS 1 14 TOR4079 20 6 ORFS 11 16 16 to 8 SAE ORB 3 4 16 TOR4079 8 8 ORFS 13 16 16 to 8 SAE ORB 3 4 16 TOR4079 9 UNION 1 each 10 ORFS 1 14 to 8 SAE ORB 3 4 16 TOR4079 2 10 ORFS 1 14 to 8 SAE ORB 3 4 16 TOR4079 7 REDUCER 1 each 12 ORFS 1 3 16 12 to 8 SAE ORB 3 4 16 TOR4079 6 4 ORFS 9 16 18 TOR4079 10 6 ORFS 11 16 16 TOR4079 11 8 ORF...

Страница 32: ...se Kit page 2 14 Note The replacement filter element is Toro Part No TOR6012 The filter element canister tightening torque is 34 N m 25 ft lb Remote Starter Switch After flushing the hydraulic system or replacing a hydraulic component e g gear pump piston pump drive motor it is necessary to prime the hydraulic pumps A remote starter switch can be used for this purpose A remote starter switch can b...

Страница 33: ...xcess current is not allowed through the meter This excess current can damage the circuits that are not designed to carry it Battery Terminal Protector Toro Part No 107 0392 Use this aerosol spray on the battery terminals ring terminals and fork terminals to reduce corrosion problems Apply the terminal protector to the connection after you secure the battery cable ring terminal or fork terminal Gr...

Страница 34: ...Specifications and Maintenance Special Tools Page 2 18 Groundsmaster 3280 D 3320 05138SL Rev B ...

Страница 35: ...ents 3 6 Adjust Throttle Control 3 6 Adjust Choke Control 3 6 Adjust Engine Speed 3 8 Service and Repairs 3 9 Fuel System 3 9 Air Cleaner 3 12 Radiator 3 13 Engine 3 15 Additional Reference Materials BRIGGS AND STRATTON DAIHATSU REPAIR MANUAL FOR 3 CYLINDER LIQUID COOLED GASOLINE ENGINES Groundsmaster 3280 D 3320 Page 3 1 Gasoline Engine 05138SL Rev B ...

Страница 36: ...Firing Order 1 2 3 Dry Weight approximate kg lb 62 137 Fuel Unleaded regular grade 87 octane minimum Carburetor Single barrel float feed 12 VDC shut off solenoid Fuel Tank Capacity L US gallons 48 5 12 8 Governor Mechanical Idle Speed no load 1 400 to 1 550 rpm High Idle no load 3 100 to 3 250 rpm Engine Oil API Service Classification SE or better refer to the Traction Unit Operator s Manual for v...

Страница 37: ...scription Water Pump Belt driven centrifugal type Cooling System Capacity including reserve tank L US qt 4 3 4 5 Starter 12 VDC 1 2 KW Alternator Regulator 12 VDC 40 A Groundsmaster 3280 D 3320 Page 3 3 Gasoline Engine Specifications 05138SL Rev B ...

Страница 38: ... explained in the engine service manual found at the end of this chapter However the cost of the test equipment and the specialized nature of some repairs may dictate that the work be done at an engine repair facility Service and repair parts for Briggs and Stratton Daihatsu gasoline engines are supplied through your local Toro Distributor If no parts list is available be sure to provide your dist...

Страница 39: ...tween the oil fill device and the oil fill opening in the valve cover Figure 6 This clearance is necessary to allow venting when adding engine oil which will prevent oil from running into the breather tube and intake system Groundsmaster 3280 D 3320 Page 3 5 Gasoline Engine General Information 05138SL Rev B ...

Страница 40: ...ed control lever should be contacting high speed screw when throttle control lever is in FAST position 3 If necessary throttle control can be adjusted by loosening cable clamp screw and repositioning control cable until speed control lever contacts high speed screw when throttle control lever is in FAST position Adjust Choke Control g230314 Figure 8 1 Choke cable 2 Cable clamp screw Proper cold en...

Страница 41: ... should be fully closed when choke lever is in START position 3 If necessary choke control can be adjusted by loosening cable clamp screw and repositioning choke cable until carburetor choke lever is fully closed when choke control lever is in START position Groundsmaster 3280 D 3320 Page 3 7 Gasoline Engine Adjustments 05138SL Rev B ...

Страница 42: ...00 to 3 250 rpm g230315 Figure 9 1 Speed control lever 2 High speed screw 3 Locknut If high idle speed is incorrect adjust high speed screw on governor bracket Figure 9 A Loosen locknut on high speed screw B Adjust high speed screw to obtain 3 100 to 3 250 rpm C Tighten locknut Check high speed 5 Move remote throttle control lever to SLOW position g230316 Figure 10 1 Carburetor 2 Throttle lever 3 ...

Страница 43: ...ommet 15 Hose clamp 26 Thumb screw 4 each 5 Knob 16 Fuel hose fuel supply 27 Retaining ring 6 Bypass cover 17 Carriage screw 2 each 28 Bolt 7 Threaded insert 18 Fuel cap 29 Flat washer 8 Flange nut 2 each 19 Grommet 30 Spacer 9 Radiator support 20 Elbow fitting 31 Locknut 10 Vent tube 21 Grommet plug 32 Flat washer 11 R clamp 22 Stand pipe Groundsmaster 3280 D 3320 Page 3 9 Gasoline Engine Service...

Страница 44: ... fuel tank periodically as recommended in the Traction Unit Operator s Manual Also drain and clean the fuel tank if the fuel system becomes contaminated or if the machine is to be stored for an extended period To clean fuel tank flush tank out with clean solvent Ensure that the tank is free of contaminates and debris Removing the Fuel Tank 1 Park machine on a level surface lower cutting deck or im...

Страница 45: ... 1 Install fuel tank to frame Figure 11 2 Connect fuel hoses to standpipe item 22 in Figure 11 and elbow fitting on the top of the fuel tank Secure hoses with clamps 3 Secure lower control panel to machine with flange head screws and flange nut Figure 12 4 Secure tank to left fender with flat washer item 32 in Figure 11 and locknut 5 Position control panel to fuel tank connect wire harness to pane...

Страница 46: ...Lock washer 2 each 11 Mounting bracket 4 Air inlet hose 8 Spacer Installing the Air Cleaner IMPORTANT Any leaks in the air filter system will allow unfiltered air to enter engine and will cause serious engine damage Ensure that the all air cleaner components are in good condition and are properly secured during assembly 1 Assemble air cleaner system Figure 13 Ensure that the vacuator valve is poin...

Страница 47: ...adiator shim 8 Radiator support 20 Bolt 4 each 32 Foam strip 9 Pop rivet 5 each 21 Flat washer 4 each 33 Locknut 2 each 10 Backup washer 5 each 22 Pop rivet 2 each 34 Latch 2 each 11 Draincock 23 Reservoir bracket 12 Vent hose 24 Hydraulic hose Removing the Radiator 1 Park machine on a level surface lower cutting deck or implement shut off the engine engage parking brake and remove key from the ke...

Страница 48: ...nge nuts that secure radiator to radiator support 12 Carefully pull radiator assembly from the machine Locate and retrieve radiator shim item 31 in Figure 14 Plug radiator and hose openings to prevent contamination Installing the Radiator 1 Remove any plugs placed during the removal procedure 2 Carefully position radiator assembly to the radiator support Place radiator shim item 31 in Figure 14 be...

Страница 49: ...er mount 5 Flat washer 15 Engine shock mount red patch 25 Lock washer 2 each per mount 6 Bolt 16 Air cleaner mounting bracket 26 Bolt 2 each per mount 7 Flange head screw 17 Locknut 3 each 27 Lock washer 1 each 8 Flange nut 18 Flat washer 3 each 28 Engine mount bracket 9 Muffler gasket 19 Engine shock mount 3 each 10 Muffler 20 Engine mount bracket Groundsmaster 3280 D 3320 Page 3 15 Gasoline Engi...

Страница 50: ...tery base 5 Lock washer 2 Bolt 3 each 4 Flange nut 3 each 6 Ground cable 5 Remove bolts and flange nuts that secure battery base to brackets Remove battery base from machine Figure 16 CAUTION Do not open radiator cap or drain coolant if the radiator or engine is hot Pressurized hot coolant can escape and cause burns Ethylene glycol antifreeze is poisonous Dispose of coolant properly or store it in...

Страница 51: ...ts that secure fan shroud to radiator Figure 17 Position fan shroud away from the radiator 9 Remove PTO shaft from machine refer to Removing the PTO Shaft page 9 8 10 Remove air cleaner refer to Removing the Air Cleaner page 3 12 g230311 Figure 18 1 Cable clamp 2 Throttle cable 3 Choke cable 11 Loosen screw that secures cable clamp to governor bracket Figure 18 Remove throttle and choke cables fro...

Страница 52: ...ngine oil dipstick E Ignition coils located on the right side of the engine F Connector fusible link connector and positive battery cable from the starter motor G Wire harness ground wire from the muffler bracket H PTO clutch wire connector I Crank position wire connector 16 Remove engine from machine A Attach short section of chain between lift tabs located on each end of the cylinder head B Conn...

Страница 53: ...ackets items 20 and 28 in Figure 15 were removed from frame secure them to frame with bolts and lock washers Torque screws to 68 to 81 N m 50 to 60 ft lb IMPORTANT The left rear shock mount item 15 in Figure 15 is different than the other 3 mounts If shock mounts were removed from engine mount brackets on frame ensure that the shock mount with red patch is correctly installed at left rear position...

Страница 54: ...on throttle and choke cables to engine governor levers Figure 18 Secure cables to governor bracket with cable clamp and screw Adjust cables refer to Adjust Throttle Control page 3 6 and Adjust Choke Control page 3 6 12 Install air cleaner refer to Installing the Air Cleaner page 3 12 IMPORTANT Ensure that the clutch pulley and PTO pulley are aligned during PTO shaft installation 13 Install PTO sha...

Страница 55: ... page 6 80 19 Check engine oil level refer to the Traction Unit Operator s Manual 20 Connect positive and then negative battery cables to the battery 21 Close hood refer to the Traction Unit Operator s Manual Groundsmaster 3280 D 3320 Page 3 21 Gasoline Engine Service and Repairs 05138SL Rev B ...

Страница 56: ...Gasoline Engine Service and Repairs Page 3 22 Groundsmaster 3280 D 3320 05138SL Rev B ...

Страница 57: ...gine Workshop Manuals 4 5 Adjustments 4 6 Adjusting the Throttle Control 4 6 Service and Repairs 4 7 Air Cleaner System 4 7 Exhaust System 4 9 Radiator 4 11 Fuel System 4 15 Engine 4 19 Additional Reference Materials KUBOTA 05 E2B SERIES WORKSHOP MANUAL KUBOTA 05 E3B SERIES WORKSHOP MANUAL KUBOTA 05 E4B SERIES WORKSHOP MANUAL Groundsmaster 3280 D 3320 Page 4 1 Diesel Engine 05138SL Rev B ...

Страница 58: ...ement 1123 cm3 68 53 in3 Firing order 1 front 2 3 Compression Ratio 22 1 Fuel Diesel or Biodiesel fuel up to B20 Fuel tank capacity 42 8 L 11 3 US gallons Fuel injection pump Bosch MD type mini Fuel injector nozzle Mini nozzle DNOPD Governor Centrifugal mechanical Low idle no load 1 500 to 1 650 rpm High idle no load 3 100 to 3 250 rpm Engine oil API classification CH 4 CI 4 or higher Engine oil v...

Страница 59: ...ntinued Item Description Oil pump Gear driven trochoid type Coolant capacity 7 6 L 8 US qt Alternator Regulator 12 VDC 40 A Engine weight dry 93 kg 205 lb Groundsmaster 3280 D 3320 Page 4 3 Diesel Engine Specifications 05138SL Rev B ...

Страница 60: ...arts for the Kubota engines are supplied through your Authorized Toro Distributor If the parts list is not available provide your distributor with the Toro model and serial number of your machine as well as the Kubota engine model and serial numbers Traction Unit Operator s Manual The Operator s Manual provides information regarding the operation general maintenance and maintenance intervals for y...

Страница 61: ...ngine workshop manual is used when servicing the engine on your machine refer to the engine group code on the emission control information label to identify the E emission level refer to Engine Group Code page 4 5 Engine Group Code Engine Group Code E Emission Level and Workshop Manual ES E2B ET E3B 1 Engine Group Code EF E4B Groundsmaster 3280 D 3320 Page 4 5 Diesel Engine General Information 051...

Страница 62: ...control lever to the FAST position 2 Check the position of speed control lever on the engine fuel injection pump The speed control lever must be contacting the high speed screw when the throttle control lever is in the FAST position 3 If necessary the throttle control can be adjusted by loosening the cable clamp screw and positioning the control cable until the speed control lever contacts the hig...

Страница 63: ...of the air cleaner 1 Park the machine on a level surface lower the cutting deck or implement shut off the engine set the parking brake and remove the key from the key switch 2 Unlatch the hood and raise it 3 Remove the air cleaner components as shown in Figure 22 4 Examine the air cleaner assembly item 6 in Figure 22 for wear or damage that could cause possible air leaks 5 Examine the air hoses fo...

Страница 64: ...he service indicator and adapter were removed install the adapter and service indicator Figure 23 Torque the adapter to 3 3 to 3 5 N m 29 to 31 in lb Torque the service indicator to 1 to 1 2 N m 9 to 11 in lb g221636 Figure 23 1 Service Indicator 4 Air cleaner assembly 2 Adapter 5 Vacuator valve 3 Bracket B Ensure that the vacuator valve item 5 in Figure 23 is pointed down after installation 2 Low...

Страница 65: ...System CAUTION A hot engine and exhaust system can cause burns Allow the engine and the exhaust system to cool before working on or near them 1 Park the machine on a level surface lower the cutting deck or implement shut off the engine set the parking brake and remove the key from the key switch 2 Unlatch the hood and raise it Groundsmaster 3280 D 3320 Page 4 9 Diesel Engine Service and Repairs 05...

Страница 66: ...item 1 in Figure 24 on the engine exhaust manifold IMPORTANT Finger tighten all the fasteners before securing the muffler to the muffler mount so there is no preload on the exhaust system 2 Position the exhaust muffler and upper alternator brace to the engine exhaust manifold and loosely install the 4 flange nuts Figure 24 3 With the muffler flange tight to the engine exhaust manifold no gaps visi...

Страница 67: ... 41 Adhesive clamp 6 Hydraulic tube 2 each 18 Bolt 4 each 30 Pipe plug 42 Carriage screw 6 each 7 O ring 2 each 19 Reservoir hose 2 each 31 Carriage bolt 4 each 43 Retaining ring 6 each 8 Straight hydraulic fitting 2 each 20 Coolant reservoir assembly 32 Retainer nut 2 each 44 Foam seal 9 O ring 2 each 21 Fan shroud 33 Driveshaft loop 45 Radiator screen 10 Oil cooler assembly 22 Upper radiator hos...

Страница 68: ...qt B Remove the pipe plug and allow the coolant to drain from radiator IMPORTANT Follow all local codes and regulations when recycling or disposing engine coolant 4 Remove the radiator screen item 45 in Figure 25 from the machine refer to the Operator s Manual 5 Remove the air cleaner inlet hose from the top of the radiator frame refer to Air Cleaner System page 4 7 6 Disconnect the upper and lowe...

Страница 69: ...adiator C If the hydraulic fittings are to be removed from the oil cooler mark the fitting orientation for assembly purposes D Remove the 2 straight hydraulic fittings item 8 in Figure 25 from the oil cooler as necessary and discard the O rings from the fittings 19 Inspect all foam seals on the radiator fan shroud and radiator frame Replace any foam seals that are damaged Installing the Radiator 1...

Страница 70: ...ure 25 to the radiator and secure the hoses with the hose clamps 9 Connect the reservoir hose item 19 in Figure 25 to the radiator fill opening and secure the reservoir hose with the hose clamp 10 Install and secure the air cleaner inlet hose refer to Air Cleaner System page 4 7 11 Install the radiator pipe plug item 30 in Figure 25 to the radiator Fill the radiator with coolant refer to the Opera...

Страница 71: ...d screw 2 each 12 Vent hose 20 Fuel hose fuel pump to separator 28 Bolt 5 Seat plate 13 Vent tube 21 Fuel pump 29 Elbow fitting 2 each 6 Rubber grommet 14 Carriage screw 2 each 22 Elbow fitting 2 each 30 Stand pipe 7 Retaining ring 2 each 15 Hose clamp 2 each 23 Fuel water separator 31 Grommet 8 Flange nut 2 each 16 Fuel return hose 24 Fuel supply hose Groundsmaster 3280 D 3320 Page 4 15 Diesel En...

Страница 72: ...fuel Ensure that the fuel tank is free of contamination and debris Priming the Fuel System The fuel system needs to be primed before starting the engine for the first time after running out of fuel or after fuel system maintenance e g draining the fuel water separator replacing the fuel filter or a fuel hose To prime the fuel system ensure that the fuel tank has fuel in it Then turn the key switch...

Страница 73: ...r or plug the fuel hoses or fitting openings to prevent contamination from entering the fuel system 14 Remove the fuel tank as shown in Figure 26 Installing the Fuel Tank 1 Install the fuel tank to the frame Figure 26 2 Connect the fuel hoses to the standpipe and elbow fittings items 30 and 29 in Figure 26 on the top of the fuel tank Secure the fuel hoses with the hose clamps 3 Secure the lower co...

Страница 74: ...uel tank with clean fuel refer to the Operator s Manual 11 Prime the fuel system refer to Priming the Fuel System page 4 16 12 Check the fuel hoses and fittings for leaks Note Repair all fuel leaks before returning the machine to service 13 Lower the hood and secure it with the latches Diesel Engine Service and Repairs Page 4 18 Groundsmaster 3280 D 3320 05138SL Rev B ...

Страница 75: ...er 3 each 11 Battery retainer 19 Lower engine shock mount 4 each 4 Locknut 3 each 12 Bolt 3 each 20 Flat washer 3 each 5 Engine 13 Threaded insert 21 Bolt 3 each 6 Lift tabs 14 Battery base 22 Flange head screw 8 each 7 Battery 15 Flange nut 3 each 8 Bolt 16 Engine mount bracket 4 each Groundsmaster 3280 D 3320 Page 4 19 Diesel Engine Service and Repairs 05138SL Rev B ...

Страница 76: ...ure 28 and 3 flange nuts that secure the battery base to the brackets and remove the battery base from the machine DANGER If the radiator or engine is hot pressurized hot coolant can escape and cause burns Do not open the radiator cap or drain the coolant when the radiator or engine is hot WARNING Ethylene glycol antifreeze is poisonous Keep the coolant away from children and pets Keep the coolant...

Страница 77: ...re 29 and remove the coolant reservoir assembly from the radiator fan shroud 8 Remove the 4 fasteners 6 flat washers and 4 locknuts that secure the fan shroud to the radiator Figure 29 Position the fan shroud away from the radiator 9 Remove the PTO shaft from the machine refer to Removing the PTO Shaft page 9 8 10 Remove the exhaust muffler from the engine refer to Exhaust System page 4 9 11 Remov...

Страница 78: ...pump C Position the throttle cable away from the engine 13 Disconnect the hoses from the engine as follows A Loosen the hose clamps and remove the upper and lower radiator hoses items 9 and 11 in Figure 29 from the engine g221631 Figure 31 1 Fuel return hose 2 Fuel supply hose B For assembly purposes label the fuel hoses At injector pump loosen the hose clamps and disconnect the fuel supply and re...

Страница 79: ...ine electrical components A Alternator connector and stud B Oil pressure switch located near the engine oil filter C Connector fusible link connector and positive battery cable from the starter motor D High temperature shut down switch and temperature sender located on the water pump housing E Fuel stop solenoid on the injector pump F Negative battery cable from the injector pump G Glow plug strip...

Страница 80: ...the Engine IMPORTANT Ensure that all parts are removed from the engine during maintenance or overhaul are correctly installed on the engine 1 Locate the machine on a level surface with the cutting deck or implement lowered and the key removed from the key switch Block the wheels with chocks to prevent the machine from moving g221632 Figure 32 1 Right front engine bracket 3 Bolt 6 each 2 Lock washe...

Страница 81: ...ft lb 4 Position the fan shroud around the engine fan CAUTION The engine is very heavy and a hoist not rated for the weight of the engine may fail causing possible injury and damage to the engine Use hoist equipment rated to lift the engine which is approximately 93 kg 205 lb 5 Attach a suitable lift or hoist to the lift tabs on the front and rear of the engine Support the engine with lift or hois...

Страница 82: ...Negative battery cable to the injector pump G Glow plug strip H PTO clutch wire connector 11 Use the notes that you recorded during removal secure the wires with cable ties in proper locations 12 Remove all of the covers and plugs from the hoses and engine openings that you placed while removing the engine Connect the hoses to the engine as follows A Use the labels that you attached during removal...

Страница 83: ...battery base to the brackets and secure with the 3 bolts item 12 in Figure 28 and 3 flange nuts 21 Install the battery to the machine refer to Servicing the Battery page 6 80 22 Connect both the battery cables to the battery Connect the positive battery cable and then the negative battery cable 23 Ensure that all the wires fuel lines hydraulic hoses and cables are clear of moving parts and secured...

Страница 84: ...Diesel Engine Service and Repairs Page 4 28 Groundsmaster 3280 D 3320 05138SL Rev B ...

Страница 85: ...ssure and Flow 5 40 Hydraulic Hose Kit 5 40 Hydraulic Test Fitting Kit 5 41 O Ring Kit 5 42 High Flow Hydraulic Filter Kit 5 42 Remote Starter Switch 5 43 Troubleshooting 5 44 General Hydraulic System Problems 5 44 Traction Circuit Problems 5 45 Lift Lower Circuit Problems 5 46 Steering Circuit Problems 5 46 Testing the Hydraulic System 5 47 Charge Pressure Test Using Pressure Gauge Machine Serial...

Страница 86: ...03 Traction Neutral Arm Assembly Machine Serial Number above 316000000 5 105 Front Axle Drive Motor Machine Serial Number above 316000000 5 107 Servicing the Front Axle Drive Motor Machine Serial Number above 316000000 5 109 Lift Cylinder 5 110 Steering Control Valve 5 113 Servicing the Steering Control Valve 5 116 Steering Cylinder 2 Wheel Drive 5 117 Servicing the Steering Cylinder 2 Wheel Drive...

Страница 87: ...mber above 316000000 4 9 cm3 0 3 in3 5 4 cm3 0 33 in3 Charge pressure For Machine Serial Number below 316000000 For Machine Serial Number above 316000000 482 to 1 034 kPa 70 to 150 psi 503 kPa 73 psi Steering valve Displacement per revolution Danfoss Steering Unit Type OSPM 80 cm3 4 88 in3 Steering circuit relief pressure For Machine Serial Number below 316000000 For Machine Serial Number above 31...

Страница 88: ...reservoir dipstick The hydraulic system on your machine is designed to operate on high quality hydraulic fluid The front axle housing acts as the hydraulic system reservoir and it holds approximately 5 7 L 1 5 US gallons of hydraulic fluid Figure 34 Refer to the Operator s Manual for the procedure on checking the hydraulic fluid level and hydraulic fluid recommendations IMPORTANT Check the hydraul...

Страница 89: ...4 8 km h 3mph and for a very short distance If you must move the machine a considerable distance more than a few feet transport it on a truck or trailer The transmission is equipped with two check valves that need to be pressed for towing or pushing Figure 35 The hydraulic pump is equipped with a bypass valve that needs to be loosened for towing or pushing Figure 36 Refer to the Traction Unit Oper...

Страница 90: ...n both the forward and reverse direction Releasing the Hydraulic Pressure from the Lift Circuit 1 Turn the key switch to the ON position do not start the engine and fully lower the cutting deck to the ground 2 Turn the key switch to the OFF position and allow the engine to stop 3 After lowering the cutting deck ensure that the lift cylinders does not support the cutting deck Releasing the Hydrauli...

Страница 91: ...ed the Toro high flow hydraulic fluid filter in the traction circuit raise and support the machine with all the drive wheels off the ground Then operate the traction circuit to allow the hydraulic fluid to flow through the circuit The filter removes contamination from the traction circuit during the circuit operation Because the Toro high flow filter is bi directional the traction circuit can be o...

Страница 92: ...o the fitting with the other wrench refer to Installing the Hydraulic Hose and Tube O Ring Face Seal Fitting page 5 9 Note If the hose has an elbow at 1 end tighten the swivel nut on the elbow end before you tighten the nut on the straight end of the hose For more hydraulic hose information refer to Hydraulic Hose Servicing of the Toro Basics Series Training Books Part No 94813SL found on the Serv...

Страница 93: ...que value within the specified range of torque values refer to the Hose Tube Installation Torque Table page 5 10 This procedure to tighten the swivel nut requires a drive adapter wrench e g crowfoot wrench Note It may be necessary to use a drive adapter wrench e g crowfoot wrench to install a hydraulic fitting refer to Calculating the Torque Values When Using a Drive Adapter Wrench page 2 7 g22122...

Страница 94: ... threads per inch Installation Torque 4 9 16 18 25 to 29 N m 18 to 22 ft lb 6 11 16 16 37 to 44 N m 27 to 33 ft lb 8 13 16 16 51 to 63 N m 37 to 47 ft lb 10 1 14 82 to 100 N m 60 to 74 ft lb 12 1 3 16 12 116 to 142 N m 85 to 105 ft lb 16 1 7 16 12 150 to 184 N m 110 to 136 ft lb 20 1 11 16 12 190 to 233 N m 140 to 172 ft lb Flats From Wrench Resistance Table Size FFWR 4 1 4 inch nominal hose or tu...

Страница 95: ...Install the fitting into the port then use a torque wrench and socket to tighten the fitting to the recommended torque value within the specified range of torque values refer to the Fitting Installation Torque Table page 5 12 Note It may be necessary to use a drive adapter wrench e g crowfoot wrench to install a hydraulic fitting refer to Calculating the Torque Values When Using a Drive Adapter Wr...

Страница 96: ...58 N m 35 to 43 ft lb 10 7 8 14 135 to 164 N m 99 to 121 ft lb 82 to 100 N m 60 to 74 ft lb 12 1 1 16 12 182 to 222 N m 134 to 164 ft lb 110 to 134 N m 81 to 99 ft lb 14 1 3 16 12 217 to 265 N m 160 to 196 ft lb 131 to 160 N m 96 to 118 ft lb 16 1 5 16 12 274 to 336 N m 202 to 248 ft lb 165 to 202 N m 121 to 149 ft lb 20 1 5 8 12 335 to 410 N m 247 to 303 ft lb 202 to 248 N m 149 to 183 ft lb Flat...

Страница 97: ...e back up washer is not loose and it is pushed up as far as possible Step 1 in Figure 41 IMPORTANT Before installing the fitting into the port determine the material of which the port is made Installing a fitting into an aluminum port requires a reduced installation torque 5 Install the adjustable fitting into the port by hand until the washer contacts the face of the port Step 2 in Figure 41 6 If...

Страница 98: ... a torque wrench is not available or if space at the port prevents the use of a torque wrench use the alternative procedure Flat From Finger Tight Table page 5 14 given below A Hold the fitting in the correct alignment with a wrench and if the port material is steel tighten the locknut with a second wrench to the listed FFFT Step 4 in Figure 41 B If the port material is aluminum tighten the fittin...

Страница 99: ...Hydraulic Schematics g243932 Figure 42 Groundsmaster 3280 D 3320 Page 5 15 Hydraulic System Hydraulic Schematics 05138SL Rev B ...

Страница 100: ...g229581 Figure 43 Hydraulic System Hydraulic Schematics Page 5 16 Groundsmaster 3280 D 3320 05138SL Rev B ...

Страница 101: ...g243934 Figure 44 Groundsmaster 3280 D 3320 Page 5 17 Hydraulic System Hydraulic Schematics 05138SL Rev B ...

Страница 102: ...g224768 Figure 45 Hydraulic System Hydraulic Schematics Page 5 18 Groundsmaster 3280 D 3320 05138SL Rev B ...

Страница 103: ... long as the traction pedal is pushed A gerotor charge pump in the hydrostat provides a constant supply of charge fluid to the closed loop traction circuit for lubrication and to make up for fluid that is lost due to internal leakage in the transmission pump and motor The charge pump takes its suction through a filter from the reservoir front axle Charge pump flow is directed to the low pressure s...

Страница 104: ...Forward Direction continued g229585 Figure 46 Hydraulic System Hydraulic Flow Diagrams Page 5 20 Groundsmaster 3280 D 3320 05138SL Rev B ...

Страница 105: ...Forward Direction continued g246024 Figure 47 Groundsmaster 3280 D 3320 Page 5 21 Hydraulic System Hydraulic Flow Diagrams 05138SL Rev B ...

Страница 106: ...Forward Direction continued g246025 Figure 48 Hydraulic System Hydraulic Flow Diagrams Page 5 22 Groundsmaster 3280 D 3320 05138SL Rev B ...

Страница 107: ...fluid is directed to the fixed displacement motor in the transmission which turns the differential input shaft to drive the front wheels in a reverse direction Fluid flowing from the motor returns to the variable displacement pump and is continuously pumped through the closed traction circuit as long as the traction pedal is pushed The charge circuit functions the same in reverse as it does in the...

Страница 108: ... speed When the traction pedal is pressed a small amount the swash plate angle is slight resulting in low pump output and lower traction speed When the traction pedal is pressed fully the pump swash plate angle is dramatic providing maximum pump output and maximum traction speed The hydraulic pump is equipped with a case drain to allow normal internal leakage to be removed from the pump The case d...

Страница 109: ...Forward Direction continued g224777 Figure 49 Groundsmaster 3280 D 3320 Page 5 25 Hydraulic System Hydraulic Flow Diagrams 05138SL Rev B ...

Страница 110: ...ns the differential input shaft to drive the front wheels in a reverse direction The reverse traction pressure is limited to 32 495 kPa 4 713 psi by the reverse traction relief valve located in the hydraulic pump The fluid flowing from the motor returns to the variable displacement pump and is continuously pumped through the closed loop traction circuit as long as the traction pedal is pushed The ...

Страница 111: ...ring control valve before reaching the lift valve so the steering circuit has priority Lift circuit pressure is limited to 5 515 kPa 800 psi by the implement relief valve located in the hydrostat During conditions of not steering or operating the lift valve flow from the charge pump passes through the lift and counterbalance valves then on to the oil cooler and then to the reservoir front axle Rai...

Страница 112: ... cylinders At the same time the pistons push the hydraulic fluid in the lower portion of the lift cylinders out and to the reservoir front axle The extending lift cylinders cause the cutting deck or implement to raise When the control valve lever is released spring action returns the lift control spool to the center position and fluid flow passes through the lift valve to the reservoir front axle ...

Страница 113: ...Lower Cutting Deck or Implement LIF T CYLINDERS RETRACTING g229582 Figure 52 g246022 Figure 53 Groundsmaster 3280 D 3320 Page 5 29 Hydraulic System Hydraulic Flow Diagrams 05138SL Rev B ...

Страница 114: ...e and on to the reservoir front axle and lift cylinder movement is stopped Counterbalance An adjustable counterbalance valve allows cutting unit weight transfer to the machine to improve traction On early production machines the counterbalance valve is incorporated in the lift control valve Later production or updated machines use a different lift valve and a separate counterbalance manifold Chang...

Страница 115: ...lance Refer to the traction unit Operator s Manual for additional counterbalance adjustment information Raise the Cutting Deck or Implement When the lift switch is set to the Raise position solenoid valve SV1 is energized holding logic cartridge LC closed Hydraulic flow is directed through solenoid valve SV2 to the cap end top of the lift cylinders When the cylinders reach the end of their stroke ...

Страница 116: ...Raise the Cutting Deck or Implement continued g224770 Figure 54 Hydraulic System Hydraulic Flow Diagrams Page 5 32 Groundsmaster 3280 D 3320 05138SL Rev B ...

Страница 117: ...2 is energized to open a path for fluid trapped behind the lift cylinder pistons to escape through the open logic cartridge LC as well The weight of the cutting deck or implement causes the cylinders to retract thus lowering the cutting deck or implement As the cylinders retract the pistons draw hydraulic fluid from the reservoir front axle into the lower rod end of the lift cylinders Groundsmaste...

Страница 118: ...Lower the Cutting Deck or Implement continued g224769 Figure 55 Hydraulic System Hydraulic Flow Diagrams Page 5 34 Groundsmaster 3280 D 3320 05138SL Rev B ...

Страница 119: ...ing cylinder Flow leaves the steering control valve through the E port and is directed to the lift control valve Left Turn When a left turn is made with the engine running the turning of the steering wheel positions the steering control spool valve so that flow goes through the bottom of the spool Flow entering the steering control valve at the P port passes through the rotary meter and is directe...

Страница 120: ...hrough the rotary meter and is directed out port R Pressure extends the steering cylinder for a right turn The rotary meter ensures that the fluid flow to the cylinder is proportional to the amount of the turning on the steering wheel Fluid leaving the cylinder flows back through the spool valve then out the T port and to the hydraulic reservoir front axle Hydraulic System Hydraulic Flow Diagrams ...

Страница 121: ...ol valve at the P port passes through the rotary meter and is directed out the L port Pressure retracts the steering cylinder for a left turn The rotary meter ensures that the fluid flow to the cylinder is proportional to amount of steering wheel rotation The fluid leaving the steering cylinder flows back through the spool valve then out the T port and returns to the hydraulic reservoir front axle...

Страница 122: ...Right Turn continued g224774 Figure 57 Hydraulic System Hydraulic Flow Diagrams Page 5 38 Groundsmaster 3280 D 3320 05138SL Rev B ...

Страница 123: ...ydraulic circuits and components for flow and pressure capacities as recommended in Testing the Hydraulic System page 5 47 This tester includes the following Inlet Hose This hose connects the system circuit to the inlet side of the hydraulic tester Load Valve Turn the valve to restrict the flow to create a simulated working load in the circuit Pressure Gauge A glycerine filled pressure gauge 0 to ...

Страница 124: ...sure Gauge A glycerine filled pressure gauge 0 to 35 000 kPa 0 to 5 000 psi to provide operating circuit pressure Flow Meter This meter measures the actual fluid flow in the operating circuit with a gauge rated at 20 to 150 L minute 4 to 40 gallons minute This tester does not include the hoses refer to Hydraulic Hose Kit page 5 40 Hydraulic Hose Kit Toro Part No TOR6007 This kit includes the fitti...

Страница 125: ...79 17 6 ORFS 11 16 16 TOR4079 18 8 ORFS 13 16 16 TOR4079 19 Cap 2 each 10 ORFS 1 14 TOR4079 20 6 ORFS 11 16 16 to 8 SAE ORB 3 4 16 TOR4079 8 8 ORFS 13 16 16 to 8 SAE ORB 3 4 16 TOR4079 9 Union 1 each 10 ORFS 1 14 to 8 SAE ORB 3 4 16 TOR4079 2 10 ORFS 1 14 to 8 SAE ORB 3 4 16 TOR4079 7 Reducer 1 each 12 ORFS 1 3 16 12 to 8 SAE ORB 3 4 16 TOR4079 6 4 ORFS 9 16 18 TOR4079 10 6 ORFS 11 16 16 TOR4079 1...

Страница 126: ... failure occurs in the closed loop traction circuit contamination from the damaged part will remain in the circuit until you remove it Install a high flow hydraulic fluid filter into the circuit when you connect the hydraulic test gauges in order to test the traction circuit components or after you replace a failed traction circuit component e g hydraulic pump or hydraulic motor This filter remove...

Страница 127: ...ting the wire to switch terminals 1 and 2 will allow the momentary switch contacts to be used for the remote starter switch Note For information on using the remote starter switch to prime the hydraulic pumps Remote Starter Switch purchased Remote Starter Switch fabricated g225779 Figure 58 1 Starter solenoid 2 Starter motor 3 B terminal A remote stater switch can also be constructed using the Tor...

Страница 128: ...iceable after initial filling of hydraulic reservoir front axle The hydraulic fluid level in the reservoir front axle is low The hydraulic system has a wrong type of fluid One of the pump suction lines has an air leak Incompatible hydraulic fluids are mixed in the system There is water in the hydraulic system The hydraulic system operates hot The traction system pressure is high due to load or dra...

Страница 129: ...so damaged Neutral is difficult to find or unit operates in 1 direction only The traction control linkage is incorrectly adjusted disconnected binding or damaged The hydrostat hydraulic pump check valve is not seating or is damaged The hydrostat hydraulic pump is worn or damaged No traction exists in either direction and the engine speed remains constant The brakes are not released The hydraulic f...

Страница 130: ...s internally The lift circuit hydraulic lines or fittings are leaking The lift control valve leaks except 3280 D Models 30344 and 30345 Air exists in the lift circuit The solenoid valve SV2 in the lift control valve is damaged or leaks Steering Circuit Problems Problem Possible Causes The steering is inoperative or sluggish Engine RPM is too low The hydraulic fluid level in the reservoir front axl...

Страница 131: ...h pressure Do not use your hands to search for leaks use a piece of paper or cardboard Hydraulic fluid escaping under pressure can have sufficient force to penetrate the skin and cause serious injury If hydraulic fluid is injected into your skin the fluid damage to your body must be surgically removed within a few hours by a doctor familiar with this form of injury or gangrene may result CAUTION F...

Страница 132: ...re that the inlet and outlet hoses are properly connected and not reversed to prevent damaging the hydraulic tester or components 7 Install the hydraulic fittings by hand and ensure that they are not cross threaded before you tighten them with a wrench 8 Position the tester hoses to prevent the rotating machine parts from contacting and damaging the hoses or tester 9 After you connect the test equ...

Страница 133: ...ure 2 Park machine on a level surface with the cutting deck or implement lowered and PTO switch off Ensure that the engine is shut off Set the parking brake and block the front wheels to prevent machine movement 3 Read all Warning Cautions and precautions listed at the beginning of this section CAUTION Before opening hydraulic system operate all hydraulic controls to relieve system pressure and av...

Страница 134: ...nected sit in the operator seat start engine and press the traction pedal to forward B While machine is moving straight ahead on level ground no turning or deck lifting monitor the pressure reading on the pressure gauge Record test results 11 The pressure should drop no more than 15 from initial test reading step 8 A pressure drop of more than 15 may indicate a traction circuit leak e g check valv...

Страница 135: ...ssure Gauge Machine Serial Numbers below 316000000 page 5 49 Ensure to use a 34 500 kPa 5 000 psi Pressure Gauge 2 With the engine running at 3 200 rpm move the lift control lever to the RAISE position and allow the cutting unit or implement to fully raise Continue to hold the lever in the RAISE position and observe the pressure gauge The pressure reading should be from 4 820 to 6 900 kPa 700 to 1...

Страница 136: ...0 010 inch of shim thickness there is an approximate 340 kPa 50 psi change in implement relief pressure If adding shims to the relief valve does not increase pressure inspect the condition of the charge pump gerotor and internal housing refer to Charge Pump Service in the Sauer Danfoss Sundstrand 15 Series Service Manual at the end of this chapter If the charge pump is in good condition no scoring...

Страница 137: ... Note Cutting deck raise lower circuit operation will be affected by lift cylinder binding extra weight on the cutting deck or implement and or binding of lift components Ensure that these items are checked before proceeding with lift cylinder internal leakage test 1 Park machine on a level surface with the PTO switch OFF Set the parking brake and block the front wheels to prevent machine movement...

Страница 138: ... the empty drain pan remains under the open fitting of the lift cylinder 7 Start the engine and briefly hold the lift control lever in the RAISE position to pressurize the lift cylinders Shut off the engine 8 Check to see if any fluid has leaked into the drain pan from the open fitting of the lift cylinder If there is any fluid in the drain pan the lift cylinder has internal leakage and must be re...

Страница 139: ...sure that the hydraulic fluid is at normal operating temperature 2 Park machine on a level surface with the cutting deck or implement lowered and PTO switch off Ensure that the engine is shut off Set the parking brake 3 Read all Warning Cautions and precautions listed at the beginning of this section CAUTION Before opening hydraulic system operate all hydraulic controls to relieve system pressure ...

Страница 140: ...ng wheel to the right the steering cylinder has internal leakage and must be repaired or replaced 7 Remove plug from the hydraulic hose Reconnect hose to the steering cylinder fitting 8 If a steering problem exists and the steering cylinder tested acceptably steering control valve requires service refer to Steering Control Valve page 5 113 and Servicing the Steering Control Valve page 5 116 Hydrau...

Страница 141: ...d all Warning Cautions and precautions listed at the beginning of this section CAUTION Before opening hydraulic system operate all hydraulic controls to relieve system pressure and avoid injury from pressurized hydraulic fluid g230808 Figure 66 1 Hydrostatic transmission 3 O ring 2 Hydraulic hose 4 Outlet fitting 4 Place a drain pan under the transmission Clean the area around the transmission cha...

Страница 142: ...Record results of hydraulic flow test 12 If pressure of 3 450 kPa 500 psi or flow of 3 8 L minute 1 gallon minute could not be achieved check the following A Perform the charge pressure test refer to Charge Pressure Test Using Pressure Gauge Machine Serial Numbers below 316000000 page 5 49 Also a dynamic charge pressure test can be performed to identify if a worn or damaged hydrostatic transmissio...

Страница 143: ... Warm oil after test equipment is connected to prevent technician from working on a hot machine applicable to tests when possible any test that requires an open un pluged capped line case drain tests would not apply and oil should be warmed before disconnecting the lines CAUTION Before opening the hydraulic system operate all the hydraulic controls to release system pressure and avoid injury from ...

Страница 144: ...ing 8 Block the wheels with chocks to prevent the wheel rotation during testing 9 Start the engine and move the throttle to full speed 3 100 to 3 250 rpm position Use a tachometer to check that the engine speed is correct 10 Record the reading on the charge circuit pressure gauge The charge pressure without load should read 345 to 483 kPa 50 to 70 psi If the charge relief pressure specification is...

Страница 145: ...peed position and shut off the engine 14 After you complete the charge pressure testing ensure that the engine is not running and then release hydraulic system pressure refer to Releasing Pressure from the Hydraulic System page 5 6 Remove the tee fitting and pressure gauge install the hydraulic tube to the fitting 15 Install the seat plate lower and secure the operator seat 16 Start the engine che...

Страница 146: ...e is less efficient Eventually enough fluid bypass will cause the unit to stall under heavy load conditions Continued operation can generate excessive heat cause damage to seals and other components in the hydraulic system and affect overall machine performance Special Equipment Required Pressure gauge Flow meter with pressure gauge that has at least a 114 L minute 30 gallons minute capacity Test ...

Страница 147: ...he traction pedal is correctly adjusted for the NEUTRAL position Also ensure that the hydraulic pump is at full stroke when traction pedal is pressed fully in forward position 6 Lift and support the machine so that all the wheels are off the ground refer to Jacking Instructions page 1 6 7 Clean the junction of the hydraulic hose and right side fitting on the top of the hydraulic pump Figure 70 and...

Страница 148: ... 963 to 13 100 kPa 1 300 to 1 900 psi by slowly closing the flow meter The flow meter pressure gauge should read 16 545 to 20 000 kPa 2 400 to 2 900 psi C Record the tester pressure and flow readings under load 14 Verify the traction relief valve operation as follows A Return the traction pedal to the NEUTRAL position B Fully close the flow meter flow control valve C Slowly set the traction pedal ...

Страница 149: ...e engine check for hydraulic fluid leaks repair any leaks as required and fill the hydraulic reservoir front axle with the correct quantity of new hydraulic fluid before returning the machine to service Groundsmaster 3280 D 3320 Page 5 65 Hydraulic System Testing the Hydraulic System 05138SL Rev B ...

Страница 150: ...ing forks Ensure that these conditions are checked and functioning properly before proceeding with any steering system hydraulic testing Note The relief valve for the steering circuit is integrated into the steering control valve Test Procedure 1 Ensure that the hydraulic fluid is at normal operating temperature by operating the machine for at least 10 minutes 2 Drive the machine slowly in a figur...

Страница 151: ...ressure gauge at the end of the disconnected hose F With the engine shut off continue turning the steering wheel to the right clockwise with the steering cylinder fully extended Monitor the open fitting on the steering cylinder as the wheel is turned If the hydraulic fluid comes out of the fitting while turning the steering wheel to the left the steering cylinder has internal leakage and should be...

Страница 152: ...efer to Releasing Pressure from the Hydraulic System page 5 6 Disconnect the pressure gauge and connect removed hydraulic hose to the steering cylinder 8 Start the engine check for hydraulic fluid leaks repair any leaks as required and fill the hydraulic reservoir front axle with the correct quantity of new hydraulic fluid before returning the machine to service Hydraulic System Testing the Hydrau...

Страница 153: ...n the hydraulic system Special Equipment Required Flow meter with pressure gauge that has at least a 16 L minute 5 gallons minute capacity Test Procedure 1 Park the machine on a level surface with the PTO switch off lower the cutting deck shut off the engine and set the parking brake 2 Read all Warning Cautions and precautions listed at the beginning of this section CAUTION Before opening the hydr...

Страница 154: ...gine running move the throttle to full speed 3 100 to 3 250 rpm position Use a tachometer to check that the engine speed is correct 10 Verify the pump flow at No Load as follows A Record the tester pressure and flow readings at no load Unrestricted pump output should be approximately 14 L minute 3 7 gallons minute 11 Verify the pump flow Under Load as follows CAUTION Do not close the tester valve ...

Страница 155: ... Releasing Pressure from the Hydraulic System page 5 6 15 Disconnect the tester and connect the removed hydraulic tube 16 Install the seat plate lower and secure the operator seat 17 Start the engine check for hydraulic fluid leaks repair any leaks as required and fill the hydraulic reservoir front axle with the correct quantity of new hydraulic fluid before returning the machine to service Ground...

Страница 156: ... the lift cylinder being tested is damaged The lift cylinders must be tested individually Note The raise lower circuit operation can be affected by the lift cylinder binding extra weight on the cutting deck and or binding of the lift components Ensure that these items are checked before continuing with the lift cylinder internal leakage test Hydraulic System Testing the Hydraulic System Page 5 72 ...

Страница 157: ...el cap and plug to ensure that there is no fluid leakage The plastic plugs cannot hold the hydraulic pressure that is developed during this test procedure 5 Install a steel cap on the open lift cylinder fitting to seal the lift cylinder Also install a steel plug in the open end of the disconnected hose to prevent leakage or contamination 6 Raise the lift arm slightly with a jack and remove the jac...

Страница 158: ... engine and operate the lift cylinders through several up and down cycles Shut off the engine and check for any leakage 14 If necessary repeat the steps 2 through 13 for other lift cylinders 15 Check and fill the hydraulic reservoir front axle with the correct quantity of new hydraulic fluid before returning the machine to service Hydraulic System Testing the Hydraulic System Page 5 74 Groundsmast...

Страница 159: ... when operating over bumpy terrain Occasionally inspect the friction wheel surface that contacts the traction pedal Figure 75 If the friction wheel is worn flat at this point the wheel should be rotated to restore contact with the pedal Adjusting the Traction Pedal Friction Wheel g230810 Figure 76 1 Traction pedal 3 Traction pedal shaft 2 Flange nut 4 Friction wheel 1 Loosen the flange nuts that s...

Страница 160: ... 2 Rotate the shaft to move the worn friction wheel section away from the traction pedal 3 Tighten the flange nuts to secure traction pedal shaft and friction wheel in position Hydraulic System Adjustments Page 5 76 Groundsmaster 3280 D 3320 05138SL Rev B ...

Страница 161: ...injury from the pressurized hydraulic fluid refer to Releasing Pressure from the Hydraulic System page 5 6 5 The hydraulic fluid may be hot Be careful when you loosen and remove the hydraulic system components 6 Install clean caps or plugs on the hydraulic lines hydraulic fittings and components that are left open or exposed to prevent hydraulic system contamination Cap the opening as soon as the ...

Страница 162: ...9 Check for hydraulic fluid leaks Shut off the engine and repair leaks if necessary 10 Check the hydraulic fluid level in the hydraulic reservoir front axle and add correct quantity of fluid if necessary Checking the Hydraulic Lines and Hoses WARNING Hydraulic fluid escaping under pressure can penetrate skin and cause injury Ensure that all hydraulic fluid hoses and lines are in good condition and...

Страница 163: ...e and add correct quantity of fluid if necessary refer to the Operator s Manual g225779 Figure 77 1 Starter solenoid 2 Starter motor 3 B terminal Note A blue wire connects to the starter motor solenoid B terminal Figure 77 It is not necessary to remove this blue wire from the solenoid terminal for hydraulic pump priming 3 Connect the remote starter switch electrical leads to the starter motor sole...

Страница 164: ...he key from the key switch Note Ensure that you clean all the hydraulic connections that are disconnected for draining 3 Drain the hydraulic fluid from the hydraulic reservoir front axle refer to the Operator s Manual 4 Clean the area around the mounting area of the hydraulic fluid filter Remove and replace the hydraulic fluid filter 5 Drain the complete hydraulic system Drain all the hoses tubes ...

Страница 165: ...e for a minimum of 1 minute under no load 12 Raise and lower the cutting deck several times Turn the steering wheel fully left and right several times 13 Shut off the engine and check for hydraulic fluid leaks Note Check the hydraulic fluid level in the hydraulic reservoir front axle and add correct quantity of fluid if necessary refer to the Operator s Manual 14 Operate the machine for 2 hours un...

Страница 166: ... a level surface shut of the engine and remove the key from the key switch IMPORTANT Before lifting the machine with a jack review and follow Jacking Instructions page 1 6 2 Lift and support the machine so that all the wheels are off the ground Note If the hydraulic motor was replaced install a high flow filter to the inlet of the new motor instead of to the hydraulic pump fitting This will preven...

Страница 167: ...idle speed slowly move the traction pedal to the forward direction to allow flow through the traction circuit and high flow filter Keep the traction circuit engaged in forward for 5 minutes while gradually increasing both forward pressure on the traction pedal and engine speed Monitor the filter indicator to ensure that the green color is showing during operation 8 With the engine running at high ...

Страница 168: ... pump fitting Ensure that you properly tighten the hoses refer to Installing the Hydraulic Hose and Tube O Ring Face Seal Fitting page 5 9 12 Lower the machine to the ground 13 Check the hydraulic fluid level in the hydraulic reservoir front axle and add correct quantity of fluid if necessary refer to the Operator s Manual Hydraulic System Service and Repairs Page 5 84 Groundsmaster 3280 D 3320 05...

Страница 169: ...vent engine from starting A Disconnect the electrical connector to the fuel stop solenoid on Groundsmaster 3280 D machines B Disconnect and ground all engine spark plug wires on Groundsmaster 3320 machines 7 Prime the hydraulic pump refer to Priming the Hydraulic Pump page 5 79 8 Connect the fuel stop solenoid Groundsmaster 3280 D or spark plug wires Groundsmaster 3320 to allow the engine to start...

Страница 170: ...from the forward or reverse direction and adjust if necessary 16 Check the operation of the traction interlock switches refer to Checking the Operation of the Interlock Switches page 6 15 17 If the hydrostat hydraulic pump was replaced or rebuilt operate the traction circuit so that all the wheels rotate slowly for 10 minutes 18 Operate the machine by gradually increasing its work load to full ove...

Страница 171: ...ff the engine Remove key from the key switch 2 Remove conelock nuts flat washers and bolts that secure rubber coupling to pump hub item 9 in Figure 79 Remove coupling spacers 3 Remove bolts item 12 in Figure 79 lock washers and flat washers that secure rubber coupling to engine hub Remove coupling spacers 4 Remove driveshaft assembly from machine 5 Remove conelock nuts item 2 in Figure 79 coupling...

Страница 172: ...0 Bolt 3 Flat washer 7 Transmission anchor 11 Locknut 4 Bolt 8 Jam nut 5 If alignment adjustment is necessary loosen locknut and jam nut that secure transmission anchor Figure 80 Note If necessary loosen the lift arm carrier bracket before installing shims between frame and axle mounting pad 6 Loosen fasteners that secure front axle to frame Install shims between frame and axle mounting pads to ad...

Страница 173: ...cers item 8 in Figure 79 into rubber couplings Position driveshaft assembly to engine and pump hubs 3 Secure rubber coupling to engine hub with bolts item 12 in Figure 79 lock washers and flat washers Tighten bolts so that the spacers are tight against flat washers 4 After attaching driveshaft to pump hub ensure that neither rubber coupling is deformed more than 6 4 mm 0 250 inch in either directi...

Страница 174: ...1 Hose clamp 8 Snap ring 25 Hose clamp 42 Elbow fitting 9 Transmission gasket 26 Hydraulic fitting 43 Hose clamp 10 Front axle assembly 27 Hydraulic fitting 44 Hydraulic hose 11 Locknut 28 O ring 45 Filter adapter seal 12 Transmission anchor 29 Hydraulic hose 46 Hydraulic hose 13 Jam nut 30 Filter union 47 Straight hydraulic fitting 14 Bolt 31 Hydraulic fitting 48 Hydraulic hose 15 Transmission 32...

Страница 175: ...nect wires from switch and position away from transmission 8 Remove locknut item 11 in Figure 81 that secures transmission to transmission anchor CAUTION Support transmission when removing it from the front axle to prevent it from falling and causing personal injury 9 Loosen and remove 4 bolts items 1 and 2 in Figure 81 that secure transmission to front axle Locate and retrieve washers and spacers...

Страница 176: ...bolts in a crossing pattern After tightening ensure that mounting spacers do not rotate 6 Secure transmission to anchor item 12 in Figure 81 with locknut Retain upper left bolt while tightening locknut 7 Connect machine harness wires to neutral switch 8 Slide traction rod item 50 in Figure 81 to pump lever and secure with flat washer and cotter pin 9 Check transmission driveshaft alignment and adj...

Страница 177: ... 46 Dowel pin 9 Lip seal 28 Plug 47 Motor shaft 10 Ball bearing 29 Bolt 2 each 48 Dowel pin 2 each 11 Woodruff key 30 Bolt 2 each 49 Housing gasket 12 Pump shaft 31 Backup ring 50 Charge pump housing 13 Swash plate 32 O ring 51 Retaining ring 14 Spring pin 33 O ring 52 Cylinder block motor 15 Thrust plate 34 Pin 53 Slipper retainer motor 16 Cylinder block pump 35 Bearing 54 Piston motor 9 each per...

Страница 178: ...s below 316000000 continued Note For transmission repair information refer to the Danfoss 15 Series Axial Piston Pumps Motors and Transmission Repair Manual and Service Manual Hydraulic System Service and Repairs Page 5 94 Groundsmaster 3280 D 3320 05138SL Rev B ...

Страница 179: ... proximity switch 5 Neutral return arm 11 Socket head screw 17 Trunnion cam 6 Bushing 12 Pin 18 Seal g230838 Figure 84 1 Eccentric pin 2 Alignment mark Disassembling the Hydrostatic Transmission Neutral Arm Assembly 1 Disassemble neutral arm components on hydrostatic transmission as necessary Figure 83 Note To remove trunnion cam item 17 in Figure 83 from hydrostatic transmission transmission has ...

Страница 180: ...smission Note fastener torque specifications 2 Lubricate grease fitting on eccentric pin refer to the Traction Unit Operator s Manual 3 Check and adjust neutral position refer to the Traction Unit Operator s Manual 4 Check for correct operation of neutral switch and adjust if necessary refer to Adjusting the Traction Neutral Switch page 6 45 Hydraulic System Service and Repairs Page 5 96 Groundsma...

Страница 181: ...ake lower the cutting deck shut off the engine and remove the key from the key switch 2 Remove the 2 locknuts and 2 flat washers that secure the driveshaft loop to the radiator frame and remove the driveshaft loop 3 Remove the 2 bolts item 11 in Figure 85 and 2 locknuts that secure the driveshaft end yoke to the hydraulic pump input shaft 4 Remove the 3 bolts item 10 in Figure 85 and 3 flat washer...

Страница 182: ...snap ring into the yoke groove to secure the installed bearing F Place second bearing into the yoke bore and onto the cross shaft Press the bearing into the yoke and secure with the snap ring G Repeat the procedure for the other yoke H Apply grease to the cross until it comes out of all the 4 bearing cups 4 Ensure that the assembled joint moves without any binding Lightly rap the yoke lugs with a ...

Страница 183: ...t shaft Secure the driveshaft end yoke to the pump input shaft with the 2 bolts item 11 in Figure 85 and 2 locknuts 5 Position the driveshaft loop to the radiator frame and secure with the 2 flat washers and 2 locknuts 6 Lubricate the grease fittings on the driveshaft Groundsmaster 3280 D 3320 Page 5 99 Hydraulic System Service and Repairs 05138SL Rev B ...

Страница 184: ...12 O ring 2 each 21 Hydraulic pump 4 Pump Bracket 13 Hydraulic tube 22 Flange nut 2 each 5 Flange head screw 4 each 14 Suction hose 23 Flat washer 2 each 6 Hardened washer 15 O ring 3 each 24 90 hydraulic fitting 2 each 7 90 hydraulic fitting 16 90 hydraulic fitting 25 O ring 2 each 8 O ring 17 Hose clamp 9 O ring 18 Front axle Hydraulic System Service and Repairs Page 5 100 Groundsmaster 3280 D 3...

Страница 185: ...mp driveshaft refer to Hydraulic Pump Driveshaft Machine Serial Number above 316000000 page 5 97 10 Remove the cotter pin and flat washer that retain the traction rod end to the pump lever and remove the traction rod from the lever Disconnect the wire harness electrical connector from the traction neutral sensor refer to Traction Neutral Arm Assembly Machine Serial Number above 316000000 page 5 10...

Страница 186: ...s electrical connector to the traction neutral sensor refer to Traction Neutral Arm Assembly Machine Serial Number above 316000000 page 5 105 6 Install the hydraulic pump driveshaft refer to Hydraulic Pump Driveshaft Machine Serial Number above 316000000 page 5 97 7 Install the fuel tank refer to Installing the Fuel Tank page 4 17 8 Install the operator seat refer to Installing the Operator Seat p...

Страница 187: ...Servicing the Hydraulic Pump Machine Serial Number above 316000000 g224915 Figure 88 Groundsmaster 3280 D 3320 Page 5 103 Hydraulic System Service and Repairs 05138SL Rev B ...

Страница 188: ... 8 Driveshaft 21 O ring 2 each 34 Plug 5 each 9 Ball bearing 22 Spring 2 each 35 Journal bearing 10 Retaining ring 23 SCR valve 2 each 36 Gerotor assembly 11 Retaining ring 2 each 24 Plug 37 O ring 12 Shaft seal lip 25 O ring 38 O ring 13 Pin 4 each 26 Spring Note For the hydraulic pump repair information refer to the Danfoss DDC20 Service Manual IMPORTANT If a hydraulic pump failure occurs refer ...

Страница 189: ...2 each 23 Ball bearing 6 Cable tie 15 Carriage bolt 24 Extension spring 7 Thread eyebolt right 16 Bolt 2 each 25 Cotter pin 8 Jam nut 17 Pivot 26 Rubber bushing 9 Flange nut 3 each 18 Neutral arm Disassembling the Traction Neutral Arm Assembly 1 Disassemble the neutral arm components on the hydraulic pump as necessary Figure 89 Note To remove the neutral cam item 3 in Figure 89 from the hydraulic ...

Страница 190: ... Check and adjust the neutral position refer to the Operator s Manual 3 Check for correct operation of the neutral sensor and adjust if necessary refer to the Traction Neutral Sensor Machine Serial Number above 316000000 page 6 16 Hydraulic System Service and Repairs Page 5 106 Groundsmaster 3280 D 3320 05138SL Rev B ...

Страница 191: ...lange head screw 6 each 11 Hardened washer 2 Hydraulic tube 7 Hydraulic motor 12 Pump bracket 3 O ring 2 each 8 O ring 13 Front axle 4 90 hydraulic fitting 2 each 9 Snap ring 2 each 5 O ring 2 each 10 Pinion gear Groundsmaster 3280 D 3320 Page 5 107 Hydraulic System Service and Repairs 05138SL Rev B ...

Страница 192: ...raulic fittings are to be removed from the hydraulic motor mark the fitting orientation for assembly purposes Remove the fittings from the hydraulic motor and discard the O rings from the fittings Installing the Front Axle Drive Motor 1 If the hydraulic fittings were removed from the hydraulic motor lubricate and install new O rings to the fittings To properly align and install the fittings into t...

Страница 193: ...Plug assembly 5 Bearing race 2 each 10 Rotating kit assembly 15 Bolt 6 each Note For the hydraulic motor repair procedures refer to the Eaton Motors 74111 and 74118 Fixed Axial Piston Motor Repair Manual IMPORTANT If a hydraulic motor fails refer to the Traction Circuit Component Failure page 5 7 for information regarding the importance of removing contamination from the traction circuit Groundsma...

Страница 194: ... hydraulic fitting 8 Locknut 2 each 14 Lift cylinder 2 each 3 O ring 7 each 9 Hydraulic hose 15 Bolt 2 each 4 Hydraulic hose 10 O ring 2 each 16 Lift arm left 5 Lift control valve 11 Adapter 2 each 6 Hydraulic hose 12 Cylinder pin 2 each Hydraulic System Service and Repairs Page 5 110 Groundsmaster 3280 D 3320 05138SL Rev B ...

Страница 195: ...autions for Removing and Installing the Hydraulic System Components page 5 77 3 For assembly purposes label all the hydraulic connections Clean the hydraulic connections before loosening the hydraulic lines from the lift cylinder CAUTION Before opening the hydraulic system operate all the hydraulic controls to release system pressure and avoid injury from the pressurized hydraulic fluid refer to R...

Страница 196: ...der to the frame with the barrel end up 3 Slide the bolt item 15 in Figure 92 through the lift cylinder and frame mounting holes 4 Align the lift cylinder to the lift arm mounting holes Slide the cylinder pin item 12 in Figure 92 with a cotter pin installed on the one end through the lift cylinder and lift arm 5 Secure the cylinder pin with the cotter pin item 13 in Figure 92 6 Remove the caps and...

Страница 197: ...eel 14 Grip 24 Pivot plate 5 Foam collar 15 Steering control valve 25 Friction disc 6 Tower panel 16 Spacer 26 Tilt bracket 7 Retainer nut 6 each 17 Flange nut 3 each 27 Flat washer 8 Flange head screw 18 Bolt 2 each 28 Jam nut 9 Philips head screw 6 each 19 Spacer 29 Steering column 10 Parking brake rod 20 Flange head screw 2 each Groundsmaster 3280 D 3320 Page 5 113 Hydraulic System Service and ...

Страница 198: ...aulic system operate all the hydraulic controls to release system pressure and avoid injury from the pressurized hydraulic fluid refer to Releasing Pressure from the Hydraulic System page 5 6 7 Disconnect the hydraulic lines from the steering control valve Allow the lines to drain into a suitable container 8 Install clean caps or plugs on the hydraulic lines and fittings to prevent contamination 9...

Страница 199: ...s that you attached during valve removal to connect the hydraulic lines to the fittings on the steering control valve Tighten the connections refer to Installing the Hydraulic Hose and Tube O Ring Face Seal Fitting page 5 9 5 Position the tower panel to the machine and secure the panel with the 6 phillips head screws 6 Install the knob on the end of the parking brake rod 7 Check the hydraulic flui...

Страница 200: ... Bearing assembly 14 Adjusting spring with O ring 23 Gearwheel set 6 Spool 15 Plug 24 Distributor plate 7 Ring 16 O ring 3 each 25 Cardan shaft 8 Cross pin 17 Special screw 2 each 9 Sleeve 18 O ring 2 each Note For the steering control valve repair procedures refer to the Danfoss Steering Unit Type OSPM Service Manual at the end of this chapter Hydraulic System Service and Repairs Page 5 116 Groun...

Страница 201: ...h 9 Flange nut 2 each 2 Spacer ring 6 O ring 2 each 10 Thrust washer 3 Steering cylinder 7 Straight hydraulic fitting 11 Steering pivot plate 4 45 hydraulic fitting 8 Bolt 12 Rear axle Groundsmaster 3280 D 3320 Page 5 117 Hydraulic System Service and Repairs 05138SL Rev B ...

Страница 202: ... hoses from the steering cylinder 5 Disconnect the hydraulic hoses from the steering cylinder 6 Install caps or plugs on the disconnected hoses and fittings to prevent contamination 7 Remove the bolts items 1 and 8 in Figure 97 and 2 locknuts that secure the steering cylinder to the machine g225168 Figure 98 1 Bolt 5 Bolt 2 Flange nut 2 each 6 Steering cylinder 3 Cylinder spacer 7 Steering pivot p...

Страница 203: ...to 176 to 203 N m 130 to 150 ft lb 4 Remove the caps and plugs from the hydraulic hoses and fittings 5 Lubricate and install new O rings on the steering cylinder fittings Correctly connect the hydraulic hoses to the steering cylinder refer to Installing the Hydraulic Hose and Tube O Ring Face Seal Fitting page 5 9 6 Check the hydraulic fluid level in the hydraulic reservoir front axle and add corr...

Страница 204: ...PORTANT When you clamp the steering cylinder in a vise clamp the pivot end only to prevent damage Do not close the vise on the barrel 2 Mount the steering cylinder securely in a vise by clamping on the pivot end so that the shaft end tilts up slightly Use a vise equipped with soft jaws 3 Use a spanner wrench to loosen and remove the internal collar item 5 in Figure 99 from the barrel 4 Hold the en...

Страница 205: ...rnal components are worn or damaged Assembling the Steering Cylinder 2 Wheel Drive 1 Use a new seal kit and replace all the seals and O rings to the piston and head Apply clean hydraulic fluid to all the seal kit components before you install them IMPORTANT Clamping the vise jaws against the shaft surface could damage the shaft When securing the shaft in a vise protect the shaft surface 2 Mount th...

Страница 206: ...s during installation 7 Coat all the internal cylinder components with clean hydraulic fluid Slide the shaft assembly into the barrel 8 Use a spanner wrench secure the internal collar in the barrel Hydraulic System Service and Repairs Page 5 122 Groundsmaster 3280 D 3320 05138SL Rev B ...

Страница 207: ...se 19 Washer 4 each 6 Ball joint 2 each 13 O ring 2 each 20 Jam nut 4 each 7 Steering cylinder 14 O ring 2 each 21 Rear axle 4 wheel drive Removing the Steering Cylinder 4 Wheel Drive 1 Park the machine on a level surface lower the cutting deck or implement shut off the engine set the parking brake and remove the key from the key switch 2 Read the General Precautions for Removing and Installing th...

Страница 208: ...ings and install the fittings to the steering cylinder refer to Installing the Hydraulic Fittings SAE Straight Thread O Ring Fitting into the Component Port page 5 11 2 If removed install the ball joints item 6 in Figure 100 into the steering cylinder and secure the ball joints with the retaining rings 3 Position the steering cylinder to the rear axle Secure the steering cylinder to the axle with ...

Страница 209: ...end only to prevent damage Do not close the vise on the barrel 2 Mount the steering cylinder securely in a vise by clamping on the pivot end so that the shaft end tilts up slightly Use a vise equipped with soft jaws 3 Use a spanner wrench to loosen and remove the internal collar item 6 in Figure 101 from the barrel 4 Hold the end of the shaft and use a twisting and pulling motion to carefully extr...

Страница 210: ...an hydraulic fluid to all the seal kit components before you install them IMPORTANT Clamping the vise jaws against the shaft surface could damage the shaft When securing the shaft in a vise protect the shaft surface 2 Mount the shaft securely in a vise Note Do not damage the rod seal and dust seal during installation 3 Coat the shaft lightly with clean hydraulic fluid Slide the internal collar and...

Страница 211: ... washer 2 each 18 Bolt 3 Hydraulic adapter 11 Bolt 2 each 19 Knob 4 O ring 12 Lock washer 2 each 20 Link tube 5 Hydraulic hose 13 Pin 21 Hydraulic hose 6 Hydraulic hose 14 Cotter pin 22 Check valve 7 Hydraulic fitting 15 Lift lever 8 O ring 16 Flange nut Groundsmaster 3280 D 3320 Page 5 127 Hydraulic System Service and Repairs 05138SL Rev B ...

Страница 212: ...System Components page 5 77 3 Remove fuel tank from machine refer to Removing the Fuel Tank page 3 10 or Removing the Fuel Tank page 4 16 4 Label all hydraulic connections for assembly purposes Clean hydraulic hose ends prior to disconnecting the hoses CAUTION Operate all hydraulic controls to relieve system pressure and avoid injury from pressurized hydraulic fluid 5 Disconnect hose connections f...

Страница 213: ... from hydraulic hoses and fittings 5 Connect hydraulic hoses to hydraulic fittings on lift control valve 6 Install fuel tank to machine refer to Installing the Fuel Tank page 3 11 or Installing the Fuel Tank page 4 17 7 Check hydraulic fluid level in reservoir front axle and adjust as required refer to the Traction Unit Operator s Manual 8 Operate the machine functions slowly until air is out of s...

Страница 214: ...k washer 2 each 16 Detent plug 25 Lockout seat silver 8 Spool 17 Spring 9 Plug 18 O ring Disassembly the Lift Control Valve 1 Plug all ports and clean the outside of control valve 2 Remove 2 screws and lock washers item 7 in Figure 104 that secure end cap to control valve Remove end cap 3 Remove screw item 5 in Figure 104 spacer spring and washer from control valve 4 Carefully slide spool item 8 i...

Страница 215: ...uipped with counterbalance valve Figure 105 remove valve from control valve if necessary Counterbalance valve disassembly is not recommended Inspecting the Lift Control Valve 1 Inspect spool and spool bore for wear If wear is excessive replace lift control valve assembly 2 Inspect all springs and replace if damaged or broken 3 Inspect detent plunger detent ball and poppet for wear Replace as neces...

Страница 216: ...rews to 2 7 to 4 1 N m 24 to 36 in lb 8 Lubricate detent plunger item 19 in Figure 104 with clean hydraulic fluid and slide into control valve bore 9 Install new O rings items 23 and 24 in Figure 104 to lockout seats Apply Loctite 242 or equivalent to threads of lockout seats Install seats into control valve Torque seats to 24 to 27 N m 18 to 20 ft lb 10 Lubricate poppet item 11 in Figure 104 popp...

Страница 217: ... System Components page 5 77 3 Remove fuel tank from machine refer to Removing the Fuel Tank page 3 10 or Removing the Fuel Tank page 4 16 4 Label all hydraulic connections for assembly purposes Clean hydraulic hose ends prior to disconnecting the hoses from control manifold 5 Disconnect hose connections from hydraulic fittings on counterbalance valve manifold Allow hoses to drain into a suitable ...

Страница 218: ... surfaces damaged threads and contamination A Contamination may cause valve to stick or hang up Contamination can become lodged in small valve orifices or seal areas causing valve malfunction B If valve sealing surfaces appear pitted or damaged the hydraulic system may be overheating or there may be water in the system CAUTION Use eye protection such as goggles when using compressed air for cartri...

Страница 219: ...e manifold 2 Position counterbalance valve manifold to machine frame Secure manifold to machine with 2 bolts and 2 flange nuts 3 Remove all caps or plugs from hydraulic hoses and fittings 4 Connect hydraulic hoses to hydraulic fittings on manifold 5 Install fuel tank to machine refer to Installing the Fuel Tank page 3 11 or Installing the Fuel Tank page 4 17 6 Check hydraulic fluid level in reserv...

Страница 220: ...r the cutting deck shut off the engine set the parking brake and remove the key from the key switch 2 Read the General Precautions for Removing and Installing the Hydraulic System Components page 5 77 3 Remove the operator seat refer to Removing the Operator Seat page 7 20 4 Remove the fuel tank refer to Removing the Fuel Tank page 4 16 5 Locate the hydraulic lift control valve that is attached to...

Страница 221: ...tings in the lift control valve Allow the lines to drain into a suitable container Remove and discard the O rings from the fittings 8 Install clean caps or plugs on the hydraulic lines and fittings to prevent contamination 9 Disconnect the wire harness leads from the solenoid coils on the lift control valve 10 Remove the 2 bolts item 6 in Figure 108 2 lock washers and 2 flat washers that secure th...

Страница 222: ...ing out C Install the fittings into the manifold block Torque the fittings to the torque values identified in Figure 109 2 Position the lift control valve to the machine frame and install the 2 bolts item 6 in Figure 108 2 lock washers and 2 flat washers but do not fully tighten 3 Remove the caps and plugs from the hydraulic lines and fittings 4 Lubricate and install new O rings on the manifold fi...

Страница 223: ...ap 12 Solenoid coil Note The ports on the lift control valve are marked for easy identification of the components Example P is the steering control valve E connection port and SV2 is the location for solenoid valve SV2 refer to the Hydraulic Schematic in Appendix A page A 1 to identify the function of the hydraulic lines and cartridge valves at each manifold port Groundsmaster 3280 D 3320 Page 5 1...

Страница 224: ...lve IMPORTANT Carefully handle the valve cartridge Slight bending or distortion of the stem tube can cause binding and malfunction When removing the cartridge valve from the control manifold ensure that the deep well socket fully engages the valve base 3 Remove the cartridge valve with a deep well socket wrench Note the correct location of the O rings sealing rings and back up rings 4 Remove and d...

Страница 225: ... rings correctly on the cartridge valve for proper operation and sealing IMPORTANT Carefully handle the valve cartridge Slight bending or distortion of the stem tube can cause binding and malfunction When installing the cartridge valve into the control manifold ensure that the deep well socket fully engages the valve base C Turn the cartridge valve carefully into the manifold port The valve should...

Страница 226: ... Pipe plug 42 Carriage screw 6 each 7 O ring 2 each 19 Reservoir hose 2 each 31 Carriage bolt 4 each 43 Retaining ring 6 each 8 Straight hydraulic fitting 2 each 20 Coolant reservoir assembly 32 Retainer nut 2 each 44 Foam seal 9 O ring 2 each 21 Fan shroud 33 Driveshaft loop 45 Radiator screen 10 Oil cooler assembly 22 Upper radiator hose 34 Clamp 11 Carriage bolt 2 each 23 Lower radiator hose 35...

Страница 227: ...ite direction of the fluid flow and dry the interiors of the oil cooler 3 Install clean plugs on the oil cooler ports Clean the outer surface of the cooler Note The oil cooler must be free from corrosion cracked tubes or excessive pitting of tubes Installing the Oil Cooler The radiator and oil cooler must be installed into the machine as an assembly refer to Installing the Radiator page 4 13 Groun...

Страница 228: ...Hydraulic System Service and Repairs Page 5 144 Groundsmaster 3280 D 3320 05138SL Rev B ...

Страница 229: ...ey Switch 6 27 Indicator Lights 6 29 Hour Meter 6 31 PTO Switch 6 32 Deck Lift Switch Machine Serial Numbers above 311000000 6 34 Seat Switch 6 36 Windshield Washer Wiper Switch Machines with Operator Cab 6 38 Accessory Power Switch Machines with Operator Cab 6 40 Fan Speed Switch Machines with Operator Cab 6 42 Work Light Switch Machines with Operator Cab Optional 6 44 Traction Neutral Switch Mac...

Страница 230: ...alve Coils Machine Serial Number above 311000000 6 76 PTO Electric Clutch 6 78 Battery Storage 6 80 Battery Care 6 80 Servicing the Battery 6 81 Electrical System Service and Repairs Page 6 2 Groundsmaster 3280 D 3320 05138SL Rev B ...

Страница 231: ...he inputs from the key neutral parking brake PTO seat high temperature warning switch and high temperature shutdown switch Current output to the PTO electric clutch engine starter motor and engine run components fuel pump diesel engine run solenoid and gasoline engine ignition are controlled based on the inputs monitored by the SCM Use the SCM to check the operation of the machine switches by moni...

Страница 232: ...erature warning switch closes due to engine coolant temperature of approximately 105 C 220 F The backlap input LED is not used on the Groundsmaster 3280 D or 3320 machine SCM Outputs g227291 Figure 113 1 Power input LED 5 PTO output LED 9 In seat input LED 2 Start input LED 6 Neutral input LED 10 High temperature shutdown input LED 3 Engine run output LED 7 Park brake off input LED 11 High tempera...

Страница 233: ...h an operator in the seat when the key is in the START position the traction pedal in the neutral position and the parking brake is not set the engine components and engine starter is energized IMPORTANT During the operation of the machine if the PTO shuts down and the console temperature warning light illuminates avoid shutting off the engine Under this condition push the PTO knob down slowly dri...

Страница 234: ...Standard Control Module Logic Chart continued g226938 Figure 114 Electrical System General Information Page 6 6 Groundsmaster 3280 D 3320 05138SL Rev B ...

Страница 235: ...e ensures that the excess current is not allowed through the meter This excess current can damage the circuits that are not designed to carry it Terminal Protector Toro Part No 107 0392 Use this aerosol spray on the battery terminals ring terminals and fork terminals to reduce corrosion problems Apply the terminal protector to the connection after you secure the battery cable ring terminal or fork...

Страница 236: ...plug the connector into the component unplug the connector apply the gel to both surfaces again and connect the harness connector to the component again The connectors must be fully packed with gel for effective results Note Do not use the dielectric gel on the sealed connection terminals as the gel can unseat the connector seals during assembly Electrical System Special Tools Page 6 8 Groundsmast...

Страница 237: ... circuits and components that are used on this machine refer to the Electrical Schematics and Wire Harness Drawings Diagrams in Appendix A page A 1 If the machine has any interlock switches that are bypassed connect the switches for the correct troubleshooting and safety Note Use the Standard Control Module input and output LED s when troubleshooting an electrical problem of the Groundsmaster 3280...

Страница 238: ...g in the engine crank circuit is loose corroded or damaged refer to the Electrical Schematics in Appendix A page A 1 The fuel filter is plugged The engine and or fuel can be too cold The engine fuel pump or circuit wiring is damaged The glow plugs are damaged Groundsmaster 3280 D The engine glow plug circuit does not operate properly The engine or fuel system is malfunctioning refer to Chapter 3 G...

Страница 239: ... it is damaged The engine coolant temperature is excessive or the engine high temperature shutdown switch is damaged The battery is discharged The battery cables are loose or corroded The ground connection is loose or corroded The fuse F1 1 15 A is damaged refer to Fuses Machine Serial Number below 400000000 page 6 22 or Fuses Machine Serial Number above 400000000 page 6 23 The fuse block is damag...

Страница 240: ...essed The seat switch or circuit wiring is damaged The key switch or circuit wiring is damaged The machine is operated on a slope with a low fuel level The parking brake switch or circuit wiring is damaged The engine continues to run but should not when the traction pedal is pressed with no operator on the seat The seat switch is damaged The seat switch wiring is loose corroded or damaged The trac...

Страница 241: ...ents is damaged or disconnected refer to Wiring Schematics in Appendix A page A 1 The fuel pump is damaged The Standard Control Module is damaged The battery does not charge A loose corroded or broken wire s exist in the charging circuit refer to the Electrical Schematics in Appendix A page A 1 The engine alternator belt is loose or damaged The alternator is damaged The battery is damaged The fusi...

Страница 242: ... is damaged The PTO switch or circuit wiring is damaged The engine temperature is excessive above 105 C 220 F The high temperature shutdown switch or circuit wiring is damaged The Standard Control Module is damaged A loose corroded or broken wire s exist in the PTO clutch circuit refer to the Electrical Schematics in Appendix A page A 1 Cutting Deck Lift Lower Problems Problem Possible Causes The ...

Страница 243: ...harging System This is a simple test that determines if a charging system is functioning It tells you if the charging system has an output but not its capacity Tool required Digital multimeter to set DC volts Test instructions Connect the positive multimeter lead to the positive battery post and negative multimeter lead to the negative battery post Keep the test leads connected to the battery post...

Страница 244: ...just the meter to read zero if applicable Activate the glow plug system and record the multimeter results The glow plug system of the Groundsmaster 3280 D machine should have a reading of approximately 21 A Checking the Operation of the Interlock Switches CAUTION Do not disconnect the safety switches They are for the operator s protection Check the operation of the interlock switches daily for pro...

Страница 245: ...5 The sensing plate for the traction neutral sensor is the neutral arm Adjusting the Traction Neutral Sensor 1 Before adjusting the traction neutral sensor check and adjust the traction drive for neutral refer to Adjusting the Traction Drive for Neutral in the Traction Unit Operator s Manual g226813 Figure 116 1 Traction neutral sensor 2 Sensor bracket 3 Neutral arm 2 When the traction pedal is in...

Страница 246: ...l sensor refer to Adjusting the Proximity Sensor in the Traction Unit Operator s Manual 4 Check that the LED on the cable end of the traction neutral sensor is illuminated when the traction pedal is in the neutral position Electrical System Adjustments Page 6 18 Groundsmaster 3280 D 3320 05138SL Rev B ...

Страница 247: ...king brake rod tab Figure 118 Adjusting the Parking Brake Switch g226937 Figure 118 1 Parking brake switch 3 Switch plunger 2 Tab parking brake rod When the parking brake is set the compressed length of the switch plunger should be 0 38 to 1 14 mm 0 015 to 0 045 inch Figure 118 Note This is the distance between the parking brake rod tab and the switch plunger housing If the gap is incorrect adjust...

Страница 248: ...component Note Refer to the Kubota Workshop Manual 05 Series Engine Groundsmaster 3280 D or Briggs and Stratton Daihatsu Engine Repair Manual Groundsmaster 3320 for additional electrical component repair information IMPORTANT When testing the electrical components for continuity with a multimeter ohms setting ensure that you disconnect the power to the circuit Fusible Link Harness g225177 Figure 1...

Страница 249: ...y page 6 81 2 Locate and unplug the fusible link connector P1 from the machine wire harness 3 Use a multimeter to ensure that the continuity exists between each terminal pin in the connector P1 and connector J1 at the starter Figure 120 4 If any of the fusible links are open replace the fusible link harness Note Do not replace individual fusible link conductors of the fusible link harness If any o...

Страница 250: ...use holder has the following function Fuse 1 15 A Protects main power circuit to key switch terminal B Fuse 2 10 A Protects power circuit from key switch terminal S Fuse 3 10 A Protects power circuit from key switch terminal I Fuse 4 2 A Protects power supply to Standard Control Module Testing the Fuses Remove fuses from the fuse block for testing Fuse should have continuity between fuse terminals...

Страница 251: ...idual fuse and its correct amperage Each fuse holder has the following function F1 1 15 A Protects main power circuit to the key switch terminal B F1 2 10 A Protects power circuit from the key switch terminal S F1 3 10 A Protects power circuit from the key switch terminal I F1 4 2 A Protects power supply to the Standard Control Module F2 1 10 A Protects power supply to the auxiliary power Groundsm...

Страница 252: ...not at the other the fuse is damaged 2 If necessary remove the fuse from the fuse block for testing The fuse should have continuity between the fuse terminals A Ensure that the key switch is in the OFF position and the key is removed from the key switch B Locate the fuse s to be tested under the control panel C Remove the fuse s from the fuse holder for testing The fuse should have continuity betw...

Страница 253: ... addition to the cab fuses in the fuse blocks there are 2 additional fuses included in the cab wire harness These fuses plug into the fuse holders near the battery Figure 126 The fuses have the following functions 60 A maxi fuse Protects the unswitched cab power circuit 10 A fuse Protects the unswitched cab radio power Groundsmaster 3280 D 3320 Page 6 25 Electrical System Testing the Electrical Co...

Страница 254: ...use F2 1 15 A Protects the windshield wiper washer circuit Fuse F2 2 15 A Protects the cab dome light circuit Fuse F2 4 15 A Protects the auxiliary power circuit Fuses F1 4 and F2 3 are available for optional equipment Testing the Fuses Ensure that the key switch is in the OFF position and the key is removed from the switch Remove the fuses from the fuse block for testing The fuse should have cont...

Страница 255: ... START position both the power input and start input LEDs should be illuminated Testing the Key Switch 1 Park the machine on a level surface lower the cutting deck set the parking brake and shut off the engine 2 Before you disconnect the key switch for testing ensure that you test the switch and its circuit wiring as a SCM input refer to Standard Control Module SCM page 6 3 3 If the SCM verifies t...

Страница 256: ...tch functions to determine if the continuity exists between the various terminals for each switch position Check the continuity between the switch terminals Circuit Logic Table Switch Position Circuits OFF None RUN B C F D E START A B C D Replace the key switch if testing determines that the switch is damaged E If the key switch testing is correct and a circuit problem still exists check the wire ...

Страница 257: ...unning shut off the engine immediately To test the oil pressure light and circuit wiring ground the wire attached to oil pressure switch located on the engine near the oil filter Turn the key switch to the ON position the engine oil pressure light should come on indicating correct operation of the indicator light and circuit wiring High Temperature Warning Light If the engine coolant temperature r...

Страница 258: ...icator Lights g226816 Figure 131 1 Glow plug indicator 3 Warning light front 5 Charge indicator 2 High temperature warning 4 Engine oil pressure 6 Warning light back 1 Park the machine on a level surface lower the cutting deck set the parking brake and shut off the engine 2 Apply 12 VDC to the terminals 1A and 2A Figure 131 3 Ground the terminals 1B and 2B Figure 131 4 Both indicator lights should...

Страница 259: ...re harness electrical connector from the hour meter 3 Connect the positive terminal of a 12 VDC source to the positive terminal of the hour meter 4 Connect the negative terminal of the voltage source to the other terminal of the hour meter 5 The hour meter should move 1 10 of an hour in 6 minutes 6 Disconnect the voltage source from the hour meter 7 Replace the hour meter if necessary 8 Connect th...

Страница 260: ...e the PTO electric clutch The Standard Control Module SCM monitors the position of the PTO switch up or down Using the inputs from the PTO switch and other switches in the interlock system the SCM controls the energizing of the electric PTO clutch and thus the PTO If the key switch is in the ON position and the PTO switch is engaged the SCM PTO switch input LED should be illuminated Electrical Sys...

Страница 261: ...ch as follows A Remove the 4 thumb screws item 3 in Figure 133 that secure the control panel to the fuel tank B Ensure that the key switch is in the OFF position Disconnect the wire harness connector from the PTO switch C The PTO switch terminals are identified in Figure 134 and the circuitry of the PTO switch is shown in the Circuit Logic Table page 6 33 With the use of a multimeter ohms setting ...

Страница 262: ...the hydraulic lift control valve are energized causing the valves to shift and the lift cylinder to extend to raise the cutting deck When the front of the lift lower switch is pressed solenoid valve coil SV2 on the hydraulic lift control valve is energized causing the valve to shift and the lift cylinder to retract to lower the cutting deck Testing the Deck Lift Switch 1 Park the machine on a leve...

Страница 263: ...its Other Circuits RAISE 2 1 5 4 OFF None None LOWER 2 3 5 6 Note The deck lift switch terminals 4 5 and 6 are not used 6 Replace the deck lift switch if testing determines that the switch is damaged 7 If the deck lift switch testing is correct and a circuit problem still exists check the wire harness refer to the Electrical Schematics and Wire Harness Drawings Diagrams in Appendix A page A 1 8 Af...

Страница 264: ...itch and its circuit wiring as a SCM input refer to Standard Control Module SCM page 6 3 3 If the SCM verifies that the seat switch and circuit wiring are functioning correctly proceed with the test 4 If the SCM determines that the seat switch and circuit wiring are not functioning correctly then test the seat switch as follows 5 Ensure that the key switch is in the OFF position Locate the switch ...

Страница 265: ... exists check the machine wire harness refer to the Electrical Schematics and Wire Harness Drawings Diagrams in Appendix A page A 1 10 After you complete the seat switch testing connect the machine wire harness connector to the seat switch Check the operation of the seat switch Groundsmaster 3280 D 3320 Page 6 37 Electrical System Testing the Electrical Components 05138SL Rev B ...

Страница 266: ...move the left or right defrost vent hose from the mixing box to access the flange nuts that secure the switch panel and remove the switch panel from the cab headliner 4 Disconnect the wire harness electrical connector from the windshield wiper washer switch g243424 Figure 139 Back of Switch 5 The windshield wiper washer switch terminals are identified in Figure 139 and the circuitry of the switch ...

Страница 267: ...sting is correct and a circuit problem still exists check the wire harness refer to the Electrical Schematics and Wire Harness Drawings Diagrams in Appendix A page A 1 8 After you complete the testing connect the wire harness connector to the windshield wiper washer switch 9 Secure the switch panel to the cab headliner with the removed fasteners 10 Install the cab roof refer to Roof Assembly page ...

Страница 268: ...the cab refer to Roof Assembly page 11 3 3 Remove the switch panel from the cab headliner 4 Disconnect the wire harness electrical connector from the accessory power switch g243573 Figure 141 Back of Switch 5 The accessory power switch terminals are identified in Figure 141 and the circuitry of the switch is shown in the Circuit Logic Table page 6 41 With the use of a multimeter ohms setting test ...

Страница 269: ... damaged 7 If the accessory power switch testing is correct and a circuit problem still exists check the wire harness refer to the Electrical Schematics and Wire Harness Drawings Diagrams in Appendix A page A 1 8 After you complete the testing connect the wire harness connector to the accessory power switch 9 Secure the switch panel to the cab headliner with the removed fasteners 10 Install the ca...

Страница 270: ...of the cab refer to Roof Assembly page 11 3 3 Remove the air heat panel from the cab headliner 4 Disconnect the machine wire harness connector from the fan speed switch g242792 Figure 143 Back of Switch 5 The switch terminals are identified in Figure 143 and the circuitry of the switch is shown in the Circuit Logic Table page 6 43 With the use of a multimeter ohms setting test the switch functions...

Страница 271: ...g is correct and a circuit problem still exists check the wire harness refer to the Electrical Schematics and Wire Harness Drawings and Diagrams in Appendix A page A 1 8 After you complete the testing connect the machine wire harness connector to the switch and install the air heat panel 9 Install the cab roof refer to Roof Assembly page 11 3 Groundsmaster 3280 D 3320 Page 6 43 Electrical System T...

Страница 272: ...m the cab headliner 4 Disconnect the machine wire harness connector from the switch that you are testing g243573 Figure 145 Back of Switch 5 The switch terminals are identified in Figure 145 and the circuitry of the switch is shown in the Circuit Logic Table page 6 44 With the use of a multimeter ohms setting test the switch functions to determine if continuity exists between the various terminals...

Страница 273: ...l Schematics and Wire Harness Drawings and Diagrams in Appendix A page A 1 8 After you complete the testing connect the machine wire harness connector to the switch and install the lights switch panel 9 Install the cab roof refer to Roof Assembly page 11 3 Groundsmaster 3280 D 3320 Page 6 45 Electrical System Testing the Electrical Components 05138SL Rev B ...

Страница 274: ...ect the electrical connector from the traction neutral switch 3 Check the continuity of the switch by connecting a multimeter ohms setting across the connector terminals 4 With the key switch in the OFF position slowly push the traction pedal in the forward and reverse direction while watching the multimeter Continuity should be broken in both the forward and reverse directions 5 Allow the tractio...

Страница 275: ...l switch is 3 2 mm 0 125 inch Figure 147 4 Torque jam nut to 8 to 10 N m 71 to 89 in lb to secure adjustment After jam nut is tightened ensure that the clearance between the socket head screw and the traction neutral switch has not changed 5 Check for proper switch operation refer to Testing the Traction Neutral Switch page 6 46 Groundsmaster 3280 D 3320 Page 6 47 Electrical System Testing the Ele...

Страница 276: ...traction neutral sensor for testing ensure that you test the sensor and its circuit wiring as a SCM input refer to Standard Control Module SCM page 6 3 3 If the SCM verifies that the sensor and circuit wiring are functioning correctly then no more switch testing is necessary 4 If the SCM determines that the traction neutral sensor and circuit wiring are not functioning correctly proceed with the t...

Страница 277: ...he key switch to the RUN position do not start the engine and check with a multimeter that the machine wire harness connector terminal for pink wire has system voltage 12 VDC present E If the black wire is closed to the ground the pink wire has system voltage present and the sensor LED did not function replace the traction neutral sensor Adjust the sensor after installation refer to Adjusting the ...

Страница 278: ...Control Module SCM monitors the operation of the parking brake switch If the key switch is in the ON position and the parking brake is released the SCM parking brake off input LED should be illuminated Testing the Parking Brake Switch 1 Park the machine on a level surface lower the cutting deck and shut off the engine 2 Before you disconnect the traction neutral sensor for testing ensure that you ...

Страница 279: ...etting across the switch connector terminals to check the continuity of the switch as follows A When the switch plunger is extended there should not be continuity between the switch terminals B When the switch plunger is pressed there should be continuity between the switch terminals 10 Replace the switch if testing determines that the switch is damaged 11 If the parking brake switch testing is co...

Страница 280: ...ature warning light on the console to illuminate and also provides an input to the Standard Control Module SCM This input causes the SCM high temperature warning LED to illuminate and the cutting deck to shut down The high temperature warning switch and circuit wiring should be tested as a SCM input before performing the following testing procedure Testing the High Temperature Warning Switch 1 Par...

Страница 281: ...y or fire Handle the hot oil with extreme care Note Before taking the small resistance readings with a digital multimeter short the multimeter test leads together The meter will display a small resistance value usually 0 5 ohms or less This resistance is because of the internal resistance of the multimeter and test leads Subtract this value from the measured value of the component you are testing ...

Страница 282: ...thread sealant to the threads of the switch B Thread the switch into the housing torque the switch to 29 4 to 39 2 N m 22 to 28 ft lb C Connect the harness wires to the temperature switch 9 Fill the engine cooling system refer to the Traction Unit Operator s Manual 10 Lower the hood and secure it with the latches Electrical System Testing the Electrical Components Page 6 54 Groundsmaster 3280 D 33...

Страница 283: ...The closed switch provides an input to the Standard Control Module SCM This input causes the SCM high temperature shutdown LED to illuminate and the cutting deck to shut down The high temperature shutdown switch and circuit wiring should be tested as a SCM input before performing the following testing procedure Testing the High Temperature Shutdown Switch 1 Park the machine on a level surface lowe...

Страница 284: ... with extreme care 6 Check the resistance of the switch with a multimeter ohms setting as the oil temperature increases The high temperature shutdown switch is normally open A On the Groundsmaster 3280 D diesel engine the high temperature shutdown switch should close between 107 and 113 C 225 and 235 F B On the Groundsmaster 3320 gasoline engine the high temperature shutdown switch should close at...

Страница 285: ...thread sealant to the threads of the switch B Thread the switch into the housing torque the switch to 29 4 to 39 2 N m 22 to 28 ft lb C Connect the harness wires to the temperature switch 10 Fill the engine cooling system refer to the Traction Unit Operator s Manual 11 Lower the hood and secure it with the latches Groundsmaster 3280 D 3320 Page 6 57 Electrical System Testing the Electrical Compone...

Страница 286: ...dsmaster 3280 D diesel engine the oil pressure switch should open at approximately 55 kPa 8 psi On the Groundsmaster 3320 gasoline engine the oil pressure switch should open between 20 to 39 kPa 2 9 to 5 7 psi The oil pressure switch is connected to the oil pressure indicator light on the control panel If the switch opens while the engine is running indicating low oil pressure the indicator light ...

Страница 287: ...nnector from the switch C Connect a multimeter ohms setting across the switch harness connector terminals to check the continuity of the switch D With the engine shut off there should be no continuity between the switch harness terminals E With the engine running there should be continuity between the switch harness terminals 4 If the testing determines that the oil pressure switch is not operatin...

Страница 288: ...inside the right side frame near the fuel water separator Figure 159 When energized the glow relay allows electrical current to the engine glow plugs g225178 Figure 160 1 Throttle control lever 2 Accessory relay if equipped 3 SCM The accessory relay if equipped is located under the control console near the SCM Figure 160 When energized the accessory relay allows electrical current to optional acce...

Страница 289: ... machine operation does not occur unexpectedly disconnect the negative cable from the battery and then disconnect the positive cable from the battery refer to Servicing the Battery page 6 81 4 Locate the relay that is to be tested and disconnect the wire harness connectors from the relay Note Before taking small resistance readings with a digital multimeter short the multimeter test leads together...

Страница 290: ...the relay if testing determines that the relay is damaged 9 If the relay testing is correct and a circuit problem still exists check the main wire harness refer to the Electrical Schematics and Wire Harness Drawings Diagrams in Appendix A page A 1 10 Connect the wire harness electrical connectors to the relay after you complete the testing 11 Connect the positive cable to the battery and then conn...

Страница 291: ...ng brake shut off the engine and remove the key from the key switch g227289 Figure 164 1 Coil diameter 2 Coil height 2 Identify the coil resistance specification by measuring the coil diameter and coil height Figure 164 3 Disconnect the wire harness electrical connector from the solenoid valve coil that is to be tested Note Before taking the small resistance readings with a digital multimeter shor...

Страница 292: ...able Solenoid Valve Coil Diameter Height Resistance SV1 35 8 mm 1 41 inches 36 3 mm 1 43 inches 8 8 ohms SV2 46 7 mm 1 84 inches 49 9 mm 1 96 inches 7 1 ohms 5 If the solenoid coil resistance is incorrect replace the solenoid coil refer to the Lift Control Valve Solenoid Valve Coils Machine Serial Number above 311000000 page 6 76 6 After testing the coils connect the wire harness electrical connec...

Страница 293: ...ernal resistance of the multimeter and test leads Subtract this value from the measured value of the component that you are testing 5 Use a multimeter ohms setting check the clutch coil resistance between the 2 terminals of the clutch electrical connector The coil resistance should be approximately 3 0 ohms Additionally check that there is no continuity between either of the clutch wire connector ...

Страница 294: ...e value usually 0 5 ohms or less This resistance is because of the internal resistance of the multimeter and test leads Subtract this value from the measured value of the component you are testing 1 Park the machine on a level surface lower the cutting deck set the parking brake shut off the engine and remove the key from the key switch 2 Unlatch the hood and raise it 3 Locate the fuel stop soleno...

Страница 295: ...id on the engine and disconnect the wire harness connector from the solenoid Note The solenoid can be removed from the engine or tested in place 4 If the solenoid is removed from the engine ensure that the solenoid plunger moves freely and is free of dirt unwanted material and corrosion Note When testing the run solenoid use test leads with at least 14 gauge wire 5 Connect a positive test lead fro...

Страница 296: ...g the glow controller circuit Controller Operation 1 When the key switch is turned to the RUN position the controller energizes the glow plugs and lights up the glow lamp for approximately 6 seconds 2 When the key switch is held in the START position the glow plugs will energize while the switch is held in START and the glow lamp will not light 3 When the key switch is released from START to RUN t...

Страница 297: ... no power to terminal 1 of the glow controller check the continuity of the circuitry from the key switch to the glow controller and perform step 4 again refer to the Electrical Schematics in Appendix A page A 1 5 If any of the conditions in step 3 are not met or power to terminal 1 exists and any of the other conditions in step 4 are not met A Check the continuity of the circuitry from the battery...

Страница 298: ... used on the Groundsmaster 3280 D for Models 30344 and 30345 is attached to the support bracket inside the right side frame near the fuel water separator Figure 170 The fuel pump used on the Groundsmaster 3280 D except Models 30344 and 30345 is attached to the support bracket inside the right side frame near the fuel water filter Figure 171 IMPORTANT When testing the fuel pump ensure that the pump...

Страница 299: ...RTANT When testing the fuel pump output do not turn the key switch to the START position 6 Turn the key switch to the ON position and collect the fuel in the graduated cylinder Allow the pump to run for 15 seconds and then turn the switch to the OFF position Note The amount of fuel pumped in 15 seconds must be approximately 475 ml 16 fl oz 7 Replace the fuel pump if output specification is not met...

Страница 300: ...t Models 30344 and 30345 Pump Capacity 0 7 L minute 23 5 fl oz minute Pressure 22 8 kPa 3 3 psi Maximum Current Draw 0 9 A 10 Lower the hood and secure it with the latches Electrical System Testing the Electrical Components Page 6 72 Groundsmaster 3280 D 3320 05138SL Rev B ...

Страница 301: ...ing Always wipe up any spilled fuel before starting the engine Testing the Fuel Pump Capacity 1 Park machine on a level surface lower cutting deck or implement shut off the engine and engage parking brake 2 Disconnect fuel pump discharge hose from the carburetor inlet Figure 172 3 Ensure that the fuel hoses attached to the fuel pump are free of obstructions 4 Place disconnected pump discharge hose...

Страница 302: ...ly 400 ml 13 5 fl oz after 30 seconds 7 Replace fuel pump if necessary Install fuel hose to carburetor inlet Fuel Pump Specifications Pump Capacity 800 ml minute 27 fl oz minute Pressure 19 6 to 29 4 kPa 2 8 to 4 3 psi Electrical System Testing the Electrical Components Page 6 74 Groundsmaster 3280 D 3320 05138SL Rev B ...

Страница 303: ...rness connector from the relay 2 Using a multimeter ohms setting measure coil resistance between terminals 85 and 86 Figure 173 Resistance should be between 70 and 90 ohms 3 Connect multimeter ohms setting leads to relay terminals 30 and 87 Ground terminal 86 and apply 12 VDC to terminal 85 The relay should make and break continuity between terminals 30 and 87 as 12 VDC is applied and removed from...

Страница 304: ...74 without opening the hydraulic system Removing the Lift Control Valve Solenoid Valve Coils 1 Park the machine on a level surface lower the cutting deck set the parking brake shut off the engine and remove the key from the key switch 2 Locate the solenoid valve coil that you replace Refer to Figure 174 for the location of solenoid coils on the lift control valve 3 Disconnect the wire harness elec...

Страница 305: ... onto the hydraulic valve 2 Install the nut onto the valve and torque the nut to 6 7 N m 5 in lb Note Do not overtighten the nut 3 Connect the machine wire harness connector to the solenoid coil Groundsmaster 3280 D 3320 Page 6 77 Electrical System Service and Repairs 05138SL Rev B ...

Страница 306: ... Stub shaft 7 Square key 2 Spacer 5 Gasoline engine 8 Clutch stop 3 Electric clutch 6 Mounting bracket 9 Flange head screw Removing the PTO Electric Clutch 1 Park machine on a level surface lower cutting deck or implement shut off the engine set the parking brake and remove the key from the key switch 2 Unplug the clutch connector from the machine wire harness Electrical System Service and Repairs...

Страница 307: ... stub shaft 2 Position the square key in the stub shaft Slide the clutch onto the stub shaft and ensure to engage the clutch stop Note Hold the coupler on the front of the engine to prevent crankshaft from turning when installing the bolt that secures the clutch to the stub shaft 3 Apply Loctite 242 or equivalent to the threads of the bolt Secure the clutch to the stub shaft with the spacer and bo...

Страница 308: ...they can cause nausea Wear safety goggles and rubber gloves when working with electrolyte Charge the battery in a well ventilated place so that the gasses produced while charging can dissipate Keep open flames and electrical sparks away from the battery do not smoke Disconnect the charger from the electrical outlet before connecting or disconnecting charger leads to or from the battery posts IMPOR...

Страница 309: ...ralized water Note Do not fill the cells above the fill line Servicing the Battery The battery is the heart of the electrical system With the regular and correct service the battery life can be extended Additionally the battery and electrical component failure can be prevented CAUTION Battery electrolyte is corrosive and can burn skin and eyes and damage clothing While working with the batteries u...

Страница 310: ...es the battery retainer 4 Carefully remove the battery from the machine 5 Install the battery in reverse order and ensure to connect and tighten the positive cable to the battery before connecting negative cable Use 2 wrenches when tightening the cables Note Before connecting the negative ground cable to the battery connect a digital multimeter set to DC Amps between the negative battery post and ...

Страница 311: ...imum and maximum fill lines Charge at 15 to 25 A for 15 minutes to allow sufficient mixing of the electrolyte refer to Charging the Battery page 6 85 2 Perform the hydrometer test of the battery electrolyte IMPORTANT Ensure that the area around the cells is clean before opening the battery caps A Use a hydrometer to measure the specific gravity of each cell Pull the electrolyte in and out of the h...

Страница 312: ...e temperature of the center battery cell D Connect a battery load tester to the battery terminals following the manufacturer s instructions Connect a digital multimeter to the battery terminals E If you charge the battery apply a 150 A load for 15 seconds to remove the surface charge Wait for 10 minutes before proceeding with load test F Apply a test load of 270 A 1 2 the cranking performance rati...

Страница 313: ...ic Gravity Open Circuit Voltage 100 1 265 12 68 75 1 225 12 45 50 1 190 12 24 25 1 155 12 06 0 1 120 11 89 2 Determine the charging time and rate using the manufacturer s battery charger instructions or the following Battery Charge Level Table page 6 85 Battery Charge Level Table Battery Charge Level Percent of Fully Charged Battery Reserve Capacity Minutes 75 50 25 0 80 or less 3 8 hrs 3 A 7 5 hr...

Страница 314: ...ry charger manufacturer s instructions connect the charger cables to the battery posts Ensure that you make a good connection 4 Charge the battery following the manufacturer s instructions 5 Occasionally check the temperature of the battery electrolyte If the temperature is more than 52 C 125 F or the electrolyte is violently gassing or spewing lower and temporarily stop the charging rate 6 Three ...

Страница 315: ...teering Column 7 6 Rear Frame and Axle Assembly 7 9 Rear Axle 2 Wheel Drive 7 11 Servicing the Rear Axle 2 Wheel Drive 7 13 Rear Wheel Bearings 2 Wheel Drive 7 17 Operator Seat 7 19 Mechanical Seat Suspension 7 21 Pneumatic Seat Suspension 7 24 Lift Arms 7 26 Groundsmaster 3280 D 3320 Page 7 1 Chassis 05138SL Rev B ...

Страница 316: ... 20 psi Rear tire pressure 4 wheel drive machines 18 x 6 50 8 4 ply tubeless 138 kPa 20 psi Front wheel lug nut torque 102 to 115 N m 75 to 85 ft lb Rear wheel lug nut torque 2 wheel drive and 4 wheel drive machines 102 to 122 N m 75 to 90 ft lb Steering wheel mounting nut 27 to 35 N m 20 to 26 ft lb Chassis Specifications Page 7 2 Groundsmaster 3280 D 3320 05138SL Rev B ...

Страница 317: ...ng the operation general maintenance and maintenance intervals for your Groundsmaster 3280 D and 3320 machines Refer to the Operator s Manual for additional information when servicing the machine Groundsmaster 3280 D 3320 Page 7 3 Chassis General Information 05138SL Rev B ...

Страница 318: ...tting deck or implement shut off the engine set the parking brake and remove the key from the key switch 2 Block the wheels that are not removed with chocks to prevent the machine from moving 3 Loosen but do not remove the 5 wheel lug nuts that attach the wheel to the machine IMPORTANT Before lifting the machine with a jack review and follow Jacking Instructions page 1 6 Chassis Service and Repair...

Страница 319: ...er the machine to the ground WARNING Failure to maintain proper torque could result in failure or loss of wheel and may result in personal injury Maintain the proper torque of the wheel lug nuts 3 Torque the front wheel lug nuts evenly to 102 to 115 N m 75 to 85 ft lb in a crossing pattern 4 Torque the rear wheel lug nuts evenly to 102 to 122 N m 75 to 90 ft lb in a crossing pattern 5 Check and ad...

Страница 320: ... wheel 14 Grip 24 Pivot plate 5 Foam collar 15 Steering control valve 25 Friction disc 6 Tower panel 16 Spacer 26 Tilt bracket 7 Retainer nut 6 each 17 Flange nut 3 each 27 Flat washer 8 Flange head screw 18 Bolt 2 each 28 Jam nut 9 Philips head screw 6 each 19 Spacer 29 Steering column 10 Parking brake rod 20 Flange head screw 2 each Chassis Service and Repairs Page 7 6 Groundsmaster 3280 D 3320 ...

Страница 321: ...ng control valve and remove the steering column from the machine 13 Locate and retrieve the 2 spacers items 16 and 19 in Figure 179 14 If necessary remove the 2 bolts item 18 in Figure 179 and 2 flange nuts item 22 in Figure 179 that secure the pivot plate to the steering column Installing the Steering Column 1 If removed secure the pivot plate item 24 in Figure 179 to the steering column with the...

Страница 322: ...brake rod 10 Slide the foam collar onto the steering column 11 Slide the steering wheel onto the steering column and secure the steering wheel with the flat washer and locknut torque the locknut to 27 to 35 N m 20 to 26 ft lb 12 Install the steering wheel cover item 1 in Figure 179 onto the steering wheel Chassis Service and Repairs Page 7 8 Groundsmaster 3280 D 3320 05138SL Rev B ...

Страница 323: ...te For assembly purposes tag the hydraulic hoses to show their correct position on the steering cylinder 3 Disconnect the hydraulic hoses from the steering cylinder Install clean caps or plugs on the hydraulic hoses and fittings to prevent system contamination 4 On 4 wheel drive machines remove the 6 socket head screws item 7 in Figure 180 and 6 lock washers that secure the driveshaft to the bi di...

Страница 324: ...t the mounting holes on the rear of the frame align with the axle frame holes 3 Secure the rear of axle frame to the machine frame with the fasteners that were removed previously Figure 180 4 If equipped with rear weight s attach the weight s to the rear of the machine 5 On 4 wheel drive machines position the driveshaft to the bidirectional clutch Secure the driveshaft to the bidirectional clutch ...

Страница 325: ...switch Note For assembly purposes tag the hydraulic hoses to show their correct position on the steering cylinder 2 Disconnect the hydraulic hoses from the steering cylinder Install clean caps or plugs on the hydraulic hoses and fittings to prevent system contamination 3 Remove the locknut item 9 in Figure 181 that secures the end of the axle pivot pin to the rear frame 4 Raise the machine just ah...

Страница 326: ...diameter thrust washer and rear frame to allow 0 8 to 2 3 mm 0 030 to 0 090 inch axle tube end play Slide the pivot pin through the rear frame washers and axle 3 Secure the pivot pin to the rear frame with the bolt item 1 in Figure 181 flat washer and locknut 4 Tighten the locknut item 9 in Figure 181 until the shoulder of the pivot pin bottoms against the rear frame Ensure that the axle can still...

Страница 327: ... 2 each 13 Jam nut 8 each 21 Steering pivot bushing 2 each 6 Flat washer 0 018 inch thick 14 Jam nut left hand thread 2 each 22 Steering pivot plate 7 Flat washer 0 032 inch thick 15 Ball joint left hand thread 2 each 23 Left spindle 8 Spindle bushing 2 each 16 Ball joint 2 each 24 Axle pivot bushing 2 each Note For repair information regarding the rear axle on 4 wheel drive machines refer to Chap...

Страница 328: ...he axle pivot tube Steering Pivot Bushings The steering pivot must fit snugly onto the mounting pin Excessive movement of the steering pivot may indicate worn steering pivot bushings item 21 in Figure 182 or tie rod ball joints item 15 and 16 in Figure 182 1 Park the machine on a level surface lower cutting deck or implement shut off the engine set the parking brake and remove the key from the key...

Страница 329: ...e rod end from the spindle arm 3 Remove the flange head screw spindle cap retaining ring and washers that secure the wheel spindle into the axle tube Slide the spindle washers and wheel assembly out of the axle tube to expose the spindle bushings 4 Use a punch and hammer to drive both bushings out of the axle tube Ensure that you do not damage the inner surface of the axle tube Clean the inner sur...

Страница 330: ...n Unit Operator s Manual 13 Check the rear wheel toe in refer to the Traction Unit Operator s Manual 14 After all adjustments have been made ensure that there is no contact between any steering components as the wheels move from lock to lock Adjust if necessary Chassis Service and Repairs Page 7 16 Groundsmaster 3280 D 3320 05138SL Rev B ...

Страница 331: ...er pin retainer jam nut and tab washer Slide the wheel hub from the spindle shaft 5 Pull the seal out of the wheel hub Discard the seal 6 Remove the bearing cones from both sides of the wheel hub Clean the bearings in solvent Ensure that the bearings are in good operating condition Clean the inside of the wheel hub Check the bearing cups for wear pitting or other noticeable damage Replace the part...

Страница 332: ...tall the cotter pin 5 Rotate the wheel hub by hand and tighten the jam nut to 8 5 to 11 3 N m 75 to 100 in lb to set the bearings Then loosen the nut until the hub has end play 6 Rotate the wheel hub by hand and tighten the jam nut to 1 7 to 2 3 N m 15 to 20 in lb After you tighten the jam nut ensure that the wheel hub does not have any free play 7 Install the retainer with slot aligned to the cot...

Страница 333: ...crew 2 each 10 Flange nut 12 each 17 Flat washer 4 each 4 Seat bracket left 11 Seat base 18 Seat adjuster 5 Seat adjuster with latch 12 Flange head screw 2 each 19 Seat bracket right 6 Seat suspension 13 Flange head screw 4 each 7 Lower seat bracket 2 each 14 Flange head screw 8 each Groundsmaster 3280 D 3320 Page 7 19 Chassis Service and Repairs 05138SL Rev B ...

Страница 334: ...n Figure 185 that secure the seat base to the machine 5 Remove the seat and seat base from the machine 6 Remove the seat components as necessary Figure 185 Installing the Operator Seat 1 Install the seat components Figure 185 2 Position the seat and seat base to the machine 3 Secure the seat base to the machine with the 2 flange head screws item 12 in Figure 185 and 2 flange nuts item 8 in Figure ...

Страница 335: ...hing 2 each 41 Flat washer 6 Bumper 3 each 18 Extension spring 30 Roller pin 42 Weight indicator assembly 7 Height adjust knob cap 19 Roller 4 each 31 Pivot pin 43 Male snap rivet 2 each 8 Height adjust knob 20 Suspension boot 32 Bearing tube 2 each 44 Upper housing 9 Height adjust rod 21 Thread forming screw 8 each 33 Drive arm 45 Weight adjust tape 10 Female snap rivet 2 each 22 Locknut 2 each 3...

Страница 336: ...electrical harness when removing the seat suspension from the machine 2 Remove the seat and seat suspension from the machine refer to Operator Seat page 7 19 3 Remove the mechanical seat suspension components as necessary Figure 186 and Figure 187 If the seat adjusters are being removed record the seat adjuster mounting holes used Installing the Mechanical Seat Suspension 1 Install all the mechani...

Страница 337: ...continued 2 Install the seat and seat suspension to the machine refer to Operator Seat page 7 19 Ensure to connect the harness electrical connector to the seat switch Groundsmaster 3280 D 3320 Page 7 23 Chassis Service and Repairs 05138SL Rev B ...

Страница 338: ...ht tape guide 20 Flat washer 2 each 34 Shaft block 2 each 7 Cable tie 9 each 21 Shock bushing 4 each 35 Scissor assembly 8 Weight tape roller 22 Damper 36 Compressor 9 Weight tape adjuster 23 Clip 21 each 37 Bumper 2 each 10 Compressor clamp 24 Suspension boot 38 Up stop bracket 2 each 11 Nylon tubing 2 each 25 Locknut 39 Carriage bolt 2 each 12 Tee fitting 26 Shock mount bolt 40 Locknut 2 each 13...

Страница 339: ...achine refer to Operator Seat page 7 19 3 Remove the pneumatic seat suspension components as necessary Figure 188 and Figure 189 Installing the Pneumatic Seat Suspension 1 Install the pneumatic seat suspension components Figure 188 and Figure 189 Refer to Figure 188 for fastener torque values for assembly purposes IMPORTANT Do not damage the electrical harness when installing the seat suspension t...

Страница 340: ...collar 3 Cylinder pin 11 Bolt 19 Flat washer 4 Cotter pin 12 Hairpin cotter 20 Bolt 5 Pivot pin 13 Clevis pin 21 Hairpin cotter 6 Roll pin 14 Thrust washer 2 each 22 Carrier bracket 7 Roll pin 15 Rod end 8 Height of cut tube 16 Lift arm left Chassis Service and Repairs Page 7 26 Groundsmaster 3280 D 3320 05138SL Rev B ...

Страница 341: ... roll pin split 1 Park the machine on a level surface lower the cutting deck or implement shut off the engine set the parking brake and remove the key from the key switch 2 Remove the cutting deck from the lift arm refer to the Cutting Unit Operator s Manual 3 Disconnect the brake return spring from the lift arm 4 Remove the lift arm components from the machine Figure 190 5 If necessary disassembl...

Страница 342: ...nstall the roll pins so that one end is flush with the pivot pin and the inner roll pin split should be opposite to the outer roll pin split Figure 192 3 Connect the brake return spring to the lift arm 4 Mount the cutting deck to the lift arm refer to the Cutting Unit Operator s Manual 5 Refer to the Cutting Unit Operator s Manual for lift arm adjustment procedures Chassis Service and Repairs Page...

Страница 343: ...Engagement Front Axle 8 40 Rear Axle Driveshaft 4 Wheel Drive 8 43 Servicing the Rear Axle Driveshaft Cross and Bearing 4 Wheel Drive 8 45 Rear Axle 4 Wheel Drive 8 46 Bevel Gear Case and Axle Case 4 Wheel Drive Axle 8 49 Differential Shafts 4 Wheel Drive Axle 8 57 Axle Shafts 4 Wheel Drive Axle 8 59 Input Shaft Pinion Gear 4 Wheel Drive Axle 8 61 Differential Gear Assembly 4 Wheel Drive Axle 8 64...

Страница 344: ...ve rear axle lubricant GL 5 API SAE 80W 90 gear lube 4 wheel drive rear axle lubricant capacity 2 9 L 0 76 US gallons Refer to the Traction Unit Operator s Manual for checking the procedure 4 wheel drive bi directional clutch lubricant Mobil fluid 424 4 wheel drive bi directional clutch capacity 35 ml 1 2 fl oz Refer to the Traction Unit Operator s Manual for checking the procedure Drive Axles Spe...

Страница 345: ...arings are used on the outside ends of the axle shafts The entire drive line of the axle assembly is made of alloy steel The axle has a die cast aluminum housing that also serves as the hydraulic fluid reservoir Power is transmitted from the hydraulic motor hydrostatic transmission output gear to the axle pinion spur gear The pinion spur gear transmits power directly to the differential drive gear...

Страница 346: ...engagement Any time the front wheels change speed e g initially pressing the traction pedal climbing an incline and tires slipping the rear axle driveshaft speed also changes As soon as the driveshaft and the rear axle input shaft turn at slightly different speeds the bi directional clutch will engage and power is transferred to the rear axle Figure 195 The result is automatic 4 wheel drive The cl...

Страница 347: ...al Gear Holder Toro Part No TOR4027 Remove the gear cover from right hand side of the differential and bolt this tool in place to lock spur gear in position when removing the nut that secures the pinion coupler Groundsmaster 3280 D 3320 Page 8 5 Drive Axles Special Tools 05138SL Rev B ...

Страница 348: ...er to Removing the Wheel page 7 4 3 Remove the brake return spring item 2 in Figure 196 from the brake cable link Remove the cotter pin and clevis pin and disconnect the brake cable from the brake lever Note If the brake drum is severely worn it may be necessary to loosen the brake shoes before removing the brake drum Loosen the brake shoes by turning the star wheel adjuster inside the brake drum ...

Страница 349: ...d could possibly slip during installation Be careful when installing the brake return and adjuster springs 2 Position the return springs items 7 and 15 in Figure 196 to the brake shoes 3 Position the brake lever item 17 in Figure 196 to the brake shoes Secure the brake lever to the shoes with the brake lever retainers 4 Spread the upper ends of the brake shoes and install the star wheel socket sta...

Страница 350: ...ud 5 each per wheel 22 Brake lever 5 Bearing retainer 14 Brake drum 23 Brake cable link 6 Bearing 15 Locknut 4 each per wheel 24 Brake return spring 7 Dust shield 16 Outer seal plate 25 Cotter pin 8 Brake spider 17 Brake lever retainer 26 Clevis pin 9 Star wheel socket 18 Brake shoe 27 Brake cable Note It is not necessary to remove the front axle assembly from the machine when servicing the front ...

Страница 351: ... Wheel page 7 4 g225903 Figure 198 4 Slide the brake drum from the machine Figure 198 Note If the brake drum is severely worn it may be necessary to loosen the brake shoes before removing the brake drum Loosen the brake shoes by turning the star wheel adjuster item 10 in Figure 197 inside the brake drum assembly g225904 Figure 199 5 Remove the 4 locknuts 4 hardened washers and 4 socket head screws...

Страница 352: ...aging the axle tube g225905 Figure 200 6 Pull the axle shaft and brake assembly out of the axle housing Figure 200 Note If necessary remove the bearing race from the axle housing with a bearing puller g225888 Figure 201 7 Remove and discard the inner axle shaft seal Figure 201 Drive Axles Service and Repairs Page 8 10 Groundsmaster 3280 D 3320 05138SL Rev B ...

Страница 353: ...ainer ring will damage the axle shaft g225890 Figure 203 WARNING Wear protective safety goggles when breaking the retaining ring Personal injury could result from flying metal particles Keep bystanders away during this procedure 9 Place a chisel in position across the drilled hole and strike sharply to break the retainer Figure 203 Remove and discard the retainer 10 Remove the bearing from the axl...

Страница 354: ...nch Assembling the Front Axle Shafts and Bearings 1 Coat a new outer seal plate with a thin layer of fluid and place the outer seal plate brake assembly and dust shield in position on the axle shaft g225892 Figure 205 2 Pack the bearing with grease and press it onto the axle shaft Figure 205 IMPORTANT Drive the bearing onto the axle shaft by pressing on the inner race of the bearing only Drive Axl...

Страница 355: ...r to install Heat will destroy the close tolerance press fit g225894 Figure 207 4 Prepare a new inner shaft seal for assembly Put a light coat of No 1 Permatex or equivalent on the outer diameter surface that contacts the axle housing and a thin layer of fluid on the inner diameter surface that contacts the axle shaft Install new seal to a depth of 30 90 mm 1 218 inches into the axle housing Figur...

Страница 356: ...ote Liquid gasket kit Toro Part No 92 8775 includes Loctite ultra gray silicone gasket eliminator and application instructions g225896 Figure 209 6 Install the 4 socket head screws 4 hardened washers and 4 locknuts Tighten the nuts evenly in an alternating pattern so that the bearing is drawn into the axle housing Figure 209 Torque the nuts to 22 to 27 N m 16 to 20 ft lb IMPORTANT When tightening ...

Страница 357: ...the clevis pin item 26 in Figure 197 and cotter pin Attach the brake return spring to the brake cable link 9 Install the wheel assembly to the front axle refer to Installing the Wheel page 7 5 10 Check and adjust the brakes refer to the Traction Unit Operator s Manual Groundsmaster 3280 D 3320 Page 8 15 Drive Axles Service and Repairs 05138SL Rev B ...

Страница 358: ...Hose clamp 4 Flat washer 13 Locknut 22 Hydraulic hose 5 Spacer 14 Carrier bracket 2 each 23 Transmission 6 Mounting spacer 4 each 15 Wheel lug nut 5 each per wheel 24 Locknut 4 each 7 Pinion gear 16 Tire and wheel assembly 25 Bolt 8 Snap ring 17 Bolt 4 each 26 Socket head screw 4 each 9 Gasket 18 Flat washer 4 each 27 Lock washer 4 each Drive Axles Service and Repairs Page 8 16 Groundsmaster 3280 ...

Страница 359: ...or Prior to raising machine remove any attachments that may interfere with the safe and proper raising of the machine Always chock or block wheels Use jack stands or solid wood blocks to support the raised machine If the machine is not properly supported by blocks or jack stands the machine may move or fall which may result in personal injury 9 Chock rear wheels and jack up front of machine refer ...

Страница 360: ...ion ensure that the transmission driveshaft alignment is checked and adjusted if necessary 4 Install hydrostatic transmission to machine refer to Installing the Hydrostatic Transmission page 5 92 5 Install front wheels to axle and secure with wheel lug nuts Torque wheel lug nuts in a crossing pattern to 102 to 108 N m 75 to 80 ft lb 6 Install carrier brackets item 14 in Figure 210 to the machine f...

Страница 361: ...ach 16 Flat washer 4 each 3 Hydraulic pump 10 90 hydraulic fitting 17 Bolt 4 each 4 Pump bracket 11 O ring 18 Front wheel assembly 5 Hydraulic motor 12 Straight thread fitting 19 Front axle 6 Flange head screw 4 each 13 Locknut 4 each 20 Carrier bracket 2 each 7 Hardened washer 14 Oil filter Groundsmaster 3280 D 3320 Page 8 19 Drive Axles Service and Repairs 05138SL Rev B ...

Страница 362: ...e fitting 6 Remove the lift arms from the machine refer to Removing the Lift Arms page 7 27 7 Remove the fuel tank refer to Removing the Fuel Tank page 4 16 8 Remove the 2 carrier brackets item 20 in Figure 212 from the machine frame 9 Remove the 2 front wheels from the front axle refer to Removing the Wheel page 7 4 10 Remove the hydraulic motor from the machine refer to Removing the Front Axle D...

Страница 363: ...cessary 4 Install the hydraulic motor to the machine refer to Installing the Front Axle Drive Motor page 5 108 5 Install the 2 front wheels to the front axle refer to Installing the Wheel page 7 5 6 Install the 2 carrier brackets item 20 in Figure 212 to the machine frame 7 Install the lift arms to the machine refer to Installing the Lift Arms page 7 28 8 Install the fuel tank refer to Installing ...

Страница 364: ...each 6 Pinion mate bevel gear 2 each 19 Flange coupler 32 Differential case 7 Spherical thrust washer 2 each 20 Seal 33 Shim pack 8 Drive pinion 21 Shim pack 34 Front axle housing 9 Bearing cone 22 Outer bearing cone 35 Vent 10 Bearing cup 23 Outer bearing cup 36 Fitting 11 Bolt 4 each 24 Bearing spacer 37 Pipe nipple 12 Gear cover 25 Rear axle carrier housing 38 Oil fill tube 13 Screw 8 each 26 P...

Страница 365: ...e 215 Clean all gasket material from the housing mating surfaces g225907 Figure 216 3 Remove the 4 bearing bolts and remove the caps Place the caps in a safe place to avoid damaging their machined surfaces Figure 216 IMPORTANT The bearing caps are marked for identification The letters or numbers are in horizontal and vertical positions Record them for reference during assembly Always install them ...

Страница 366: ...matched sets Figure 217 g225909 Figure 218 Note Protect the ring gear when removing it from the differential case this will avoid damage of the ring gear teeth 5 Remove the ring gear bolts Use a hard wooden block and hammer drive the ring gear from the differential case Figure 218 Note Whenever the ring gear bolts are removed they are to be replaced with new bolts Drive Axles Service and Repairs P...

Страница 367: ...n Figure 219 If the bearings are removed from the differential case locate and retrieve the shims from the case For assembly purposes note the location of the shim g225911 Figure 220 WARNING To prevent personal injury always wear a face shield or safety goggles when striking a drift punch with a hammer 7 Put the case in a vise Drive the lock pin out of the pinion mate shaft Figure 220 Use a small ...

Страница 368: ...s will allow the pinion mate gears to turn to the opening of the case Figure 222 Remove the pinion mate gears and spherical washers behind the gears Inspect all differential components including the machined surfaces of the case If there is a gear damage replace the entire gear set as damage to 1 gear will most likely damage other gears as well If necessary replace the complete differential assemb...

Страница 369: ...assembly g226660 Figure 224 1 Bearing spacer 4 Shim 7 Washer 2 Outer bearing cup 5 Seal 8 Nut 3 Outer bearing cone 6 Flange coupler 11 Install the differential gear holder to carrier to retain the spur gear refer to the Differential Gear Holder page 8 5 Remove the nut washer flange coupler and seal from the pinion shaft Figure 224 Groundsmaster 3280 D 3320 Page 8 27 Drive Axles Service and Repairs...

Страница 370: ...ng removal as damage will result Carefully press the drive pinion shaft from the housing When the pinion is close to being pressed completely out of the bearing reach under the housing and catch the pinion in your hand to prevent any damage to the pinion g225916 Figure 226 13 Removing the drive pinion releases the spur gear Figure 226 14 Remove the oil seal from the housing Then remove the bearing...

Страница 371: ...ring removal as damage will result g225918 Figure 228 16 To remove the outer pinion bearing cup position the housing in a press Place a press plate of the proper size against the cup Press the cup out of the housing Figure 228 17 Position the front housing on a press bed with the bearing saddles resting on the press bed Protect the bearing saddles with a piece of wood if the press bed is rough Gro...

Страница 372: ...rings that were removed B Check the ring pinion and spur gear for abnormal wear or damage replace the components that are worn C Inspect the housings for cracks and external damage that could affect the operation of the axle assembly D Inspect the differential case for wear in the side gear and pinion mate area Replace the case if its machined areas are scored or if the pinion mate shaft fits loos...

Страница 373: ... housing assembly for differential repairs is available Using this assembly eliminates the need for shimming to establish the correct contact pattern between the ring and pinion gears 4 Determine the correct inner bearing shims for use with ring and pinion gear sets A When you install the original ring and pinion gears the original bearing shims or new shims of the same thickness should be used In...

Страница 374: ... controlled by adding or removing shims behind the inner bearing cup A pinion gear etched 0 is considered standard and has a 1 210 inches pinion to ring gear distance A pinion gear etched 3 requires a pinion to ring gear distance of 1 213 inches 0 003 inch from standard Removing 0 003 inch of bearing shims moves the pinion gear away from the ring gear increasing the pinion to ring gear distance A ...

Страница 375: ...he chamfered area of the center spline toward the pinion gear Tap the pinion gear with a soft mallet to engage the splines in the spur gear Figure 234 g225925 Figure 235 7 Support the drive pinion in a suitable press Figure 235 Groundsmaster 3280 D 3320 Page 8 33 Drive Axles Service and Repairs 05138SL Rev B ...

Страница 376: ... is felt when the gear is rotated by hand Figure 237 If more than 0 2 to 1 5 N m 2 to 13 in lb torque is required to rotate the pinion and spur gear tap the pinion shaft with a soft mallet until the drag is reduced 10 Apply permatex No 2 or equivalent to the outer diameter of the seal external splines of the pinion shaft and internal splines of the pinion coupler Install the differential gear hold...

Страница 377: ...place the shim with appropriate thicker or thinner shim and assemble Ensure that the pinion shaft end play is correct before you proceed with assembly procedure Note Pinion shaft shims are available in 2 39 mm 0 094 inch to 3 05 mm 0 120 inch thickness and in 3 18 mm 0 125 inch to 3 84 mm 0 151 inch thickness in 0 05 mm 0 002 inch increments 13 Remove the differential gear holder from the carrier ...

Страница 378: ...s in the case Install the pinion gears while holding the side gears in place Rotate the side gears until the holes of the washers and pinion gears line up with the holes of the case If the gears cannot be rotated by hand install 1 of the axle shafts into the side gear spline and use a pipe wrench to turn the shafts g225930 Figure 241 16 Install the pinion shaft Grease the shaft to aid assembly Ens...

Страница 379: ...n place Figure 242 g226482 Figure 243 18 Position the ring gear onto the differential case and thread new bolts into the ring gear Tighten the bolts alternating back and forth across the gear to allow the gear to be pulled evenly into place Torque the bolts to 61 to 88 N m 45 to 65 ft lb to secure assembly Figure 243 Groundsmaster 3280 D 3320 Page 8 37 Drive Axles Service and Repairs 05138SL Rev B...

Страница 380: ...20 Assemble new differential bearing cups onto the differential bearing cones Seat differential assembly with drive gear on proper side of carrier into the carrier bearing cradles Note This application requires that the ring gear teeth face toward the spur gear cover g225934 Figure 245 21 The bearing cradles are designed to apply a slight preload to the bearings It is important to push both of the...

Страница 381: ...elow the differential bearings from one side to the other until the correct backlash is attained 23 Check the ring to pinion gear engagement refer to Ring to Pinion Gear Engagement Front Axle page 8 40 g225936 Figure 247 24 Apply silicone sealant between the front and the rear axle housings and install the 8 housing bolts Torque the bolts to 24 to 31 N m 18 to 23 ft lb Figure 247 25 Install the ri...

Страница 382: ...blue g226485 Figure 249 1 Heel 3 Toe 2 Drive side 4 Coast side 2 While applying a light load to the ring gear rotate the pinion gear until the ring gear has made 1 complete revolution The drive side pattern should be located at the toe portion of the tooth The coast pattern should also be at the toe portion of the tooth Figure 249 Study the patterns in the following illustrations and correct engag...

Страница 383: ...ary to be changed by 0 10 mm 0 004 inch the shim pack should be changed by 0 15 mm 0 006 inch as a starting point High backlash is corrected by moving the ring gear closer to the pinion Low backlash is corrected by moving the ring gear away from the pinion These corrections are made by switching shims from one side of the differential case to the other g226455 Figure 250 1 Heel 3 Toe 2 Drive side ...

Страница 384: ... pattern concave side of gear moves slightly lower and toward the toe 3 Thicker pinion position shim with the backlash constant moves the pinion closer to the ring gear Drive pattern convex side of gear moves deeper on the tooth flank contact and slightly toward the toe Coast pattern concave side of gear moves deeper on the tooth and toward the heel 4 Thinner pinion position shim with backlash con...

Страница 385: ...e lower the cutting deck shut off the engine set the parking brake and remove the key from the key switch 2 Support the driveshaft to prevent it from falling 3 Remove the 6 socket head screws and 6 lock washers that secure the driveshaft front yoke flange to the front axle flange item 8 in Figure 253 4 Remove the 6 socket head screws and 6 lock washers that secure the driveshaft rear yoke flange t...

Страница 386: ...and will cause unnecessary vibration 1 Position the rear axle driveshaft to the machine Ensure that the driveshaft tube item 10 in Figure 253 is toward the rear axle 2 Secure the yokes of the driveshaft to the front axle flange and bi directional clutch with the fasteners that are previously removed 3 Lubricate the driveshaft grease fittings refer to the Traction Unit Operator s Manual Drive Axles...

Страница 387: ...tially into the yoke C Insert the cross into the yoke and bearing D Hold the cross in alignment and press the bearing in until it hits the yoke E Install the snap ring into the yoke groove to secure the installed bearing F Place second bearing into yoke bore and onto cross shaft Press the bearing into the yoke and secure with the snap ring G Repeat the procedure for other yoke H Apply grease to th...

Страница 388: ...Axle support 36 Grease fitting 7 Bolt 22 Axle pin 37 Steering cylinder 8 Lock washer 6 each 23 Washer head screw 38 Grease fitting 9 Socket head screw 6 each 24 Grease fitting 39 Tie rod 10 Driveshaft assembly 25 Flange head screw 4 each 40 Bolt 4 each 11 Bolt 2 each 26 Rear bumper 41 Washer 4 each 12 Bolt 27 Tie rod end 2 each 42 Jam nut 4 each 13 Axle stop 28 Slotted hex nut 2 each 43 Bolt 2 eac...

Страница 389: ...eparate the rear axle support from the rear axle Note the location of the thrust washers on both ends of the axle mounting boss Installing the Rear Axle 4 Wheel Drive 1 Position the rear axle support to the axle Install the thrust washers items 31 and 32 in Figure 255 between the axle boss and the axle support to minimize clearance 2 Install the axle pin item 22 in Figure 255 to secure the axle to...

Страница 390: ...r wheel toe in and adjust if necessary refer to the Traction Unit Operator s Manual 12 Check the steering stop bolt adjustment on both sides of the axle At full right and left turns a gap of 2 2 mm 0 088 inch should exist between the bevel gear case casting and the stop bolt on the axle case Drive Axles Service and Repairs Page 8 48 Groundsmaster 3280 D 3320 05138SL Rev B ...

Страница 391: ...ounting screws nuts and lock washers and remove the bevel gear case axle case assembly and O ring from the axle support Figure 256 2 Mark both right and left bevel gear case axle case assemblies IMPORTANT Do not interchange the right and left bevel gear case axle case assemblies g226487 Figure 257 1 Axle case 3 Mounting screw 2 O ring 4 Axle cover assembly 3 Remove the axle cover mounting screws a...

Страница 392: ...ntinued g226460 Figure 258 1 Axle case 3 Mounting screw 2 Axle case support 4 Support shim 4 Remove the axle case support mounting screws axle case support and support shims Figure 258 Drive Axles Service and Repairs Page 8 50 Groundsmaster 3280 D 3320 05138SL Rev B ...

Страница 393: ...ap the upper end of the bevel gear shaft out of the upper bearing and upper bevel gear 7 Pull the bevel gear case from the axle case and remove the upper bevel gear collar spacer and thrust washer from the gear case 8 Remove the axle case cover screws cover and O ring from the axle case 9 Remove the plug and sealing washer not shown from the center of the axle case cover Hold the axle case cover l...

Страница 394: ...cification 24 95 to 24 98 mm 0 982 to 0 983 inch Axle case support bushing inner diameter factory specification 25 00 to 25 08 mm 0 984 to 0 987 inch 2 Inspect all gears shafts bearings cases and covers for damage and wear Replace the components as necessary Installing the Bevel Gear Case and Axle Case 4 Wheel Drive Axle g226463 Figure 261 1 Axle case 2 Bevel gear case 3 Shaft seal 1 Coat new shaf...

Страница 395: ... 4 Install the new O ring and then knuckle pin Use medium strength Loctite threadlocker and tighten the knuckle pin mounting screws to 23 to 27 N m 17 to 20 ft lb 5 Determine necessary quantity of the support shims A Lubricate the axle case support bushing with a thin coat of grease and slide the axle case support onto the knuckle pin B Position the support shims that were removed during disassemb...

Страница 396: ...y by increasing or reducing the number of axle case support shims Note Axle case support shims are available in 0 10 mm 0 004 inch 0 20 mm 0 008 inch and 0 40 mm 0 016 inch thickness 6 After correct support shims have been determined remove the mounting screws and apply heavy strength thread locking compound to the screw threads Install the screws torque the screws to 77 to 91 N m 57 to 67 ft lb I...

Страница 397: ...vel gear backlash 0 10 to 0 40 mm 0 004 to 0 016 inch 8 Adjust backlash by increasing or reducing the axle bearing shim thickness refer to the Differential Shafts 4 Wheel Drive Axle page 8 57 Note Axle bearing shims are available in 0 10 mm 0 004 inch 0 20 mm 0 008 inch and 0 50 mm 0 020 inch thickness g226467 Figure 265 1 Dial indicator 3 Axle cover assembly 5 Lower bevel gear 2 Axle bearing shim...

Страница 398: ...g the axle bearing shim thickness refer to the Axle Shafts 4 Wheel Drive Axle page 8 59 Note Axle bearing shims are available in 0 20 mm 0 008 inch 0 30 mm 0 012 inch and 0 50 mm 0 020 inch thickness 11 Tighten the axle cover screws to 23 to 27 N m 17 to 20 ft lb 12 Coat a new O ring with grease and install the bevel gear case axle case assembly on the axle support Tighten the mounting screws and ...

Страница 399: ...ocknut 2 O ring 4 Lock washer 6 Axle support 1 Remove the mounting screws nuts and lock washers and remove the bevel gear case axle case assembly and O ring from the axle support Figure 266 2 Mark and pull the differential shaft assembly from the axle support g226469 Figure 267 1 O ring 3 Bearing shims 5 Bevel gear 2 Differential shaft 4 Bearing 2 each 6 Retaining ring 3 Remove the retaining ring ...

Страница 400: ...s in the axle support and drive the differential shaft and bearing assembly into the axle support 2 Install the bevel gear and retaining ring 3 Coat new O ring with grease Align the differential shaft splines with the differential gear assembly and slide the differential shaft assembly onto the axle support 4 Install the bevel gear case axle case assembly refer to Bevel Gear Case and Axle Case 4 W...

Страница 401: ...cover from the axle case as an assembly Figure 268 g226471 Figure 269 1 Bearing 3 Shims 5 Spacer 2 Bevel gear 4 Retaining ring 2 Use a bearing puller to remove the bearing and bevel gear Figure 269 3 Remove the shims spacer and retaining ring Drive the axle out of the bearing and cover Remove and discard the axle shaft seal 4 Inspect all gears shafts bearings spacers and cases for damage and wear ...

Страница 402: ... cover and bearing assembly onto the axle shaft Press only on the inner race of the cover bearing Figure 270 3 Install the retaining ring spacer and correct combination of bearing shims Install the bevel gear and bearing 4 Coat a new O ring with grease and install the axle cover assembly Tighten the axle cover screws to 23 to 27 N m 17 to 20 ft lb Drive Axles Service and Repairs Page 8 60 Groundsm...

Страница 403: ...the shims and bearing case O ring 2 Release the stake washer and remove the locknut Remove and discard the stake washer 3 Drive the input shaft pinion gear out from the outer bearing cone and bearing case Remove and discard the oil seal and O ring 4 Inspect all gears shafts bearings spacers and cases for damage and wear Replace the components as necessary Note Replacement input shaft pinion gears ...

Страница 404: ...n in Figure 272 4 Coat a new O ring with grease Install the O ring in the seal collar and install the collar 5 Install a new stake washer and install the locknut finger tight 6 Set the bearing preload by securing the bearing case in a vise Thread a M12 x 1 5 bolt into the splined end of the input shaft pinion gear 7 Slowly tighten the locknut until 0 4 to 0 7 N m 4 0 to 6 0 in lb of force is requi...

Страница 405: ...rily install the input shaft pinion gear assembly into the axle case Tighten the mounting screws to 47 to 56 N m 35 to 41 ft lb g226492 Figure 274 1 Axle case 3 Input shaft pinion gear 2 Screwdriver 4 Dial indicator 11 Insert a screwdriver through the drain plug hole to hold the ring gear and measure the pinion gear to ring gear backlash Figure 274 Pinion gear to ring gear backlash 0 10 to 0 40 mm...

Страница 406: ...embly purposes mark the differential shaft assemblies Pull the differential shaft assemblies from the axle support g226493 Figure 275 1 Case screw 4 O ring 7 Axle support left 2 O ring 5 Pinion gear assembly 3 Differential gear assembly 6 Axle support right 3 Remove the input shaft pinion gear assembly shims and O ring from the axle support Figure 275 4 Remove the axle support case screws Separate...

Страница 407: ...position g226495 Figure 277 1 Differential pinion shaft 4 Side gear 2 each 7 Differential case 2 Pinion washer 2 each 5 Side gear shims 3 Pinion gear 2 each 6 Ring gear 7 Remove the differential pinion shaft pinion gears and pinion washers Remove the differential side gears and side gear shims Remove the ring gear only if it will be replaced Figure 277 Note Replacement ring gears are only availabl...

Страница 408: ...he side gear to case clearance Figure 278 Replace the components as necessary Side gear to case clearance 0 05 to 0 30 mm 0 002 to 0 012 inch Side gear outer diameter factory specification 33 91 to 33 95 mm 1 335 to 1 337 inch Differential case inner diameter factory specification 34 00 to 34 06 mm 1 339 to 1 341 inch Drive Axles Service and Repairs Page 8 66 Groundsmaster 3280 D 3320 05138SL Rev ...

Страница 409: ... 03 to 0 25 mm 0 001 to 0 010 inch Pinion shaft outer diameter factory specification 13 97 to 13 98 mm 0 550 to 0 551 inch Pinion gear inner diameter factory specification 14 00 to 14 02 mm 0 551 to 0 552 inch 3 Inspect all the gears shafts bearings cases and covers for damage and wear Replace the components as necessary Installing the Differential Gear Assembly 4 Wheel Drive Axle g226498 Figure 2...

Страница 410: ...0 047 inch and 1 30 mm 0 051 inch thickness 7 Apply gear marking compound such as DyKem steel blue lightly over several gear teeth 8 While applying a light load to either side gear rotate either pinion gear until the side gears have made 1 complete revolution g226499 Figure 281 1 More than 35 total tooth contact 2 1 3 to 1 2 of entire width from small end of tooth 9 Ideal tooth contact should cove...

Страница 411: ...tial shaft splines with the differential gear assembly and slide the differential shaft assemblies onto the axle support 16 Install the bevel gear case axle case assemblies refer to Bevel Gear Case and Axle Case 4 Wheel Drive Axle page 8 49 Groundsmaster 3280 D 3320 Page 8 69 Drive Axles Service and Repairs 05138SL Rev B ...

Страница 412: ...f the ring gear both drive and coast side with a gear marking compound such as DyKem steel blue 2 Install the input shaft pinion gear assembly into the axle case 3 While applying a light load to the ring gear rotate the pinion gear in the direction of forward travel until the ring gear has made 1 complete revolution g226501 Figure 283 1 More than 35 total tooth contact Ideal tooth contact observed...

Страница 413: ...dy the different contact patterns Figure 285 and Figure 286 and correct gear engagement as necessary Note When making changes note that 2 variables are involved refer to the Gear Pattern Movement Summary page 8 71 Example If the pinion gear to ring gear backlash is set correctly to specifications and the bearing case shim is changed to adjust tooth contact it may be necessary to adjust backlash to...

Страница 414: ...eat until proper tooth contact and pinion gear to ring gear backlash are correct g226504 Figure 286 1 Toe contact 2 Tip contact 2 If contact is toward the toe or tip of the gear Figure 286 do as follows A Install the thinner or remove bearing case shim s to move the pinion shaft away from the ring gear B Install the thicker or additional differential bearing shim s to move the ring gear forward C ...

Страница 415: ...the bolt item 8 in Figure 287 lock washer and flat washer that secure the clutch to the rear axle Locate and retrieve the spacer 5 Pull the bi directional clutch from the rear axle input shaft Installing the Bi Directional Clutch 4 Wheel Drive 1 Apply anti seize lubricant to the splines of the rear axle input shaft 2 Slide the bi directional clutch onto the rear axle input shaft Align the notches ...

Страница 416: ... Directional Clutch 4 Wheel Drive continued 6 Fill the clutch with oil to the correct level refer to the Traction Unit Operator s Manual Drive Axles Service and Repairs Page 8 74 Groundsmaster 3280 D 3320 05138SL Rev B ...

Страница 417: ...Wheel Drive 1 Clean the external surface of the clutch before disassembly 2 Disassemble the clutch as shown in Figure 288 Assembling the Bi Directional Clutch 4 Wheel Drive 1 Lightly lubricate the clutch components with a clean Mobil Fluid 424 before assembly 2 Assemble the clutch as shown in Figure 288 3 When you install the oil seals ensure that the seal lips are facing in 4 Apply Hylomar jointi...

Страница 418: ...Bi Directional Clutch 4 Wheel Drive continued 5 Secure the end plate with the 6 socket head screws torque the screws to 19 N m 14 ft lb Drive Axles Service and Repairs Page 8 76 Groundsmaster 3280 D 3320 05138SL Rev B ...

Страница 419: ...ation 9 2 Service and Repairs 9 3 PTO Drive Belt 9 3 PTO Driveshaft 9 4 Servicing the PTO Driveshaft Cross and Bearing 9 7 PTO Shaft 9 8 Aligning the PTO Pulley to the Electric Clutch Pulley 9 11 Groundsmaster 3280 D 3320 Page 9 1 PTO System 05138SL Rev B ...

Страница 420: ...mation regarding the operation general maintenance and maintenance intervals for your machine Refer to the Operator s Manual for additional information when servicing the machine PTO System General Information Page 9 2 Groundsmaster 3280 D 3320 05138SL Rev B ...

Страница 421: ...Lock washer 3 Compression spring 8 Electric clutch 13 Flat washer 4 Spacer 9 Locknut 14 PTO pulley 5 PTO shaft 10 PTO drive belt 15 PTO tension shaft Note Refer to the Traction Unit Operator s Manual for information regarding PTO Belt Adjustment and Installation Groundsmaster 3280 D 3320 Page 9 3 PTO System Service and Repairs 05138SL Rev B ...

Страница 422: ...switch when the PTO driveshaft is disconnected from the cutting deck or implement If you start the engine and the PTO shaft is allowed to rotate serious personal injury and machine damage could result Disconnect the PTO electric clutch electrical connector whenever the PTO driveshaft is disconnected from the cutting deck or implement PTO System Service and Repairs Page 9 4 Groundsmaster 3280 D 332...

Страница 423: ...box shaft 4 Remove the PTO driveshaft from the machine Installing the PTO Driveshaft g220802 Figure 291 1 End yoke 5 Grease fitting 2 Universal joint kit cross and bearings 2 each 6 Slip tube yoke 3 Grease fitting 2 each 7 End yoke 4 Slip shaft yoke IMPORTANT If the driveshaft tube and shaft were separated ensure that the slip shaft yoke and slip tube yoke are aligned when the tube and shaft are a...

Страница 424: ... in the end yoke and gearbox shaft C Install the 4 bolts in the driveshaft end yokes Alternate direction that the bolt is installed on each yoke D Install and tighten the 4 locknuts to secure the end yokes to the gearbox shaft and PTO shaft 4 Lubricate the PTO driveshaft grease fittings refer to the Traction Unit Operator s Manual PTO System Service and Repairs Page 9 6 Groundsmaster 3280 D 3320 0...

Страница 425: ...y into the yoke C Insert the cross into the yoke and bearing D Hold the cross in alignment and press the bearing in until it hits the yoke E Install the snap ring into the yoke groove to secure installed bearing F Place second bearing into the yoke bore and onto the cross shaft Press the bearing into the yoke and secure with the snap ring G Repeat the procedure for the other yoke H Apply grease to...

Страница 426: ...you start the engine and the PTO shaft is allowed to rotate serious personal injury and machine damage could result Disconnect the PTO electric clutch electrical connector whenever the PTO driveshaft is disconnected from the cutting deck or implement Removing the PTO Shaft 1 Park the machine on a level surface lower the cutting deck or implement shut off the engine set the parking brake and remove...

Страница 427: ... shaft from the machine 11 Slide the flange bearings bearing bracket and support plate from the PTO shaft 12 If necessary disassemble the front flange bearing bearing bracket and support plate Figure 293 Installing the PTO Shaft 1 If separated assemble the front flange bearing bearing bracket and support plate as follows A Secure the flange bearing to the support plate with the 2 carriage screws a...

Страница 428: ...ue the bolt to 41 to 47 N m 30 to 35 ft lb 8 Install the PTO drive belt to the machine refer to the Traction Unit Operator s Manual Do not fully tension the belt 9 Align the PTO pulley to the electric clutch pulley refer to Aligning the PTO Pulley to the Electric Clutch Pulley page 9 11 10 After the pulleys are aligned properly ensure that the flange bearing locking collars are locked to the PTO s...

Страница 429: ...at secure the front and rear flange bearing locking collars to the PTO shaft Use the blind hole in each bearing collar as a striking point unlock the collars from the PTO shaft with a punch by rotating the collars clockwise as viewed while facing forward 3 Shift the position of the PTO shaft and pulley until the PTO pulley groove is aligned with the clutch pulley groove 4 Use the blind hole in eac...

Страница 430: ...PTO System Service and Repairs Page 9 12 Groundsmaster 3280 D 3320 05138SL Rev B ...

Страница 431: ...tors That Can Affect Quality of Cut 10 3 Adjustments 10 4 Castor Wheel Tire Pressure 10 4 Service and Repairs 10 5 Cutting Deck 10 5 Idler Assembly 10 6 Blade Spindle 10 8 Servicing the Blade Spindle 10 10 Gearbox 10 14 Castor Forks and Wheels 10 18 Cutting Deck Rollers and Skids 10 20 Groundsmaster 3280 D 3320 Page 10 1 Cutting Units 05138SL Rev B ...

Страница 432: ...ir of 72 inch base cutting deck The 52 60 62 and 72 inch side discharge cutting decks 62 inch base cutting deck information is not covered in this chapter Cutting Unit Operator s Manual The Cutting Unit Operator s Manual provides information regarding the operation general maintenance and maintenance intervals for the cutting deck on your machine Refer to the Cutting Unit Operator s Manual for add...

Страница 433: ...ified in the Operator s Manual 4 Blade condition Sharpen the blades if their cutting edges are dull or nicked Inspect the blade sail for wear or damage Replace the blade if necessary 5 Mower housing condition Ensure that the cutting chamber is in good condition Keep the underside of the deck clean The unwanted material buildup can reduce the cutting performance 6 Height of cut Ensure that all cutt...

Страница 434: ...key switch before working on the cutting deck Refer to the Cutting Unit Operator s Manual for adjustment procedures for the cutting unit on the Groundsmaster 3280 D and 3320 Castor Wheel Tire Pressure Castor tires on the cutting deck should be inflated to 345 kPa 50 psi Cutting Units Adjustments Page 10 4 Groundsmaster 3280 D 3320 05138SL Rev B ...

Страница 435: ...eshaft is disconnected from the cutting deck disconnect the PTO electric clutch electrical connector CAUTION Do not work on the cutting deck or lift arms with the engine running Always shut off the engine and remove the key from the key switch before working on the cutting deck Cutting Deck Refer to specific Cutting Unit Operator s Manual for cutting deck removal and installation procedure Grounds...

Страница 436: ...g 5 Torsion spring 9 Locknut 2 Snap ring 6 Washer 10 Idler pulley 3 Flange bushing 2 each 7 Drive belt 11 Idler spacer 4 Idler arm 8 Cutting deck 12 Button head screw Cutting Units Service and Repairs Page 10 6 Groundsmaster 3280 D 3320 05138SL Rev B ...

Страница 437: ...etains the idler arm assembly to the cutting deck 6 Remove the idler components as shown in Figure 295 Installing the Idler Assembly 1 Install the idler components that were removed and secure the idler arm assembly to the cutting deck with the snap ring Figure 295 2 Insert a nut driver or small piece of pipe onto the torsion spring end of the idler arm CAUTION The spring is under heavy load and c...

Страница 438: ...urface raise the cutting deck shut off the engine set the parking brake and remove the key from the key switch Support the cutting deck so that it cannot fall accidentally 2 Remove the belt covers from the top of the cutting deck Remove the drive belt from the deck pulleys refer to the Cutting Unit Operator s Manual 3 Remove the cutting blade item 6 in Figure 296 anti scalp cup and blade bolt from...

Страница 439: ... spindle assembly to the deck with the 8 ribbed neck bolts and 8 flange nuts 2 Install the cutting blade anti scalp cup and blade bolt refer to the Cutting Unit Operator s Manual Torque the blade bolt to 115 to 149 N m 85 to 110 ft lb 3 Slowly rotate the cutting blades to check that the blades do not contact any deck component s 4 Install the drive belt to the deck pulleys refer to the Cutting Uni...

Страница 440: ...Use an arbor press to remove the spindle shaft from the spindle housing Note Ensure that the spindle shaft spacer remains on the spindle shaft while removing the shaft 4 Remove the oil seals from the spindle housing 5 Remove the bearing cones O ring inner bearing spacer and spacer ring from the spindle housing 6 Use an arbor press to remove the 2 bearing cups and outer bearing spacer from the hous...

Страница 441: ...PORTANT If new bearings are installed into a used spindle housing it is not necessary to replace the original large snap ring If the original snap ring is in good condition with no sign of damage e g spun bearing leave the snap ring in the housing and discard the snap ring that comes with the new bearings If the large snap ring is damaged replace the snap ring 1 If the large snap ring was removed ...

Страница 442: ...ressing the second bearing cup against it 4 Pack the bearing cones with grease Apply a film of grease on the lips of the oil seals and O ring 5 Install the lower bearing cone and oil seal into the bottom of the spindle housing g223665 Figure 301 1 Upper seal installation 2 Bottom seal installation Note The bottom seal must have the lip facing out down This seal installation allows grease to purge ...

Страница 443: ...the spacer up through the spindle housing Note The bottom oil seal and spindle spacer fit together when the spindle is fully installed g223666 Figure 302 1 Locknut 3 O ring 2 Upper seal 4 Hardened washer 10 Install the O ring to the top of the spindle shaft Figure 302 11 Install the pulley hub down special hardened washer and locknut to the spindle shaft Figure 302 torque the locknut to 176 to 203...

Страница 444: ... Cutting deck 5 Washer 4 each 10 Drive pulley Removing the Gearbox 1 Park the machine on a level surface lower the cutting deck shut off the engine set the parking brake and remove the key from the key switch 2 Remove the belt covers from the top of the cutting deck Remove the drive belt from the deck pulleys refer to the Cutting Unit Operator s Manual Cutting Units Service and Repairs Page 10 14 ...

Страница 445: ...ws 4 flange nuts 4 washers and 4 mounts that secure the left and right gearbox brackets items 8 and 6 in Figure 303 to the deck mounting plate and remove the brackets from the deck 6 Remove the gearbox assembly with the drive pulley attached from the deck Drain the lubricant from the gearbox 7 Remove the 2 set screws item 12 in Figure 303 that secure the taper lock bushing to the drive pulley on t...

Страница 446: ...continued g223658 Figure 305 1 Oil cap 4 Washer 7 Oil cap 2 Oil seal 2 each 5 90 elbow fitting 8 Gearbox 3 Breather plug 6 Plug 9 Dipstick Cutting Units Service and Repairs Page 10 16 Groundsmaster 3280 D 3320 05138SL Rev B ...

Страница 447: ...he set screws to 19 8 N m 175 in lb 5 Fill the allen recess in the set screws and bushing threads with grease to prevent dirt from packing into the crevices 6 Position the gearbox assembly with the drive pulley attached to the deck 7 Position and secure the left and right gearbox brackets items 8 and 6 in Figure 303 to the deck mounting plate with the 4 carriage screws 4 flange nuts 4 washers and ...

Страница 448: ...her 2 each 3 Bolt 5 each per arm 11 Wheel rim half 19 Spacer 4 Bolt 12 Plate 20 Retaining ring 5 Bearing 2 each 13 Flange nut 4 each 21 Cap washer 6 Inner bearing spacer 14 Locknut 22 Compression spring 7 Wheel hub 15 Castor fork 23 Cap 8 Wheel rim half 16 Grease fitting Cutting Units Service and Repairs Page 10 18 Groundsmaster 3280 D 3320 05138SL Rev B ...

Страница 449: ...ved from the wheel hub do the following steps A Press first bearing into the hub until it contacts the shoulder of the hub B Place the inner bearing spacer in the hub and then press the second bearing into the hub C Check that the spacer fits tightly between the bearings after hub assembly 3 If the castor fork was removed from the castor arm lubricate the grease fitting 4 Refer to the Cutting Unit...

Страница 450: ... deck Figure 307 Installing the Cutting Deck Rollers and Skids 1 Install the skids to the cutting deck Figure 307 Ensure to install the skids in the same mounting hole height position lower or upper 2 When you install the rollers to the deck tighten the nut until the roller will not rotate then loosen the nut only enough to allow the roller to rotate freely Ensure to install all the cutting deck r...

Страница 451: ...2 Electrical Components and Schematics 11 2 Cab Heater System 11 2 Service and Repairs 11 3 Roof Assembly 11 3 Heating Components 11 5 Mixing Box Assembly 11 7 Heater Core 11 10 Blower Fan 11 12 Windshield Wiper Assembly 11 14 Groundsmaster 3280 D 3320 Page 11 1 Operator Cab 05138SL Rev B ...

Страница 452: ...ctrical System page 6 1 The Electrical Schematics and Wire Harness Drawings for the operator cab in Appendix A page A 1 Cab Heater System The cab heater system used on the Groundsmaster 3280 D machine consists of the following components 1 A heater core located in the headliner of the cab 2 The hoses to allow a circuit for engine coolant to circulate through the heater core 3 A blower fan motor th...

Страница 453: ...of strap 2 each 12 Headliner assembly 3 Short side cover seal 2 each 8 Flange nut 38 each 13 Long side cover seal 2 each 4 Roof 9 Long roof strap 2 each 5 Shoulder screw 22 each 10 Side cab strap 2 each Get access to the heater core components by removing the roof Groundsmaster 3280 D 3320 Page 11 3 Operator Cab Service and Repairs 05138SL Rev B ...

Страница 454: ...headliner and cab 5 Inspect all the roof seals for wear or damage Replace the roof seals as necessary Installing the Roof Assembly 1 Ensure that all the components in the headliner are installed and secure 2 Position the roof onto the headliner Ensure that all the roof mounting holes are correctly aligned with the headliner 3 Secure the roof to the headliner with the 22 shoulder screws item 5 in F...

Страница 455: ...nts g243012 Figure 309 1 Right intake air filter 3 Heater valve 5 Wiper motor assembly 2 Left intake air filter 4 Mixing box assembly Groundsmaster 3280 D 3320 Page 11 5 Operator Cab Service and Repairs 05138SL Rev B ...

Страница 456: ... to the cab heating components by removing the cab roof refer to Removing the Roof Assembly page 11 4 After you remove the cab roof refer to Figure 309 and Figure 310 to identify the components used for heating the operator cab Operator Cab Service and Repairs Page 11 6 Groundsmaster 3280 D 3320 05138SL Rev B ...

Страница 457: ...ng box inlet foam 24 Vent hose center 4 Flat washer 4 each 11 Hose clamp 7 each 18 Flat washer 2 each 25 Vent hose right 5 Hairpin cotter 4 each 12 Tube support 4 each 19 Button head screw 2 each 26 Heater core fan assembly 6 Control cable 13 Intake hose 2 each 20 Cab headliner 27 Mixing box 7 Carriage screw 2 each 14 Mixing box wire harness 21 Vent hose left defrost Groundsmaster 3280 D 3320 Page...

Страница 458: ... or Blower Fan page 11 12 for information on removing and installing these components 4 Disconnect the electrical connectors from the mixing box wire harness 5 Remove the mixing box components as shown in Figure 311 and Figure 312 Installing the Mixing Box Assembly g243014 Figure 312 1 Heater core 2 Blower fan 3 Air diverter assembly 1 Install all the mixing box components that were removed Figure...

Страница 459: ...re that there are no coolant leaks in the cab headliner 5 When you complete all the service in the cab headliner secure the roof to the top of the cab refer to Installing the Roof Assembly page 11 4 Groundsmaster 3280 D 3320 Page 11 9 Operator Cab Service and Repairs 05138SL Rev B ...

Страница 460: ...in Figure 313 attached to the cab headliner Removing the Heater Core 1 Park the machine on a level surface lower the cutting deck shut off the engine set the parking brake and remove the key from the key switch 2 Remove the roof from the top of the cab to get access to the heater core refer to Removing the Roof Assembly page 11 4 3 For assembly purposes label the heater hoses Loosen the hose clamp...

Страница 461: ... the mixing box 2 Position the mount bracket cover to the mount bracket Secure the cover to the mount bracket with the 7 tap screws item 7 in Figure 313 3 Secure the cover to the mixing box assembly as follows A Position the mixing box cover to the mixing box Ensure that the wire harness is routed through recess in side of the mixing box B With the rivet pin in a raised position insert the rivets ...

Страница 462: ... parking brake and remove the key from the key switch 2 Remove the roof from the top of the cab to get access to the blower fan refer to Removing the Roof Assembly page 11 4 3 For assembly purposes label the heater hoses Loosen the hose clamps and disconnect both the heater hoses from the tubes on the heater core 4 Remove the mixing box cover as follows A Carefully use a small prybar to raise the ...

Страница 463: ... with attached blower fan into the mixing box 3 Connect the wire harness connectors to the blower fan assembly Figure 315 4 Secure the mixing box cover as follows A Position the mixing box cover to the mixing box Ensure that the wire harness is routed through recess in side of the mixing box B With the rivet pin in a raised position insert the rivets through cover and into the hole in the mixing b...

Страница 464: ... 2 lock washers that secure the wiper blade to the wiper arm assembly and remove the wiper blade 3 If necessary remove the wiper arm assembly as follows A Disconnect the washer hose from the wiper assembly B Lift the caps at the top of the wiper arms and remove the 2 flange nuts that secure the wiper arms to the wiper motor C Use a suitable puller to remove the tapered wiper arm sockets from the w...

Страница 465: ... Secure the roof to the top of the cab refer to Installing the Roof Assembly page 11 4 2 If the wiper arm was removed do the following A Clean the tapered wiper arm sockets and wiper motor shafts B Slide the wiper arm sockets onto the wiper motor shafts and secure the wiper arm sockets with the 2 flange nuts Install the wiper arm caps over the 2 flange nuts C Connect the washer hose to the wiper a...

Страница 466: ...Operator Cab Service and Repairs Page 11 16 Groundsmaster 3280 D 3320 05138SL Rev B ...

Страница 467: ...00600 A 20 Wire Harness Diagram Main 3280 D Machine Serial Number 260000000 to 270000600 A 21 Wire Harness Drawing Main 3280 D Machine Serial Number 270000601 to 311000000 A 22 Wire Harness Diagram Main 3280 D Machine Serial Number 270000601 to 311000000 A 23 Wire Harness Drawing Main 3280 D Machine Serial Number 311000000 to 316000000 A 24 Wire Harness Diagram Main 3280 D Machine Serial Number 31...

Страница 468: ...Wire Harness Drawing North American Light Kit Model 30701 Machines Serial Number 315000000 and Up A 40 Wire Harness Diagram North American Light Kit Model 30701 Machines Serial Number 315000000 and Up A 41 Foldout Drawings Page A 2 Groundsmaster 3280 D 3320 05138SL Rev B ...

Страница 469: ...include a line with an alternate color These wires are identified with the wire color and line color with either a or _ separating the color abbreviations listed above e g R BK is a red wire with a black line OR_BK is an orange wire with a black line Wire Size The individual wires of the electrical harness diagrams in this chapter identify both the wire color and the wire size Examples 16 BK 16 AW...

Страница 470: ...Foldout Drawings Page A 4 Groundsmaster 3280 D 3320 05138SL Rev B ...

Страница 471: ...Groundsmaster 3280 D 3320 Drawing 108 2091 Rev Sheet 1 of 1 05138SL Rev B Page A 5 Hydraulic Schematic 3280 D Serial Numbers below 270000400 and 3320 Serial Numbers below 280000000 g243931 ...

Страница 472: ...age A 6 05138SL Rev B Groundsmaster 3280 D 3320 Drawing 114 2878 Rev C Sheet 1 of 1 Hydraulic Schematic 3280 D Serial Numbers 270000400 to 311000000 and 3320 Serial Numbers 280000000 to 311000000 g243930 ...

Страница 473: ...Groundsmaster 3280 D Drawing 120 6589 Rev A Sheet 1 of 1 05138SL Rev B Page A 7 Hydraulic Schematic 3280 D Serial Numbers 311000001 through 316000000 g243933 ...

Страница 474: ...Page A 8 05138SL Rev B Groundsmaster 3280 D Drawing 133 6390 Rev B Sheet 1 of 1 Hydraulic Schematic 3280 D Machine Serial Numbers after 316000000 g226776 ...

Страница 475: ...Groundsmaster 3320 Drawing 108 2006 Rev A Sheet 1 of 1 05138SL Rev B Page A 9 Electrical Schematic 3320 D C B A 6 5 4 3 2 1 D C B A 6 5 4 3 2 1 g231003 ...

Страница 476: ...Page A 10 05138SL Rev B Groundsmaster 3280 D Drawing 108 2007 Rev C Sheet 1 of 1 Electrical Schematic Machine Serial Number before 311000000 g231002 ...

Страница 477: ...Groundsmaster 3280 D Drawing 119 5771 Rev A Sheet 1 of 1 05138SL Rev B Page A 11 Electrical Schematic Machine Serial Number 311000000 and Up g243927 ...

Страница 478: ...Page A 12 05138SL Rev B Operator Cab Drawing 122 0426 Rev A Sheet 1 of 2 Electrical Schematic Operator Cab g226449 ...

Страница 479: ...Operator Cab Drawing 122 0426 Rev A Sheet 2 of 2 05138SL Rev B Page A 13 Electrical Schematic Operator Cab g226450 ...

Страница 480: ...Page A 14 05138SL Rev B Groundsmaster 3320 Drawing 108 2019 Rev F Sheet 1 of 2 Wire Harness Drawing Main 3320 Serial Numbers below 260000000 g231009 ...

Страница 481: ...Groundsmaster 3320 Drawing 108 2019 Rev F Sheet 2 of 2 05138SL Rev B Page A 15 Wire Harness Diagram Main 3320 Serial Numbers below 260000000 g231010 ...

Страница 482: ...Page A 16 05138SL Rev B Groundsmaster 3320 Drawing 110 1684 Rev F Sheet 1 of 2 Wire Harness Drawing Main 3320 Serial Numbers above 260000000 D C B A 6 5 4 3 2 1 D C B A 6 5 4 3 2 1 g231011 ...

Страница 483: ...Groundsmaster 3320 Drawing 110 1684 Rev F Sheet 2 of 2 05138SL Rev B Page A 17 Wire Harness Diagram Main 3320 Serial Numbers above 260000000 g231012 ...

Страница 484: ...Page A 18 05138SL Rev B Groundsmaster 3280 D Drawing 108 2020 Rev D Sheet 1 of 2 Wire Harness Drawing Main 3280 D Serial Numbers below 260000000 g231005 ...

Страница 485: ...Groundsmaster 3280 D Drawing 108 2020 Rev D Sheet 2 of 2 05138SL Rev B Page A 19 Wire Harness Diagram Main 3280 D Serial Numbers below 260000000 g231006 ...

Страница 486: ...Page A 20 05138SL Rev B Groundsmaster 3280 D Drawing 110 1686 Rev E Sheet 1 of 2 Wire Harness Drawing Main 3280 D Machine Serial Number 260000000 to 270000600 g231007 ...

Страница 487: ...Groundsmaster 3280 D Drawing 110 1686 Rev E Sheet 2 of 2 05138SL Rev B Page A 21 Wire Harness Diagram Main 3280 D Machine Serial Number 260000000 to 270000600 g231008 ...

Страница 488: ...Page A 22 05138SL Rev B Groundsmaster 3280 D Drawing 114 3398 Rev C Sheet 1 of 2 Wire Harness Drawing Main 3280 D Machine Serial Number 270000601 to 311000000 g246496 ...

Страница 489: ...Groundsmaster 3280 D Drawing 114 3398 Rev C Sheet 2 of 2 05138SL Rev B Page A 23 Wire Harness Diagram Main 3280 D Machine Serial Number 270000601 to 311000000 g246497 ...

Страница 490: ...Page A 24 05138SL Rev B Groundsmaster 3280 D Drawing 119 5772 Rev C Sheet 1 of 2 Wire Harness Drawing Main 3280 D Machine Serial Number 311000000 to 316000000 g243935 ...

Страница 491: ...Groundsmaster 3280 D Drawing 119 5772 Rev C Sheet 2 of 2 05138SL Rev B Page A 25 Wire Harness Diagram Main 3280 D Machine Serial Number 311000000 to 316000000 g243936 ...

Страница 492: ...Page A 26 05138SL Rev B Groundsmaster 3280 D Drawing 122 0703 Rev C Sheet 1 of 2 Wire Harness Drawing Main 3280 D Machine Serial Number 316000000 to 400000000 g243937 ...

Страница 493: ...Groundsmaster 3280 D Drawing 122 0703 Rev C Sheet 2 of 2 05138SL Rev B Page A 27 Wire Harness Diagram Main 3280 D Machine Serial Number 316000000 to 400000000 g243938 ...

Страница 494: ...Page A 28 05138SL Rev B Groundsmaster 3280 D Drawing 122 0987 Rev B Sheet 1 of 2 Wire Harness Drawing Main 3280 D Machine Serial Number 400000000 and Up g226777 ...

Страница 495: ...Groundsmaster 3280 D Drawing 122 0987 Rev B Sheet 2 of 2 05138SL Rev B Page A 29 Wire Harness Diagram Main 3280 D Machine Serial Number 400000000 and Up g226778 ...

Страница 496: ...Page A 30 05138SL Rev B Cab Model 30298 Power Drawing 122 0387 Rev A Sheet 1 of 2 Wire Harness Drawing Cab Model 30298 Power D C B A 6 5 4 3 2 1 D C B A 6 5 4 3 2 1 g243941 ...

Страница 497: ...Cab Model 30298 Power Drawing 122 0387 Rev A Sheet 2 of 2 05138SL Rev B Page A 31 Wire Harness Diagram Cab Model 30298 Power g243942 ...

Страница 498: ...Page A 32 05138SL Rev B Cab Model 30298 Headliner Drawing 122 0723 Rev B Sheet 1 of 2 Wire Harness Drawing Cab Model 30298 Headliner g243429 ...

Страница 499: ...Cab Model 30298 Headliner Drawing 122 0723 Rev B Sheet 2 of 2 05138SL Rev B Page A 33 Wire Harness Diagram Cab Model 30298 Headliner g243430 ...

Страница 500: ...Page A 34 05138SL Rev B Cab Model 30298 Front Mount Accessory Power Supply Drawing 122 0158 Rev A Sheet 1 of 2 Wire Harness Drawing Cab Model 30298 Front Mount Accessory Power Supply g243939 ...

Страница 501: ...Cab Model 30298 Front Mount Accessory Power Supply Drawing 122 0158 Rev A Sheet 2 of 2 05138SL Rev B Page A 35 Wire Harness Diagram Cab Model 30298 Front Mount Accessory Power Supply g243940 ...

Страница 502: ...Page A 36 05138SL Rev B Cab Model 30298 Heat Air Conditioning Blower Drawing 122 0153 Rev B Sheet 1 of 2 Wire Harness Drawing Cab Model 30298 Heat Air Conditioning Blower g243427 ...

Страница 503: ...Cab Model 30298 Heat Air Conditioning Blower Drawing 122 0153 Rev B Sheet 2 of 2 05138SL Rev B Page A 37 Wire Harness Diagram Cab Model 30298 Heat Air Conditioning Blower g243428 ...

Страница 504: ...Page A 38 05138SL Rev B Light Kit Model 30405 Drawing 120 3983 Rev A Sheet 1 of 2 Wire Harness Drawing Light Kit Model 30405 Machines without Cab g226451 ...

Страница 505: ...Light Kit Model 30405 Drawing 120 3983 Rev A Sheet 2 of 2 05138SL Rev B Page A 39 Wire Harness Diagram Light Kit Model 30405 Machines without Cab g226452 ...

Страница 506: ...v B North American Light Kit Model 30701 Drawing 122 0668 Rev A Sheet 1 of 2 Wire Harness Drawing North American Light Kit Model 30701 Machines Serial Number 315000000 and Up D C B A 6 5 4 3 2 1 D C B A 6 5 4 3 2 1 g226453 ...

Страница 507: ...North American Light Kit Model 30701 Drawing 122 0668 Rev A Sheet 2 of 2 05138SL Rev B Page A 41 Wire Harness Diagram North American Light Kit Model 30701 Machines Serial Number 315000000 and Up g226454 ...

Страница 508: ......
Отзывы: