background image

36

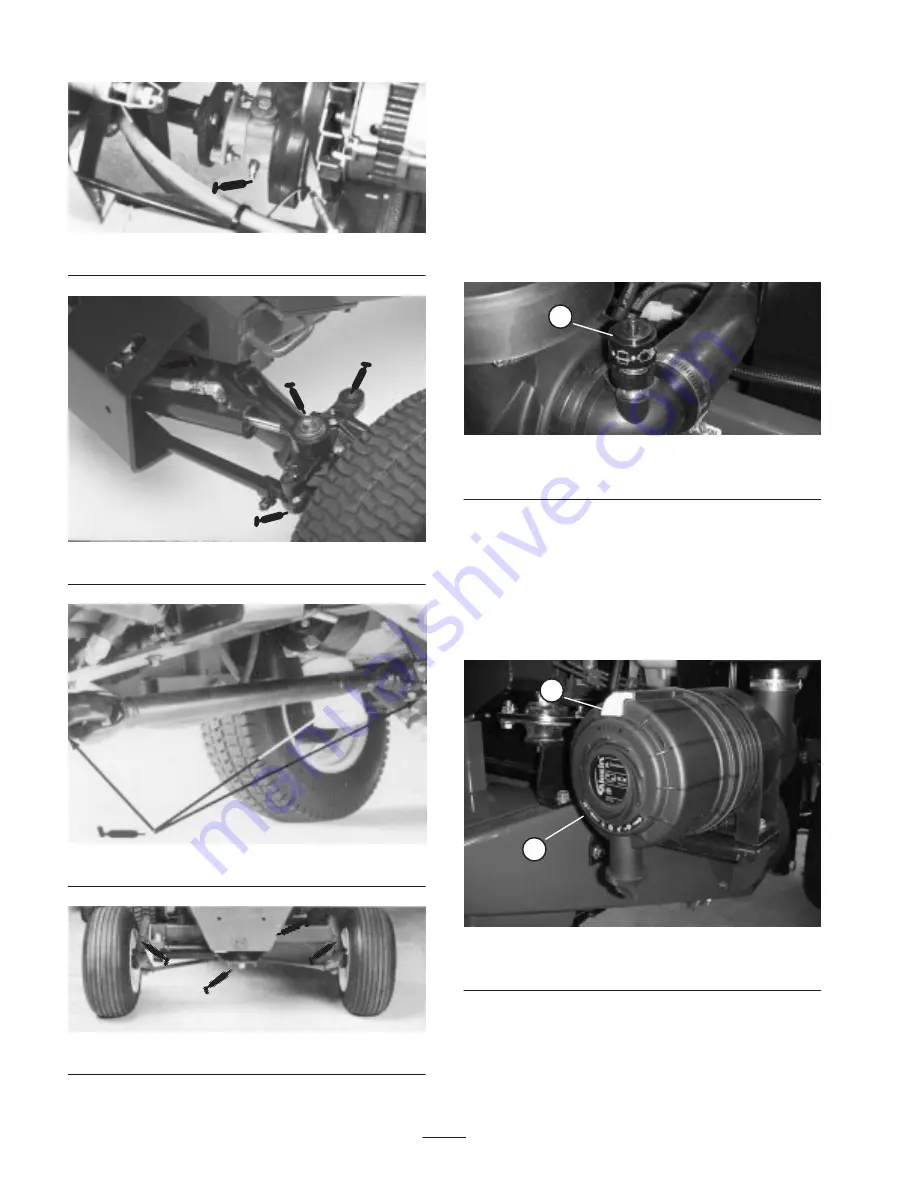
Figure 37

(2)

(2)

(4)

Figure 38

Figure 39

Figure 40

General Air Cleaner
Maintenance

Check air cleaner body for damage which could
possibly cause an air leak. Replace a damaged air
cleaner body.

Service the air cleaner filters when air cleaner indicator
(Fig. 41) shows red or every 400 hours (more frequently
in extreme dusty or dirty conditions). Do not over
service air filter.

1

Figure 41

1.

Air cleaner indicator

Be sure cover is sealing around air cleaner body.

Servicing Air Cleaner

1. Pull latch outward and rotate air cleaner cover

counter–clockwise. Remove cover from body (Fig. 42).
Clean inside of air cleaner cover.

2

1

Figure 42

2.

Air cleaner latch

3.

Air cleaner cover

2. Gently slide primary filter (Fig. 43) out of air cleaner

body to reduce the amount of dust dislodged. Avoid
knocking filter against air cleaner body.

Содержание Groundsmaster 328-D

Страница 1: ...nual English EN GB Form No 3328 323 Groundsmaster 328 D 2 4 Wheel Drive Traction Units Model No 30626 230000001 and Up Model No 30627 230000001 and Up Model No 30630 230000001 and Up Model No 30631 230000001 and Up ...

Страница 2: ...5 Hood Prop 25 Check Engine Oil 25 Filling the Fuel Tank 26 Check Cooling System 26 Checking the Hydraulic System Fluid 26 Checking the Rear Axle 27 Check Bidirectional Clutch Lubricant 27 Page Operation 28 Controls 28 Starting Stopping Engine 30 Bleeding Fuel System 30 Checking the Interlock Switches 31 Pushing or Towing the Traction Unit 31 Operating Characteristics 32 Maintenance 33 Recommended...

Страница 3: ...d serial numbers in the space below Model No Serial No This manual identifies potential hazards and has special safety messages that help you and others avoid personal injury and even death Danger Warning and Caution are signal words used to identify the level of hazard However regardless of the hazard be extremely careful Danger signals an extreme hazard that will cause serious injury or death if...

Страница 4: ...ry passengers All drivers and mechanics should seek and obtain professional and practical instruction The owner is responsible for training the users Such instruction should emphasize the need for care and concentration when working with ride on machines control of a ride on machine sliding on a slope will not be regained by the application of the brake The main reasons for loss of control are ins...

Страница 5: ...surfaces other than grass When using any attachments never direct discharge of material toward bystanders nor allow anyone near the machine while in operation Never operate the machine with damaged guards shields or without safety protective devices in place Be sure all interlocks are attached adjusted properly and functioning properly Do not change the engine governor settings or overspeed the en...

Страница 6: ...in an open well ventilated area away from spark and flames Unplug charger before connecting or disconnecting from battery Wear protective clothing and use insulated tools Toro Riding Mower Safety The following list contains safety information specific to Toro products or other safety information that you must know that is not included in the CEN ISO or ANSI standard This product is capable of ampu...

Страница 7: ...ess and wear on a regular basis Tighten or repair them as needed If the engine must be running to perform a maintenance adjustment keep hands feet clothing and any parts of the body away from the cutting units attachments and any moving parts especially the screen at the side of the engine Keep everyone away To ensure safety and accuracy have an Authorized Toro Distributor check the maximum engine...

Страница 8: ...Models 30630 30631 1 Caution fill fuel tank to 1 in 25 mm below filler neck Read the operator s manual for further instructions CA UTION DO NOT USE STARTING FLUID 83 9150 83 9150 Models 30626 30627 93 7275 Models 30630 30631 1 Read the operator s manual for further instructions 2 Do not use starting fluid 52 1321 Models 30626 30627 93 6680 Models 30630 30631 1 Diesel fuel 93 6686 1 Hydraulic oil 2...

Страница 9: ...raction unit forward or backward depress the traction pedal 55 4300 Models 30626 30627 93 6696 Models 30630 30631 1 Warning spring loaded mechanism Read the operator s manual for further instructions 77 3100 Models 30626 30627 1 Fan blades can cause injury stay away from moving parts 93 7272 Model 30630 30631 1 Fan blades can cause injury stay away from moving parts 67 1720 Models 30626 30627 ...

Страница 10: ...ey to the start position Read the operator s manual for further instructions 2 Warning when engine temperature is too high engine will shut off Depress high temperature reset before restarting engine 3 Warning coolant is under pressure and could cause burns Keep a safe distance away 82 8930 Model 30626 30627 1 Read the operator s manual for further instructions 93 7831 1 Parking brake read the ope...

Страница 11: ...PTO off 3 Warning read the operator s manual 4 Cutting hazard to hands or feet stay away from rotating blades and moving parts 5 Throw object hazard keep bystanders away 6 Warning set the parking brake stop the engine and remove the key before leaving the operator s position 7 Tipping hazard when driving down slopes less that 14 degrees lower the cutting unit to the ground When driving down slopes...

Страница 12: ...grees lower the cutting unit to the ground When driving down slopes less than 20 degrees use the ROPS fasten the seat belt and lower the cutting unit to the ground 70 2560 Model 30627 1 Change the rear axle lubricant initially after first 50 operating hours thereafter every 500 hours 93 6697 Model 30631 1 Read operator manual 2 Change the rear axle lubricant initially after first 50 operating hour...

Страница 13: ...opes less that 14 degrees lower the cutting unit to the ground When driving down slopes less than 20 degrees use the ROPS fasten the seat belt and lower the cutting unit to the ground 3 Warning disengage the Power Take Off before raising the cutting unit 4 Float cutting unit 5 Lower cutting unit 6 Raise cutting unit 66 6390 Models 30626 30627 ...

Страница 14: ...ic transmission is mounted directly to the front axle and is driven by flexible drive couplings Operating pressure is 500 to 3000 psi 3447 to 20685 kPa and normal charge pressure is 70 to 150 psi 453 to 1034 kPa Implement relief valve setting is 700 to 900 psi 4826 to 6205 kPa Displacement is 0 913 cubic inch 15 cm3 per revolution and transmission is controlled by foot actuated pedal Front axle is...

Страница 15: ...control are on instrument panel Hand operated PTO lever is located to right of the seat Traction pedal for traction operation at right of steering column PTO Drive Shaft is driven by a tight slack double A section torque team V belt directly from output shaft of engine Shaft is clutched by pivoting the shaft support with a spring loaded over center hand operated lever PTO speed 1810 RPM 3200 RPM e...

Страница 16: ...oom Model No 30743 Quick Attach Receiver Kit for traction unit Model No 30711 Quick Attach for Guardian 72 Recycler Cutting Unit Model No 30716 Model No 30729 Quick Attach for 72 Side Discharge Cutting Unit Model No 30722 72 Rear Discharge Cutting Unit Model No 30710 and Rotary Broom Model No 30743 Model No 30719 Tire Chains front set of 2 Part No 11 0390 Tire Chains rear set of 2 Models 30627 306...

Страница 17: ... Foam seal Nut Screw Cap 1 1 1 1 1 Installing the steering wheel Manual tube shipped in tool box R clamp 1 2 Holding the operator s manual Install on right underside of seat Seat belt Bolt 7 16 x 1 in Lock washer 7 16 in 1 2 2 Installing the seat belts Models 30627 30631 only Roll Bar ROPS Bolt 3 4 x 3 1 2 in Lock washer 3 4 in Nut 3 4 in 1 4 4 4 Installing the roll bar Models 30627 30631 only Rig...

Страница 18: ...nt ends of tie rod Insert ball joint ends into rear hole of each axle steering arm Insert ball joints from bottom of each steering arm Fig 3 2 Secure ball joint ends to steering arms with a jam nut and torque it to 40 60 ft lb 54 81 N m Install a second jam nut and torque it to 40 60 ft lb 54 81 N m 1 Figure 3 1 Tie rod Installing the Rear Bumper Models 30627 30631 only 1 Remove 2 capscrews 1 2 x ...

Страница 19: ...Fig 6 Lift battery out of chassis Keep wing nuts and hold down strap in safe place for later use 1 2 1 3 4 Figure 6 1 Wing nuts 2 Hold down strap 3 Positive terminal 4 Negative terminal Installing the Seat The machine is shipped without the seat assembly Either optional Seat Kit Model No 30623 or 30625 must be installed Seat Kit Model No 30623 Standard Seat 1 Loosely secure 2 R clamps to right sid...

Страница 20: ... and secure with 4 lock washers flat washers and nuts Fig 12 1 6 4 2 5 3 Figure 12 1 Seat suspension assembly 2 R clamps 3 Lock washer flat washer and nut 4 Manual tube 5 Cap 6 Seat support 2 Loosely secure 2 R clamps to right side of seat bottom with 2 capscrews and flat washers supplied in kit Fig 12 Install manual tube into R clamps and tighten capscrews Fig 12 3 Mount seat support over four th...

Страница 21: ...oll Bar Models 30627 30631 only 1 Lower roll bar onto frame aligning mounting holes as shown in Figure 15 2 Secure roll bar to frame with 4 bolts 3 4 x 3 1 2 in lock washers and nuts Fig 15 Tighten securely 1 Figure 15 1 Roll bar Pushing the Traction Unit Off of the Pallet 1 Reach in and rotate bypass valve on transmission Fig 16 counterclockwise 1 2 to 1 turn Opening the valve opens an internal p...

Страница 22: ... parts of the machine Do not allow metal tools to short between the battery terminals and metal parts of the machine Warning 1 Install battery and secure with hold down strap and wing nuts Fig 6 Remove tape over ends of each cable 2 Slide the red positive battery cable Fig 6 onto positive battery post and tighten nut securely Incorrect battery cable routing could damage the machine and cables caus...

Страница 23: ... Use caution as lift arm is spring loaded Hold parts together with cylinder pin spring pin and cotter pin Cotter pin must be to the outside 7 Install implement refer to implement Operator s Manual for proper installation procedures Checking the Tire Pressure The tires are over inflated for shipping Therefore release some of the air to reduce the pressure Correct air pressure in the front and rear ...

Страница 24: ...t Description Qty 72 Side Discharge Model No 30722 70 lb 24 5780 Rear Weight Kit two 35 lb weights and mounting hardware 1 72 Rear Discharge Model No 30710 70 lb 24 5780 Rear Weight Kit two 35 lb weights and mounting hardware 1 Guardian 72 Recycler Model No 30716 70 lb 24 5780 Rear Weight Kit two 35 lb weights and mounting hardware 1 72 Flex Deck Model 30799 210 lb 24 5780 Rear Weight Kit two 35 l...

Страница 25: ...vel of oil must be checked before and after the engine is first started 1 Park machine on a level surface stop engine and remove key from ignition switch Open hood and install hood prop 2 Remove dipstick Fig 20 wipe clean and reinstall dipstick Remove dipstick and check oil level Oil level should be up to FULL mark on dipstick 1 Figure 20 1 Dipstick 3 If oil is below FULL mark remove fill cap and ...

Страница 26: ... and dirty The cooling system is filled with a 50 50 solution of water and permanent ethylene glycol anti freeze Check level of coolant in expansion tank at beginning of each day before starting the engine Capacity of cooling system is 6 quarts 5 6 l If engine has been running pressurized hot coolant can escape when radiator cap is removed and cause burns Caution 1 Check level of coolant in expans...

Страница 27: ...y more than 1 2 in 13 mm above groove Important When adding oil to the hydraulic system use a funnel with a fine wire screen 200 mesh and ensure funnel and oil are immaculately clean This procedure prevents accidental contamination of the hydraulic system 1 2 Figure 24 1 Dipstick cap 2 Groove 3 Screw dipstick filler cap finger tight onto filler neck It is not necessary to tighten cap with a wrench...

Страница 28: ...dals Fig 27 are connected to the left and right front wheel brakes since both brakes work independently of each other The brakes can be used to turn sharply or to increase traction if one wheel tends to slip while operating on a hillside However wet grass or soft turf could be damaged when brakes are used to turn Tilt Steering Control The tilt steering control is a lever on right side of steering ...

Страница 29: ...ht Fig 29 glows when oil pressure in engine drops below a safe level If low oil pressure ever occurs stop engine and determine the cause Repair the damage before starting the engine again Charge Indicator Illuminates when system charging circuit malfunctions Fig 29 Engine Coolant Temperature Warning Light The light illuminates and engine shuts down when coolant reaches a excessively high temperatu...

Страница 30: ...y to OFF position then to ON preheat position Repeat process as required 4 Run engine at idle speed or partial throttle until engine warms up Note Move throttle to 1 2 throttle position when restarting a warm engine 5 When engine is started for the first time or after engine oil change or overhaul of engine transmission or axle operate the machine in forward and reverse for one to two minutes Also...

Страница 31: ...n neutral position try to start the engine The engine should not crank If the engine cranks there is a malfunction in the interlock system that should be corrected before beginning operation 3 Sit on seat Move PTO lever to OFF and depress the traction pedal Try to start the engine The engine should not crank If the engine cranks there is a malfunction in the interlock system that should be correct...

Страница 32: ... traction pedal slowly but fully to attain maximum ground speed Another characteristic to consider is the operation of the turning pedals that are connected to the brakes The brakes can be used to assist in turning the machine However use them carefully especially on soft or wet grass because the turf may be torn accidentally Another benefit of the turning brakes is to maintain traction For exampl...

Страница 33: ... drive belt adjustment Inspect the air filter Every 100 hours Change the engine oil and filter Check the PTO belt tension Check the fan and alternator belt tension Inspect the cooling system hoses Every 200 hours Service the air filter Check rear wheel toe in and steering linkage Change the transmission filter Torque the wheel lug nuts Every 400 hours Replace the cutting unit gear box oil Change f...

Страница 34: ... Check the radiator and screen for debris Check unusual engine noises 1 Check the transmission oil level Check the hydraulic hoses for damage Check for fluid leaks Check the tire pressure Check instrument operation Check the condition of the blades Lubricate all grease fittings 2 Touch up damaged paint 1Check the glow plug and injector nozzles if hard starting excess smoke or rough running is note...

Страница 35: ... ball joints Fig 33 Push arm pivot bushings Fig 34 PTO pivot housing blocks Fig 35 Brake pivot bushings Fig 36 Engine output shaft bearing Fig 37 Four Wheel Drive Models Axle tie rod 2 Fig 38 Axle pivot pin Fig 38 Axle steering pivots 2 Fig 38 Cylinder rod ends 4 Fig 38 Drive shaft 3 Fig 39 Clutch housing Fig 39 Two Wheel Drive Models Rear wheel spindle bushings Fig 40 Steering plate bushings Fig ...

Страница 36: ...extreme dusty or dirty conditions Do not over service air filter 1 Figure 41 1 Air cleaner indicator Be sure cover is sealing around air cleaner body Servicing Air Cleaner 1 Pull latch outward and rotate air cleaner cover counter clockwise Remove cover from body Fig 42 Clean inside of air cleaner cover 2 1 Figure 42 2 Air cleaner latch 3 Air cleaner cover 2 Gently slide primary filter Fig 43 out o...

Страница 37: ...ry to check and to clean the screen each quarter hour and radiator checked every hour in extremely dusty and dirty conditions Note This situation may be particularly prevalent if the rear discharge cutting unit is being used The front of the radiator can be cleaned thoroughly by blowing with compressed air from the fan side of the radiator Make sure to clean out any debris that settles to the bott...

Страница 38: ...every 400 hours or yearly whichever comes first Inspect for deterioration damage or loose connections Water Separator Drain water or other contaminants from water separator Fig 46 daily 1 Place a clean container under water separator Water separator is mounted to inside of frame next to left side of engine 2 Loosen drain plug on bottom of filter canister Tighten plug after draining 1 2 Figure 46 1...

Страница 39: ...usty and dirty conditions Note If engine shuts off due to overheating first check the radiator and screen for excessive buildup of debris To thoroughly clean the radiator 1 Remove the screen 2 Working from the fan side of the radiator either spray the radiator with a water hose or blow with compressed air 3 After the radiator is thoroughly cleaned clean out debris that may have collected in the ch...

Страница 40: ...r decrease alternator belt tension and tighten bolts Check deflection of belt again to assure tension is correct 2 1 Figure 52 1 Alternator 2 Mounting bolt Cooling Fan Belt 1 Unlatch and open hood 2 Remove capscrews 5 securing fan belt guard and remove guard Fig 53 1 Figure 53 1 Fan belt guard 3 Belt should deflect 1 4 in 6 mm midway between the pulleys with 5 lb force 22 n Fig 54 If deflection is...

Страница 41: ...fan belt tension after first day s operation Readjust tension if necessary Follow regular maintenance check procedure thereafter Adjusting Throttle 1 Adjust throttle cable Fig 55 so governor lever on engine contacts low and high speed set bolts before throttle lever contacts slot in control panel 1 Figure 55 1 Throttle cable Adjusting Traction Control Rod 1 Check traction drive neutral position to...

Страница 42: ...backward 8 Jack up frame so left front wheel is off the shop floor Use a jack stand to support the frame 9 Start engine and allow it to idle for 5 minutes to heat oil in transmission to operating temperature 10 Release parking brake then check left front wheel that is off shop floor Wheel must not be rotating If wheel is rotating proceed to step 11 for an adjustment If wheel is not rotating procee...

Страница 43: ...he switch circuit should not have any continuity If there is continuity recheck switch installation If there is no continuity proceed to next step 7 Move PTO lever to the OFF position When PTO lever is in its normal released position the PTO switch should have continuity If there is no continuity recheck switch installation If there is no continuity proceed to next step 8 Push switch connectors to...

Страница 44: ...g wheel tilt control lever must be adjusted proceed as follows 1 Remove knob from parking brake and self tapping screws from steering column cover Slide cover up steering shaft to expose pivot bracket Fig 62 1 2 3 Figure 62 1 Pivot plate 2 Small nut 3 Large nut 2 Loosen small nut rotate pivot bracket until it tightens large nut below Fig 62 Retighten small nut 3 Reinstall steering column cover and...

Страница 45: ...ove cotter pin securing retainer Fig 65 1 3 4 2 5 Figure 65 1 Dust cup 2 Cotter pin 3 Nut retainer 4 Jam nut 5 Flatwasher 3 Tighten the jam nut Fig 65 to approximately 75 100 in lbs using a hand wrench 4 Turn the wheel hub to seat the bearings 5 Loosen the jam nut until it is away from the flatwasher and the wheel hub has end play 6 Tighten the jam nut to 15 20 in lbs while rotating the the wheel ...

Страница 46: ...uds 4 Jack up machine until front wheel is off the shop floor Use jack stands or block the machine to prevent it from falling accidentally 5 Remove wheel nuts and slide wheel and tire assembly off studs Rotate brake drum until adjusting slot is at bottom and centered over star nut that adjusts brake shoes Fig 67 1 Figure 67 1 Slot 6 Using a brake adjusting tool or screwdriver rotate star nut Fig 6...

Страница 47: ...if they can cross reference to find an equivalent to the products listed Toro will not assume responsibility for damage caused by improper substitutions so use only products from reputable manufacturers who will stand behind their recommendation Universal Tractor Hydraulic Fluid Mobil Mobil Fluid 424 Amoco 1000 Fluid Chevron Tractor Hydraulic Fluid Conoco Power Tran 3 Exxon Torque Fluid Pennzoil H...

Страница 48: ...ition machine on a level surface 2 Clean area around the drain plugs Fig 72 3 Remove plug allowing oil to drain into drain pans 4 After oil is drained apply thread locking compound on drain plug threads and reinstall in axle 5 Fill axle with lubricant refer to Check Rear Axle 1 1 Figure 72 1 Drain plugs Changing Bidirectional Clutch Lubricant Models 30627 30631 only After every 400 hours of operat...

Страница 49: ...ed accessories contain lead and lead compounds chemicals known to the State of California to cause cancer and reproductive harm Wash hands after handling Warning Important Before welding on the machine disconnect ground cable from the battery to prevent damage to the electrical system Note Check battery condition weekly or after every 50 hours of operation Keep terminals and entire battery case cl...

Страница 50: ...RE 7 15 STROKE STEERING VALVE 4 95 CU IN DISP TRANSMISSION IMPLEMENT RELIEF 700 900 PSI CHARGE PUMP 33 IN REV 1 4 MAN 1 4 T P 3 8 1 2 3 8 1 4 1 4 1 4 1 4 R L IN OUT 1 2 1 2 70 150 PSI 700 900 PSI RES FRONT AXLE CASE DRAIN THRU BEARING AT OUTPUT SHAFT OF TRANSMISSION A B AUX 3 5200 PSI NOT IN 2 WHEEL DRIVE MODELS ...

Страница 51: ...RE 7 15 STROKE STEERING VALVE 4 95 CU IN DISP TRANSMISSION IMPLEMENT RELIEF 700 900 PSI CHARGE PUMP 33 IN REV 1 4 MAN 1 4 T P 3 8 1 2 3 8 1 4 1 4 1 4 1 4 R L IN OUT 1 2 1 2 70 150 PSI 700 900 PSI RES FRONT AXLE CASE DRAIN THRU BEARING AT OUTPUT SHAFT OF TRANSMISSION A B AUX 3 5200 PSI NOT IN 2 WHEEL DRIVE MODELS ...

Страница 52: ...RATURE OK OR 30 85 86 87 GLOW RELAY GLOW PLUGS 3 R A F 1 15 A B I OR F 4 RUN OFF Y VIO START S 7 5 A R GY X Y R PK F 2 R 7 5 A FUSE BLOCK F 3 15 A OPTIONAL LIGHT BU FUSIBLE LINK HARNESS FL1 FL2 FL3 BK GY GY OR PK PK PK GN OR 30 85 87 86 87a SEAT SWITCH PK GN TO HIGHTEMP OVERRIDE SWITCH IN CONTROL PANEL HARNESS CONNECTED TO GROUND ON OVER TEMP CONDITION OVER TEMP SHUT DOWN OR PTO SWITCH OFF PK NEUT...

Страница 53: ...RATURE OK OR 30 85 86 87 GLOW RELAY GLOW PLUGS 3 R A F 1 15 A B I OR F 4 RUN OFF Y VIO START S 7 5 A R GY X Y R PK F 2 R 7 5 A FUSE BLOCK F 3 15 A OPTIONAL LIGHT BU FUSIBLE LINK HARNESS FL1 FL2 FL3 BK GY GY OR PK PK PK GN OR 30 85 87 86 87a SEAT SWITCH PK GN TO HIGHTEMP OVERRIDE SWITCH IN CONTROL PANEL HARNESS CONNECTED TO GROUND ON OVER TEMP CONDITION OVER TEMP SHUT DOWN OR PTO SWITCH OFF PK NEUT...

Страница 54: ... from the battery posts B Clean the battery terminals and posts with a wire brush and baking soda solution C Coat the cable terminals and battery posts with Grafo 112X skin over grease Toro Part No 505 47 or petroleum jelly to prevent corrosion D Slowly recharge the battery every 60 days for 24 hours to prevent lead sulfation of the battery Engine 1 Drain the engine oil from the oil pan and replac...

Страница 55: ...55 ...

Страница 56: ...eather storage practices contamination use of unapproved coolants lubricants additives or chemicals etc Normal wear and tear items Normal wear and tear includes but is not limited to damage to seats due to wear or abrasion worn painted surfaces scratched decals or windows etc Parts Parts scheduled for replacement as required maintenance are warranted for the period of time up to the scheduled repl...

Отзывы: