


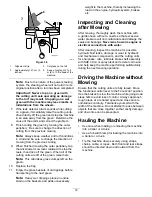


g036124
Figure 35
Note:
When sharpening, setting the
height-of-cut, or performing other maintenance
procedures on the cutting units, store the cutting
unit reel motors in the storage location on the
front of the suspension arms to prevent damage
to them.
Important:
Do not raise the suspension to
the transport position when the reel motors
are in the holders in the machine frame.
Damage to the motors or hoses could result.
If you must move the traction unit without
the cutting units installed, secure them to
the suspension arms using cable ties.
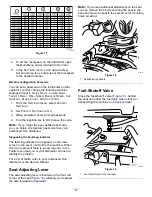
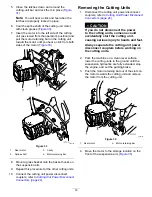
5.
Open the latches on the suspension-arm bar of
the cutting unit you are removing (
6.
Disconnect the latches from the cutting-unit bar.
7.
Roll the cutting unit out from under the
suspension arm.
8.
Repeat steps
through
for the other cutting
units as required.
9.
Connect the cutting unit power disconnect
couplers; refer to
Connectors (page 24)
.
Mowing
Before mowing greens, find a clear area and practice
starting and stopping the machine, raising and
lowering the cutting units, turning, etc.
Inspect the green for debris, remove the flag from
the cup, and determine the best direction to mow.
Base the direction to mow on the previous mowing
direction. Always mow in an alternate pattern from
the previous mowing so that the grass blades will be
less apt to lay down and therefore be difficult to trap
between the reel blades and the bedknife.
1.
Approach the green with the functional-control
lever in the M
OW
position and the throttle at full
speed.
2.
Start on one edge of the green so that you can
use the ribbon procedure of cutting.
Note:
This holds compaction to a minimum and
leaves a neat, attractive pattern on the greens.
3.
Actuate the raise/lower mow lever as the front
edges of the grass baskets cross the outer edge
of the green.
Note:
This procedure drops the cutting units to
the turf and starts the reels.
Important:
The No. 1 cutting unit reel is
delayed; therefore, you should practice
to gain the required timing necessary to
minimize the cleanup mowing operation.
4.
Overlap a minimal amount with the previous cut
on return passes.
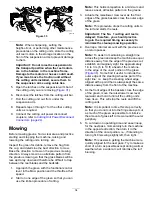
Note:
To assist in maintaining a straight line
across the green and keep the machine an equal
distance away from the edge of the previous cut,
establish an imaginary sight line approximately
1.8 to 3 m (6 to 10 ft) ahead of the machine
to the edge of the uncut portion of the green
(
). Some find it useful to include the
outer edge of the steering wheel as part of the
sight line; i.e. keep the steering wheel edge
aligned with a point that is always kept the same
distance away from the front of the machine.
5.
As the front edges of the baskets cross the edge
of the green, move the raise/lower mow lever
rearward and hold it until all the cutting units
have risen. This will stop the reels and lift the
cutting units.
Note:
It is important to time this step correctly
so that you do not cut into the fringe area yet cut
as much of the green as possible to minimize
the amount of grass left to mow around the outer
periphery.
6.
To cut down on operating time and ease lineup
for the next pass, momentarily turn the machine
in the opposite direction, then turn it in the
direction of the uncut portion; i.e., if intending to
turn right, first swing slightly left, then right.
Note:
This assists in getting the machine more
quickly aligned for the next pass. Try to make as
short of a turn as possible except during warmer
weather when a wider arc will minimize the turf
bruising.
34