background image

Operation

Starting the Edger

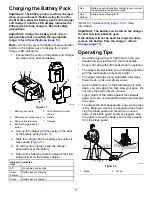
1.

Align the cavity in the battery pack with the
tongue on the handle housing (

Figure 7

).

2.

Push the battery pack into the handle until the
battery locks into the latch (

Figure 7

).

g333238

Figure 7

1.

Battery latch

3.

To start the edger, pull back on the lockout
button, then squeeze the run trigger (

Figure 8

).

Note:

Once the edger is running you can

release the lockout button.

g333239

Figure 8

1.

Lockout button

2.

Run trigger

Shutting Off the Edger

To shut off the trimmer, release the trigger.

Whenever you are not using the edger or are
transporting the edger to or from the work area,
remove the battery pack.

Removing the Battery Pack
from the Trimmer

Press the battery latch on the machine to release the
battery pack and slide the battery pack out of the
machine (

Figure 9

).

g333240

Figure 9

1.

Battery latch

11


Содержание Flex-Force Power System 51833

Страница 1: ...Form No 3441 965 Rev C Flex Force Power System 60V Stick Edger 51833 Cortabordes Flex Force Power System 60V 51833 Coupe bordures à manche Flex Force Power System de 60 V 51833 www Toro com 3441 965 ...

Страница 2: ......

Страница 3: ...Form No 3441 962 Rev C Flex Force Power System 60V Stick Edger Model No 51833 Serial No 321000001 and Up Register at www Toro com Original Instructions EN 3441 962 ...

Страница 4: ...void injury and product damage You are responsible for operating the product properly and safely Visit www Toro com for product safety and operation training materials accessory information help finding a dealer or to register your product Whenever you need service genuine the manufacturer parts or additional information contact an Authorized Service Dealer or the manufacturer Customer Service and...

Страница 5: ...ied by Toro A charger suitable for 1 type of battery pack may create a risk of fire when used with another battery pack 8 Charge the battery pack in a well ventilated area only 9 Do not expose a battery pack or battery charger to fire or to temperatures higher than 68 C 154 F 10 Follow all charging instructions and do not charge the battery pack outside of the temperature range specified in the in...

Страница 6: ... 2 When the battery pack is not in use keep it away from metal objects such as paper clips coins keys nails and screws that can make a connection from 1 terminal to another Shorting the battery terminals may cause burns or a fire 3 Keep your hands and feet away from moving parts 4 Stop the appliance remove the battery pack from the appliance and wait for all movement to stop before adjusting servi...

Страница 7: ...ructions are easily visible to the operator and are located near any area of potential danger Replace any decal that is damaged or missing decal139 5350 139 5350 decal139 5360 139 5360 decal144 3098 144 3098 decal144 3096 144 3096 decal144 3088 144 3088 5 ...

Страница 8: ...rging fault decal140 8475 140 8475 1 Read the Operator s Manual 3 Keep away from open fire or flames 2 Call2Recycle battery recycling program 4 Do not expose to rain decal137 9461 137 9461 1 Battery charge status decal139 5210 139 5210 1 Warning read the Operator s Manual stay away from moving parts keep all guards in place wear eye protection do not operate in wet conditions 6 ...

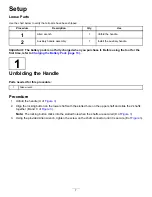
Страница 9: ...st time refer to Charging the Battery Pack page 13 1 Unfolding the Handle Parts needed for this procedure 1 Allen wrench Procedure 1 Unfold the handle A of Figure 3 2 Align the locking button on the lower shaft with the slotted hole on the upper shaft and slide the 2 shafts together B and C of Figure 3 Note The locking button clicks into the slotted hole when the shafts are secured D of Figure 3 3...

Страница 10: ...g333338 Figure 3 8 ...

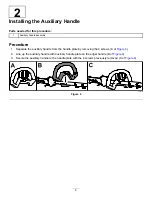
Страница 11: ...1 Separate the auxiliary handle from the handle plate by removing the 4 screws A of Figure 4 2 Line up the auxiliary handle with auxiliary handle plate on the edger handle B of Figure 4 3 Secure the auxiliary handle to the handle plate with the 4 screws previously removed C of Figure 4 g333337 Figure 4 9 ...

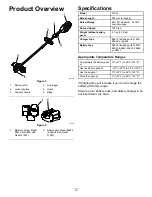
Страница 12: ...eed 7000 rpm Weight without battery pack 4 7 kg 10 4 lbs Charger Type 88610 included with 51833 88602 or 88605 Battery Type 88620 included with 51833 88625 88640 88650 88660 or 88675 Appropriate Temperature Ranges Charge store the battery pack at 5 C 41 F to 40 C 104 F Use the battery pack at 30 C 22 F to 49 C 120 F Use the edger at 0 C 32 F to 49 C 120 F Store the edger at 0 C 32 F to 49 C 120 F ...

Страница 13: ...rigger Figure 8 Note Once the edger is running you can release the lockout button g333239 Figure 8 1 Lockout button 2 Run trigger Shutting Off the Edger To shut off the trimmer release the trigger Whenever you are not using the edger or are transporting the edger to or from the work area remove the battery pack Removing the Battery Pack from the Trimmer Press the battery latch on the machine to re...

Страница 14: ... down in the track to increase or decrease the depth Figure 10 g333293 Figure 10 3 Adjust the depth so that the blade barely touches the ground when the machine is held in a normal working position 4 Tighten the wing nut 5 Standing in a normal working position check the depth of cut again and correct if necessary 12 ...

Страница 15: ...ff No battery pack inserted Green blinking Battery pack is charging Green Battery pack is charged Red Battery pack and or battery charger is over or under the appropriate temperature range Red blinking Battery pack charging fault Refer to Troubleshooting page 16 for more information Important The battery can be left on the charger for short periods between uses If the battery will not be used for ...

Страница 16: ... g334038 Figure 13 1 Rotate clockwise to loosen the blade nut 2 Rotate counterclockwise to tighten the blade nut 4 Remove the blade washer and the old blade Figure 14 Note You may discard the old blade 5 Install the new blade and secure it with the previously removed blade washer and blade nut g334037 Figure 14 1 Wrench 4 Blade 2 Blade nut 5 Blade secure slot 3 Blade washer 6 Screwdriver not inclu...

Страница 17: ...th the battery pack installed Clean all foreign material from the product When not in use store the tool battery pack and battery charger out of the reach of children Keep the tool battery pack and battery charger away from corrosive agents such as garden chemicals and de icing salts To reduce the risk of serious personal injury do not store the battery pack outside or in vehicles Store the tool b...

Страница 18: ...is over or under the appropriate temperature range 1 Move the battery pack to a place where it is dry and the temperature is between 5 C 41 F and 40 C 104 F 1 The battery charger is over or under the appropriate temperature range 1 Unplug the battery charger and move it to a place where it is dry and the temperature is between 5 C 41 F and 40 C 104 F The battery charger is not working 2 The outlet...

Страница 19: ...eads of the battery pack 1 Allow the battery pack to dry or wipe it dry The tool does not run or run continuously 2 The battery is not fully installed into the tool 2 Remove and then replace the battery into the tool making sure that it is fully installed and latched 17 ...

Страница 20: ...Notes ...

Страница 21: ...to restaurants grocery stores hotels schools and hospitals and on a wide variety of products Additionally some online and mail order retailers provide Prop 65 warnings on their websites or in catalogs How do the California warnings compare to federal limits Prop 65 standards are often more stringent than federal and international standards There are various substances that require a Prop 65 warnin...

Страница 22: ......

Страница 23: ...Form No 3441 963 Rev C Cortabordes Flex Force Power System 60 V Nº de modelo 51833 Nº de serie 321000001 y superiores Registre su producto en www Toro com Traducción del original ES 3441 963 ...

Страница 24: ...Usted es responsable de utilizar el producto de forma correcta y segura Visite www Toro com para buscar materiales de formación y seguridad o información sobre accesorios para localizar un distribuidor o para registrar su producto Si necesita asistencia técnica piezas genuinas del fabricante o información adicional póngase en contacto con un Servicio Técnico Autorizado o con el Servicio de atenció...

Страница 25: ... explosión o riesgo de lesiones 5 Si el cable de alimentación del cargador de la batería está dañado póngase en contacto con un Servicio Técnico Autorizado para cambiarlo 6 No utilice baterías no recargables 7 Cargue la batería únicamente con el cargador de la batería especificado por Toro Un cargador diseñado para un tipo de batería puede crear un riesgo de incendio si se utiliza con otra batería...

Страница 26: ...cambiar de accesorio Mantenga las empuñaduras secas limpias y libres de aceite y grasa 2 Cuando la batería no se está utilizando manténgala alejada de objetos metálicos como clips monedas llaves clavos y tornillos que pudieran hacer una conexión entre un terminal y otro Un cortocircuito entre los terminales de la batería puede causar quemaduras o un incendio 3 Mantenga las manos y los pies alejado...

Страница 27: ...ucciones están a la vista del operador y están ubicadas cerca de cualquier zona de peligro potencial Sustituya cualquier pegatina que esté dañada o que falte decal139 5350 139 5350 decal139 5360 139 5360 decal144 3098 144 3098 decal144 3096 144 3096 decal144 3088 144 3088 5 ...

Страница 28: ...40 8475 140 8475 1 Lea el Manual del operador 3 Mantener alejado de fuegos o llamas desnudas 2 Programa de reciclado de baterías Call2Recycle 4 No exponer a la lluvia decal137 9461 137 9461 1 Estado de carga de la batería decal139 5210 139 5210 1 Advertencia lea el Manual del operador manténgase alejado de las piezas móviles mantenga colocados todos los protectores utilice protección ocular no uti...

Страница 29: ...herramienta por primera vez consulte Carga de la batería página 12 1 Despliegue de la empuñadura Piezas necesarias en este paso 1 Llave allen Procedimiento 1 Despliegue la empuñadura Figura 3 A 2 Alinee el botón de bloqueo del mango inferior con el orificio ranurado del mango superior y junte los dos mangos Figura 3 B y C Nota El botón de bloqueo encaja en el orificio ranurado al juntarse los mang...

Страница 30: ...g333338 Figura 3 8 ...

Страница 31: ...to 1 Separe la empuñadura auxiliar de la abrazadera retirando los 4 tornillos Figura 4 A 2 Alinee la empuñadura auxiliar con la abrazadera en el mango del cortabordes Figura 4 B 3 Sujete la empuñadura auxiliar a la abrazadera con los 4 tornillos que se retiraron anteriormente Figura 4 C g333337 Figura 4 9 ...

Страница 32: ...d sin carga 7000 rpm Peso sin batería 4 7 kg 10 4 libras Tipo de cargador 88610 incluida con 51833 88602 o 88605 Tipo de batería 88620 incluida con el modelo 51833 88625 88640 88650 88660 o 88675 Intervalos de temperatura adecuados Cargue guarde la batería a 5 C 40 C 41 F 104 F Utilice la batería a Entre 30 C y 49 C 22 F y 120 F Utilice el cortabordes a 0 C a 49 C 32 F a 120 F Guarde el cortaborde...

Страница 33: ...ionamiento Figura 8 Nota Una vez que el cortabordes esté en marcha puede soltar el botón de bloqueo g333239 Figura 8 1 Botón de bloqueo 2 Gatillo de accionamiento Apagado del cortabordes Para apagar la desbrozadora suelte el gatillo Cuando no esté utilizando el cortabordes o cuando lo esté transportando a o desde el área de trabajo retire la batería Retirada de la batería de la desbrozadora Presio...

Страница 34: ...a Lea todas las precauciones de seguridad Importante Cargue la batería solo a temperaturas que estén dentro del intervalo apropiado consulte Especificaciones página 10 Nota En cualquier momento presione el botón del indicador de carga de la batería de la batería para mostrar la carga actual indicadores LED 1 Compruebe que los orificios de ventilación de la batería y del cargador están libres de po...

Страница 35: ...nte con las dos manos mientras trabaje Sujete el cortabordes en una posición cómoda con la empuñadura trasera a la altura de las caderas aproximadamente El cortabordes puede perfilar los bordes de aceras caminos de acceso parterres bordillos y otras zonas similares Corte a un ritmo uniforme Si la cuchilla empieza a ir más despacio está cortando demasiado deprisa reduzca la velocidad No fuerce la c...

Страница 36: ...e muestra en la Figura 14 3 Retire la tuerca de la cuchilla girándola en sentido horario usando la llave suministrada Figura 13 g334038 Figura 13 1 Girar en sentido horario para aflojar la tuerca de la cuchilla 2 Girar en sentido antihorario para apretar la tuerca de la cuchilla 4 Retire la arandela de la cuchilla y la cuchilla usada Figura 14 Nota Puede desechar la cuchilla usada 5 Instale la cuc...

Страница 37: ...los indicadores LED de la batería cambien a verde No almacene la batería completamente cargada ni completamente descargada Antes de volver a usar la herramienta cargue la batería hasta que se encienda el indicador izquierdo del cargador en verde o hasta que los 4 indicadores LED de la batería cambien a verde Desconecte el producto del suministro de energía es decir retire el enchufe del suministro...

Страница 38: ...una instalación adscrito cercano llame al 1 800 822 8837 o visite www call2recycle org Si no puede localizar un comercio o instalación adscrito cercano o si su batería recargable no está etiquetada con el sello Call2Recycle póngase en contacto con su ayuntamiento para obtener más información sobre el reciclado responsable de la batería Si se encuentra fuera de EE UU o Canadá póngase en contacto co...

Страница 39: ...a produce vibraciones o ruidos excesivos 2 La cuchilla no está correctamente apretada 2 Apriete la cuchilla 1 El ajuste de profundidad es demasiado bajo 1 Eleve la profundidad de corte El cortabordes se para durante el uso 2 Camina o corta demasiado deprisa 2 Reduzca su velocidad para que la máquina pueda funcionar eficazmente La batería se descarga rápidamente 1 La temperatura de la batería está ...

Страница 40: ...rpadeando después de 2 intentos elimine la batería correctamente en una instalación de reciclado de baterías El indicador LED del cargador de la batería parpadea en rojo 2 La batería está casi agotada 2 Elimine correctamente la batería en una instalación de reciclado de baterías 1 Hay humedad en los cables de la batería 1 Deje que la batería se seque o séquela con un paño La herramienta no funcion...

Страница 41: ...escuelas y hospitales y en una amplia variedad de productos Además algunos minoristas de Internet y de la venta por correo incluyen advertencias de la Proposición 65 en sus sitios web o en sus catálogos Qué diferencia hay entre las advertencias de California y los límites federales Las normas de la Proposición 65 son a menudo más exigentes que las normas federales o internacionales Varias sustanci...

Страница 42: ......

Страница 43: ...No 3441 964 Rev C Coupe bordures à manche Flex Force Power System de 60 V N de modèle 51833 N de série 321000001 et suivants Enregistrez votre produit à www Toro com Traduction du texte d origine FR 3441 964 ...

Страница 44: ...rendre comment utiliser et entretenir correctement votre produit et éviter ainsi de l endommager ou de vous blesser Vous êtes responsable de l utilisation sûre et correcte du produit Rendez vous sur www Toro com pour tout document de formation à la sécurité et à l utilisation des produits pour tout renseignement concernant un produit ou un accessoire pour obtenir l adresse des dépositaires ou pour...

Страница 45: ...s personnes non compétentes Ne confiez l utilisation de l appareil qu à des personnes responsables compétentes qui ont lu et compris les instructions et sont physiquement aptes à l utiliser et en faire l entretien 4 Avant d utiliser l appareil la batterie et le chargeur de batterie lisez toutes les instructions et mises en garde qui figurent sur ces produits 5 Familiarisez vous avec les commandes ...

Страница 46: ...e régler ou de changer d accessoire 6 N approchez jamais les mains ou les pieds de la zone de coupe et des pièces mobiles 7 Arrêtez l appareil retirez la batterie et attendez l arrêt de tout mouvement avant de régler réviser nettoyer ou ranger l appareil 8 Retirez la batterie de l appareil chaque fois que vous le laissez sans surveillance 9 Ne faites pas forcer l appareil vous obtiendrez des perfo...

Страница 47: ... les instructions faites réparer ou remplacer les protections et pièces endommagées par un dépositaire réparateur agréé 6 Si lame est usée faussée ou endommagée remplacez la contactez un dépositaire Toro agréé 7 Ne remplacez pas les dispositifs de coupe non métallique existants de l appareil par des équivalents en métal 8 Ne réviser ou réparer l appareil la batterie ou le chargeur de batterie qu e...

Страница 48: ...des instructions bien visibles par l opérateur sont placés près de tous les endroits potentiellement dangereux Remplacez tout autocollant endommagé ou manquant decal139 5350 139 5350 decal139 5360 139 5360 decal144 3098 144 3098 decal144 3096 144 3096 decal144 3088 144 3088 6 ...

Страница 49: ...75 140 8475 1 Lisez le Manuel de l utilisateur 3 Tenir à l écart du feu ou des flammes 2 Programme de recyclage de batteries Call2Recycle 4 Ne pas exposer à la pluie decal137 9461 137 9461 1 État de charge de la batterie decal139 5210 139 5210 1 Attention lisez le Manuel de l utilisateur n approchez pas des pièces en mouvement laissez toutes les protections en place protégez vous les yeux n utilis...

Страница 50: ...de la batterie page 13 1 Dépliage du manche Pièces nécessaires pour cette opération 1 Clé Allen Procédure 1 Dépliez le manche A de la Figure 3 2 Alignez le bouton de verrouillage de la moitié inférieure du manche et le trou dans la moitié supérieure et emboîtez les 2 moitiés ensemble B et C de la Figure 3 Remarque Le bouton de verrouillage s enclenche dans le trou quand les deux moitiés du manche ...

Страница 51: ...g333338 Figure 3 9 ...

Страница 52: ...1 Séparez la poignée auxiliaire du support en retirant les 4 vis A de la Figure 4 2 Placez la poignée auxiliaire au dessus de son support sur le manche du coupe bordures B de la Figure 4 3 Fixez la poignée auxiliaire à son support à l aide des 4 vis retirées précédemment C de la Figure 4 g333337 Figure 4 10 ...

Страница 53: ...itesse à vide 7000 tr min Poids sans batterie 4 7 kg 10 4 lb Type de chargeur 88610 inclus avec le modèle 51833 88602 ou 88605 Type de batterie 88620 incluse avec le modèle 51833 88625 88640 88650 88660 ou 88675 Plages de température adéquates Charger ranger la batterie entre 5 ºC 41 ºF et 40 ºC 104 ºF Utiliser la batterie entre 30 C 22 F et 49 C 120 F Utiliser le coupe bordures entre 0 ºC 32 ºF e...

Страница 54: ...rque Lorsque le coupe bordures est en marche vous pouvez relâcher le bouton de verrouillage g333239 Figure 8 1 Bouton de verrouillage 2 Gâchette de marche Arrêt du coupe bordures Pour arrêter le coupe bordures relâchez la gâchette Retirez la batterie chaque fois que vous cessez d utiliser le coupe bordures ou que vous le transportez vers ou de la zone de travail Retrait de la batterie du coupe bor...

Страница 55: ... consignes de sécurité Important Chargez la batterie uniquement à des températures comprises dans la plage adéquate voir Caractéristiques techniques page 11 Remarque À tout moment appuyez sur le bouton indicateur de charge de la batterie pour afficher la charge actuelle diodes 1 Vérifiez que les évents de la batterie et du chargeur sont exempts de poussière et de débris g330066 Figure 11 1 Creux d...

Страница 56: ...s dans une position confortable avec la poignée arrière à peu près à hauteur des hanches Le coupe bordures coupe nettement le long des trottoirs allées plate bandes bordures et zones similaires Coupez à un rythme régulier Si la lame commence à ralentir cela signifie que vous allez trop vite ralentissez le rythme de coupe Ne forcez pas la lame dans le sol Un léger contact de la lame contre le bord ...

Страница 57: ... Figure 13 g334038 Figure 13 1 Tourner dans le sens horaire pour desserrer l écrou de la lame 2 Tourner dans le sens antihoraire pour serrer l écrou de la lame 4 Retirez la rondelle et la lame existante Figure 14 Remarque Vous pouvez mettre la lame au rebut 5 Montez le nouvelle lame et fixez la avec la rondelle et l écrou retirés précédemment g334037 Figure 14 1 Clé 4 Lame 2 Écrou de lame 5 Fente ...

Страница 58: ...ie et recherchez tout dommage éventuel après utilisation Ne remisez pas l outil en laissant la batterie dessus Débarrassez l appareil de tout corps étranger Lorsqu ils ne sont pas utilisés rangez l outil la batterie et le chargeur de batterie hors de la portée des enfants N approchez pas l outil la batterie et le chargeur des agents corrosifs tels les produits chimiques de jardinage et les sels de...

Страница 59: ...e se décharge rapidement 1 La température de la batterie est supérieure ou inférieure à la plage de température appropriée 1 Placez la batterie dans un endroit sec où la température est comprise entre 5 C 41 F et 40 C 104 F 1 La température du chargeur de batterie est supérieure ou inférieure à la plage de température adéquate 1 Débranchez le chargeur de batterie et placez le dans un endroit sec o...

Страница 60: ...batterie 1 Laissez sécher ou essuyez la batterie L outil ne fonctionne pas ou fonctionne par intermittence 2 La batterie n est pas complètement installée dans l outil 2 Retirez et remettez la batterie en place dans l outil en vérifiant qu elle est complètement insérée et enclenchée 18 ...

Страница 61: ...els écoles et hôpitaux et sur un vaste éventail de produits En outre certains détaillants en ligne et par correspondance fournissent des avertissements de la Proposition 65 sur leurs sites internet ou dans leurs catalogues Quelles différences entre les avertissements de Californie et les limites fédérales Les normes de la Proposition 65 sont souvent plus strictes que les normes fédérales et intern...

Страница 62: ......

Страница 63: ......

Страница 64: ......

Отзывы:

Похожие инструкции для Flex-Force Power System 51833