background image

6

m–4372

2

1

2

3

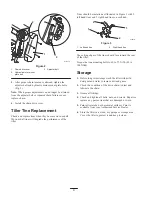
Figure 2

1.

Chain drive cover

2.

Hydraulic motor, mount
plate bolt

3.

Adjuster bolt

5. After proper chain tension is attained, tighten the

adjuster bolt and hydraulic motor mount plate bolts
(Fig, 2).

Note: When proper adjustment can no longer be attained
from the adjuster bolt or repeated chain failures occur,
replace chain.

6. Install the chain drive cover.

Tiller Tine Replacement

Check and replace tines when they become worn or dull.
Worn or dull tines will degrade the performance of the
tiller.

Tines should be installed as illustrated in Figure 3 with 2
left hand tines and 2 right hand tines on each hub.

m–4414

2

1

2

1

Figure 3

1.

Left hand tine

2.

Right hand tine

The cutting edges of the tines should face toward the rear
of the tiller.

Torque the tine mounting bolts to 63 to 77 ft.-lb. (85 to
104 N

m).

Storage

1. Before long term storage wash the tiller with mild

detergent and water to remove dirt and grime.

2. Check the condition of the drive chain. Adjust and

lubricate the chain.

3. Grease all fittings.

4. Check and tighten all bolts, nuts, and screws. Repair or

replace any part or tines that are damaged or worn.

5. Paint all scratched or bare metal surfaces. Paint is

available from your Authorized Service Dealer.

6. Store the tiller in a clean, dry garage or storage area.

Cover the tiller to protect it and keep it clean.

Содержание Dingo 22445

Страница 1: ...Operator s Manual English CE Form No 3324 220 Rev A Tiller Dingo Attachment Model No 22445 200000001 Up...

Страница 2: ...d be extremely careful DANGER signals an extreme hazard that will cause serious injury or death if the recommended precautions are not followed WARNING signals a hazard that may cause serious injury o...

Страница 3: ...engine is off attachments in the raised position can gradually lower WHAT CAN HAPPEN Someone nearby may be pinned or injured by the attachment as it lowers HOW TO AVOID THE HAZARD Always lower the loa...

Страница 4: ...uld be crushed HOW TO AVOID THE HAZARD Do not drive the the traction unit on a slope steeper that the maximum slope Operation IMPORTANT Lift and move the attachment using the traction unit Refer to yo...

Страница 5: ...se fittings with a rag 3 Scrape any paint off the front of the fittings 4 Connect a grease gun to each fitting 5 Pump grease into the fittings until grease begins to ooze out of the bearings 6 Wipe up...

Страница 6: ...2 left hand tines and 2 right hand tines on each hub m 4414 2 1 2 1 Figure 3 1 Left hand tine 2 Right hand tine The cutting edges of the tines should face toward the rear of the tiller Torque the tin...

Страница 7: ...obstruction in a hydraulic hose 3 Find and remove the obstruction 4 Auxiliary valve on the traction unit is not opening 4 Repair the valve 5 An obstruction in the tiller e g rock or root 5 Find and r...

Страница 8: ......

Отзывы: