


Note:
For easier installation, look down through the
opening in the speed selector (Figure 13).
Figure 13
1.
Speed selector
4
Installing the Chute Control
Rod
Parts needed for this procedure:
2
Carriage bolts
2
Locknuts
Procedure
1.
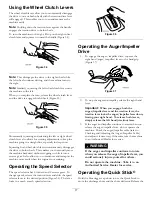
Unwrap the Quick Stick and rotate it so that it is
upright and in the center.
2.
Hold the blue trigger cap down and pull the lever fully
rearward.
Note:
The discharge chute and deflector should face
forward. If they do not, hold the blue trigger cap
down (but do not move the Quick Stick) and rotate the
discharge chute until they do.
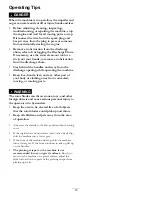
3.
Align the flattened back end of the long chute control
rod with the flattened front end of the short rod
that extends from the control panel so that they nest
together (Figure 14).
g018656
Figure 14
1.
Short rod
2.
Long chute control rod
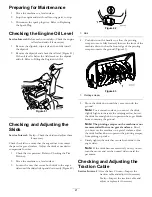
4.
Insert the front end of the rod into the opening in
the back of the chute gear cover until it slides into the
chute gear (Figure 15).
Figure 15
5.
Align the holes in the nested ends of the rods and
insert 2 carriage bolts (in the loose parts bag) through
the short rod from the left side of the machine (from
the operating position).
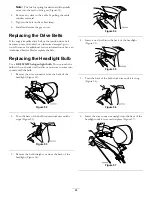
6.
Insert the cable clip that supports the deflector cable
under the head of the forward carriage bolt, and secure
the carriage bolts with locknuts from the loose parts
bag (Figure 16).
g018657
Figure 16
1.
Cable clip
2.
Deflector cable
10
Содержание 38828 Power Max HD 1128 OXE
Страница 28: ...Notes 28 ...
Страница 29: ...Notes 29 ...


