background image

Setup

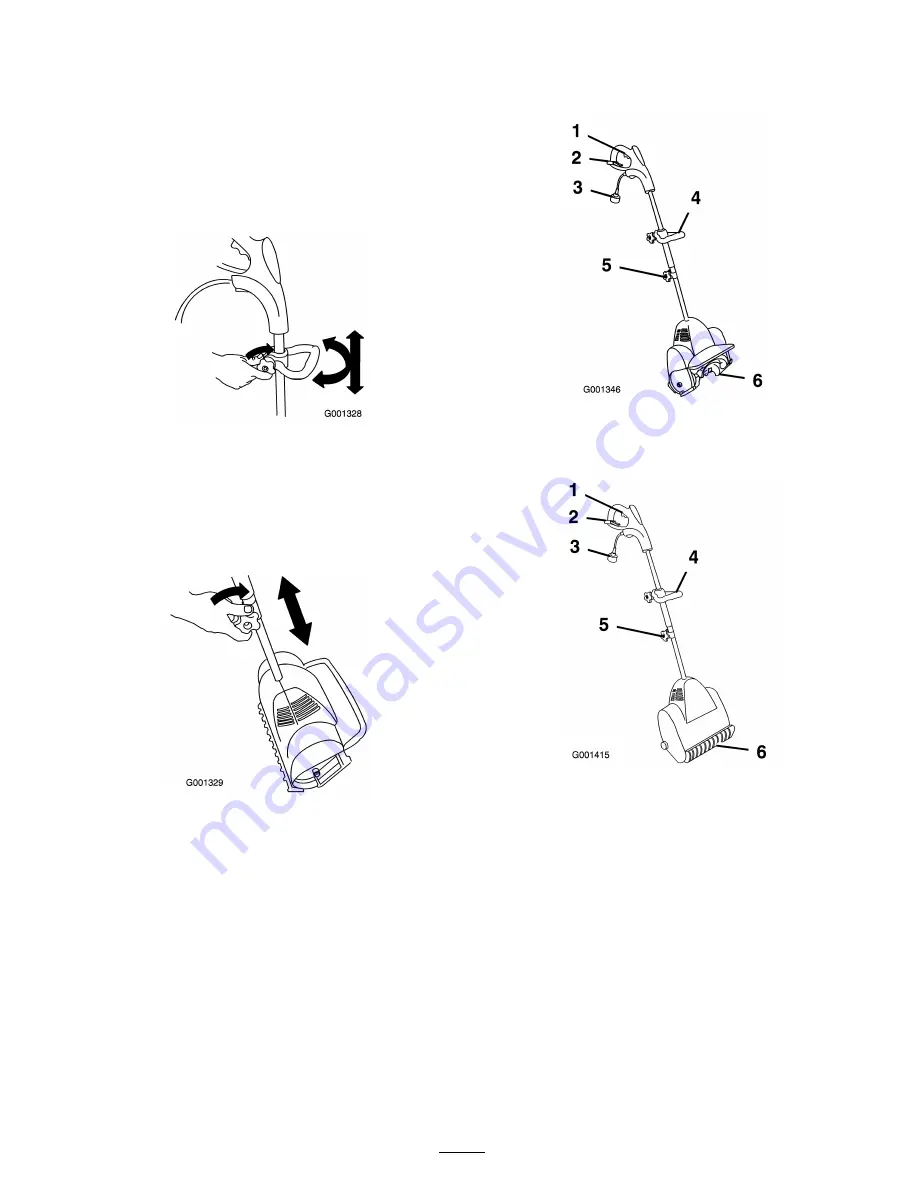
1. Positioning the Assist

Handle

1. Move and rotate the assist handle to a position that is

comfortable for you.

2. Tighten the knob.

2. Adjusting the Power Shovel

Plus Height

1. Set the shaft to a height that is comfortable for you.

2. Tighten the knob.

Product Overview

Snow Mode

1. Trigger

4. Assist handle

2. Cord lock system

5. Knob

3. Electric cord connection

6. Rotor blades

Broom Mode

1. Trigger

4. Assist handle

2. Cord lock system

5. Knob

3. Electric cord connection

6. Broom

5

Содержание 38365

Страница 1: ...the time of production Read and understand the contents of this manual before the motor is ever started This is the safety alert symbol It is used to alert you to potential personal injury hazards Obe...

Страница 2: ...ar snow across the face of slopes Exercise extreme caution when changing direction on slopes Do not attempt to clear steep slopes Never operate the snowthrower without proper guards plates or other sa...

Страница 3: ...his unit has a guaranteed sound power level of 96 dBA based on measurements of identical machines per EN 3744 Vibration This unit does not exceed a hand arm vibration level of 5 79 m s2 based on measu...

Страница 4: ...e only this side up 2 Brush mode only this side up 107 9977 1 Read the Operator s Manual 107 9978 1 Read the Operator s Manual 107 9979 1 Warning read the Operator s Manual 2 Electric shock hazard do...

Страница 5: ...Adjusting the Power Shovel Plus Height 1 Set the shaft to a height that is comfortable for you 2 Tighten the knob Product Overview Snow Mode 1 Trigger 4 Assist handle 2 Cord lock system 5 Knob 3 Elec...

Страница 6: ...t run the cord through standing water or wet grass 1 Make a loop in the extension cord 2 Insert the loop through the hole in the back of the upper handle securing the loop around the hook Note This he...

Страница 7: ...t on the side of the housing 2 Remove the snowthrower rotor from the housing 3 Install the broom in the housing 4 Secure the broom with the bolt that you previously removed 5 Tighten the bolt on the s...

Страница 8: ...efore performing this procedure 1 Remove the de ector 2 Use a 9 16 inch wrench to remove the bolt on the side of the housing 3 Remove the broom from the housing 4 Install the rotor in the housing by i...

Страница 9: ...15 cm with each pass and repeat as many times as required Keep the cord clear of obstructions sharp objects and rotor Do not pull sharply on the cord or abuse it in any manner Frequently inspect the c...

Страница 10: ...of the product Storage Preparing the Power Shovel Plus for Storage 1 Examine the Power Shovel Plus thoroughly for worn loose or damaged parts If parts repair or replacement is necessary contact an Aut...

Страница 11: ......

Страница 12: ......

Отзывы: