background image

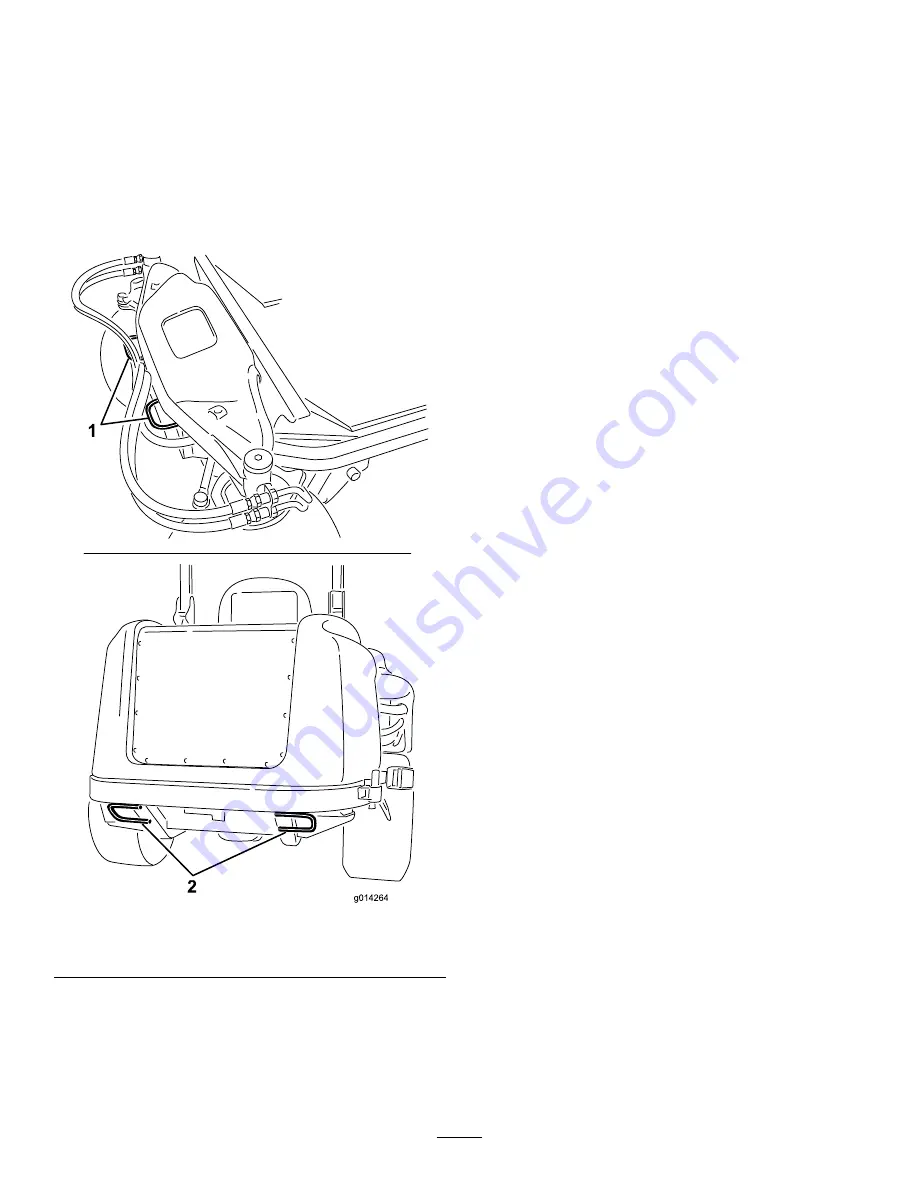
Locating the Tie-Down
Points

There are tie downs located at the front and rear sides
of the machine (

Figure 50

).

Note:

Use properly-rated DOT-approved straps in 4

corners to tie down the machine.

2 on the front of the operator's platform

Rear tire

g014264

Figure 50

1.

Tie-down point

41


Содержание 31200

Страница 1: ...ve 4 Wheel Drive or 4 Wheel Drive with Cab Multi Purpose Machine Model No 31200 Serial No 400000000 and Up Model No 31202 Serial No 400000000 and Up Model No 31203 Serial No 400000000 and Up Register...

Страница 2: ...his information carefully to learn how to operate and maintain your product properly and to avoid injury and product damage You are responsible for operating the product properly and safely You may co...

Страница 3: ...hecklist 43 Pre Maintenance Procedures 44 Pre Maintenance Safety 44 Preparing the Machine for Maintenance 45 Using the Hood Prop Rod 45 Lubrication 46 Greasing the Bearings and Bushings 46 Engine Main...

Страница 4: ...p the machine and shut off the engine before servicing fueling or unclogging the machine Improperly using or maintaining this machine can result in injury To reduce the potential for injury comply wit...

Страница 5: ...not wear a seat belt when the roll bar is lowered decal106 2353 106 2353 1 Electrical power point decal117 4766 117 4766 1 Cutting dismemberment hazard fan stay away from moving parts keep all guards...

Страница 6: ...loat 7 5 A 4 Glow indicator fuel run solenoid diagnostic light start 7 5 A 5 Headlights deck actuator power takeoff 10 A 6 Lights 15 A 7 Operator presence switch 10 A 8 Power point lights 15 A 9 Engin...

Страница 7: ...ove the key from the key switch and read the instructions before servicing or performing maintenance 9 Cutting hazard of hand or foot stay away from moving parts keep all guards in place 5 Warning wea...

Страница 8: ...0 0 0 0 0 0 0 0 0 0 0 0 0 0 0 0 0 0 0 0 0 0 0 0 0 0 0 0 0 0 0 0 0 0 0 0 0 0 0 0 0 0 0 0 0 0 0 0 0 0 0 0 0 0 0 0 0 0 0 0 0 0 0 0 0 0 0 0 0 0 0 0 0 0 0 0 0 0 0 0 000 00 00 0 0 0 0 0 0 0 0 0 0 0 0 0 0 0...

Страница 9: ...del with Cab Only 1 Windshield wipers off 3 Windshield wipers on 2 Windshield wipers 4 Spray windshield washer fluid decal130 0611 130 0611 Model with Cab Only 1 Warning 1 Remove the pin 2 Raise the d...

Страница 10: ...cal132 6553 132 6553 Model with Cab Only 1 Height of cut decal120 0250 120 0250 1 Slow moving vehicle decal131 1946 131 1946 1 Read the Operator s Manual for more information on servicing the machine...

Страница 11: ...rs Operator training material 1 Review before operating machine 1 Installing the PTO Driveshaft to an Optional Mower Deck or QAS Parts needed for this procedure 1 PTO driveshaft 4 Bolt 5 16 x 1 3 4 in...

Страница 12: ...fittings on the PTO driveshaft 8 After you connect the other end of the driveshaft to the attachment gearbox shaft connect the wire harness connector to the PTO solenoid valve coil connector Figure 3...

Страница 13: ...essure Check the tire pressure refer to Checking the Tire Pressure page 54 5 Checking the Fluid Levels No Parts Required Procedure 1 Check the level of the hydraulic fluid before starting the engine r...

Страница 14: ...parking brake press the brake pedal until the parking brake latch retracts Tilt Steering Pedal To tilt the steering wheel toward you press the foot pedal down and pull the steering tower toward you to...

Страница 15: ...Air conditioning switch 2 Temperature control 5 Air recirculation control 3 Windshield wiper switch Air Recirculation Control Sets the cab to either recirculate the air in the cabin or to draw air in...

Страница 16: ...ion screen of the InfoCenter You can switch between the splash screen and main information screen at any time by pressing any of the InfoCenter buttons and then selecting the appropriate directional a...

Страница 17: ...n cont d InfoCenter Bad or failed Bulb Output of TEC controller or control wire in harness Switch Operator must release switch Operator should change to indicated state Symbols are often combined to f...

Страница 18: ...of other machine inputs such as accessories and A C clutch Settings Menu Item Description Units Controls the units used on the InfoCenter The menu choices are English or Metric Language Controls the l...

Страница 19: ...u is unlocked the word PIN displays in the upper right corner of the screen Note Rotate the key switch to the OFF position and then to the ON position locks the protected menu You have the ability to...

Страница 20: ...nsion or Weight Height with roll bar up C 202 cm 80 inches Height with roll bar down G 140 cm 55 inches Height with cab D 225 cm 88 1 2 inches Overall length F 276 cm 108 1 2 inches Overall width B 13...

Страница 21: ...the operator The owner is responsible for training all operators and mechanics Become familiar with the safe operation of the equipment operator controls and safety signs Know how to stop the machine...

Страница 22: ...ses starting and reduces fuel filter plugging Using summer grade fuel above 7 C 20 F contributes toward longer fuel pump life and increased power compared to winter grade fuel Biodiesel This machine c...

Страница 23: ...els in excess of 85 dBA at the operator s ear and can cause hearing loss through extended periods of exposure Wear hearing protection when operating this machine G009027 1 2 g009027 Figure 16 1 Warnin...

Страница 24: ...and the engine continues to run 4 Without sitting on the seat engage the parking brake move the PTO switch to the OFF position and move the traction pedal to the NEUTRAL position Now start the engine...

Страница 25: ...ide a customized lumbar support for your lower back To adjust the back of the seat turn the knob under the left side armrest in either direction to provide the best comfort Figure 17 Raising and Lower...

Страница 26: ...e leaving the operating position including to empty the catchers or to unclog the chute do the following Park the machine on level ground Disengage the power takeoff and lower the attachments Engage t...

Страница 27: ...between the machine and any hazard 2 machine widths Using the Rollover Protection System ROPS 2 Wheel Drive with ROPS and 4 Wheel Drive with ROPS Models Only Keep the roll bar in the raised and locke...

Страница 28: ...st time after the fuel system has been completely drained Important When you start the engine for the first time or after an engine oil change or an overhaul of the engine the transmission or a wheel...

Страница 29: ...he 4 tires point straight ahead Turn the steering wheel slowly to straighten out the wheels until the green light stops flashing and remains off When the switch light is continuously off the machine i...

Страница 30: ...lus 12 mm 1 2 inch The bottom row gives you the height listed plus 18 mm 3 4 inch For the 15 8 cm 6 inches position there is only 1 hole located in the second row This does not add 6 mm 1 4 inch to th...

Страница 31: ...the amount of time that you idle the engine or operate the engine at low engine speed to help reduce the accumulation of soot in the soot filter CAUTION The exhaust temperature is hot approximately 60...

Страница 32: ...Warning Messages Ash Accumulation Indication Level Advisory or Fault Code Engine Speed Reduction Engine Power Rating Recommended Action Level 1 System Advisory g213865 Figure 29 Advisory 179 None 100...

Страница 33: ...that assist regeneration did not sufficiently reduce the soot level When the assist reset regeneration icon is displayed in the InfoCenter a regeneration is in progress During reset regeneration the c...

Страница 34: ...tion page 38 Passive DPF Regeneration Passive regeneration occurs as part of normal engine operation While operating the machine run the engine at full engine speed when possible to promote DPF regene...

Страница 35: ...eset regeneration is finished processing when the icon disappears from the InfoCenter Parked Regeneration g214713 Figure 35 Parked regeneration request icon The parked regeneration requested icon disp...

Страница 36: ...isplay the PIN indicator in the upper right corner of the display g212371 Figure 38 3 In the SERVICE MENU press the middle button until the DPF REGENERATION options displays and press the right button...

Страница 37: ...sage displays Figure 43 g212405 Figure 43 B The Waiting on message displays Figure 44 g212406 Figure 44 C The computer determines whether the regeneration runs One of the following messages displays i...

Страница 38: ...engine is warm wait The engine hot regeneration in progress percent complete 9 The parked regeneration is complete when the Regen Complete message displays in the InfoCenter Press the left button to...

Страница 39: ...ow down the forward speed and or raise the height of cut to the next higher setting Important If cutting more than 1 3 of the grass blade off or in sparse long grass or dry conditions the use of flat...

Страница 40: ...lic system may occur Pushing the Machine 1 Disengage the power takeoff PTO turn the key to the OFF position and engage the parking brake 2 Remove the key from the key switch You must open both bypass...

Страница 41: ...ie downs located at the front and rear sides of the machine Figure 50 Note Use properly rated DOT approved straps in 4 corners to tie down the machine 2 on the front of the operator s platform Rear ti...

Страница 42: ...eck the tension of the alternator belt Every 200 hours Inspect the cooling system hoses and seals Replace them if they are cracked or torn Torque the wheel lug nuts Every 250 hours Change the engine o...

Страница 43: ...ck the radiator and screen for debris Check for unusual operating noises Check the hydraulic system oil level Check the hydraulic hoses for damage Check for fluid leaks Check the fuel level Check the...

Страница 44: ...surface Move the throttle switch to the low idle position Disengage the cutting units Lower the cutting units Ensure that the traction is in neutral Engage the parking brake Shut off the engine and r...

Страница 45: ...remove it 7 Allow machine components to cool before performing maintenance Using the Hood Prop Rod 1 Release the hood latches 2 Lift up the hood until you can position the prop rod behind the frame t...

Страница 46: ...grease fittings that you must lubricate regularly with No 2 lithium grease Lubricate the grease fittings immediately after every washing regardless of interval specified 1 Wipe the grease fittings cle...

Страница 47: ...king pin bushings You should see grease purging out of both the top and the bottom of the axle casting bushing assembly areas of all 4 kingpin assemblies Figure 54 G026734 g026734 Figure 54 Note The...

Страница 48: ...t is damaged Check the whole intake system for leaks damage or loose hose clamps Service the air cleaner filter only when the service indicator requires it Figure 55 Changing the air filter before it...

Страница 49: ...engine oil level is above the Full mark change the engine oil The best time to check the engine oil is when the engine is cool before it has been started for the day If it has already been run allow t...

Страница 50: ...ot filter g213865 Figure 60 If engine faults CHECK ENGINE SPN 3251 FMI 0 CHECK ENGINE SPN 3720 FMI 0 or CHECK ENGINE SPN 3720 FMI 16in the InfoCenter Figure 61 display in the InfoCenter clean the soot...

Страница 51: ...open area when the engine is off and is cold Wipe up any fuel that spills Do not fill the fuel tank completely full Add fuel to the fuel tank until the level is to the bottom of the filler neck Never...

Страница 52: ...the machine Disconnect the negative terminal first and the positive last Connect the positive terminal first and the negative last Charge the battery in an open well ventilated area away from sparks a...

Страница 53: ...first and scrape the clamps and terminals separately Connect the cables positive cable first and coat the terminals with petroleum jelly WARNING Battery terminals or metal tools could short against me...

Страница 54: ...kPa 15 psi in the front tires If a cab is installed on the machine the front and rear tires should be inflated to 172 kPa 25 psi Uneven tire pressure can cause an uneven cut Check the tires when they...

Страница 55: ...al Before each use or daily DANGER The rotating fan and drive belt can cause personal injury Do not operate the machine without the covers in place Keep your fingers hands and clothing clear of rotati...

Страница 56: ...e flange nut securing the clean out cover to the underside of the rear frame Figure 70 Rotate the cover to the side to expose the clean out hole in the frame G014515 g014515 Figure 70 1 Clean out cove...

Страница 57: ...2 Front nuts 2 Tighten the rear nut to move the cable backward until brake pedals have 1 27 to 1 9 cm 1 2 to 3 4 inch of free travel before the wheels lock up 3 Tighten the front nuts ensuring that bo...

Страница 58: ...then replenish the oil as required Note When positioned on a level surface the machine must not creep when you release the traction pedal 1 Park the machine on a level surface engage the parking brak...

Страница 59: ...tion and engage the parking brake 2 Move the throttle lever to the SLOW position shut off the engine remove the key from the key switch and wait for all moving parts to stop before leaving the operati...

Страница 60: ...y with approximately 17 L 18 US qt of high quality tractor transmission hydraulic fluid The recommended replacement fluid is as follows Toro Premium Transmission Hydraulic Tractor Fluid Available in 1...

Страница 61: ...ase the traction pedal to the NEUTRAL position and engage the parking brake 2 Move the throttle lever to the SLOW position shut off the engine remove the key from the key switch and wait for all movin...

Страница 62: ...Air Filters Service Interval Every 250 hours Replace the cab air filters if they are torn or excessively dirty 1 Remove the screws and grates from over both the in cab and rear cab air filters Figure...

Страница 63: ...rd 2 4 Remove the 2 knobs that secure the fan panel assembly and fans to the underside of the cab top Figure 82 and remove the assembly 5 Clean the screen air conditioning duct fans and fan panel usin...

Страница 64: ...fuel tank with clean diesel fuel and connect all fuel lines 6 Thoroughly clean and service the air cleaner assembly 7 Seal the air cleaner inlet and the exhaust outlet with weatherproof masking tape 8...

Страница 65: ...erminals and battery posts with Grafo 112X skin over grease Toro Part No 505 47 or petroleum jelly to prevent corrosion D Slowly charge the battery for 24 hours every 60 days to prevent lead sulfation...

Страница 66: ...Notes...

Страница 67: ...Notes...

Страница 68: ...o damage to seats due to wear or abrasion worn painted surfaces scratched decals or windows etc Parts Parts scheduled for replacement as required maintenance are warranted for the period of time up to...

Отзывы: