background image

30

m–7453

1

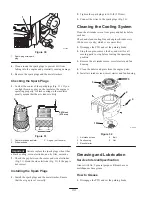
Figure 30

1.

Spark-plug wire/spark
plug

4. Clean around the spark plugs to prevent dirt from

falling into the engine and potentially causing damage.

5. Remove the spark plugs and the metal washers.

Checking the Spark Plugs

1. Look at the center of the spark plugs (Fig. 31). If you

see light brown or gray on the insulator, the engine is
operating properly. A black coating on the insulator
usually means that the air cleaner is dirty.

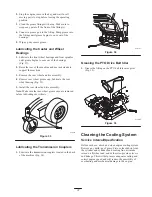
0.030 inch

(0.75 mm)

2

3

1

Figure 31

1.

Center electrode insulator

2.

Side electrode

3.

Air gap (not to scale)

Important


Always replace the spark plugs when it has

a black coating, worn electrodes, an oily film, or cracks.

2. Check the gap between the center and side electrodes

(Fig. 31). Bend the side electrode (Fig. 31) if the gap is
not correct.

Installing the Spark Plug

s

1. Install the spark plugs and the metal washer. Ensure

that the air gap is set correctly.

2. Tighten the spark plugs to 16 ft-lb (22 N

m).

3. Connect the wires to the spark plugs (Fig. 30).

Cleaning the Cooling System

Clean the air intake screen from grass and debris before
each use.

Check and clean cooling fins and engine shrouds every
100 hours or yearly, which ever comes first.

1. Disengage the PTO and set the parking brake.

2. Stop the engine, remove the key, and wait for all

moving parts to stop before leaving the operating
position.

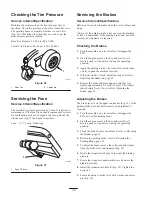
3. Remove the air intake screen, recoil starter and fan

housing.

4. Clean the debris and grass from the engine parts.

5. Install air intake screen, recoil starter and fan housing.

3

2

4

1

m–7450

5

Figure 32

1.

Air intake screen

2.

Fan housing

3.

Recoil starter

4.

Bolt

5.

Nut

Greasing and Lubrication

Service Interval/Specification

Grease with No. 2 general purpose lithium base or
molybdenum base grease.

How to Grease

1. Disengage the PTO and set the parking brake.

Содержание 30314TE

Страница 1: ...erator s Manual Domestic English EN Register your product at www Toro com Form No 3350 750 Mid Size Mower ProLine T Bar Gear 13HP with 91cm Side Discharge Mower Model No 30314TE Serial No 250000001 and Up ...

Страница 2: ...Schedule 24 Servicing the Air Cleaner 25 Servicing the Engine Oil 26 Servicing the Spark Plugs 27 Cleaning the Cooling System 28 Greasing and Lubrication 28 Cleaning the Cooling System 29 Checking the Tire Pressure 30 Servicing the Fuse 30 Servicing the Brakes 30 Adjusting the Electric Clutch 31 Servicing the Fuel Tank 31 Servicing the Fuel Filter 32 Servicing the Cutting Blades 32 Correcting the ...

Страница 3: ...ng or danger personal safety instruction Read and understand the instruction because it has to do with safety Failure to comply with the instruction may result in personal injury General Lawn Mower Safety The following instructions have been adapted from the ISO standard 5395 This cutting machine is capable of amputating hands and feet and throwing objects Failure to observe the following safety i...

Страница 4: ...s be sure of your footing on slopes Use low throttle settings when engaging the traction clutch especially in high gears Reduce speed on slopes and in sharp turns to prevent overturning or loss of control Stop the blades if the lawn mower has to be tilted for transportation when crossing surfaces other than grass and when transporting the lawn mower to and from the area to be mowed Do not operate ...

Страница 5: ...otate Be careful during adjustment of the lawn mower to prevent entrapment of the fingers between moving blades and fixed parts of the lawn mower To ensure the best performance and safety purchase only genuine Toro replacement parts and accessories Do not use will fit parts and accessories they may cause a safety hazard Sound Pressure This unit has a maximum sound pressure level at the operator s ...

Страница 6: ...6 ...

Страница 7: ...7 Slope Chart Fold along appropriate line Align this edge with a vertical surface Tree Building Fence post pole etc Example Compare slope with folded edge ...

Страница 8: ...8 ...

Страница 9: ...lace 3 Cutting dismemberment of hand or foot stay away from moving parts 93 7298 1 Traction drive forward 2 Brake 93 7299 1 Traction drive reverse 106 5533 1 Read the Operator s Manual 2 Height of cut 3 Remove the ignition key and read the instructions before servicing or performing maintenance 93 7316 1 Thrown object hazard stay a safe distance from the machine 2 Thrown object hazard mower keep t...

Страница 10: ... of hand or foot mower blade stay away from moving parts 93 9353 1 Shut off the fuel by turning the fuel shutoff valve clockwise before transporting the machine 98 1977 1 Entanglement hazard belt stay away from moving parts 98 3256 98 4387 1 Warning wear hearing protection 104 8185 106 0636 1 To set the height of cut install the hairpin cotter in the hole for the desired setting 2 Turn off the pow...

Страница 11: ...hen pull the knob 106 5519 1 Cutting dismemberment hazard of hand or foot mower blade stay away from moving parts 2 Warning stop the engine before leaving the machine 3 Warning read the Operator s Manual 4 Thrown object hazard keep bystanders a safe distance from the machine 5 Thrown object hazard mower keep the deflector in place ...

Страница 12: ...t possible then refuel such equipment on a truck or trailer from a portable container rather than from a gasoline dispenser nozzle If a gasoline dispenser nozzle must be used keep the nozzle in contact with the rim of the fuel tank or container opening at all times until fueling is complete Gasoline is harmful or fatal if swallowed Long term exposure to vapors can cause serious injury and illness ...

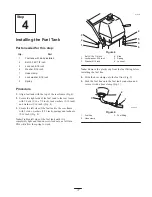
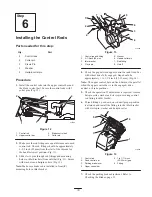
Страница 13: ... inch 1 4 4 Installing the handle assembly 4 Fuel tank with studs installed Locknut 5 16 inch Bolt 5 16 x 7 8 inch Lock washer 5 16 inch Washer 5 16 inch Spring Hose clamp 1 2 2 2 4 2 1 Installing the fuel tank 5 No parts needed Checking and adjusting the shift lever 6 Clevis pin Washer Hairpin cotter pin 2 2 2 Installing the control rods 7 Oil drain hose 1 Use for draining the engine oil 8 Operat...

Страница 14: ... 3 4 5 Figure 2 1 Center Gage Wheels and Spacer 2 Nut 3 Large washer discard 4 Angle bracket discard 5 Small washer 2 Install the center gage wheels with the previously removed bolt spacer small washer and nut Fig 3 1 2 3 4 4 m 7660 5 Figure 3 1 Center Gage Wheels and Spacer 2 Nut 3 Bolt 4 Washer 5 Spacer 3 Remove the hairpin cotter and washer on both front height of cut posts Fig 3 Discard the wa...

Страница 15: ... 1 Remove the existing rear hairpin cotter pins from the rear height of cut posts Fig 5 2 Install a spacer onto both rear height of cut posts and install the hairpin cotter pins Fig 5 3 2 1 m 7584 Figure 5 1 Hairpin cotter 2 Spacer 3 Height of cut post rear shown 3 Install a spacer onto both front height of cut posts and install the hairpin cotter pins 4 On the opposite side of the muffler install...

Страница 16: ...Fig NO TAG 3 Select the low position for the lower mounting hole Fig NO TAG 4 Secure the handle at each lower mounting hole with a flange bolt 3 8 x 1 inch and flange nut Fig NO TAG Note The handle position can be adjusted to match the operator s height preference 1 2 3 4 8 7 5 6 m 6402 Figure 7 1 Upper handle 2 Rear frame 3 Flange nut 3 8 inch 4 Flange bolt 3 8 x 1 inch 5 Upper mounting hole 6 Lo...

Страница 17: ...the fuel tank to the rear frame with 2 studs washers 5 16 inch springs and locknuts 5 16 inch Fig 8 Note Tighten left side of the fuel tank until it is completely tight and then unscrew locknut one full turn This will allow the spring to work m 3771 1 2 3 5 4 6 3 Figure 8 1 Bolt 5 16 x 7 8 inch 2 Lock washer 5 16 inch 3 Washer 5 16 inch 4 Stud 5 Spring 6 Locknut Note Remove the plastic cap from th...

Страница 18: ...0 1 Shift lever 2 Shift lever plate 3 Rubber seal washer 4 Square hole washer 5 Spring washer 6 Locknut 3 8 inch Note Do not bend lever while attached to transmission shaft or damage may occur 3 Shift lever to neutral and check alignment of lever in slot of shifter lever plate The clearance on the sides of shift lever should be equal Fig 11 4 If clearance is not correct loosen shift lever plate an...

Страница 19: ...ng hole in idler bracket 1 3 2 6 4 7 8 5 m 5329 Figure 13 1 Control rod and fitting 2 3 1 2inch 89 mm 3 Idler bracket 4 Clevis pin 5 Washer 6 Hairpin cotter pin 7 Rod fitting 8 Hole F 4 Check the gap between upper control bar and fixed bar with wheel drive fully engaged Gap should be approximately 1 to 1 1 4 inch 25 32 mm Fig 14 Note The upper control bar and fixed bar must be parallel when the up...

Страница 20: ...drive mower blades Gear Shift Lever Transmission has five forward speeds neutral and reverse and has an in line shift pattern Do not shift while unit is moving as transmission damage may occur Upper Control Bar Shift to desired gear and push forward on control bar to engage forward traction operation and pull back to brake Pull right side of control bar to turn right and left side to turn left Low...

Страница 21: ...portant Do not pull recoil rope to its limit or let go of the starter handle when rope is pulled out because rope may break or recoil assembly may be damaged Stopping the Engine 1 Move the throttle lever to slow Fig 18 2 Let engine idle for 30 to 60 seconds before turning the ignition key to off 3 Turn the ignition key to off Fig 18 1 2 m 6443 Figure 18 1 Throttle lever 2 Ignition key 4 Set the pa...

Страница 22: ... Service Dealer repair the safety system immediately 1 Set the parking brake and start the engine refer to Starting and Stopping the Engine page 21 2 Squeeze the blade control bail against upper control bar The blades should not rotate 3 Then continue holding the blade control bail and pull up on the blade control switch and release The clutch should engage and the mower blades begin rotating 4 Re...

Страница 23: ...hine until drive wheels contact curb Fig 21 6 Lower the front of the machine Fig 21 Note Both drive wheels should contact the curb and caster wheels straight 7 At the same time engage lower control bar and lift up on handle to drive over the curb Fig 20 and 21 Note Lifting up on handle will assist driving the machine up a curb and not spin the drive wheels m 4185 3 2 1 2 Figure 21 1 Lower Control ...

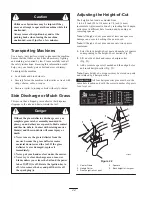
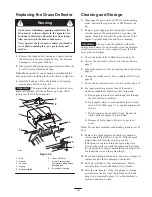
Страница 24: ...ause the grass deflector routes material down toward the turf If the grass deflector is ever damaged replace it immediately Never put your hands or feet under the mower Never try to clear discharge area or mower blades unless you release the bail and the power take off PTO is off Rotate the ignition key to off Also remove the key and pull the wire off the spark plug s Adjusting the Height of Cut T...

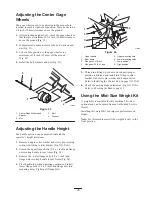
Страница 25: ...inch and flange nut securing handle to rear frame Fig 24 3 Remove the lower flange bolts 3 8 x 1 inch and flange nuts securing handle to rear frame Fig 24 4 Pivot handle to desired operating position and install lower flange bolts 3 8 x 1 inch and flange nuts into mounting holes Tighten all flange bolts 1 2 3 4 8 7 5 6 m 6403 Figure 24 1 Upper handle 2 Rear frame 3 Flange nut 3 8 inch 4 Flange bol...

Страница 26: ...ide Oil Filter change 100 hours or every other oil change Paper Air Cleaner clean1 200 Hours Fuel Filter replace 250 Hours Transmission Couplings grease1 300 Hours Paper Air Cleaner replace1 400 Hours Wheel Bearings grease1 At storage Chipped Surfaces paint Perform all maintenance procedures listed above before storage 1More often in dusty dirty conditions Important Refer to your engine operator s...

Страница 27: ... engine and causing damage Fig 25 4 Unscrew the cover knob and remove the air cleaner cover Fig 25 5 Unscrew the 2 wing nuts and remove the air cleaner assembly Fig 25 6 Carefully pull the foam element off the paper element Fig 25 m 7452 2 3 4 5 1 6 Figure 25 1 Engine 2 Cover 3 Wing nut 4 Foam element 5 Paper element 6 Cover knob Cleaning the Foam Element 1 Wash the foam element in liquid soap and...

Страница 28: ... parts to stop before leaving the operating position 4 Clean around the oil dipstick Fig 26 so that dirt cannot fall into the filler hole and damage the engine m 7449 2 1 Figure 26 1 Oil dipstick 2 Filler tube 5 Unscrew the oil dipstick and wipe the end clean Fig 26 6 Slide the oil dipstick fully into the filler tube but do not thread onto tube Fig 26 7 Pull the dipstick out and look at the end If...

Страница 29: ...ter clockwise until the rubber gasket contacts the filter adapter then tighten the filter an additional 3 4 turn Fig 29 5 Fill the crankcase with the proper type of new oil refer to Servicing the Engine Oil page 28 6 Run the engine for about 3 minutes stop the engine and check for oil leaks around the oil filter 7 Check the engine oil level and add oil if needed Servicing the Spark Plugs Service I...

Страница 30: ...ark Plugs 1 Install the spark plugs and the metal washer Ensure that the air gap is set correctly 2 Tighten the spark plugs to 16 ft lb 22 N m 3 Connect the wires to the spark plugs Fig 30 Cleaning the Cooling System Clean the air intake screen from grass and debris before each use Check and clean cooling fins and engine shrouds every 100 hours or yearly which ever comes first 1 Disengage the PTO ...

Страница 31: ...icate the rear wheel bearing Fig 33 5 Install the rear wheel and tire assembly Note Make sure the rear wheel grease caps are removed before lubricating rear wheels m 6367 Figure 33 Lubricating the Transmission Couplers 1 Lubricate the transmission couplers located in the back of the machine Fig 34 m 5191 Figure 34 Greasing the PTO Drive Belt Idler 1 Grease the fitting on the PTO belt idler arm piv...

Страница 32: ... the PTO 2 Stop the engine remove the key and wait for all moving parts to stop before leaving the operating position 3 Apply the parking brake The wheels must lock when you try to push the machine forward 4 If the wheels do not lock adjust the brakes Refer to Adjusting the Brakes on page 32 5 Release the brake and press upper control bar very lightly approximately 1 2 inch 13 mm The wheels should...

Страница 33: ... the plates are parallel to each other m 2600 1 2 3 Figure 39 1 Adjusting nut 2 Slot 3 Feeler gauge Servicing the Fuel Tank Danger In certain conditions gasoline is extremely flammable and highly explosive A fire or explosion from gasoline can burn you and others and can damage property Drain gasoline from the fuel tank when the engine is cold Do this outdoors in an open area Wipe up any gasoline ...

Страница 34: ...r from the fuel lines 6 Install a new filter and move the hose clamps close to the filter 7 Open fuel shut off valve at fuel tank Fig 40 8 Check for fuel leaks and repair if needed Fig 40 3 2 1 m 5234 3 1 Figure 41 1 Hose clamp 2 Fuel line 3 Filter Servicing the Cutting Blades To ensure a superior quality of cut keep the blades sharp For convenient sharpening and replacement you may want to keep e...

Страница 35: ...and Installing the Blades on page 36 A blade that is bent or damaged could break apart and could seriously injure or kill you or bystanders Always replace bent or damaged blade with a new blade Never file or create sharp notches in the edges or surfaces of blade Warning Removing the Blades Blades must be replaced if a solid object is hit if the blade is out of balance or is bent To ensure optimum ...

Страница 36: ...res to specifications on page 32 4 Check that the blades and spindle shafts are not bent Refer to Checking for Bent Blades on page 35 5 Set the height of cut to the 4 inch 101 6 mm position Refer to Adjusting the Height Of Cut in the Operation section 6 Perform steps in the following sections Frame Set Up Checking Front to Rear Pitch and Checking Side to Side Leveling Frame Set Up Checking Carrier...

Страница 37: ... 6 mm 10 mm lower than location B Fig 50 5 If the carrier frame is not correct move caster spacers to make it a 1 4 3 8 inch 6 10 mm pitch Fig 50 Move spacers from top or bottom to make the correct pitch 6 The tire pressure may also be adjusted slightly to make a 1 4 inch 6 mm pitch 24 in 1 2 A B 3 4 4 5 5 61cm m 6370 Figure 50 1 Caster Wheel 2 Carrier Frame 3 1 4 3 8 inch 6 mm 10 mm pitch over 24...

Страница 38: ...ght of Cut Posts 1 To change the front to rear pitch the front height of cut posts can be adjusted Fig 54 2 To raise the front of the deck loosen jam nut and rotate the front pin clockwise Fig 54 3 To lower the front of the deck loosen jam nut and rotate the front pin counter clockwise Fig 54 3 m 6371 1 2 4 5 Figure 54 1 Caster Wheel 2 Carrier Frame 3 Front height of cut pins 4 Jam nut 5 Ball join...

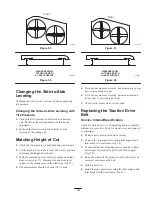
Страница 39: ...surement should be 4 inch 101 6 mm m 1078 Front A Figure 57 MEASURE FROM CUTTING EDGE TO A LEVEL SURFACE m 2550 Figure 58 5 If it does not measure correctly add air pressure in rear tires to raise height of cut 6 If it does not measure correctly decrease air pressure in rear tires to lower height of cut 7 Check carrier frame front to rear pitch Replacing the Traction Drive Belt Service Interval Sp...

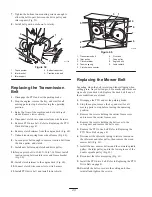
Страница 40: ...all PTO drive belt and install lower shield 5 2 3 1 4 6 7 8 m 5335 9 Figure 60 1 Transmission belt 2 Idler pulley 3 Clutch retainer 4 Tension spring 5 Clutch wire connector 6 Pivot bolt 7 Drive pulley 8 Engine deck 9 Lower shield Replacing the Mower Belt Squealing when the belt is rotating blades slipping when cutting grass frayed belt edges burn marks and cracks are signs of a worn deck belt Repl...

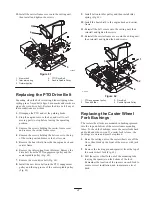
Страница 41: ...ew drive belt onto the PTO engagement pulley and the top groove of the center spindle pulley Fig 62 9 Install belt onto idler pulley and then install idler spring Fig 62 10 Install the heat shield to the engine deck and carrier frame 11 Reinstall the belt covers onto the cutting unit then reinstall and tighten the screws 12 Reinstall the carrier frame cover onto the cutting unit then reinstall and...

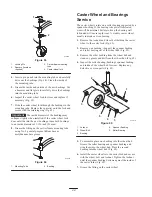
Страница 42: ...arings Service The caster wheels rotate on a roller bearing supported by a spanner bushing If the bearing is kept well lubricated wear will be minimal Failure to keep the bearing well lubricated will cause rapid wear A wobbly caster wheel usually indicates a worn bearing 1 Remove the locknut and wheel bolt holding the caster wheel to the caster fork Fig 65 2 Remove one bushing then pull the spanne...

Страница 43: ...ith mild detergent and water Do not pressure wash the machine Avoid excessive use of water especially near the shift lever plate and engine 3 Check the brake refer to Brake Service page 32 4 Service the air cleaner refer to Air Cleaner Service page 27 5 Grease the machine refer to Greasing and Lubrication page 30 6 Change the crankcase oil refer to Engine Oil Service page 28 7 Check the tire press...

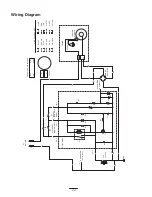
Страница 44: ...BAIL SW NORMALLY OPEN S2 CLUTCH SW MOMENTARY OR PK W BK P5 2 P5 1 BK PINK RED TAN BLACK WIRE COLOR CODES BROWN BLUE WHITE VIOLET YELLOW ORANGE GREY GREEN BN W VIO GN GY OR Y BU BN PK R T BK KEY SW G M KEY SWITCH P N 29 5560 NONE G M OFF ON W PK J8 1 SPARK PLUG ENGINE IGNITION MODULE MAG AC W BK BU PK BU BU BRIDGE RECTIFIER R4 R3 D5 C2 D6 PK HOURMETER OPTIONAL ...

Страница 45: ...t 3 Oil level in crankcase is low 3 Add oil to crankcase 4 Cooling fins and air passages under engine blower housing are plugged 4 Remove obstruction from cooling fins and air passages 5 Spark plug is pitted fouled or gap is incorrect 5 Install new correctly gapped spark plug 6 Vent hole in fuel cap is plugged 6 Clean or replace the fuel cap 7 Dirt in fuel filter 7 Replace fuel filter 8 Dirt water...

Страница 46: ...harpen blade s g g 2 Cutting blade s is are bent 2 Install new cutting blade s 3 Mower is not level 3 Level mower from side to side and front to rear 4 Underside of mower is dirty 4 Clean the underside of the mower 5 Tire pressure is incorrect 5 Adjust tire pressure 6 Blade spindle bent 6 Contact Authorized Service Dealer Blades do not rotate 1 PTO Drive belt is worn loose or broken 1 Install new ...

Страница 47: ...47 ...

Страница 48: ...48 ...

Отзывы: