


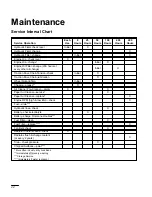


Maintenance
25
Engine Oil
Service Interval/Specification
Change oil:
•
After the first 50 operating hours.
•
After every 100 operating hours.
Oil Type: High–quality detergent oil classified “API
Service CD” or higher for diesel engines. Use no
special additives with recommended oils.
Crankcase Capacity: 4 quarts (3.8 liters)
Viscosity: See the table below.
USE THESE SAE VISCOSITY OILS
Changing/Draining the Engine Oil
1.
Start the engine and let it run for five minutes.
This warms the oil so it drains better.
2.
Park the machine so that the drain side is slightly
lower than the opposite side to assure the oil
drains completely. Then lower the loader arms,
and turn the ignition key to “OFF” to stop the
engine. Remove the key.
POTENTIAL HAZARD
•
Components will be hot if the traction unit
has been running.
WHAT CAN HAPPEN
•
Touching hot components can cause burns.
HOW TO AVOID THE HAZARD
•
Allow the traction unit to cool before
performing maintenance or any touching
components.
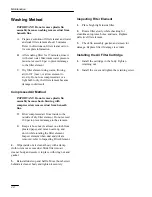
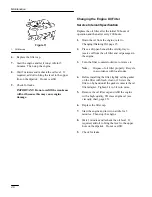
3.
Place a pan below the oil drain. Remove the
drain plug from the drain hose and let the oil
drain completely (Fig. 10).
4.
Install the drain plug and tighten.
Note:
Dispose of the used oil at a certified
recycling center.
5.
Remove the oil filler cap (Fig. 11) and refill the
engine with a high–quality, CD class engine oil
(see viscosity chart).
1
Figure 10
1.
Drain plug
Содержание 22302
Страница 7: ...Safety 5 Slope Chart Read all safety instructions on pages 2 4...
Страница 43: ......


