


5
Installation
Refer to your traction unit
Operator’s Manual
for
complete instructions on installing attachments onto the
traction unit and connecting hydraulic hoses.
Installing a Blade
Toro offers several different blades and pullers. Purchase
a blade and puller from your Toro dealer.
1.
Raise the plow about 36 in. (1 m) off of the ground
and install the cylinder locks.
2.
Stop the engine and remove the key.
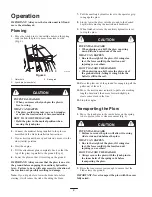
3.
Remove the two click pins from the clevis pins in the
blade bracket, then remove the clevis pins (Fig. 2).
4.
Slide the blade into the blade bracket and secure it at
the desired depth (a change in mounting holes will
change the depth by 3 in. (7.6 cm)), using the clevis
pins and click pins removed previously (Fig. 2).
m–4155
3
1
2
Figure 2
1. Click pin
2. Clevis pin
3. Blade
Removing the Plow from the
Traction Unit
Refer to your traction unit operator’s manual for complete
instructions on removing attachments from the traction
unit and disconnecting hydraulic hoses.
1.
With the plow raised above the ground, stop the
engine.
2.
Remove the lower click pin and clevis pin securing the
blade to the plow (to completely remove the blade,
remove both the upper and lower click and clevis pins)
(Fig. 2).
3.
Swing the blade up and secure it as illustrated in
Figure 3.
CAUTION
POTENTIAL HAZARD
•
The blade is sharp and has pinch points.
WHAT CAN HAPPEN
•
The blade can swing and pinch or crush hands
or feet.
HOW TO AVOID THE HAZARD
•
Wear gloves and work boots and securely hold
the blade.
4.
Tilt the plow forward and lower it to the ground or
trailer, with the stand and coulter supporting the
weight of the plow (Fig. 3).
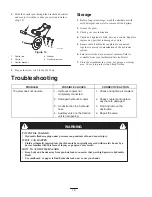
1
2
m–4337
Figure 3
1. Stand
2. Coulter
5.
Stop the engine and remove the plow as directed in
your traction unit operator’s manual.