background image

4

Coupling the PTO Shaft to the
Transaxle

No Parts Required

Procedure

1.

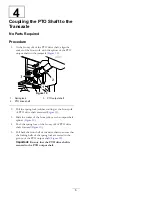
At the front yolk of the PTO drive shaft, align the
socket of the front yolk with the splines of the PTO
output shaft on the transaxle (

Figure 10

).

Figure 10

1.

Spring lock

3.

PTO output shaft

2.

PTO drive shaft

2.

Pull the spring lock (rubber cowling) at the front yolk
of PTO drive shaft rearward (

Figure 10

).

3.

Slide the socket of the front yolk over the output shaft
splines (

Figure 10

).

4.

Push the spring lock of the front yolk of PTO drive
shaft forward (

Figure 10

).

5.

Pull back the front half of the drive shaft to ensure that
the locking balls of the spring lock are seated in the
groove of the PTO output shaft (

Figure 10

).

Important:

Ensure that the PTO drive shaft is

secured to the PTO output shaft.

5


Содержание 131-3302

Страница 1: ...f key 1 Set screw 2 Drive shaft shield 1 Clip 2 2 Flange head bolt 1 4 x 3 4 inch 2 Install the PTO shaft and the drive shaft shield to the sprayer pump Hydraulic hose 5 8 x 55 6 inches 1 Hydraulic hose 5 8 x 85 2 inches 1 Male quick coupler 1 Female quick coupler 1 Tube clamp 2 Clamp bolt 5 16 x 1 1 2 inches 1 3 Cable tie 3 Install the hydraulic hoses for the boom lift cylinders 4 No parts requir...

Страница 2: ...ve shaft shield bracket onto the sprayer pump with the 2 bolts removed in step 1 as shown in Figure 2 Figure 2 1 Drive shaft shield bracket 2 Bolts from the sprayer pump 4 Torque the bolts to 23 to 26 N m 17 to 21 ft lb 2 Install the PTO Shaft and the Drive Shaft Shield to the Sprayer Pump Parts needed for this procedure 1 PTO drive shaft 1 Woodruff key 2 Set screw 1 Drive shaft shield 2 Clip 2 Fl...

Страница 3: ...o the shield support bracket with 2 flange head bolts 1 4 x 3 4 inch and 2 clips Figure 5 Figure 5 1 Flange head bolt 2 3 Drive shaft shield 2 Clip 2 3 Installing the Hydraulic Hoses for the Boom Lift Cylinders Parts needed for this procedure 1 Hydraulic hose 5 8 x 55 6 inches 1 Hydraulic hose 5 8 x 85 2 inches 1 Male quick coupler 1 Female quick coupler 2 Tube clamp 1 Clamp bolt 5 16 x 1 1 2 inch...

Страница 4: ...om the T fitting in the hydraulic tube next to the transmission oil filter Figure 8 Figure 8 1 T fitting 2 Transmission oil filter 5 Connect the free end of the hose 3 8 x 55 6 inches to the T fitting Figure 8 and torque the swivel nut of the hose to 37 to 45 N m 27 to 33 ft lb 6 Remove the cap from the T fitting in the hydraulic tube next to the hydraulic fluid tank Figure 9 Figure 9 The crosstub...

Страница 5: ...ull the spring lock rubber cowling at the front yolk of PTO drive shaft rearward Figure 10 3 Slide the socket of the front yolk over the output shaft splines Figure 10 4 Push the spring lock of the front yolk of PTO drive shaft forward Figure 10 5 Pull back the front half of the drive shaft to ensure that the locking balls of the spring lock are seated in the groove of the PTO output shaft Figure ...

Страница 6: ...Notes 6 ...

Страница 7: ...Notes 7 ...

Страница 8: ......

Отзывы: