
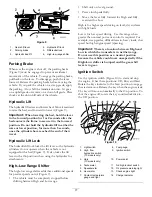


hill are particularly dangerous. Even at a slow speed
and without a load, tip overs are more likely if you turn
on a hill.
Slow down and shift into a lower gear before starting
up or down a hill. If you have to turn while on a hill,
do it as slowly and cautiously as possible. Never make
sharp or fast turns on a hill.
If you stall or begin to lose headway while climbing
a steep hill, quickly apply the brakes, shift to neutral,
restart the engine and shift to reverse. At idle speed,
the engine and transaxle drag will aid the brakes in
controlling the vehicle on the hill and help you back
down the hill more safely.
Reduce the weight of the load if it is a steep hill or if the
load has high center of gravity. Remember, loads can
shift, secure them.
Note:
The vehicle has excellent hill climbing ability.
The differential lock will increase this ability. Hill
climbing traction can also be increased by adding weight
to the rear of the vehicle in one of the following ways:
•
Adding weight to inside of box, making sure it is
secured.
•
Mounting wheel weights to rear wheels.
•
Adding liquid ballast (calcium chloride) to rear tires.
•
Traction will increase with no passenger in front
seat.
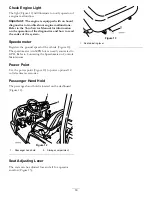
Loading and Dumping
The weight and position of the cargo and passenger
can change the vehicle center of gravity and vehicle
handling. To avoid loss of control resulting in personal
injury, follow these guidelines.
Do not carry loads which exceed the load limits
described on the vehicle weight label.
WARNING
The bed will lower whenever the dump lever
is pushed down, even when the engine is off.
Turning off the engine will
not
prevent the box
from lowering. Always place the safety support on
the extended lift cylinder to hold the box up if you
are not going to lower it right away.
The vehicle has several combinations of boxes,
platforms, and attachments available. These can be
used in various combinations that allow for maximum
capacity and versatility. The full sized box is 55 inches
(140 cm) wide by 65 inches (165 cm) long and can hold
up to 3000 lb (1360 kg) of evenly distributed cargo.
Loads vary in how they are distributed. Sand spreads
out evenly and quite low. Other items, such as bricks,
fertilizer or landscape timbers, stack higher in the box.
The height and weight of the load has a significant
influence on tip overs. The higher a load is stacked, the
more likely the vehicle is to tip over. You may find that
3000 lb (1360 kg) stacks too high for safe operation.
Reducing the total weight is one way to reduce the risk
of a tip over. Distributing the load as low as possible is
another way to reduce the risk of a tip over.
If the load is positioned toward one of the sides, it will
make the vehicle much more likely to tip over on that
side. This is especially true when turning if the load is
on the outside of the turn.
Never position heavy loads behind the rear axle. If the
load is positioned so far to the rear that it is behind the
rear axle, it will reduce the weight on the front wheels
and this will reduce steering traction. With the load all
the way to the back, the front wheels can even come
off of the ground when going over bumps or up a hill.
This will result in a loss of steering and may lead to the
vehicle tipping over.
As a general rule, position the weight of the load
evenly from front to rear and evenly from side to
side.
If a load is not secured, or you are transporting a liquid
in a large container such as a sprayer, it can shift. This
shifting happens most often while turning, going up or
down hills, suddenly changing speeds, or while driving
over rough surfaces. Shifting loads can lead to tip overs.
Always secure loads so that they do not shift. Never
dump the load while the vehicle is sideways on the hill.
Heavy loads increase stopping distance and reduce your
ability to turn quickly without tipping over.
The rear cargo space is intended for load carrying
purposes only, not for passengers.
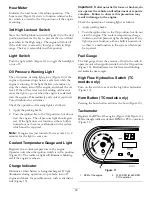
Using The Differential Lock
The differential lock increases the vehicle’s traction by
locking the rear wheels so one wheel will not spin out.
This can help when you have heavy loads to haul on
wet turf or slippery areas, going up hills, and on sandy
surfaces. It is important to remember however, that this
extra traction is only for temporary limited use. Its use
does not replace the safe operation, already discussed
concerning steep hills and heavy loads.
The differential lock causes the rear wheels to spin at the
same speed. When using differential lock your ability to
make sharp turns is somewhat restricted and may scuff
30
Содержание 07367TC
Страница 41: ...Figure 44 41...
Страница 60: ...Schematics Hydraulic Schematic Rev B High Flow Hydraulics Schematic TC models only Rev A 60...
Страница 61: ...Electrical Schematic Rev B 61...
Страница 62: ...Notes 62...
Страница 63: ...Notes 63...