background image

Introduction

This cutting unit is designed for cutting turf on greens and
small fairways of golf courses.

Read this information carefully to learn how to operate and
maintain your product properly and to avoid injury and
product damage. You are responsible for operating the
product properly and safely.

You may contact Toro directly at www.Toro.com for product
and accessory information, help finding a dealer, or to register
your product.

Whenever you need service, genuine Toro parts, or additional
information, contact an Authorized Service Dealer or Toro
Customer Service and have the model and serial numbers of
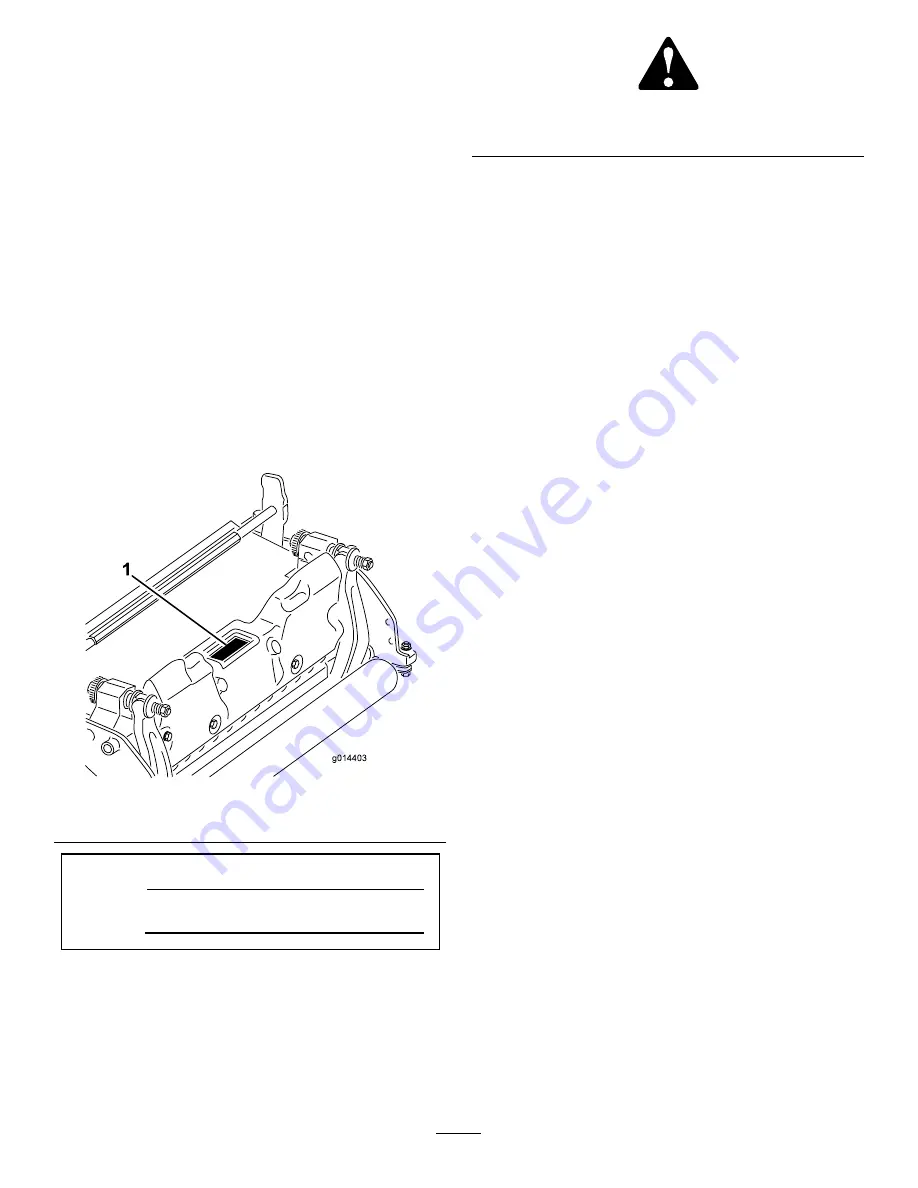
your product ready. Figure 1 identifies the location of the
model and serial numbers on the product. Write the numbers
in the space provided.

Figure 1

1.

Location of the model and serial numbers

Model No.

Serial No.

This manual identifies potential hazards and has safety
messages identified by the safety alert symbol (Figure 2),
which signals a hazard that may cause serious injury or death
if you do not follow the recommended precautions.

Figure 2

1.

Safety alert symbol

This manual uses 2 words to highlight information.

Important

calls attention to special mechanical information

and

Note

emphasizes general information worthy of special

attention.

Contents

Introduction .................................................................. 2
Safety ........................................................................... 3

Safety and Instructional Decals. ................................ 3

Setup ............................................................................ 4

Installing the Front Roller ......................................... 4
Using the Cutting Unit Prop...................................... 4
Adjusting the Bedknife to the Reel ............................. 4
Adjusting the Rear Roller.......................................... 5
Adjusting the Height of Cut ...................................... 5
Adjusting the Cut-Off Bar ........................................ 7

Product Overview .......................................................... 8

Specifications. ........................................................ 8
Attachments/Accessories......................................... 8

Operation ..................................................................... 9

Cutting Unit Characteristics ...................................... 9
Daily Adjustments of the Cutting Unit........................ 9

Maintenance .................................................................10

Servicing the Bedbar ...............................................10
Backlapping the Reel...............................................11

© 2014—The Toro® Company
8111 Lyndale Avenue South
Bloomington, MN 55420

2

Contact us at www.Toro.com.

Printed in the USA.

All Rights Reserved


Содержание 04615

Страница 1: ...PA Reel Mower Greensmaster 3300 3400 Series Traction Unit Model No 04613 Serial No 313000001 and Up Model No 04614 Serial No 313000001 and Up Model No 04615 Serial No 313000001 and Up Register at www Toro com Original Instructions EN 3376 576 B ...

Страница 2: ...nual identifies potential hazards and has safety messages identified by the safety alert symbol Figure 2 which signals a hazard that may cause serious injury or death if you do not follow the recommended precautions Figure 2 1 Safety alert symbol This manual uses 2 words to highlight information Important calls attention to special mechanical information and Note emphasizes general information wor...

Страница 3: ...al ordinances and insurance regulations Remove all debris or other objects that might be picked up and thrown by the cutting unit reel blades Keep all bystanders away from the working area If the cutting blades strike a solid object or the unit vibrates abnormally stop and shut the engine off Check the cutting units for damaged parts Repair any damage before restarting and operating the cutting un...

Страница 4: ...2 Figure 4 1 Bedknife adjusting screw 2 Nut 3 Rotate the reel so that a blade crosses the bedknife edge between the first and second bedknife screw heads on the right side of the cutting unit 4 Put an identifying mark on the blade where it crosses the bedknife edge this will make subsequent adjustments easier 5 Insert the 05 mm 0 002 inch shim between the marked blade and the bedknife edge at the ...

Страница 5: ...ow the sideplate mounting flange when height of cut settings range from 3 to 25 mm 1 8 to 1 inch Figure 7 Figure 7 1 Spacer 3 Sideplate mounting flange 2 Roller bracket 2 To adjust rear roller proceed as follows A Raise the rear of the cutting unit and place a block under the bedknife B Remove the 2 nuts securing each roller bracket and spacer to each sideplate mounting flange C Lower the roller a...

Страница 6: ...d will be snug against the bedknife This ensures that the height of cut is identical at both ends of the bedknife 5 Tighten the nuts to secure the adjustment Do not overtighten the nuts Tighten them enough to remove play from the washer Note Use the following chart to determine which bedknife is best suited for the desired height of cut Recommended Bedknife Height of Cut Chart Bedknife Part Number...

Страница 7: ...gauge between the top of the reel and the bar and tighten the screws Ensure the bar and reel are equal distance apart across the complete reel for optimum performance Note The bar is adjustable to compensate for changes in turf conditions Adjust the bar closer to the reel when the turf is extremely dry By contrast adjust the bar further away from the reel when the turf conditions are wet Adjust th...

Страница 8: ... diameter steel full roller Bedknife Replaceable single edged high carbon steel bedknife is fastened to a machined cast iron bedbar with 13 screws Bedknife Adjustment Dual screw adjustment to the reel detents corresponding to 0 018 mm 0 0007 inch bedknife movement for each indexed position Grass Shield Non adjustable shield with adjustable cut off bar to improve grass discharge from reel in wet co...

Страница 9: ...nts corresponding to 0 018 mm 0 0007 inch bedknife movement for each indexed position Refer to Adjusting the Bedknife to the Reel 3 Test the cutting performance by inserting a long strip of cutting performance paper Toro part number 125 5610 between reel and bedknife perpendicular to the bedknife Figure 12 Slowly rotate the reel forward it should cut the paper Figure 12 Note If excessive contact r...

Страница 10: ...20096 Figure 15 1 Bedbar bolt 3 Steel washer 2 Locknut 4 Nylon washer Assembling the Bedbar 1 Install the bedbar positioning the mounting ears between the washer and bedbar adjuster 2 Secure the bedbar to each side plate with 2 bedbar bolts locknuts nuts on bolts and 6 washers Position a nylon washer on each side of the side plate boss Place a steel washer outside of the outer nylon washer Figure ...

Страница 11: ... a clean level surface lower the cutting units stop the engine engage the parking brake and remove the ignition key 2 Remove the reel motors from the cutting units and disconnect and remove the cutting units from the lift arms 3 Connect the backlapping machine to the cutting unit by inserting a piece of 3 8 inch square stock into the splined coupling in the end of the cutting unit Note Additional ...

Страница 12: ...Notes 12 ...

Страница 13: ...Notes 13 ...

Страница 14: ...Notes 14 ...

Страница 15: ...l Mower 14 BLADE DPA TRIFLEX 14 Blade DPA Reel Mower 2006 42 EC 2000 14 EC Relevant technical documentation has been compiled as required per Part B of Annex VII of 2006 42 EC We will undertake to transmit in response to requests by national authorities relevant information on this partly completed machinery The method of transmission shall be electronic transmittal This machinery shall not be put...

Страница 16: ...ted to damage to seats due to wear or abrasion worn painted surfaces scratched decals or windows etc Parts Parts scheduled for replacement as required maintenance are warranted for the period of time up to the scheduled replacement time for that part Parts replaced under this warranty are covered for the duration of the original product warranty and become the property of Toro Toro will make the f...

Отзывы: