background image

Engine: 

Kawasaki, air cooled, overhead valve, 4

cycle, 2.76 kW (3.7 hp), 2.36” x 1.73” bore and
stroke, 7.57 cu. in. (124 cc) displacement, 8.4:1
compression ratio, 14.9 Nm (11 ft. lbs.) @ 1400
rpm. Electronic ignition, maximum noise
suppression muffler. 2.5 l (2.64 quart) fuel tank
capacity.

Traction Drive

: Engine to countershaft drive: two

“A” section V belts. Countershaft to differential
drive: 5mm pitch timing belt. Differential to drum
drive: 8mm pitch timing belt.

Differential

: Peerless Series 100.

Transport Clutch

: Belt idler

Brake: 

Band drum

Optional Transport Tires

: Quick detachable,

3.00/3.25 x 6, 32.5 tread width.

Traction Drum

: Dual cast aluminum, 19 cm (7.5”)

diameter.

Controls

: Engine has recoil starter, ON/OFF switch,

and choke.  Handle has throttle lever, traction
engage lever and service/ park brake lever. The
mower has reel drive engage lever.  Safety devices:
neutral interlock system.

Handle: 

Loop style, 2.5cm (1”) diameter.

Reel Construction:

12.7cm (5”) diameter, 11

carbon steel blades welded to 5 stamped steel
spiders.

Width of Cut

: 53.3 cm (21”)

Height of Cut Range

: 2mm–12.25 mm (5/64” to

1/2”)

Clip: 0

.16”

Reel Clutch:

Jaw Type.

Bedknife and bedbar

: Single-edged, high-carbon

steel bedknife, hardened to Rc 48–55. Fastened to
machined, cast iron bedbar. Tournament bedknife
(Part No. 93-4263), standard.

Grass Basket:

Molded polyethylene.

Dimensions:

Width: 

91.4 cm (36”)

Height: 

119.4 cm (47”)

Length: 

149.9 cm (59”)

Dry Weight:

208 lbs. with basket and Wiehle roller,

without wheels or grooming reel.

– 9 –

Specifications

Содержание 04052TE

Страница 1: ...OPERATOR S MANUAL FORM NO 3324 332 Rev A MODEL NO 04052TE 200000001 UP GREENSMASTER 1000 1999 The Toro Company ...

Страница 2: ...dentification And Ordering 29 2 The GREENSMASTER 1000 was developed to provide an efficient trouble free method of mowing high quality turf on the finest greens The latest concepts of engineering design and safety have been incorporated into this machine along with the highest quality parts and workmanship Excellent service will be derived if proper operation and maintenance practices are followed...

Страница 3: ...ate the equipment when barefoot or wearing open sandals 2 Thoroughly inspect the area where the equipment is to be used and remove all objects which may be thrown by the machine 3 WARNING Petrol is highly flammable Store fuel in containers specifically designed for this purpose Refuel outdoors only and do not smoke while refueling Add fuel before starting the engine Never remove the cap of the fue...

Страница 4: ...take off and lower the attachments change into neutral and set the parking brake stop the engine and remove the key 13 Disengage the drive to attachments when transporting or not in use 14 Stop the engine and disengage the drive to the attachment before refueling before removing the grass catcher before making height adjustments unless the adjustment can be made from the operator s position before...

Страница 5: ... machine is to be parked stored or left unattended lower the cutting means unless a positive mechanical lock is used Sound Pressure Level This unit has an equivalent continuous A weighted sound pressure at the operator ear of 83 dB A based on measurements of identical machines per 84 538 EEC Vibration Level This unit has a hand arm vibration level of 10 05 m s2 based on measurements of identical m...

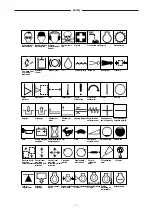
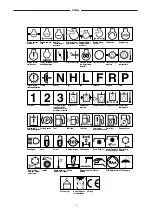
Страница 6: ...nglement implement input drive line Fingers or hand entangle ment chain drive Runover back over relevant machine to appear in dashed box Machine tipping riding mower Machine rollover ROPS relevant machine to appear in dashed box Stored energy hazard kickback or upward motion Hot surfaces burns to fingers or hands Hand arm entanglement belt drive Thrown or fly ing objects whole body exposure Thrown...

Страница 7: ... Slow Continuous variable linear Volume empty Volume full Machine travel direction forward rearward Control lever operating direction dual direction Control lever operating direction multiple direction Clockwise rotation Counter clock wise rotation Grease lubrication point Oil lubrication point Lift point Jack or support point Draining emptying Engine lubricat ing oil Engine lubricating oil pressu...

Страница 8: ... 4 Wheel drive Power Take Off Power Take Off rotational speed Reel cutting element Reel cutting element height adjustment Traction Above working temperature range Drilling Manual metal arc welding Manual 0356 Water pump 0626 Keep dry 0430 weight Do not dispose in the garbage CE logo Engine coolant pressure Engine coolant f ilter Engine lubricating oil pressure Engine intake combustion air Engine i...

Страница 9: ...19 cm 7 5 diameter Controls Engine has recoil starter ON OFF switch and choke Handle has throttle lever traction engage lever and service park brake lever The mower has reel drive engage lever Safety devices neutral interlock system Handle Loop style 2 5cm 1 diameter Reel Construction 12 7cm 5 diameter 11 carbon steel blades welded to 5 stamped steel spiders Width of Cut 53 3 cm 21 Height of Cut R...

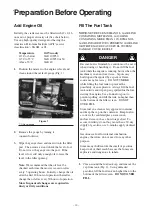
Страница 10: ...UM GASOLINE OR WHITE GAS BECAUSE FUEL SYSTEM DAMAGE COULD RESULT 1 Clean around the fuel tank cap and remove the cap from tank Fig 2 Using unleaded gasoline fill the fuel tank no higher than to the bottom of the filter screen DO NOT OVER FILL 10 Preparation Before Operating Because fuel is flammable caution must be used when storing or handling it Do not fill the fuel tank while the engine is runn...

Страница 11: ...f the gap is less than 0 25mm no adjustment is required 5 Remove the rear belt cover from the right side of the machine 6 Rotate the drive pulley until the holes align with the 4 roller bearing flange screws Fig 3 Figure 3 1 Drive pulley 2 Four holes 3 Idler pulley 7 Loosen the four roller bearing screws and the screw securing the idler pulley Raise or lower the right side of the roller assembly u...

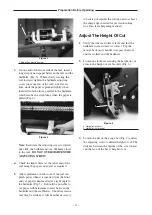
Страница 12: ...rted from the front and cut paper when inserted at a right angle to the bedknife Fig 5 It should be possible to cut paper with minimum contact between the bedknife and the reel blades Should excessive reel drag be evident it will be either necessary to backlap or regrind the cutting unit to achieve the sharp edges needed for precision cutting see Toro reel sharpening manual Adjust The Height Of Cu...

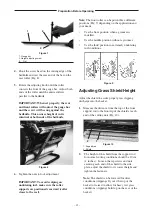
Страница 13: ...ns Fig 9 depending on the application and your needs Use the front position when a groomer is installed Use the middle position without a groomer Use the third position in extremely undulating turf conditions Figure 9 Adjusting Grass Shield Height Adjust the shield to assure proper grass clipping discharge into the basket 1 Measure the distance from the top of the front support rod to the front li...

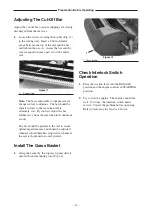
Страница 14: ...adjust the bar further away from the reel when turf conditions are dry The bar should be parallel to the reel to assure optimum performance and should be adjusted whenever shield height is adjusted or whenever the reel is sharpened on a reel grinder Install The Grass Basket 1 Grasp the basket by the top rear lip and slide it onto the basket mounting rods Fig 12 Figure 12 1 Grass basket Check Inter...

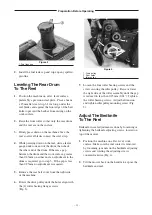
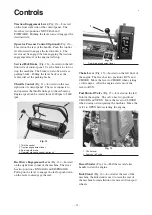
Страница 15: ...trol 2 Traction engagement lever 3 Service park brake 4 Operator presence control optional Reel Drive Engagement Lever Fig 14 Located on the right front corner of the machine The lever has two positions ENGAGE and DISENGAGE Pull up on the lever to engage the reel or push down on the lever to disengage the reel Fig 14 1 Reel drive engagement lever Choke Lever Fig 15 Located on the left front of the...

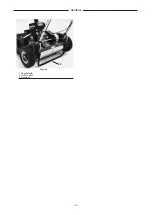
Страница 16: ...Fig 16 1 Recoil starter 2 On Off switch 3 Kickstand Controls 16 3 2 1 ...

Страница 17: ... off valve before storing or transporting the mower in a vehicle Transport Operation 1 Push the kick stand down with your foot and pull up on the handle to raise the rear of the mower and install the transport wheels 2 To release the kickstand push the mower forward and then downward on handle 3 Assure the traction and reel drive controls are in DISENGAGE and start the engine 4 Set throttle contro...

Страница 18: ...ing pace Fast speeds saves very little time and will result in an inferior mowing job Control Operation To operate the controls while mowing 1 Start the engine set the throttle at reduced speed push down on the handle to raise the cutting unit move the traction lever to ENGAGED and transport the mower onto the collar of green 2 Move the traction lever to DISENGAGED and ENGAGE the reel drive lever ...

Страница 19: ...ce Procedure Maintenance Interval Service Initial break in at 20 hours Replace all interlock switches Clean the combustion chamber Replace the spark plug Adjust the valves and torque the head bolts Check the cut off bar adjustment Service the air cleaner filter Clean the fuel filter and sediment bowl Adjust the traction drive belts Change the engine oil Service air filter pre cleaner Lubricate all...

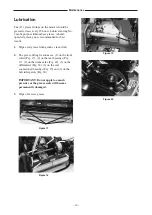
Страница 20: ...ting with a clean cloth 2 The grease fitting locations are 2 on the front roller Fig 17 2 on the reel bearings Fig 17 2 on the drum axles Fig 18 3 on the differential Fig 18 2 on the reel countershaft bearings Fig 19 and 2 on the belt idler pivots Fig 20 IMPORTANT Do not apply too much pressure or the grease seals will become permanently damaged 3 Wipe off excess grease Figure 17 Figure 18 Figure ...

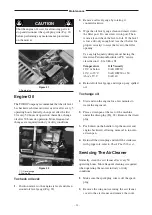
Страница 21: ...ice classification SG SH or SJ Temperature Oil Viscosity 10 C or below SAE 10W30 10 C to 35 C SAE 10W30 or 30 Above 35 C SAE 40 4 Reinstall oil level gauge and wipe up any spilled oil To change oil 1 Start and run the engine for a few minutes to warm the engine oil 2 Place a drain pan at the rear of the machine under the drain plug Fig 22 Remove the drain plug 3 Push down on the handle to tip the ...

Страница 22: ...ce as required 5 Reinstall the foam element paper element and air cleaner cover IMPORTANT Do not operate the engine without an air cleaner element because extreme engine wear and damage will likely result Replacing The Spark Plug Use an NGK BPR 5ES spark plug or equivalent Correct air gap is 0 71 0 79mm 0 028 0 031 Remove the plug after every 100 operating hours and check its condition 1 Pull the ...

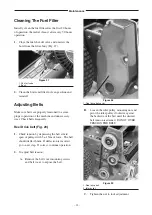
Страница 23: ...k belts frequently Reel Drive belt Fig 29 1 Check tension by depressing the belt at mid span of pulleys with 5 1 Nm of force The belt should deflect 6mm If deflection is incorrect go to next step If correct continue operation 2 To adjust belt tension A Remove the belt cover mounting screws and belt cover to expose the belt Figure 28 1 Reel drive belt cover B Loosen the idler pulley mounting nut an...

Страница 24: ...THE BELT C Tighten the nut to lock adjustment D Install the belt cover by placing the cover in position While maintaining a slight gap between the cover seal and the side plate install each mounting bolt until the threads engage in the insert The gap will allow visual alignment of the bolt to the threaded insert After all bolts are installed tighten until the stand offs inside the cover contact th...

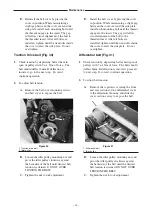
Страница 25: ...isaligned loosen the screws securing engine mounting base to the mower frame and slide the engine from side to side until the pulleys are aligned within 0l76mm Figure 32 1 V belt cover 2 Retainer Figure 33 1 Primary V belts 2 Belt guide 3 idler pulley 5 Tighten the mounting screws and recheck alignment 6 Close cover and secure the retainer 7 To push or pull the machine easier without starting the ...

Страница 26: ...sitioned against the backside of the belt 9 Rotate both housings back into the upright position and secure to side plate with capscrews and nuts previously removed 10 Adjust differential belt tension refer to Adjusting The Differential Belt 11 Adjust belt tension on the traction drive and reel drive belts refer to Adjusting The Traction Drive and Reel Drive Belts 12 Reinstall the differential trac...

Страница 27: ... position if improperly adjusted Tighten the screw securing the cable to the arm Make sure the throttle control is in the SLOW position 4 Check setting with a tachometer Low idle speed is 800 rpm High idle speed is 1800 rpm See note below 5 Adjust the idle speed screws in or out to attain correct speed setting Note Speed is measured at the engine output shaft Actual engine speed is twice the outpu...

Страница 28: ... positioning the mounting ears between the thrust washer and channel on bedbar adjuster 2 Secure the bedbar to each side plate with bedbar bolts flange nuts on bolts and 8 washers A nylon washer is to be positioned on each side of side plate boss Place a steel washer outside each of the nylon washers Torque bolts 27 36 Nm Tighten the flange nuts until the thrust washers just rotate freely 3 Adjust...

Страница 29: ...e concerning the unit supply the model and serial numbers to ensure correct information and replacement parts are obtained Note Do not order by reference number if a parts catalog is being used use the part number To order replacement parts from an authorized TORO Distributor supply the following information 1 Model and serial numbers 2 Part number description and quantity of parts desired 29 Main...

Страница 30: ......

Страница 31: ......

Страница 32: ......

Отзывы: