5
PREPARATION
DESCRIPTION
WARNING:
This Product contains chemicals known to
the state of California to cause cancer and birth defects or
other reproductive harm.
OPERATING INSTRUCTIONS
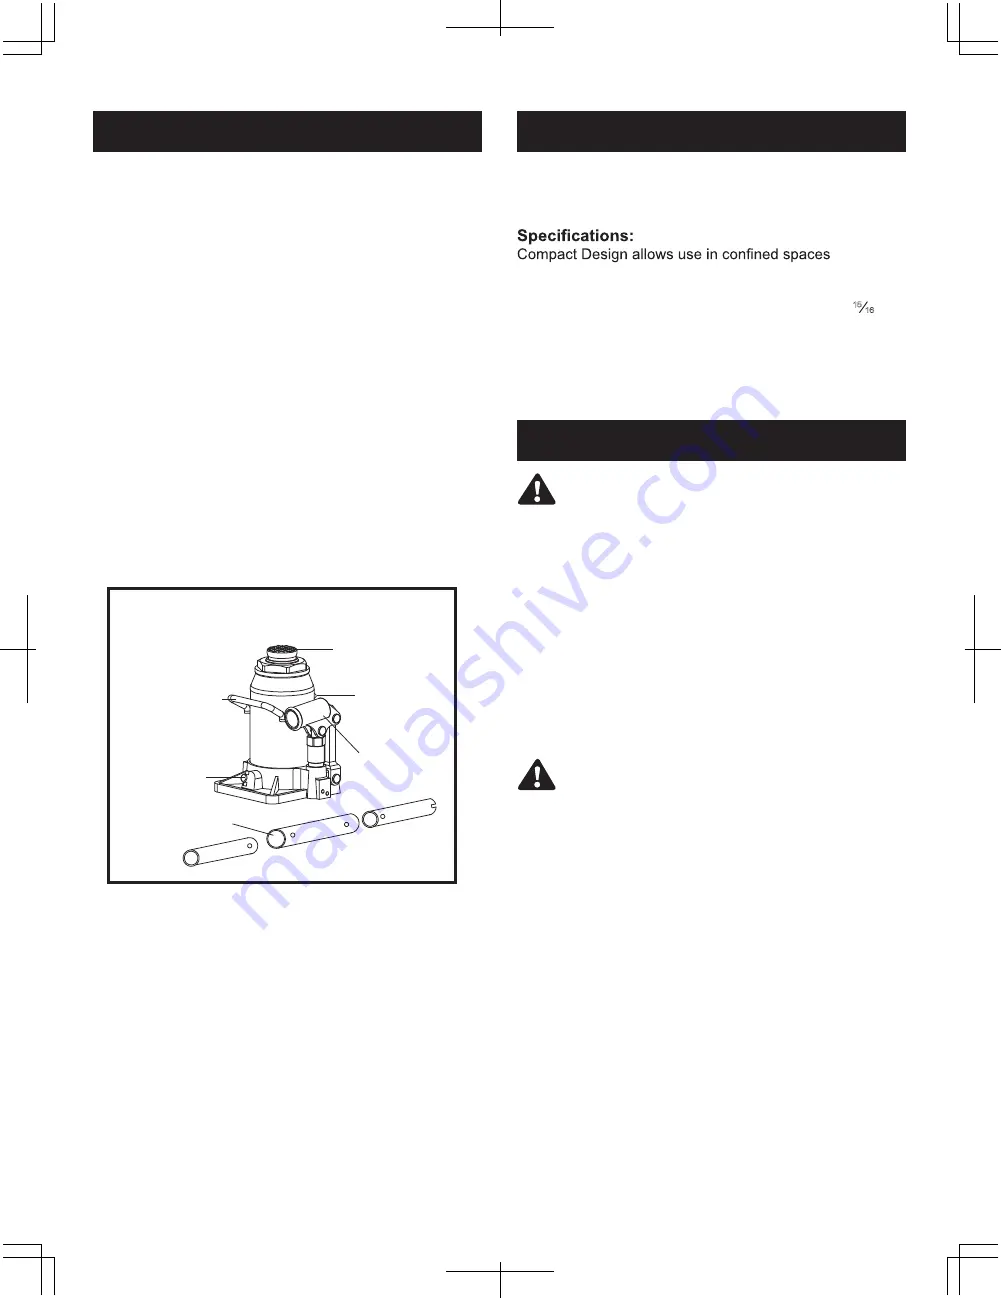
Before use (refer to Fig 1)
1. Verify that the product and the application are
compatible. If in doubt, contact Customer Support.
2. Before using this product, read the owner’s manual
completely and familiarize yourself thoroughly with the
product and its components, and recognize the hazards
associated with its use.
3. To familiarize yourself with basic operation, use the
stamped end of the provided handle to engage and
turn the release valve:
a. Clockwise until firm resistance is felt to further thread
engagement. This is the ‘CLOSED’ release valve
position used to raise the load.
b. Counterclockwise, but no more than ½ turn from the
closed position. This is the ‘OPEN’ release valve
position used to lower the load.
4. Check that the pump operates smoothly and that the
extension screw will thread up/down easily before
putting into service. Replace damaged or missing parts
with factory authorized replacement parts only. Only the
handle assembly, oil filler plug, label, and owners
manual are available for this jack. Repair of this product
may require special skills and knowledge and should
only be attempted by a factory authorized service center.
This is the safety alert symbol. It is used to alert
you to potential personal injury hazards. Obey all
safety messages that follow this symbol to avoid
possible injury or death.
Lifting
1. Place vehicle in park with emergency brake on and
wheels securely chocked to prevent inadvertent vehicle
movement.
2. Locate and close release valve by turning handle
clockwise until firm resistance is felt to further thread
engagement. Center jack saddle under lift point.
3. Verify lift point, insert handle into handle sleeve and
pump to contact lift point. To lift, pump handle until load
reaches desired height.
4. Transfer the load immediately to a pair of appropriately
rated jack stands.
Use only the handle assembly provided by the jack
manufacturer. The handle assembly provided with
this jack will safely engage the release valve and
operate the handle sleeve. If the handle is worn,
operates abnormally, or will not positively engage
the release valve, STOP. Discontinue use of the
jack until a factory replacement handle assembly
can be acquired.
Lowering
1. Raise load high enough to clear the jack stands; then,
carefully remove jack stands.
2. Slowly turn the handle counterclockwise, but no more
than a ½ turn. If the load fails to lower:
a. Use another jack to raise the vehicle high enough to
reinstall jack stands
b. Remove the affected jack and then the stands.
c. Using the other jack, lower the load by turning the
operating handle counterclockwise, but no more
than a ½ turn.
3. After removing jack from under the load, push saddle
down to reduce ram exposure to rust and contamination.
Model
T92007AT
features a
40,000
- lb. maximum capacity.
The jack features an overlad valve bypass system to
prevent jack damage and user injury.
Maximum Load Capacity......................20 tons (40,000-lb.)
Minimum Lifting Height............................................6
⅝
inch
Maximum Lifting Height.......................................10 inch
15
16
FIGURE 1 - Typical Bottle Jack
saddle
oil filler plug
(on reservior)
carry handle
(on selected
model only)
release valve
handle
sleeve
handle assembly
Содержание T92007AT
Страница 7: ...7...


