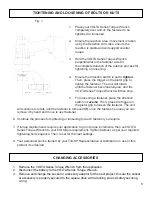
background image

6

SETTING THE TORQUE

1.  Momentarily press Volta trigger to activate LCD display (the board will remain energized for 

approximately 30 seconds after the trigger is released).

2.  Use the two arrows to set desired torque. Pressing the arrow pointed upward will raise the 

torque and pressing the arrow pointed downward will lower the torque (pressing and holding a 

button will cycle through the torque settings).

3.  Simultaneously pressing the up and down arrows will switch the display torque between ft·lbs 

and Nm (NOTE: TRANSITIONING UNITS AUTOMATICALLY RESETS THE TORQUE TO THE 

LOWEST POSSIBLE VALUE).

4.  After the LCD times out, once the trigger is pulled to reactive it, the torque will still be set to the 

last setting. 

TORQUE THROUGH THE LIFE OF THE BATTERY


If the tool is used continuously/rapidly to the point that the tool feels hot to the touch, the tool 

accuracy can diminish and cause a slight increase in torque. Once the tool cools down, the 

accuracy should return to normal. 

The battery is recommended to be changed before the charge gets to 25% battery life, 

although the torque should be consistent until the last few fastenings before the battery dies. 

NOTE: This tool is designed to be operated with right-hand thread fasteners. There is a 15% 

reverse bias to assist with breakout. If this tool is to be used with left-hand thread fasteners 

consult TorcUP.

OPERATING PROCEDURES

Содержание VOLTA 1000

Страница 1: ...00 VT 1000 VT 2000 AND VT 3000 MANUAL VT SERIES Battery Powered Torque Wrenches VT Series Phone 1 610 250 5800 Fax 1 610 250 2700 Toll Free 1 888 TORCUP 1 Email sales torcup com Website www torcup com 1025 Conroy Place Easton PA 18040 U S A ...

Страница 2: ... during bolt breakout TorcUP Inc is not responsible for customer modification of tools or for applications on which TorcUP Inc was not consulted WARNING IMPORTANT SAFETY INFORMATION ENCLOSED READ THIS MANUAL BEFORE OPERATING TOOL IT IS THE RESPONSIBILITY OF THE EMPLOYER TO PLACE THE INFORMATION IN THIS MANUAL INTO THE HANDS OF THE OPERATOR FAILURE TO OBSERVE THE FOLLOWING WARNINGS COULD RESULT IN ...

Страница 3: ...iced unless the operator reads the operating instructions and fully understands the purpose consequences and procedures of each step FAILURE TO OBSERVE THE FOLLOWING WARNINGS COULD RESULT IN INJURY Always wear ear protection when operating this tool Keep body stance balanced and firm Do not overreach when operating this tool The Reaction Arm must be positioned against a positive stop Do not use th...

Страница 4: ...rystalline silica from bricks and cement and other masonry products iii Arsenic and chromium from chemically treated lumber Your risk from these exposures varies depending on how often you do this type of work To reduce your exposure to these chemicals work in a well ventilated area and work with approved safety equipment such as dust masks that are specially designed to filter out microscopic par...

Страница 5: ...ur desired square drive size and bolt nut AF size impact socket or hex drive socket for use 3 Secure impact socket onto the tool square drive with a safety pin and secure a safety o ring on the socket 4 See illustration below for details 1 1 1 2 2 2 3 Slide Rubber Safety Ring Over Safety Pin Safety Pin Safety Screw PLACING THE TOOL IN SERVICE ...

Страница 6: ... VALUE 4 After the LCD times out once the trigger is pulled to reactive it the torque will still be set to the last setting TORQUE THROUGH THE LIFE OF THE BATTERY If the tool is used continuously rapidly to the point that the tool feels hot to the touch the tool accuracy can diminish and cause a slight increase in torque Once the tool cools down the accuracy should return to normal The battery is ...

Страница 7: ...ion area When the machine is put into operation it is mandatory to wear ear protection safety shoes and safety goggles Never leave a running VOLTA Series Torque Wrench unattended and always be ready to switch off the machine if necessary Maintain a safe distance of arm length Always place the impact socket or hex driver snugly onto the screw or nut bolt Faulty screw or nut bolt connections may res...

Страница 8: ...htening or loosening 4 Ensure the direction switch is set to tighten Then press the trigger on the pistol grip to tighten the fastener The tool will rotate until the fastener becomes torqued and the VOLTA Series Torque Wrench will then stop 5 For loosening a fastener place the direction switch in reverse Then press the trigger on the pistol grip to loosen the fastener The unit will continue to rot...

Страница 9: ... of the power tool for operations different from those intended could result in a hazardous situation BATTERY SAFETY INSTRUCTIONS BATTERY USE AND CARE 1 Recharge only with the charger specified by the manufacturer A charger that is suitable for one type of battery pack may create a risk of fire when used with another battery pack 2 Use power tools only with specifically designated battery packs Us...

Страница 10: ...o see the charge level If the battery pack is almost depleted it must be recharged 2 Long continuous overloading of the machine This will activate the temperature cut out Leave the machine or battery pack to cool Note If the battery pack feels very warm the pack will cool more quickly in an AIR COOLED charger Note The machine will cool more quickly if you operate it at idling speed 3 Safety Shutdo...

Страница 11: ...660 1355 2700 4025 HEIGHT A w battery in 10 40 10 40 10 40 10 40 HEIGHT A w battery mm 265 265 265 265 LENGTH C in 8 86 10 97 11 45 13 94 LENGTH C mm 225 279 291 355 DIAMETER D in 2 56 2 85 3 09 3 75 DIAMETER D mm 65 72 4 78 5 95 3 WEIGHT w o reaction arm battery lbs 8 3 11 5 13 1 19 6 WEIGHT w o reaction arm battery kg 3 8 5 2 5 9 8 9 WEIGHT w reaction arm battery lbs 10 4 14 5 15 9 22 5 WEIGHT w...

Страница 12: ...14 4 12 STEEL BALL RP CM BB 35 13 SPUR GEAR RP 05 ST G 3 VT 500 Series Wrench ITEM DESCRIPTION PART QTY 14 1ST STAGE GEAR CAGE RP 05 ST1 1 15 SPUR GEAR RP 05 ST G 3 16 2ND STAGE GEAR CAGE RP 05 ST2 1 17 HIGH SPEED ANNULUS RP 05 HSA 1 18 LONG HARDENED DOWEL RP 05 DOWEL 2 19 THRUST WASHER RP 05 TW 2 20 NEEDLE ROLLER THRUST BEARING RP 05 NRB 1 21 DRIVE STAGE ASSEMBLY RP 05 DSTA 1 22 MAIN BEARING RP 0...

Страница 13: ... STEEL BALL RP CM BB 35 VT 1000 Series Wrench with 1 Drive ITEM DESCRIPTION PART QTY 13 1ST STAGE SPUR GEAR RP 10 ST1 G 3 14 1ST STAGE GEAR CAGE RP 10 ST1 1 15 2ND STAGE SPUR GEAR RP 10 ST2 G 3 16 2ND STAGE GEAR CAGE RP 10 ST2 1 17 HIGH SPEED ANNULUS RP 10 HSA 1 18 THRUST WASHER RP 10 TW 1 19 3RD STAGE GEAR CAGE ASSEMBLY RP 10 ST3A 1 20 DRIVE STAGE ASSEMBLY RP 10 DSTA 1 1 21 MAIN BEARING RP 10 MB ...

Страница 14: ...SING SCREWS VT ADPTR 14 4 12 STEEL BALL RP CM BB 35 13 1st STAGE SPUR GEAR RP 20 ST1 G 3 14 1ST STAGE GEAR CAGE RP 20 ST1 1 VT 2000 Series Wrench ITEM DESCRIPTION PART QTY 15 2ND STAGE SPUR GEAR RP 20 ST2 G 3 16 2ND STAGE GEAR CAGE RP 20 ST2 1 17 HIGH SPEED ANNULUS RP 20 HSA 1 18 MAIN ANNULUS O RING RP CM OR MA 2 19 3RD STAGE GEAR CAGE ASSEMBLY RP 20 ST3A 1 20 DRIVE STAGE ASSEMBLY RP 20 DSTA 1 21 ...

Страница 15: ...30 ST2 2ND STAGE GEAR CAGE 1 VT 3000 Series Wrench ITEM PART DESCRIPTION QTY 17 RP 30 HSA HIGH SPEED ANNULUS 1 18 RP 30 TW HSA HIGH SPEED THRUST WASHER 1 19 RP 30 ST3A 3RD STAGE GEAR CAGE ASSEMBLY 1 20 RP 30 ST4A 4TH STAGE GEAR CAGE ASSEMBLY 1 21 RP CM OR MA MAIN ANNULUS O RING 1 22 RP CM SS DA DRIVE ANNULUS SET SCREW 4 23 RP 30 DA DRIVE ANNULUS 1 24 RP 30 OR DA DRIVE ANNULUS O RING 1 25 RP 30 DST...

Страница 16: ...16 MSDS ...

Страница 17: ...17 ...

Страница 18: ...18 ...

Страница 19: ...19 ...

Страница 20: ...20 ...

Страница 21: ...21 ...

Страница 22: ...22 SAVE THESE INSTRUCTIONS DO NOT DESTROY NOTES Phone 1 610 250 5800 Fax 1 610 250 2700 Toll Free 1 888 TORCUP 1 Email sales torcup com Website www torcup com 1025 Conroy Place Easton PA 18040 U S A ...

Отзывы: