2
BEFORE YOU OPERATE THE MONITOR
FEATURES
•
47.0cm(18.5") / 49.5cm(19.5") / 54.7cm(21.5")TFT Color LCD Monitor
•
Crisp, Clear Display for Windows
•
Recommended Resolutions: 1366x768@60Hz(18.5")/1600×900@60Hz(19.5")/1920×1080@60Hz(21.5")
•
Ergonomic Design
•
Space Saving, Compact Case Design
CHECKING THE CONTENTS OF THE PACKAGE
The product package should include the following items:
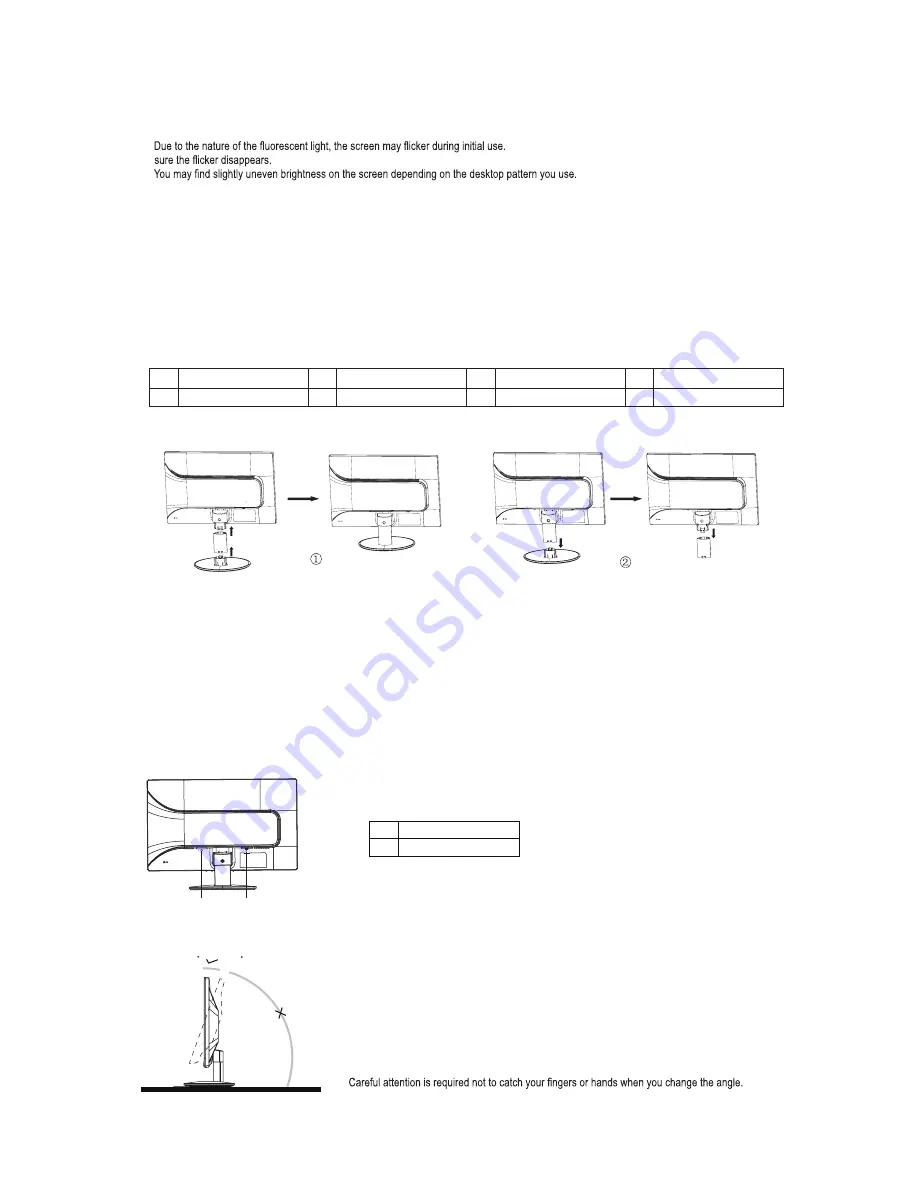
INSTALLATION INSTRUCTIONS
Install
Remove
Figure 1 Installing and Removing the Base
POWER SOURCE
1. Make sure that the power cord is the correct type required in your area.
2. This LCD monitor allows operation in 100-240V AC voltage area(No user adjustment is required.).
3. Connect the AC-power cord into your LCD monitor’s AC-power-input. The AC-power cord may be connected to either a wall power outlet or
the power outlet socket on your PC, depending on the type of power cord supplied with your LCD monitor.
CONTROLS AND CONNECTORS
Connecting the D-Sub Cable:
Connect one end of the 15-pin VGA cable to the back of the monitor and connect the other end to the
computer’s D-Sub port.
Connecting the Power Cord:
Plug the AC-power cord one end to LCD monitor's AC input socket,the other end to Wall outlet.
1. AC input socket
2. D-Sub input socket
Figure 2 Connecting Cables
ADJUSTING THE VIEWING ANGLE
•
For optimal viewing it is recommended to look at the full face of the monitor, then adjust the
monitor’s angle to your own preference.
•
Hold the stand so you do not topple the monitor when you change the monitor’s angle.
•
You are able to adjust the monitor’s angle from -3° to 11°.
NOTES
•
Do not touch the LCD screen when you change the angle. It may cause damage or break the LCD
screen.
Figure 3 Angle
SPECIAL NOTES ON LCD MONITORS
The following symptoms are normal with LCD monitor and do not indicate a problem.
NOTES
•
Turn off the Power Switch and then turn it on again to make
•
•
The LCD screen has effective pixels of 99.99% or more. It may include blemishes of 0.01% or less such as a missing pixel or a pixel lit all of the
time.
•
Due to the nature of the LCD screen, an afterimage of the previous screen may remain after switching the image, when the same image is
displayed for hours. In this case, the screen is recovered slowly by changing the image or turning off the Power Switch for hours.
•
1
2
-3 11
1. LCD Monitor
3. Power Cord
5.
6.
2. User's Manual
4. 15-pin D-Sub Cable
Stand
Warranty Registration Card
7.
Base
Содержание EB1927WSL
Страница 1: ...EB1927WSL LCD MONITOR USER S MANUAL...