


EX-93211/93511/93711/93911User Manual
37
Quick Power On Self Test
When enabled, this field speeds up the Power On Self Test (POST) after the system is turned on. If it
is set to Enabled, BIOS will skip some items.
First/Second/Third Boot Device
These fields determine the drive that the system searches first for an operating system. The options
available include Floppy, LS/ZIP, HDD-0, SCSI, CDROM, HDD-1, HDD-2, HDD-3, LAN and Disable.
Boot Other Device
These fields allow the system to search for an OS from other devices other than the ones selected in
the First/Second/Third Boot Device.
Swap Floppy Drive
This item allows you to determine whether or not to enable Swap Floppy Drive. When
enabled
, the
BIOS swaps floppy drive assignments so that Drive A becomes Drive B, and Drive B becomes Drive A.
By default, this field is set to
Disabled.
Boot Up Floppy Seek
This feature controls whether the BIOS checks for a floppy drive while booting up. If it cannot detect
one (either due to improper configuration or its absence), it will flash an error message.
Boot Up NumLock Status
This allows you to activate the NumLock function after you power up the system.
Gate A20 Option
This field allows you to select how Gate A20 is worked. Gate A20 is a device used to address memory
above 1MB.
Typematic Rate Setting
When
disabled
, continually holding down a key on your keyboard will generate only one instance.
When enabled, you can set the two typematic controls listed next. By default, this field is set to
Disabled.
Typematic Rate (Chars/Sec)
When the typematic rate is enabled, the system registers repeated keystroke speeds. Settings are
from 6 to 30 characters per second.
Typematic Delay (Msec)
When the typematic rate is enabled, this item allows you to set the time interval for displaying the first
and second characters. By default, this item is set to 250msec.
Содержание EX-93211
Страница 7: ...EX 93211 93511 93711 93911User Manual 7 1 2 Dimensions Figure 1 1 Dimensions of the EX 93211...
Страница 8: ...EX 93211 93511 93711 93911User Manual 8 Figure 1 2 Dimensions of the EX 93511...
Страница 9: ...EX 93211 93511 93711 93911User Manual 9 Figure 1 3 Dimensions of the EX 93711...
Страница 10: ...EX 93211 93511 93711 93911User Manual 10 Figure 1 3 Dimensions of the EX 93911...
Страница 15: ...EX 93211 93511 93711 93911User Manual 15 Figure 1 6 Rear View of EX 93211 93511 93711 93911...
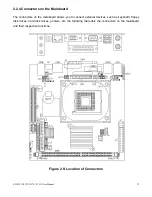
Страница 16: ...EX 93211 93511 93711 93911User Manual 16 Chapter 2 Hardware 2 1 Mainboard Figure 2 1 Mainboard Overview...
Страница 20: ...EX 93211 93511 93711 93911User Manual 20...
Страница 21: ...EX 93211 93511 93711 93911User Manual 21...
Страница 22: ...EX 93211 93511 93711 93911User Manual 22...
Страница 24: ...EX 93211 93511 93711 93911User Manual 24...
Страница 25: ...EX 93211 93511 93711 93911User Manual 25...
Страница 26: ...EX 93211 93511 93711 93911User Manual 26...
Страница 27: ...EX 93211 93511 93711 93911User Manual 27...
Страница 28: ...EX 93211 93511 93711 93911User Manual 28...
Страница 29: ...EX 93211 93511 93711 93911User Manual 29...
Страница 30: ...EX 93211 93511 93711 93911User Manual 30...
Страница 51: ...EX 93211 93511 93711 93911User Manual 51...
Страница 52: ...EX 93211 93511 93711 93911User Manual 52...
Страница 53: ...EX 93211 93511 93711 93911User Manual 53...
Страница 54: ...EX 93211 93511 93711 93911User Manual 54...
Страница 55: ...EX 93211 93511 93711 93911User Manual 55...
Страница 56: ...EX 93211 93511 93711 93911User Manual 56...
Страница 57: ...EX 93211 93511 93711 93911User Manual 57...
Страница 58: ...EX 93211 93511 93711 93911User Manual 58...
Страница 59: ...EX 93211 93511 93711 93911User Manual 59...
Страница 60: ...EX 93211 93511 93711 93911User Manual 60...
Страница 70: ...EX 93211 93511 93711 93911User Manual 70 The PenMount Monitor has the following functions...


