background image


11 

www.topazsystems.com


Back to Top


GemView 16 Tablet Display User Manual 

Install GemView Tablet Display Driver  


Note: If you are using your computer in a Citrix environment, please refer to the 
document “GemView Tablet Displays in Citrix XenDesktop Environments” posted on 
the Topaz website for setup and configuration instructions on the Citrix XenDesktop 
server and client. 


Download and run the GemView installer from the Topaz website: 

www.topazsystems.com/software/download/gemview.exe

.You must reboot your PC after 

the installation completes. This software provides pen input functionality for the tablet display.  


Configure Tablet Display for Pen Input 

Follow the instructions below to configure your GemView Tablet Display for pen input: 


1.  In All Apps or All Programs, under GemView Tablet Display Manager, click on Tablet 

Display Manager. 


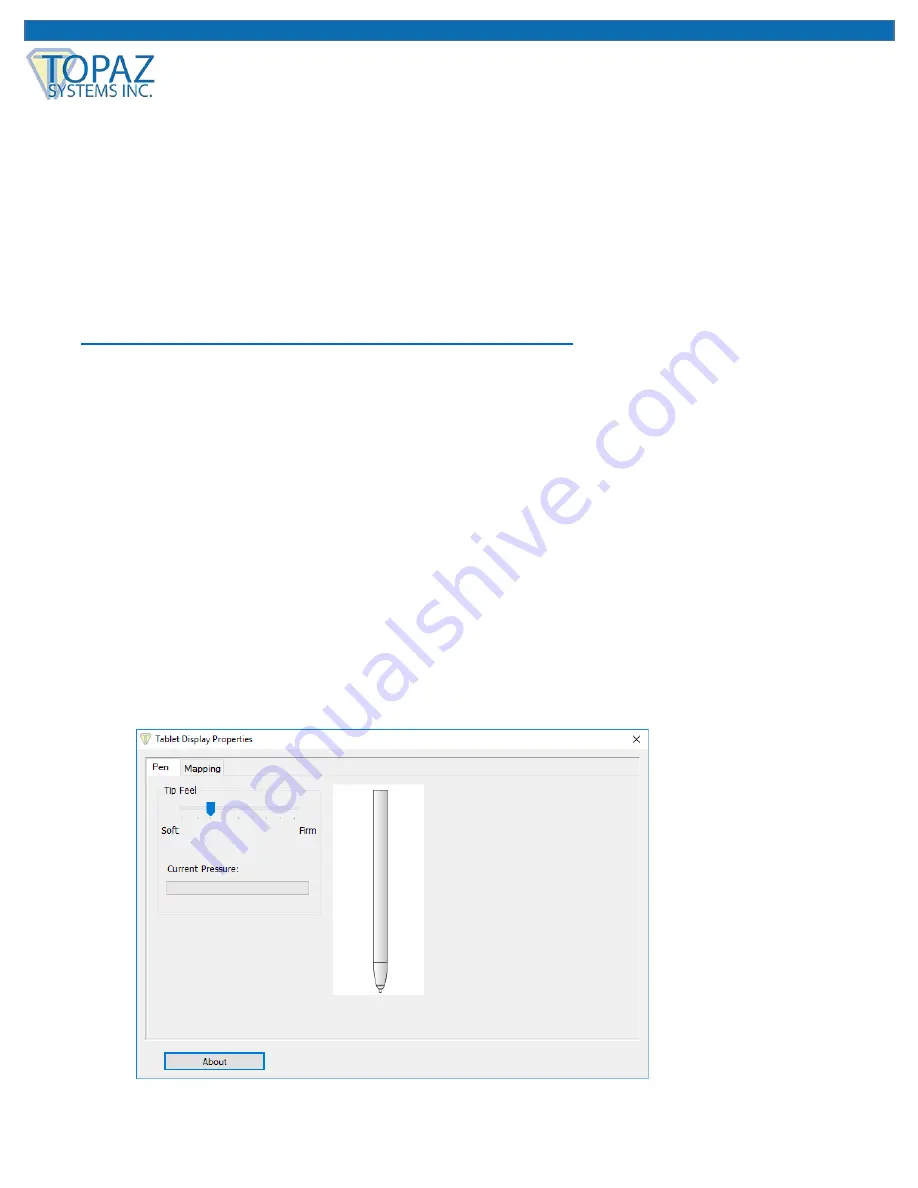
2.  In the Tablet Display Properties window that opens, notice that the Pen tab is selected.  

Write on the GemView Tablet Display with the pen and the current pressure will show as 
a green bar.  Adjust the tip feel slider between soft and firm to select the pressure desired.  
The default setting is recommended for standard use. 

Содержание TD-LBK156VA-USB-R

Страница 1: ...Copyright Topaz Systems Inc All rights reserved For Topaz Systems Inc trademarks and patents visit www topazsystems com legal User Manual GemView 16 Tablet Display TD LBK156VA USB R ...

Страница 2: ... Packing List 7 Product Overview 8 Front and Side View 8 Rear View 8 Interactive Electromagnetic Pen 8 Installation 8 Connect Tablet Display to PC 8 Connect Pen to Tablet Display 9 Install DisplayLink Driver 9 Configure Tablet Display for Installation 9 Install GemView Tablet Display Driver 11 Configure Tablet Display for Pen Input 11 Install Bundled Topaz Software 12 pDoc Signer 12 pDoc Pro 13 Mo...

Страница 3: ...ms com Back to Top GemView 16 Tablet Display User Manual Table of Contents Troubleshooting 13 Screen Problems 13 Product Specification 14 Screen 14 Interactive Electromagnetic Pen 15 Appendix 16 Replace the Pen Tip 16 ...

Страница 4: ... is encouraged to try to correct the interference by one or more of the following measures Reorient or relocate the receiving antenna Increase the separation between the equipment and receiver Connect the equipment into an outlet on a circuit different from that to which the receiver is connected Consult the dealer or an experienced radio TV technician for help Warning You are cautioned that chang...

Страница 5: ...l Authority or retailer for proper disposal of electronic products 9 The device may produce some heat during normal operation or charging To prevent discomfort or injury from heat exposure DO NOT leave the device on your lap 10 POWER INPUT RATING Refer to the rating label on the device Only use accessories specified by the manufacturer 11 DO NOT use any sharp object to tap the screen 12 Clean the ...

Страница 6: ...ts as stated above are exempted under the Annex III of the RoHS2 Directives as noted below Examples of exempted components are 1 Mercury in cold cathode fluorescent lamps and external electrode fluorescent lamps CCFL and EEFL for special purposes not exceeding per lamp 1 Short length 500 mm maximum 3 5 mg per lamp 2 Medium length 500 mm and 1 500 mm maximum 5 mg per lamp 3 Long length 1 500 mm max...

Страница 7: ...vement Topaz Systems Inc reserves the right to change product specifications without notice Information in this document may change without notice No part of this document may be copied reproduced or transmitted by any means for any purpose without prior written permission from Topaz Systems Inc Introduction Packing List After unpacking please confirm whether the following contents are included Ta...

Страница 8: ...tic pen touch area 2 Pen holder 3 Power button 4 Brightness adjustment button increase 5 Brightness adjustment button decrease 6 Ergonomic support multi angle kickstand Rear View 7 Pen slot 8 Tether hole 9 Lock hole x2 10 USB connector 11 Power connector Note Please don t open the enclosure contact service personnel for any problem ...

Страница 9: ... GemView Tablet Display 1 Connect the tablet display to the PC using the USB cable as shown below 2 Connect the tablet display to a power source using the power adapter as shown below and push the power button to turn on the tablet display Note Connect both USB connectors at one end of the cable to the PC to ensure a stable power supply Due to the manner that Windows enumerates USB devices and the...

Страница 10: ...ad and run the DisplayLink installer from the Topaz website www topazsystems com software download displaylink exe This software provides extended display functionality for the tablet display Configure Tablet Display for Installation Use the Display program in the control panel to configure the tablet display for your installation see screenshot below You may specify the following characteristics ...

Страница 11: ...ws 1 Click the identify button the number 1 should appear on the main display and the number 2 should appear on the tablet display 2 Move your mouse from the main display to the tablet display it should track properly 3 Move a window from the main display to the tablet display it should appear normally and respond to mouse interactions ...

Страница 12: ...iew exe You must reboot your PC after the installation completes This software provides pen input functionality for the tablet display Configure Tablet Display for Pen Input Follow the instructions below to configure your GemView Tablet Display for pen input 1 In All Apps or All Programs under GemView Tablet Display Manager click on Tablet Display Manager 2 In the Tablet Display Properties window ...

Страница 13: ...button to see information about the versions of the software driver and the hardware Install Bundled Topaz Software pDoc Signer With every Topaz GemView Tablet Display purchase comes a license to use pDoc Signer for Windows Tablets Tablet Displays pDoc Signer is a bundled electronic signature application for the capture binding and authentication of handwritten signatures in standard PDF documents...

Страница 14: ...roblems Problems Recommended actions No picture Check whether USB cables at computer end and screen end are connected properly Try to use another USB interface of the computer Confirm whether the computer is under sleep mode Press the keyboard or move the mouse and reboot the system Press Screen power button and confirm whether the screen is starting up Try to adjust the brightness Confirm whether...

Страница 15: ...200 cd m2 min Angle of Visibility Horizontal 90 vertical 130 Response Time Tr Tf 25ms typical 50ms max Connector USB USB x1 Power Supply Input AC 100 240V 50 60HZ Output DC 12V 2A Power Consumption Start up 6 5W sleep 1 0W Body Equipment Dimension 390mm x 290mm x 22 35mm Equipment Weight Net weight no support 1 88kg Net weight With support 2 39kg Total weight 3 28 kg Environment Temperature Range ...

Страница 16: ...ns Resolution 5080 LPI lines per inch Tracking Velocity 200 PPS dots per second Pressure Sensing 2048 Levels Accuracy Rating 0 5mm center 2mm edges and corners Readable Height 5mm Electromagnetic Pen Model Pressure sensing wireless Inclination of Detectable Pressure Sensitive Pen Inclination range 45 Pen Tip Replaceable Note The specification is subject to change without prior notice ...

Страница 17: ...the pen tip is too short or exists the sharp edge it can be replaced to the back up tip Please replace according to the following steps 1 Pull out the pen tip from electromagnetic pen straightly with tool 2 Insert new pen tip into the handwriting pen and then push in the pen tip until the tip does not move ...

Отзывы: