background image


www.topazsystems.com


Back to Top


GemView 10 & 10 Touch Tablet Display User Manual 

Installation 


Connect Tablet Display to PC 

To begin, follow the steps listed below to connect your GemView Tablet Display: 


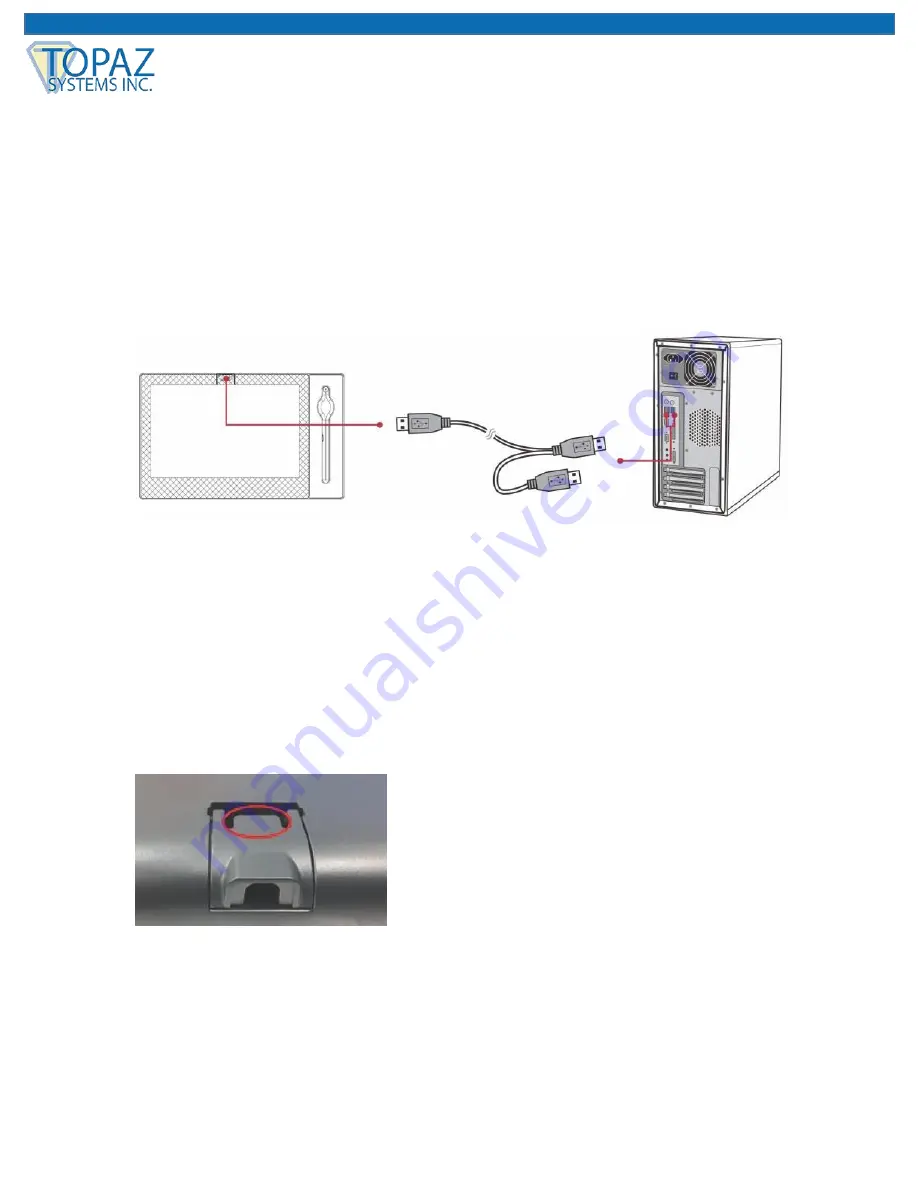
1.  Connect the tablet display to the PC using the USB cable, as shown below. 


Notes:  

  Connect both USB connectors at one end of the cable to the PC, to ensure a stable power 

supply.  Due to the manner that Windows enumerates USB devices and the use of internal 
USB hubs in some PCs, it may be necessary to changes the ports into which the USB 
connectors are inserted. 


  To open the USB cover on the back of the tablet display, press on the tab (highlighted in 

red) with your forefinger, then lift the cover with your thumb.  


Содержание D-LBK101VA-USB-R

Страница 1: ...Topaz Systems Inc All rights reserved For Topaz Systems Inc trademarks and patents visit www topazsystems com legal User Manual Software Set Up GemView 10 10 Touch Tablet Display TD LBK101VA USB R TD...

Страница 2: ...w 8 Interactive Electromagnetic Pen 8 Installation 9 Connect Tablet Display to PC 9 Connect Pen to Tablet Display 10 Install DisplayLink Driver 10 Configure Tablet Display for Installation 10 Install...

Страница 3: ...www topazsystems com Back to Top GemView 10 10 Touch Tablet Display User Manual Table of Contents Product Specification 19 Screen 19 Interactive Electromagnetic Pen 20 Appendix 21 Replace the Pen Tip...

Страница 4: ...user is encouraged to try to correct the interference by one or more of the following measures Reorient or relocate the receiving antenna Increase the separation between the equipment and receiver Con...

Страница 5: ...ocal Authority or retailer for proper disposal of electronic products 9 The device may produce some heat during normal operation or charging To prevent discomfort or injury from heat exposure DO NOT l...

Страница 6: ...paz Systems Inc reserves the right to change product specifications without notice Information in this document may change without notice No part of this document may be copied reproduced or transmitt...

Страница 7: ...azsystems com Back to Top GemView 10 10 Touch Tablet Display User Manual Product Overview Front and Side View 1 Display and electromagnetic pen touch area 2 Tether hole 3 Kensington lock hole 4 Pen ho...

Страница 8: ...and small supports x2 can be extended or retracted 7 Rubber foot pad x4 8 Product label Note Please don t open the enclosure contact service personnel for any problem Interactive Electromagnetic Pen T...

Страница 9: ...cable as shown below Notes Connect both USB connectors at one end of the cable to the PC to ensure a stable power supply Due to the manner that Windows enumerates USB devices and the use of internal...

Страница 10: ...nk installer from the Topaz website www topazsystems com software download displaylink exe This software provides extended display functionality for the tablet display For silent installation use the...

Страница 11: ...llows 1 Click the identify button the number 1 should appear on the main display and the number 2 should appear on the tablet display 2 Move your mouse from the main display to the tablet display it s...

Страница 12: ...etup and configuration instructions Download and run the GemView installer from the Topaz website www topazsystems com software download gemview exe Note You must reboot your PC after the installation...

Страница 13: ...splay Properties window that opens notice that the Pen tab is selected Write on the GemView Tablet Display with the pen and the current pressure will show as a green bar Adjust the tip feel slider bet...

Страница 14: ...tablet display from the drop down list The numbering of the monitors follows that in the Windows display settings Select Landscape or Portrait for the orientation of the tablet display It should be th...

Страница 15: ...plays to provide the following functions 1 Display full page or half page document images 2 Sign digital signature fields with the electronic pen 3 Fill in form fields check radio buttons and check bo...

Страница 16: ...e steps for set up 1 The GemView 10 Touch Tablet Display GemView 10T looks and performs like the standard GemView 10 Tablet Display but it responds to finger touch input in addition to pen input Follo...

Страница 17: ...revert to displaying their original content and the system will recognize the GemView 10T for touch input b If the screen on which the message appears is not the GemView 10T press the Enter key on yo...

Страница 18: ...evices may trigger electrical disturbances Image blur Using the original resolution of 1280 x 800 may provide the optimum quality Note Do not open the enclosure For assistance contact technical suppor...

Страница 19: ...800 Brightness 160 cd m2 typical 200 cd m2 max Angle of Visibility Horizontal 170 vertical 170 Response Time Tr Tf 25ms typical 50ms max Connector USB USB x1 Power Supply Input DC5V 1A USB power suppl...

Страница 20: ...tions Resolution 5080 LPI lines per inch Tracking Velocity 200 PPS dots per second Pressure Sensing 2048 Levels Accuracy Rating 0 5mm center 2mm edges and corners Readable Height 5mm Electromagnetic P...

Страница 21: ...If the pen tip is too short or exists the sharp edge it can be replaced to the back up tip Please replace according to the following steps 1 Pull out the pen tip from electromagnetic pen straightly w...

Отзывы: