4
www.topvehicletech.com
Please note: configuration layout may differ dependent on vehicle model.
FITTING GUIDE
STEREO INSTALLATION
CONT’D.
8. Attach the additional wiring on the harness to the back of the stereo:
Pink
- Speed Pulse
Green
- Park Brake
Purple
- Reverse
Blue
- Antenna Remote
9. When all the above wires (and any additional accessories) have been connected, finally make the
connections between the stereo and the vehicles pre-existing connector.
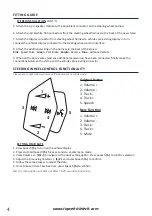
STEERING WHEEL CONTROL FUNCTIONALITY
1
2
3
4
5
1.
2. Volume -
3. Track -
4. Track +
5. Mute
1.
2. Volume -
3. Track -
4. Track +
5. Speech
Original Button
New Function
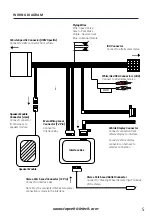
5. Attach the 4-pin speaker module to the equivalent connector on the steering wheel harness.
6. Attach the red & white RCA connectors from the steering wheel harness to the back of the new stereo.
7. Attach the display connector from steering wheel harness to vehicles pre-existing display. In turn,
connect the vehicles display connector to the steering wheel control interface.
1. Press Speech
(5.)
to turn on the vehicle display.
2. Press and hold Speech
(5.)
for 2x seconds to enable menu mode.
3. Press /-
(1/2.)
to navigate to the clock setting option. Press Speech
(5.)
to confirm selection.
4. Adjust the time using /-
(1/2.)
and press Speech
(5.)
to confirm.
5. Follow the same process to adjust the date.
6. Once time and date have been set, press Speech
(5.)
to confirm.
NB: the menu option will time out after 15-20 seconds of inactivity.
SETTING TIME/DATE

