3
www.topvehicletech.com
FITTING GUIDE
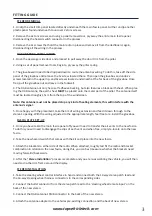
1. Unclip the small trim panel located directly underneath the main fascia panel. Further unclip another
plastic panel found underneath to uncover 2x torx screws.
1. Open the passenger side door and proceed to pull away the door trim from the pillar.
STEREO REMOVAL
DAB ANTENNA INSTALLATION
2. Using a set of panel removal tools, begin to pry away the pillar casing.
4. The DAB antenna not only has a self adhesive backing, but also features a black earth sheet. When plac-
ing the DAB antenna, the earth sheet
MUST
be placed onto the metal part of the pillar. The antenna itself
must be located roughly 15cm from the top of the windscreen.
Note: this antenna must not be placed atop any kind of heating elements, this will interfere with the
antenna’s signal.
5. Once happy with the placement, take the 3m of wiring extension and feed it down through to the
stereo’s opening. With the wiring adjusted to the appropriate length, feel free to re-install the glovebox.
3. The glovebox will need to be dropped down to route the antennas wiring. To do this, take off the side
panel of the glovebox and remove the 1x screw located there. Then open the glovebox and undo 2x
screws located in the upper lip, and 2x screws located underneath at the far back of the glovebox. Once
free, pull the glovebox out and leave in the footwell.
FASCIA PLATE SET-UP
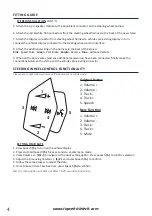
1. Once you have taken the main fascia panel off, you will need to transfer the air vents to the new fascia.
To do this you will need to disengage the clips of each vent and when free, simply re-locate onto the new
fascia.
2. Take the new hazard switch that comes with the kit and place into the new fascia.
3. Attach the brackets to either side of the radio. When attached, roughly test fit the radio and bracket
combination in relation to the new fascia, doing this, you can best measure whether the brackets need
moving forwards/backwards.
2. Remove the 2x torx screws, and using a panel removal tool, pry away the entire main fascia panel,
disconnecting the hazard switch connector in the process.
3. Remove the 2x screws that hold the main radio in place and remove it from the dashboard, again,
disconnecting all the wiring in the process.
4. After the “
Stereo Installation
” process is complete and you are re-assembling the vehicle, you will then
need to clip the trim frame around the display.
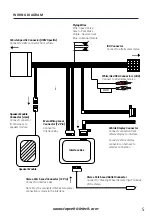
1. Take the steering wheel control interface in hand and connect both the 12-way stereo patch lead and
the 14-way steering wheel harness connectors to the corresponding sides.
2. Connect the bullet connector from the stereo patch lead to the ‘steering wheel remote input’ on the
back of the new stereo.
STEREO INSTALLATION
3. Connect the DAB antenna’s SMB connector to the back of the new stereo.
4. Attach the antenna adapter to the vehicles pre-existing connection and the back of new stereo.

