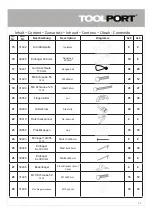
background image

5

Caution!

1. Please find a flat and even ground base to pitch the tent. 

2. Only those materials provided with the tent can be used. 

3. Please check whether the ground base is suitable for your purpose.

4. The tent can be used also during temperatures a few degrees below zero. However, prior to such use, the tarp material 

must be stored in temperature of at least 10°C for a sufficiently long time, and then unwrapped at such, or higher tempe

-

rature. Otherwise, the material may break at points of folds. 

5. Bungees are consumable parts. Used bungees must be replaced. 

6. Each country has separate regulations regarding movable structures (tents) and unmovable structures. Please ask your 

local authorities whether a permission be obtained to pitch the tent. In some countries this depends on the size of the tent. 

7. The tarps should not come into contact with any objects with sharp edges. 

Before first usage


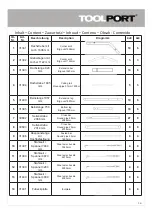
1. Please unpack the cartons and check against the packing list enclosed whether all parts have been delivered. 

2. Metal parts have been covered by a thin film of lubricant in the manufacturer‘s plant. Some parts may have more than 

the ordinary amount of lubricant on them. In such case, use a cloth to remove excess lubricant. Please excuse us for that. 

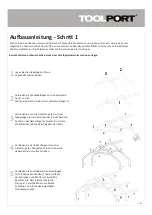
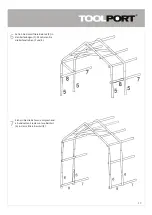
3. Please reserve some more time for your first installation of the tent. The rules to be followed when pitching the tent are 

simple. Please use the illustrative instructions for each step of installation. 

4. The screws joining the pipes with connectors must be tightened manually, using a hexagon key or an automatic screw 

driver, set at a max. level 2, to avoid material wear. 

Cleaning and storage 

1. Please do not use agressive chemicals to clean the tarp material. The best cleaning agent is water with slightly alkaline 

reaction. 

2. The tent should not be folded and packed when wet. First dry it thoroughly. 

3. Do not make any modifications of the metal structure of the tent, such as for example, connecting and/or welding 


additional loads, making grooves and/or any deformations. 

4. Please be careful when handling individual components of the tent. During disassembly, please use the lopacking list 

again to check the possible missing parts, so as to avoid problems with next assssembly. 

5. Do not put any objects on the tent when stored in a dry place. 

Environment

After the end of usage, please do not dispose of the tent or any of its components with ordinary garbage, but recycle it. If 

in doubt, please ask the manufacturer or an authorised sales representative. We will be happy to help you recycle the tent 

correctly, at the same time preserving the environment. 

Guarantee and customer services 

If  you  need  any  information  or  have  any  problems,  please  contact  us  at  the  following  email  address: 


[email protected], or contact TOOLPORT Service-Center in your country. Our phone number is: 040 - 608 72 717 in 

Germany, or 00800 240 240 24 in foreign countries. 

Содержание Wikinger Marine

Страница 1: ...rmany Phone 49 0 40 60 87 27 17 Fax 49 0 40 60 87 27 37 E Mail info toolport de 4 m series Wikinger Marine DE AT CH Aufbauanleitung GB Assembly instruction NL Gebruiksaanwijzing FR Mode d emploi PL In...

Страница 2: ...eren Sie sich bitte bei Ihren rtlichen Beh rden 3 Beim Einsatz geeigneter Heizger te Auskunft hierzu im Fachhandel ist ein Abstand von mindestens 1 2 m zu jeglichem Planenmaterial einzuhalten Sie soll...

Страница 3: ...immer z giger gehen Das Aufbauprinzip ist einfach Beachten Sie unsere Bebilderung der Schritte 4 Die Verschraubung der Rohre mit den Verbindern f hren Sie bitte manuell mit einem Inbusschl ssel aus o...

Страница 4: ...accommodation and should be taken down in adverse weather conditions 2 Always be sure to keep sufficient distance to houses as well as gas and power lines to avoid possible dama ge Please check the ar...

Страница 5: ...en pitching the tent are simple Please use the illustrative instructions for each step of installation 4 The screws joining the pipes with connectors must be tightened manually using a hexagon key or...

Страница 6: ...odat deze niet beschadigd raken Verzoek de lokale toeleveranciers om informatie over de loop van de diverse leidingen zodat u tijdens het opzetten van de tent beschadigingen ervan kunt voorkomen 3 Bij...

Страница 7: ...ik de instructietekeningen van de opeenvolgende montagestappen 4 Maak de schroefverbindingen van de buizen met de koppelstukken met de hand met behulp van een inbussleutel of met een automatische schr...

Страница 8: ...z ou aux lignes lectriques afin d viter de les endommager Veuillez vous renseigner aupr s des fournisseurs locaux o se trouvent tous les conduits afin d viter de les endommager lors du montage de la t...

Страница 9: ...illez suivre les images du sch ma de monatge relatives aux tapes particuli res 4 Il convient de faire manuellement les assemblages par boulons des tuyaux et des joints l aide d une cl allen ou d un to...

Страница 10: ...przewod w wodnych gazowych i elektrycznych aby ich nie uszkodzi Prosz dowiedzie si od lokalnych dostawc w gdzie przebiegaj wszelkie przewody aby nie uszkodzi ich przy monta u namiotu 3 W przypadku u...

Страница 11: ...si rysunkow instrukcj poszczeg lnych krok w monta u 4 Po czenia rubowe rur z cznikami nale y wykona r cznie za pomoc klucza imbusowego lub automatycznej wkr tarki ustawionej maks na poziom 2 aby unikn...

Страница 12: ...ecuada con tubos y conducciones de gas o electricidad para evitar que se da en Pregunte a las autoridades locales sobre la localizaci n de los cables para no da arlos al montar la carpa 3 Si se utiliz...

Страница 13: ...pios de montaje son sencillos Siga todos los pasos mostrados en los dibujos de las instrucciones 4 Atornille los tubos con los conectores manualmente con ayuda de una llave Allen o con un atornillador...

Страница 14: ...elettrici in modo tale da non dann eggiarli Per evitare il loro danneggiamento nel crso del montaggio della tenda chiedere informazioni relative alla posizione dei cavi e delle condotte ai fornitori...

Страница 15: ...sizionamento della tenda sono semplici Fare riferimento all istruzione allegata con le varie fasi di montaggio 4 Realizzare i collegamenti degli elementi tubolari con le piastre di collegamento serven...

Страница 16: ...mm Extension leg Big oval 1857mm 10 6 6 31395 Beinstange 750 mm Bottom leg Big oval 750mm 10 6 7 30692 Seitenstrebe 2068 mm Cross bar Round pipe 25mm 2068mm 27 9 8 30693 Seitenstrebe 2014 mm Cross ba...

Страница 17: ...m 20 12 19 31404 M8 Schraube 120 mm M8x120mm 45 27 20 30052 Fl gelmutter nut 65 39 21 30409 Gurtschloss Steel clip 24 12 22 30410 Ratschenspanner Tie down kit 4 4 23 30854 Plastikkappen Cap 18 18 24 3...

Страница 18: ...Verbinden Sie die Giebelb gen mit den Seitenstre ben 7 und 8 Achten Sie darauf dass 8 immer die letzte Stange ist 3 Verbinden Sie nun die Dachstange 3 mit dem Giebelbogen 2 und verschrauben Sie die Da...

Страница 19: ...7 6 Setzen Sie das mittlere Beinteil 5 in den Seitenbogen 1 Montieren Sie die Seitenstreben 7 und 8 Sichern Sie die Rahmen entsprechend ab und setzen Sie das untere Beinteil 6 in das mittlere Beinteil...

Страница 20: ...u rahmen entsprechend auf 2 Jetzt bauen Sie die Rahmen einzeln an die fertigen Sektionen mit der Seitenstrebe 7 Hierzu ben tigen Sie Leitern und mehrere Personen Bitte benutzen Sie nur die Seitenstreb...

Страница 21: ...21 3 Wiederholen Sie Position 2 mit allen Rahmen und achten Sie dabei genau Aufbau und Reihenfolge siehe Position 1 4x8 m 4x4 m...

Страница 22: ...22 4 Setzen Sie die F e in die unteren Beinteile und be festigen Sie das Ger st mit Erdnagel 16 und Erdna gel 26 am Boden Bauen Sie ggf die Bodenb gel an...

Страница 23: ...23 5 Ziehen Sie die Plane ber das Gestell Achten Sie besonders auf scharfe Kanten die die Plane besch digen k nnten...

Страница 24: ...24 6 Schieben Sie die Abspannstangen 9 in die vorgesehenen Taschen und setzen Sie die Gurtschl sser ein Bauen Sie die Giebelw nde mit den Gummischlaufen 17 ein...

Страница 25: ...8 and 20 Make sure that the last strut used is always 8 Close the endpipes 7 and 8 with the corresponding pla stic caps 35 Put the middle leg 5 in the side arch 1 Now join the side struts 7 and 8 Secu...

Страница 26: ...momencie przytrzymywa stela Nast pnie za pomoc rub i nakr tek 18 i 20 po czy uk boczny 1 ze wspornikami bocznymi 7 i 8 Nale y pami ta e element nr 8 montuje si zawsze jako wspornik ko cowy Na rury ko...

Страница 27: ...t de zijstijlen 7 en 8 met behulp van schroeven en moeren 18 en 20 Let er op dat 8 steeds de laatste stang is Sluit de twee eindbuizen 7 en 8 met de meegeleverde plastic kappen 35 af Plaats het middel...

Страница 28: ...potences lat rales 7 et 8 l aide des vis et des crous 18 et 20 Veuillez vous assurer que 8 soit toujours la derni re barre Embo ter les tubes 7 et 8 avec le pied en plastique 35 Mettez la partie de l...

Страница 29: ...dr et N sledn spojte bo n oblouk 1 s bo n mi v ztuhami 7 a 8 pomoc roub a matek 18 a 20 Dbe jte na to aby 8 byla v dy posledn ty Uzav ete ob koncov trubky 7 a 8 p ilo en mi plastov mi krytkami 35 Vsa...

Страница 30: ...aterales 1 con los travesa os laterales 7 y 8 con ayuda de los tornillos y tuercas 18 y 20 Procure que la n mero 8 siempre sea la ltima barra Cierre los dos tubos finales 7 y 8 con las tapas de pl sti...

Отзывы: