d) Connected Devices
• Make sure any tips connected to the air gun are correctly attached and cannot
become loose during use.
e) Location
• Place the workstation on a clean, level, non flammable surface of a sufficient
size. Protect the workstation against vibrations. Do not place the workstation on a
flammable surface (e.g. rug or tablecloth). Always use a non-flammable, heatproof
surface.
• Keep the workstation away from flammable or combustible materials (e.g.
curtains).
• Do not place the workstation on valuable furniture without using suitable protection,
as this may result in scratch marks, pressure points, discolouration or burn marks.
• Do not use the product in the immediate vicinity of strong magnetic/electromagnetic
fields, transmitter aerials or HF generators. These may affect the electronic control
system.
• Make sure that there is enough space in the direction from which the hot air nozzle
discharges hot air. The hot air may cause a fire if there is not enough space!
• Ensure that there is sufficient lighting.
• Keep your work area clean and tidy.
f) Risk of Burns
• Never use the workstation to heat up liquids or gases.
• Never point the flow of hot air at the work station, mains cable, hose or other parts.
In addition, never point the flow of hot air at people or animals, as this may cause
burn injuries!
• Never touch the tip of the hot air nozzle or soldering iron.
• Do not attempt to remove a tip from the airgun when it is hot.
g) Personal Safety
• Wear suitable protective clothing and safety goggles when soldering/desoldering.
Splashing “spitting” solder may cause serious burns or eye damage.
• Never work under the influence of alcohol or medication.
• Do not ingest solder. Do not eat or drink during soldering. Wash your hands
thoroughly after working with solder.
• Ensure that there is sufficient ventilation while soldering. Vapours can be harmful
to your health.
h) Fuse
• A defective fuse must be replaced with a new fuse with the same specifications
(see “Replacing the fuse”). Do not repair or bridge a defective fuse, as this may
cause a fire or result in fatal electric shock.
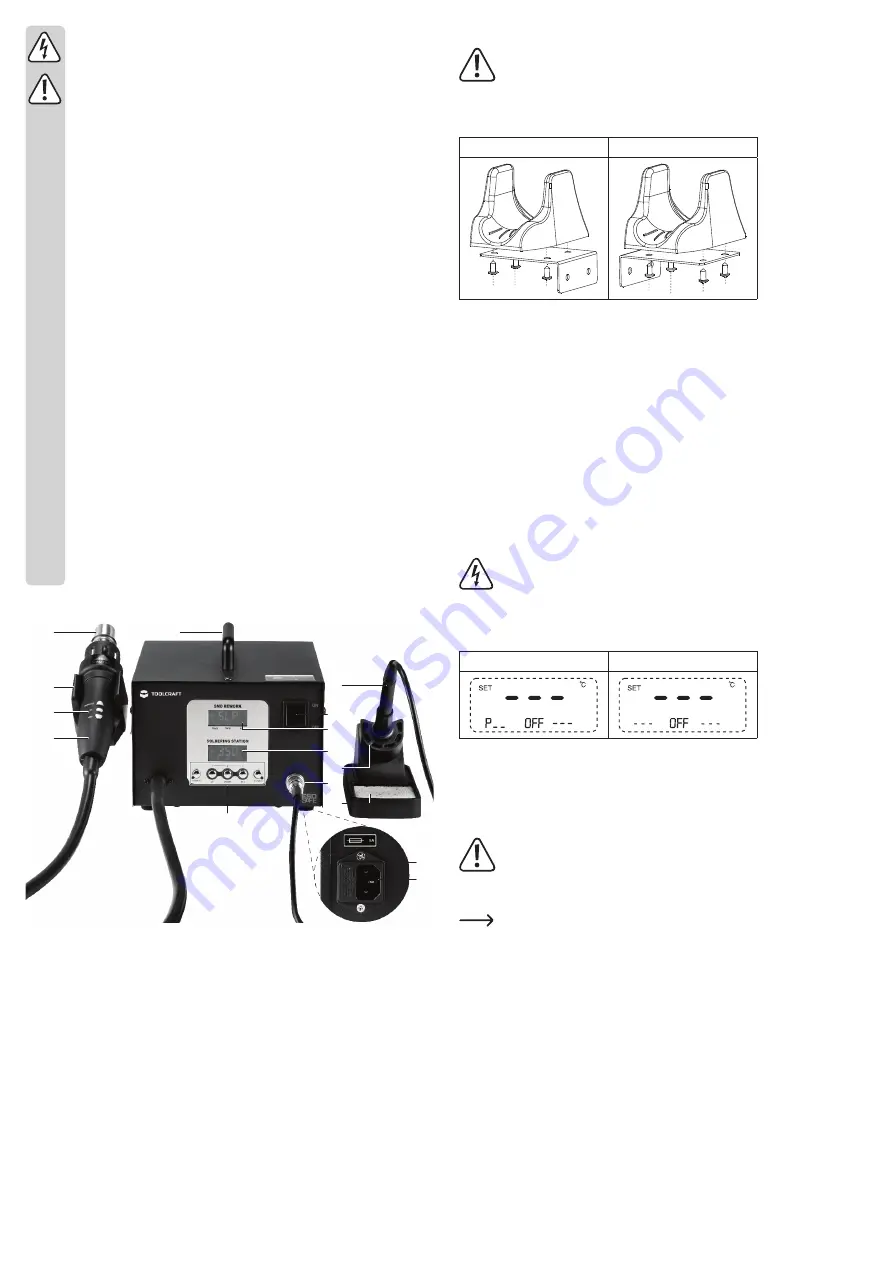
Operating Elements
15
4
3
2
1
5
6
7
8
9
10
11
12
14
13
1 Hot air gun handle
2 Hot air gun controls
3 Hot air gun holder
4 Hot air gun nozzle
5 Main unit carry handle
6 Soldering iron handle
7 Main power switch
ON/OFF
8 LCD display:
SMD REWORK
9 LCD display:
SOLDERING STATION
10 Soldering iron holder
11 Soldering iron input
socket
12 Sponge
13 Fuse holder
14 Power socket
15 Control panel
Connection and Setup
The power switch should be in the OFF position, and the mains cable should not be
connected to the power supply.
The hot air gun holder must be attached to the main unit before use.
a) Assembling the Hot Air Gun Holder
• The holder can be mounted to the left or right side of the main unit:
Left side
Right side
• Use 4x screws (included) to attach the mounting plate to the hot air gun holder as shown.
• Use 2x screws (inlcuded) to attach the mounting plate to the left or right side of the main
unit.
• Before connecting to the power supply, check the attachment is secure by placing the hot
air gun into the holder (3).
b) Soldering Iron
• Insert the sponge (12) into the tray at the base of the holder (10).
• Insert the soldering iron into the holder.
• Attach the soldering iron plug to the input socket (11) on the main unit and then use the
locking screw to secure the connection.
c) Main Unit Power Supply
• Make sure the main power switch (7) is in the OFF position.
• Connect one end of the power cable into the power socket (14), and the other end to a
mains power supply.
Operation
Touching or soldering capacitors (or similar components) or leads/cables that are
connected to capacitors may cause a fatal electric shock! Capacitors may stay
charged for several hours after you switch off the power supply!
a) Main Unit Power ON/OFF
• Use the main power switch (7) to turn the power ON or OFF.
• LCD displays (8) and (9) will show “OFF”.
REWORK STATION
SOLDERING STATION
b) Change Temperature Unit (°C and °F)
• The main power switch should be OFF (7).
• Press and hold UP, DOWN, SET, then turn the power switch ON (7).
• The new temperature unit will show on the LCD displays (8) and (9).
c) Change Hot Air Gun Tips
Risk of burns! Allow the hot air gun to completely cool before attempting to attach or
remove any tips from the nozzle (4)!
• Insert the selected tip over the hot air gun nozzle (4), making sure it is securely attached.
• Remove the tip by pulling it away from the nozzle (4).
Tighten or loosen the bolt on the tip if needed.


