background image

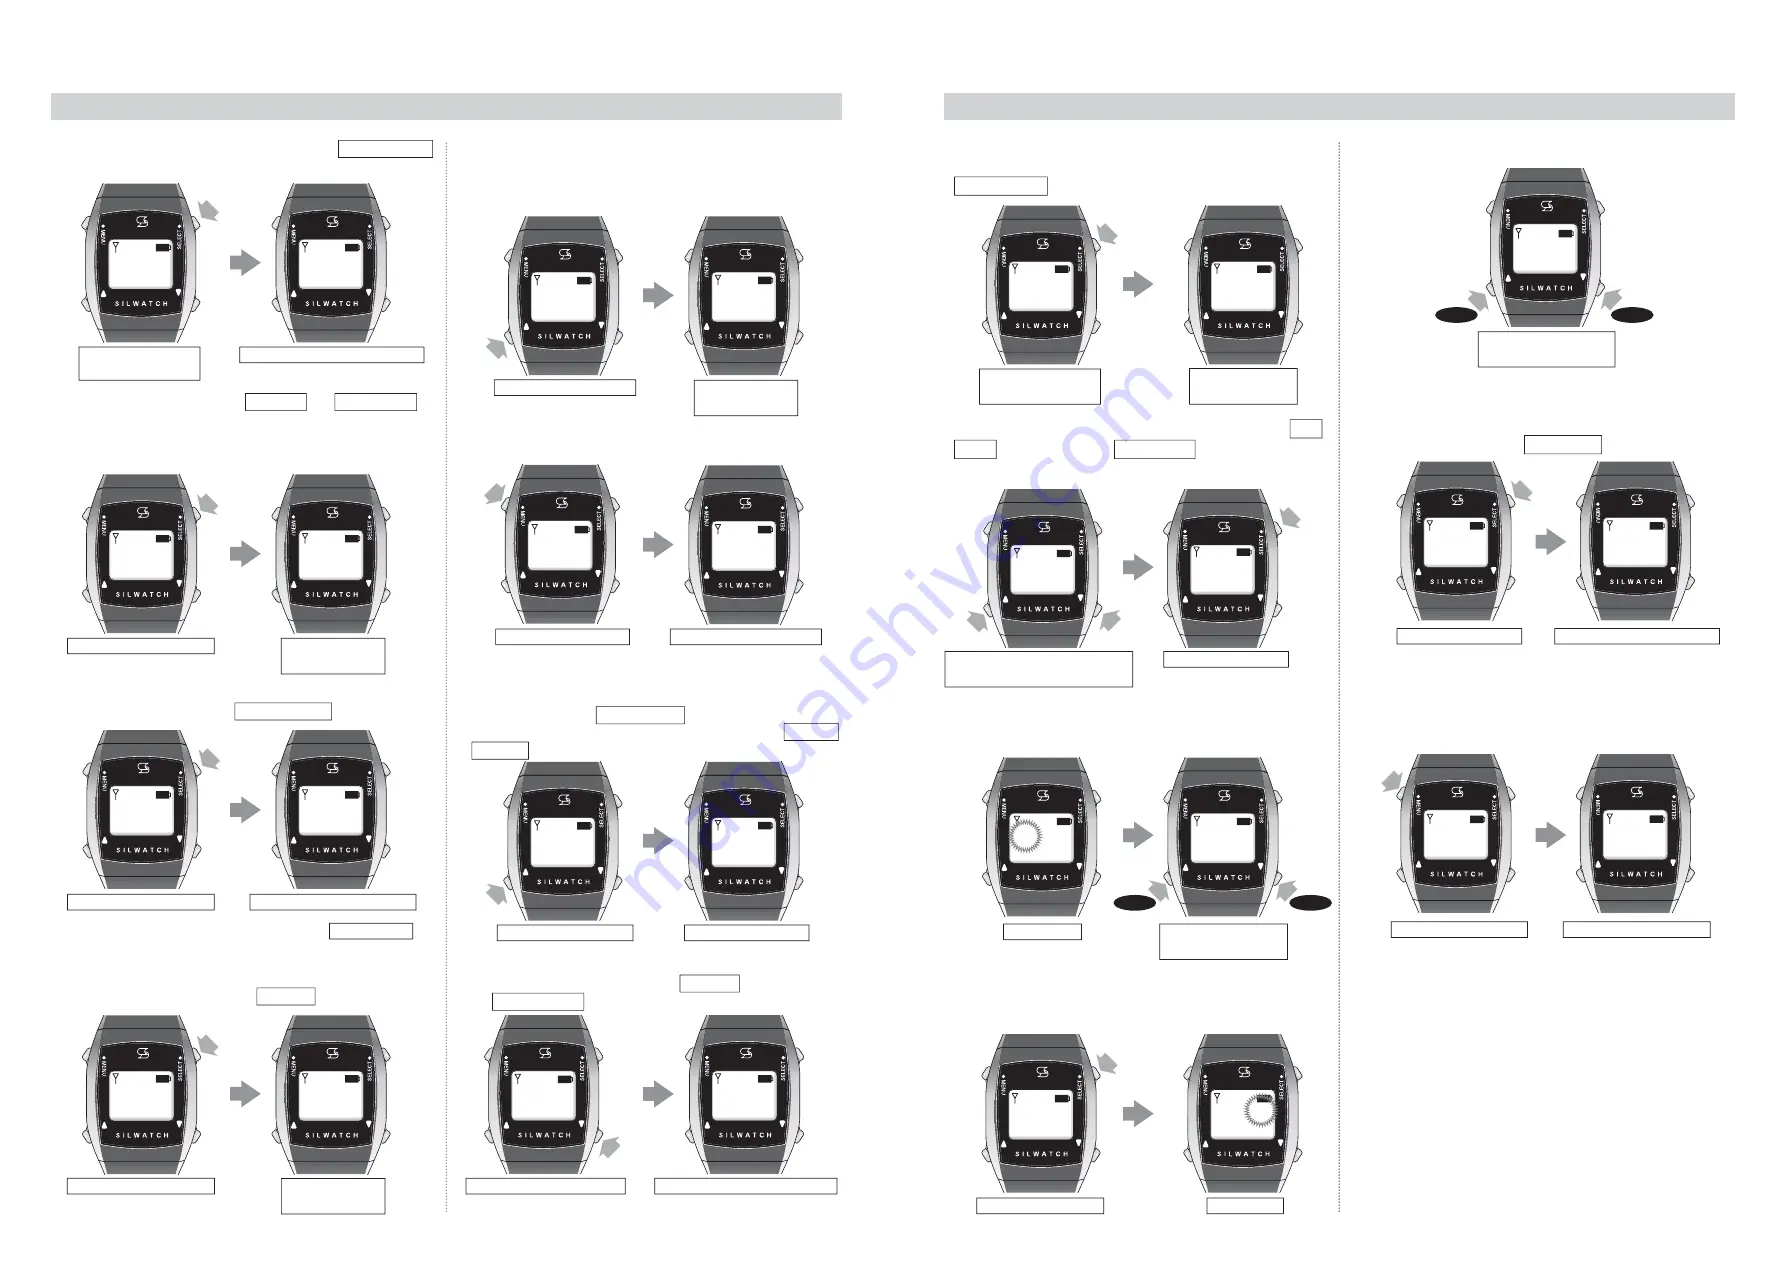
Received History

    *You can confirm what content was notified (received) at what time.

Long press (about 2 seconds) the SELECT button. Received history 

screen is displayed.

SELECT 
button

Long press SELECT 

(about 2 sec) 

Received history screen appears

To see the next history, press the UP (

) button, then the next 

history is displayed.

* Beyond this point, operate from step 

, then you can confirm the 

Received content.

Press UP (

) once

SELECT 
button

Press SELECT once

History 01

The time appears

Press the SELECT button once  History 01 and Received time is 

displayed.

Example: History 01  19 : 00

(When there is no Received history, it is displayed as "-- : --".)

History 02

The time appears

SELECT 
button

Press SELECT once

Example  It means wanting to receive a signal of Guests coming

at 19:00.

The received content appears

Press the SELECT button once. Received content is displayed.

SELECT 
button

Press SELECT once

History 01

The time appears

Press the SELECT button. Return to History 01 screen.

UP (

button

Press MENU once

Normal screen is displayed

Press the MENU button to return to the Time display.

MENU 
button

Press UP (

) once

Next history appears

UP (

button

Switch Display

* You can save up to 10 Received history , and when you press the UP 

(

) button (in step 

), the screen displays are switched to History 01, 

History 02 …in that order.

Press DOWN (

) once

Received history screen appears

* Press the DOWN (

) button from the History 01 screen to return to 

the Received history screen

DOWN(

)

button

11

12

Time Setting

    *You can set the current time.

Example: When adjusting to 10:10 am  * Time is displayed by 24-hour format.

Long press (about 2 seconds) the SELECT button.

Received history screen is displayed.

SELECT
button

Received history

screen appears

SELECT
button

Press SELECT

Time setting screen appears

MENU
button

SELECT
button

Press the UP (

) or DOWN (

) button to display the Time 

setting screen. When the Time setting screen is displayed, 

press the SELECT button once.

Press UP (

) or DOWN (

) until 

Time setting screen appears

Press SELECT

UP(

)

button

DOWN(

)

button

Adjust the hour(s) and determine by pressing the SELECT 
button once. The minute(s) blinks.

SELECT
button

Press SELECT

[Min.] blinks.

Adjust Hour(s) with UP

(

) or DOWN (

)

The hour(s) blinks. Adjust the hour(s) with the UP (

) or 

DOWN (

) button.

[Hour] blinks.

Forward

Back

Adjust Hour(s) with UP 

(

) or DOWN (

)

Adjust the minute(s) with the UP (

) or DOWN (

) button.

Forward

Back

Adjust the minute(s) and determine by pressing the SELECT 

button once. Return to the Time setting screen.

MENU button once

Adjusted time appears

When you press the MENU button, the display is returned to 
the Time display and the adjusted time is displayed.

Long press SELECT 

(about 2 sec) 

1 2   :   0 0

Received
history

Received
history

History 01
1 9   :   0 0

Guests
coming

History 01
1 9   :   0 0

Guests
coming

History 01
1 9   :   0 0

History 01
1 9   :   0 0

Received
history

History 02
1 8   :   5 0

History 01
1 9   :   0 0

1 2   :   0 0

History 02
1 8   :   5 0

History 01
1 9   :   0 0

History 01
1 8   :   5 0

1 0   :   0 0

1 0   :   0 0

1 0   :   0 0

1 2   :   0 0

Time
setting

Received
history

Received
history

1 2   :   0 0

1 0   :   0 0

Time
setting

1 0   :   1 0

1 0   :   1 0

Time
setting

Содержание Silwatch

Страница 1: ...s CO2 reduction attestation was given after Japan Smart Energy Co Ltd examined and checked this printing system It has participated in the forest regeneration enterprise 3 000 trees in the quasi national park of Bali state in Indonesia through printing by MCP CO2 emissions of this printed matters was reduced by 17 85 kg by reusing the 1 76 kg aluminum plate which is used in the printing process of...

Страница 2: ...arging Silwatch 2 Part Names and Functions Wristwatch Receiver SWR 2130T 3 Charger SWC 1140 4 Repeater SW 0123T 4 Transmitter SW N124T 5 6 Preparation for Using Silwatch Charge the wristwatch receiver 7 8 Power ON 9 How to Use Setting Menu 10 Received history 11 Time setting 12 Alarm setting 13 14 Buzzer setting 15 Wireless setting 16 Display setting 17 Operation setting 18 Eco mode 19 Set while c...

Страница 3: ...nd the characteristics of lithium ion battery The phenomena in which consumption of the battery becomes earlier than before and the new battery is exhausted in short time after being charged may be caused by the dirt which is adhered to the contacts of the wristwatch receiver and the battery contacts of the charger except that a remaining amount of the battery life has decreased As a result requir...

Страница 4: ...in about 3 hours Completing the charging is not displayed on the screen Long press the MENU button for about 2 seconds Attention When you charge the battery at the time of purchase or in an empty battery state completing the charging is not displayed on the screen Long press the MENU button for about 2 seconds The time is displayed Time may not be matched 3 Repeater Optional SW 0123T Left side Fro...

Страница 5: ...d to the audio input terminal responds the transmission lamp blinks for about 10 seconds to transmit a signal When the bell flasher connected to the audio input terminal responds to fax phone reception the transmission lamp blinks for about 10 seconds to transmit a signal When a contact signal is input from the contact input cord connected to the external contact input terminal the transmission la...

Страница 6: ...ion for Using Silwatch Charge the Wristwatch Receiver Using Charger Integrated Adapter Fig 1 Fig 2 Fig 3 Set the both terminals of the charger and the receiver to fit properly Message Display While Charging While charging you can check if it is charged by the blinked message Charging While charging the Alarm function and the Buzzer function are OFF regardless of the settings While charging the nor...

Страница 7: ...ON Antenna mark appears Receive OFF Antenna mark disappears Do not receive Alarm setting You can set the Alarm clock time You can set to three alarms Alarms 1 2 will not stop until you stop them by yourself Be sure to stop any of the four buttons by long pressing about 2 seconds ON Vibrates at the set time OFF Does not vibrate at the set time Time setting You can set the current time Display setti...

Страница 8: ...o return to the Received history screen DOWN button 11 12 Time Setting You can set the current time Example When adjusting to 10 10 am Time is displayed by 24 hour format Long press about 2 seconds the SELECT button Received history screen is displayed SELECT button Received history screen appears SELECT button Press SELECT Time setting screen appears MENU button SELECT button Press the UP or DOWN...

Страница 9: ...ut 2 sec 13 14 When you press the SELECT button the Alarm 1 screen is displayed and the set time is displayed When the Alarm is ON the mark is displayed SELECT button Press SELECT Press the MENU button to return to the Time display Press MENU once DOWN button How to Stop Alarm Vibration Press any of the four buttons until the vibration stops The time display appears MENU button Vibrates when the s...

Страница 10: ...ock functions can be used ON mark appears Receive OFF mark disappears Do not receive Long press about 2 seconds the SELECT button Received history screen is displayed SELECT button Received history screen appears SELECT button Press the UP or DOWN button to display the Wireless setting screen When the Wireless setting screen is displayed press the SELECT button once UP button DOWN button Press SEL...

Страница 11: ...n OFF is set all of reception alarm etc do not operate Set when not using for a while To turn on the power long press about 2 seconds the MENU button OFF Power OFF Long press about 2 seconds the SELECT button Received history screen is displayed SELECT button Received history screen appears SELECT button Press the UP or DOWN button to display the Operation setting screen When the Operation setting...

Страница 12: ...eceive when charging please turn ON in step Receive ON Choose Receive OFF with the UP or DOWN button Press UP or DOWN to select OFF UP button DOWN button Press the SELECT button to display the Set while charging screen SELECT button Press SELECT 19 20 Eco Mode Long press about 2 seconds the SELECT button Received history screen is displayed SELECT button Received history screen appears SELECT butt...

Страница 13: ...In case Set while charging is ON pages 7 8 Q It cannot charge even if the wristwatch receiver is connected with the charger A Check an orientation of the wristwatch receiver when connecting It cannot charge unless the terminal of the receiver and the charging terminal of the charger match pages 7 8 Q Nothing is displayed when disconnected from the charger A The Set while charging is OFF Switch the...

Страница 14: ... use 5 to 6 times a day with clock display turned on 2 Two AAA batteries for a transmitter or a repeater are sold eparately Frequency Transmitting output Transmission range m Power source Current rating External dimensions mm Weight g Operating temperature Water resistance Battery life Accessory Specification Wristwatch type receiver 426 MHz range 170 estimate Lithium ion battery 3 7V 150mA MAX 43...

Отзывы: