


17
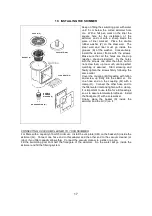
19. INSTALLING THE SKIMMER
Keep on filling the swimming pool with water
until 5 cm below the cutted skimmer hole
die. With a felt pen mark on the liner the
square hole for the installation of the
skimmer and cut with a sharp blade the
piece of liner marked. Place the double
rubber washer (Z) on the steel wall. The
steel wall and liner must go inside the
grooves (K) of the washer. Consecutively,
install the skimmer frame with the screws.
Make sure that all the holes are lined up
(washer, die and skimmer). Fix the holes
with the screws one after the other, but do
not screw them up too much until a perfect
matching is assured. Start screwing and
finally tighten the screws firmly following the
same order.
Cover the coupling (M) threading with teflon
and screw up firmly into the skimmer. Fix
one hose end on the coupling (M) with a
clamp (H). Connect the other hose end to
the filter water inlet and tighten with a clamp.
It is important to use teflon for all threadings
so as to assure total waterproofness. Install
the floodgate (P) with a screwdriver.
Finally, place the basket (S) inside the
skimmer and the lid (V) on it.
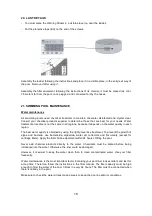
CONNECTING A VACUUM CLEANER TO YOUR SKIMMER
For filters with a capacity of 6m3/h minimum. Install the vac plate (XM) on the basket (S) inside the
skimmer (Q). Connect one hose end to this adapter and the other end to the vacuum cleaner (or
robot, if you filter capacity allows this). Connect the vacuum cleaner to a stick or a pole.
Fill the swimming pool until half the floodgate of the skimmer. So, the water will go inside the
skimmer and fill the filtering system.
COVER (V)
VAC PLATE (XM)
BASKET (S)
HOSE ADAPTOR (M)
FLOODGATE (P)
DOUBLE
RUBBER
WASHER (Z)


