TOI OVAL MAGNUM Series Скачать руководство пользователя страница 12


12


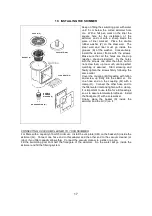
11.  ASSEMBLY OF STEEL WALL (CH) 


We  recommend  that  two  or  more  people  do  the  installation,  and  on  a  still  day  with  no  wind.  For 
safety  reasons,  wear  gloves  to  protect  your  hands  from  the  metal  edges.  During  installation,  do 
not fold the wall and unroll it with care. 


a)  Place the pool wall vertically (label upwards) on a piece of cardboard in the centre of the circle, 

this will make it easier to unroll and prevent scratching the bottom of the wall, photo 26.   

b)  Without unfolding completely, place the wall into the grooves in the lower sections, photo 28. The 

beginning of the wall should be on a base plate (T1), photo 27, generally the central plate of the 
semi-circle so that the skimmer opening is on the same side. 


Important: Insert the wall  into the sections, checking that they  are securely  inserted into  the  PCM 
section grooves, photo 29. Check that the transition sections are correctly positioned, photo 30. To 
prevent the pool wall from falling inwards, attach with tape to the vertical columns (1), photo 31. You 
can also position the upper plate (5) fixing the strip, photo 32. 
 

c)  Complete  the  circle  of  the  wall  and  make  sure  the  holes  are  aligned  then  fix  with  screws, 

remembering that the screw heads must be on the inner side of the wall and the washers and 
nuts on the outside, photos 33 to 37. 


photo 26 


    photo 27 


     photo 28 


  photo 29 


 photo 30 


photo 31 


  photo 32 


photo 33 


     photo 34 


         photo 35   


photo 36 

          photo 37 

Содержание OVAL MAGNUM Series

Страница 1: ...1962 Pol Ind c Buitrera s n Apdo de correos 10 46180 Benaguacil Valencia Tel atenci n al cliente 902 36 47 17 e mail export torrenteindustrial com S P V s tecnico torrenteindustrial com www torrentein...

Страница 2: ...E LINER L p 13 13 INSTALLATION OF THE UPPER PROTECTIVE SECTION PL p 14 14 INSTALLATION OF THE UPPER SECTION PBS p 14 15 ASSEMBLY OF THE VERTICAL SECTIONS VER p 14 16 ASSEMBLY OF THE HORIZONTAL PROFILE...

Страница 3: ...arden gates make part of the fence make sure that they can be closed with a key or bolt Do not use your swimming pool at night or when visibility is not good The water of your swimming pool shoud be a...

Страница 4: ...ID TELEPHONE NUMBER CLOSE TO THE POOL Fire brigade Ambulance doctor RECOMMENDATIONS FOR THE ASSEMBLY OF YOUR SWIMMING POOL 1 Take your time and read the instructions carefully before starting to insta...

Страница 5: ...completely flat and solid The maximum weight that the installation site can support must be taken into consideration Remove roots grass and stones in the selected area including those under the groun...

Страница 6: ...he swimming pools best friends The resin and falling leaves and twigs can cause problems in maintaining your swimming pool s water clean If there is a filtering system it will have to be used more oft...

Страница 7: ...33 31 33 31 33 31 AR 31 33 31 33 31 33 31 33 31 TU 31 33 31 33 31 33 31 33 31 T1 10 10 10 10 10 T2 10 10 10 10 10 VER 10 10 10 10 10 PCM 8 8 8 8 8 EMB 10 10 10 10 10 EMR 2 4 6 6 10 HOR1 0 2 4 4 8 HOR...

Страница 8: ...ht direction 3 as illustrated in photos 1 2 and 3 The angle plate 3 must be joined to the strip at its upper part tighten the nuts in random order d Repeat this process on each side of the strap and f...

Страница 9: ...e tightening check that the base plate is not at an angle b Repeat this process on each side of the strap and for each strap 8 INSTALLATION OF THE VERTICALS a Situate one of the vertical columns 1 on...

Страница 10: ...nchoring photos 17 and 18 c Repeat steps a to c on the other side of the strap and for each strap 10 ASSEMBLY OF POOL BASE PCM Install the curved transition sections Each pool model has two three or f...

Страница 11: ...column photo 21 c Repeat steps a b on the other side of the pool Important Ensure that transition sections A and B are correctly placed and adjusted in the grooves of vertical columns 1 Install the P...

Страница 12: ...te T1 photo 27 generally the central plate of the semi circle so that the skimmer opening is on the same side Important Insert the wall into the sections checking that they are securely inserted into...

Страница 13: ...er some climate and use conditions its characteristics may vary slightly Do not walk on the liner wearing shoes do not throw tools onto the liner and do not place any sharp objects on the liner The li...

Страница 14: ...d place it as per the decoration s manual before installing the upper profiles PBS a Position the upper section PBS on top of the protective section PL around the entire pool perimeter photo 52 b Mark...

Страница 15: ...point above columns 1 and the other end on plate T2 photos 62 63 Align the holes insert and tighten but not too much screws TO2 c Place all the upper sections HOR3 onto T2 plates photo 65 Align the ho...

Страница 16: ...tside cut the piece of liner that exceeds on the outside 4 Place the carton washer on the outside of the pool and while holding the connection from the inside tighten the threading D of the large nut...

Страница 17: ...threading with teflon and screw up firmly into the skimmer Fix one hose end on the coupling M with a clamp H Connect the other hose end to the filter water inlet and tighten with a clamp It is import...

Страница 18: ...ality in each region The best water quality is obtained by using the right preventive treatment To prevent the growth of algae and bacteria use bactericide algaecide water pH correctors and flocculant...

Страница 19: ...ainers 8 Keep the products in their original containers 9 Do not remove the labels from the containers 10 Make sure that the storage area for chemical products has proper ventilation 11 When raining i...

Страница 20: ...rofiles b Check that the screws are tight 2 Check rusted areas a Paint all scratches or rusted areas using anti rust paint 3 Check liner a Check that the upper part of the liner is still joined to the...

Страница 21: ...arts of the pool in a dry and covered place If any of the pool elements are damaged replace them as soon as possible with original TOI accessories See the address at the end of this manual ASSEMBLED P...

Страница 22: ...V C is not warranted if the pool is disassembled and reassembled The pools can not be in ground only above ground If you in ground your pool TOI does not take responsibility of the damages caused by a...

Страница 23: ...r manipulated by non qualified people Engine s damage produced by making it work in emptyness The Guarantee is annuled if instructions of electric intalation aren t followed scrupulously Decoh pool Th...

Отзывы: