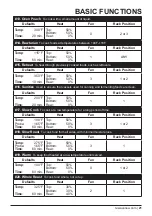
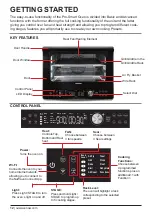
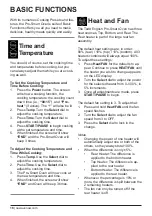
Todd English PRO-SMART 20901 Скачать руководство пользователя страница 14

14


| nuwavenow.com

Primary Controls

GETTING STARTED 

Control

Function

Power

The 

Power

 button turns the Pro-Smart Oven on and off.

Heat/FAN

Heat:

 Press 

Heat/FAN

 until the heater to be changed appears, 

then adjust the rear, top, and/or bottom heat using the 

Select 

dial. The odd percentage of Top/Bottom heat defaults to the 

bottom.

Fan:

 Press and hold 

Heat/FAN

 and use the 

Select

 dial to 

adjust the fan speed from 0–3. Note: If you are using the rear 

heater, the fan speed must be 1 or more.

WiFi

Press 

WiFi

 to connect to your local wi-fi network and, through 

that, to the NuWave Connect App.

Sear

Press 

Sear

, then adjust the Sear temperature and time, if de-

sired, and press 

START/PAUSE

 to begin cooking. Sear defaults 

to 450°F for 5 minutes.

Light/STAGE

Light:

 Press 

Light/STAGE

 once to turn on the oven lamp. 

Press it again to turn it off.

STAGE:

 Press and hold 

Light/STAGE

 to access Stage Cook-

ing. You can program up to 5 cooking stages.

Select Dial

Used to change cooking times and temperatures, as well as to 

scroll through and select cooking functions and presets.

START/

PAUSE 

Clear

Once the cooking parameters are set, this starts and pauses 

the cooking process. Pressing and holding the button allows 

you to clear any selections.

Temp

Allows you to adjust the cooking temperature before and

during the cooking process. Press 

Temp

 and use the 

Select


dial to adjust the temperature.

Time

Allows you to adjust the cooking time before and during the 

cooking process. Press 

Time

 and use the 

Select

 dial to adjust 

the time.

Function

Allows you to choose from among 20 cooking functions, 9 on 

the LED display and 11 under “F”. Press 

Function


and scroll through the cooking functions. At “F”, press 

the 

Select

 dial for functions 10–20. Continue scrolling until you 

reach the Function you want, then press the 

Select

 dial and 

START/PAUSE

 to begin cooking.

STAGE

Light

Clear

Содержание PRO-SMART 20901

Страница 1: ...Engineered by Questions or Concerns Toll Free 1 877 689 2838 help nuwavenow com Mon Fri 7 30am 4 30pm CST Owner s Manual Model 20902 20901 20906 20905 PRO SMART OVEN TODD ENGLISH...

Страница 2: ...rchase So if you have any questions comments or concerns please don t hes itate to contact Customer Service They ll take good care of you I m glad you re with us and I know that you will be too Chef T...

Страница 3: ...94 Nation s Restaurant News named English one of their Top 50 Tas temakers in 1999 In 2001 English was awarded Bon Appetit s Restaurateur of the Year award and was named one of People Magazine s 50 Mo...

Страница 4: ...o Smart Oven or cord malfunctions or has been damaged in any way Return the unit to the nearest authorized service facility for examination repair or adjustment 9 Use only on a clean stable dry and le...

Страница 5: ...fire or risk of electric shock 2 A fire may occur if the toaster oven is covered or touching flammable material includ ing curtains draperies walls and the like when in operation Do not store any ite...

Страница 6: ...pulled on or tripped over unintentionally 3 The Pro Smart Oven should be operated on a separate electrical outlet from other operating appliances due to wattage limitations 4 This appliance is of the...

Страница 7: ...ustomer Service You can do that by Phone at 877 689 2838 M F 7 30am 4 30pm CST or Email at help nuwavenow com You can even order directly online Just visit www nuwavenow com ORDERING PARTS Wire Rack P...

Страница 8: ...it to the Griddle side for baking The Grill Griddle must be used with the Grill Griddle Rack Grill Griddle Rack inch depth is ideal for dehydrating Air Fry Basket 1 inch depth is perfect for making c...

Страница 9: ...it When you select a cooking function the appropriate rack number s will illuminate on the control panel These numbers coincide with those on the frame of the unit Position 4 Position 3 Position 2 Pos...

Страница 10: ...nd properly installed make sure that your smart device is connected to your home Wi Fi 2 4GHz network and that the Pro Smart Oven is in Standby Mode Then follow these steps 1 On the Oven press and hol...

Страница 11: ...k 3 Press WIFI This will extend control of the Pro Smart Oven to the NuWave Connect App Notes You will only have to do this once After control has been extended it will remain extended and to use it y...

Страница 12: ...of Dehydrate Function 1 2 3 4 Preheat Ready Stage Probe Fan Carryover Sear Rear Top Shade Menu Bottom Slice STAGE Light Rack Level Air Fry Grill Bake Broil Air Roast Toast Pizza Proof Dehydrate Functi...

Страница 13: ...king Helpful Tips Rack Level Air Fry Grill Bake Broil Air Roast Toast Pizza Proof Dehydrate Function 1 2 3 4 Preheat Ready Stage Probe Fan Carryover Sear Rear Top Shade Menu Bottom Slice Wi Fi Operate...

Страница 14: ...GE Press and hold Light STAGE to access Stage Cook ing You can program up to 5 cooking stages Select Dial Used to change cooking times and temperatures as well as to scroll through and select cooking...

Страница 15: ...art Guide You can save 50 of your own Preheat Ensures the Pro Smart Oven is at the set cooking temperature at the start of the main cooking cycle giving you better results The default is 400 F default...

Страница 16: ...ach Yes Yes Yes Rawtarian Yes Yes Yes Reheat Yes Yes Yes Sanitize Yes Yes Yes Slow Cook Yes Yes Yes Slow Roast Yes Yes Yes Warm Yes Yes Yes Whole Roast Yes Yes Yes Yes Use an oven safe baking cooking...

Страница 17: ...e cooking and again to resume it Press and hold START PAUSE to clear all settings The unit will display END Press it again to return to the default settings Once the Pro Smart Oven has fin ished cooki...

Страница 18: ...me 4 When finished the screen will show END and Oven will beep 3 times The Todd English Pro Smart Oven has three heat sources Top Bottom and Rear The Rear heater is part of the large rear fan assembly...

Страница 19: ...start cooking 1 Air Fry To fry with superheated circulating air while using little to no oil Defaults Heat Fan Rack Position Temp 400 F Time 15 min Top 10 Bottom 10 Rear 80 3 2 or 3 2 Grill To use co...

Страница 20: ...0 2 2 or 3 11 Defrost To thaw frozen foods to prepare them for cooking Defaults Heat Fan Rack Position Temp 50 F Time 30 min Top 50 Bottom 50 Rear 0 3 ANY 12 D I Y Allows you to create your own Cookin...

Страница 21: ...ng foods are clean Defaults Heat Fan Rack Position Temp 200 F Time 20 min Top 50 Bottom 50 Rear 0 1 1 17 Slow Cook To cook at a low temperature for a long period of time Defaults Heat Fan Rack Positio...

Страница 22: ...enu and 101 6 Choose the Preset number from the Menu 101 150 by turning the Select dial 7 Once the desired Preset number is chosen press and hold Menu again to save it SAVE and the Preset number will...

Страница 23: ...t the end of cooking the Pro Smart Oven will display SAVE The user will then press Menu twice choose a Preset number and press and hold Menu again If you choose to save a Preset in a slot that is alre...

Страница 24: ...imply set the Probe target temperature for each stage and the Pro Smart Oven will cook each stage until that temperature is achieved and then move on to the next stage Once the Probe target temperatur...

Страница 25: ...eless 350 F 125 F 135 F 145 F 150 F 160 F Pork bone in Pork boneless 350 F 145 F 150 F 165 F Salmon Tuna Halibut Swordfish 450 F 145 F 150 F 160 F Fish Steaks 1 inch thick 450 F 145 F 150 F 160 F Saus...

Страница 26: ...the Select dial 3 To stop the clock display press Pre heat Time again The Lock Feature is used to disable the Pro Smart Oven s keypad preventing it from responding to most actions until either the key...

Страница 27: ...in Stage 1 is changed the default temperature for all other stages will be that function s default temperature not the changed temperature If a time is not entered in a Stage but other stages are set...

Страница 28: ...r to and during the searing process Sear Default Settings 450 F for 5 min utes Selectable Sear Temperature Range 50 F 500 F Selectable Sear Time Range 0 30 minutes 00 00 00 30 The Three Sear Settings...

Страница 29: ...ants to change the Slow Cook cooking temperature 1 Press the Temp button The screen will read 190 F This is the default Slow Cook cooking temperature 2 Use the Select dial to adjust the Slow Cook cook...

Страница 30: ...l Griddle to completely cool before cleaning Once cooled wipe it with a clean damp towel then rinse it in a sink with cool water and dry it completely WARNING NEVER submerge or rinse a hot Grill Gridd...

Страница 31: ...own contact NuWave Customer Service Err1 The NTC Temperature Sensor has short circuited Contact NuWave Err2 The NTC Temperature Sensor is open Contact NuWave Err8 A button may be jammed No PRB The Pro...

Страница 32: ...Smart Oven The Crumb Tray may not be correctly placed into the slot or something may be blocking it Remove the Crumb Tray and clean away any food items that may have accumulated in the back of the Pr...

Страница 33: ...n the package the owner s name address daytime telephone number a detailed description of the problem and your Return Goods Authorization RGA number Call 1 877 689 2838 or email help nuwavenow com to...

Страница 34: ...ill have 30 days from the date of product delivery to opt out of arbitration with respect to any dispute arising out of or relating to use or purchase of any Nu Wave product If more than 30 days have...

Страница 35: ...nuwavenow com 35 NOTES...

Страница 36: ...905 Para la versi n en espa ol de este manual visita www nuwavenow com For patent information please go to www nuwavenow com legal patent Designed in France Developed in USA NuWave LLC 560 Bunker Ct V...

Отзывы: