Toa A-5006A Скачать руководство пользователя страница 7

Page | 7 

For PRESET 5/ ALL CHANNELS MUTED, click on 
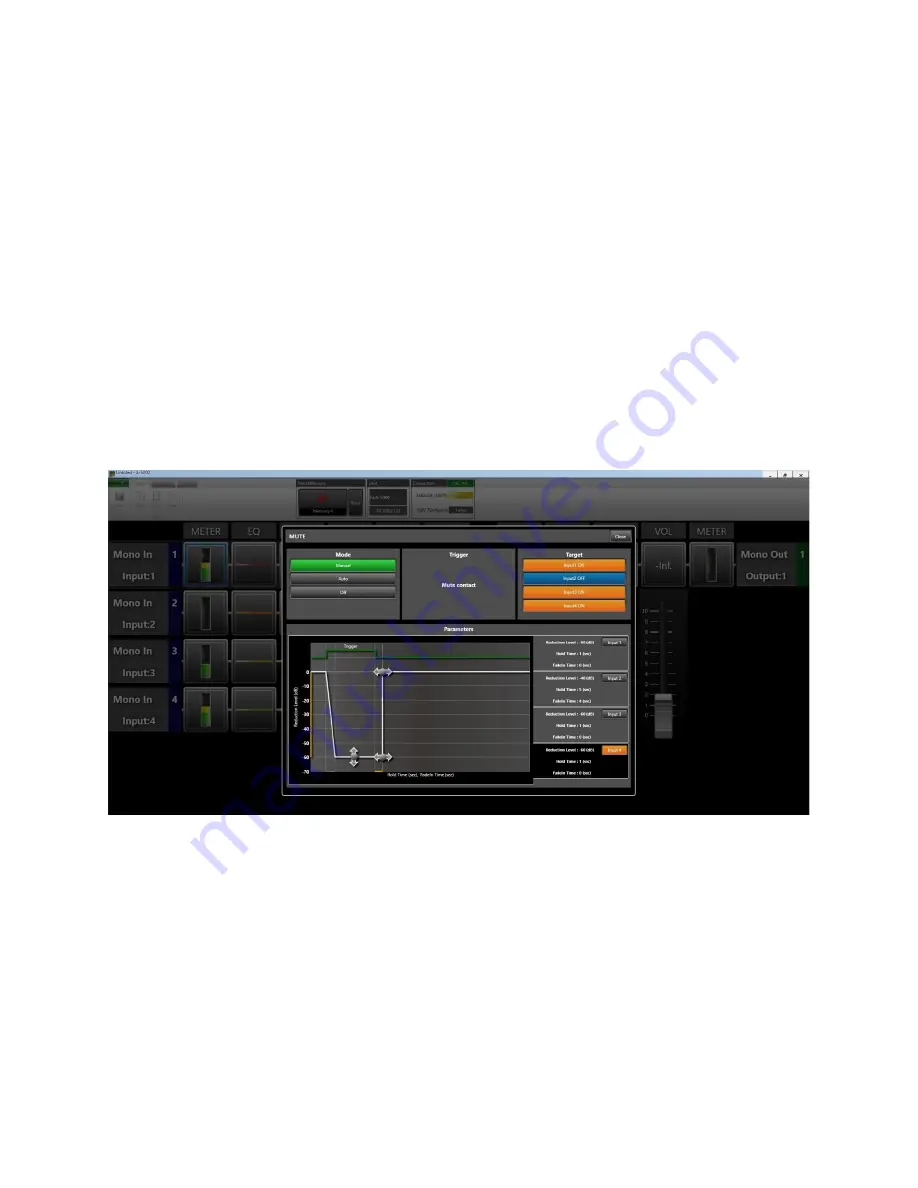
MUTE

 for INPUT 1, perform the following steps: 

1. Set MODE to 

MANUAL

. When enabled the MANUAL button will change color to GREEN.

2. Set 

TARGET

, enable INPUT 1, INPUT 3 and INPUT 4. When enabled the TARGET buttons

will change color to orange.

3. To set input 1, 3 & 4 mute parameters, first click on the 

INPUT 1

 button on the far-right

side, then perform the following adjustments:

Set 

REDUCTION

 (vertical axis) to 

 60 dB.  

Set 

HOLD TIME

 (horizontal axis) to 1 second. 

Set 

FADE IN TIME 

to 0 

When done on input 1, enable the 

PARAMETERS

/ INPUT 3 button, the color will change to 

orange. Set the REDUCTION, the HOLD TIME and the FADE IN TIME settings as was done for 
input 1. Repeat this procedure for input 4. When completed, close the prompt. 

PRESET 5: MUTE SETTINGS 

After completion of the fifth preset, click on the preset memory 

STORE 

button above the signal 

path layout. 

Содержание A-5006A

Страница 1: ...SOLUTION Program a series of presets with single open channels and manual mute enabled for channels not wanted Example If using INPUTS 1 3 4 four presets would be considered Preset 1 Ch 1 ON Ch 3 4 O...

Страница 2: ...L 1 ON click on MUTE for INPUT 3 and perform the following steps 1 Set MODE to MANUAL When enabled the MANUAL button will change color to GREEN 2 Set TARGET enable INPUT 3 and INPUT 4 When enabled the...

Страница 3: ...f the display and click STORE or click Memory 1 and click store in the drop down menu as shown below TIP In this example the means there have been changes that have not been saved Once you successfull...

Страница 4: ...PLAY Change Preset 3 To program for INPUT 3 on INPUTS 1 4 off repeat steps 1 4 the difference is in step 2 enable INPUT 1 4 as the targets In step 3 click on PARAMETERS INPUT 1 to adjust REDUCTION HOL...

Страница 5: ...PLAY Change Preset 4 To program for INPUT 4 on INPUTS 1 3 off repeat steps 1 4 the difference is in step 2 enable INPUT 1 3 as the targets In step 3 click on PARAMETERS INPUT 1 to adjust REDUCTION HOL...

Страница 6: ...SET 4 COMPLETE Programming Layout After completion of the PRESET 4 click on the MEMORY button above the signal path layout click on MEMORY 5 then click on the CHANGE button CHANGE PRESET DISPLAY Chang...

Страница 7: ...1 button on the far right side then perform the following adjustments Set REDUCTION vertical axis to 60 dB Set HOLD TIME horizontal axis to 1 second Set FADE IN TIME to 0 When done on input 1 enable t...

Страница 8: ...If all presets work as intended the last step is to save the program file Go to the upper left corner of the programming page click on SAVE A SAVE AS prompt will appear SAVE AS PROMPT Type a name for...

Отзывы: