background image

8

6.7 Changing the tool (Fig. 5)

Important! 

Set the changeover switch to its 

centre position whenever you carry out any work 

(for example changing the tool, maintenance 

work, etc.) on the cordless screwdriver.

 Pull back and hold the locking sleeve (12).

 Insert the bit (a) into the bit chuck (1) and let go 

of the locking sleeve (12).

 Check that it is secure by attempting to pull the

tool apart again.

6.8 Screwdriving

We recommend using self-centering screws (e.g.

Torx screws, recessed head screws) designed for

reliable working. Be sure to use a bit that matches

the screw in shape and size. Set the torque, as

described elsewhere in these operating 

instructions, to suit the size of screw.

7. Cleaning and  maintenance 

Always pull out the mains power plug before 

starting any cleaning work.

7.1 Cleaning

 Keep all safety devices, air vents and the motor

housing free of dirt and dust as far as possible.

Wipe the equipment with a clean cloth or blow it

with compressed air at low pressure.

 We recommend that you clean the device

 Clean the equipment regularly with a moist 

cloth and some soft soap. Do not use cleaning 

agents or solvents; these could attack the plastic 

parts of the equipment. Ensure that no water can 

seep into the device.

7.2 Maintenance

There are no parts inside the equipment which

require additional maintenance.

8. Disposal and recycling

The unit is supplied in packaging to 

prevent its being damaged in transit. 

This packaging is raw material and can 

therefore be reused or can be returned to 

the raw material system.

The unit and its accessories are made of various

types of material, such as metal and plastic.

Defective components must be disposed of as

special waste. Ask your dealer or your local 

council.

GB

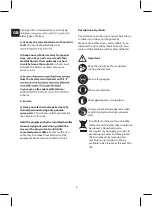
The yellow and red LED illuminate:

The battery has an adequate remaining charge.

Red LED:

The battery is empty, recharge the battery.

Содержание SD03-1036

Страница 1: ...3 6V CORDLESS SCREWDRIVER SD03 1036 ...

Страница 2: ...2 1 2 3 6 4 9 12 1 2 3 8 10 11 14 3 5 8 9 5 13 7 4 8 14 5 a 1 12 b c 13 ...

Страница 3: ...lectric tool out of the reach of children and other persons If there is a distraction you may lose control of the appliance 2 Electrical safety a The connector plug from this electric tool never be altered in any way Never use adapter plugs together with earthed electric tools Unaltered plugs and correct sockets reduce the risk of an electric shock b Avoid bodily contact with earthed surfaces such...

Страница 4: ...hin the given performance boundaries b Do not use an electric tool with a defective switch An electric tool that cannot be repaired c Pull the plug out of the socket and or remove the battery before making any adjustments to the appliance changing accessories or put the appliance down This safety measure prevents starting the electric tool unintentionally d Keep unused electric tools out of the re...

Страница 5: ...in tool could strike concealed power cables Contact with a live cable may also make the metal parts of the equipment live and cause an electric shock Important Read the instructions for use before starting the machine Wear safety goggles Wear ear protection Wear good quality strong gloves Always use breathing apparatus when machining materials which generate dust End of life machines contain valua...

Страница 6: ...hargeable battery 600 mA Battery charger supply voltage 100 240 V 50 60 Hz Charging time 3 5 hours Battery type Li Ion 1 3 Ah Weight 415 g Sound and vibration Sound and vibration values were measured in accordance with EN 60745 LpA sound pressure level 57 5 dB A KpA uncertainty 3 dB LWA sound power level 68 5 dB A KWA uncertainty 3 dB The impact of noise can cause damage to hearing Total vibration...

Страница 7: ... will cause it to develop a defect 6 2 Changeover switch Fig 2 Item 9 The slide switch above the ON OFF switch is for setting the direction of rotation of the cordless screwdriver and for preventing the cordless screwdriver from being switched on inadvertently You can select between clockwise and counterclockwise rotation Change the direction of rotation only when the equipment is at a standstill ...

Страница 8: ...and the motor housing free of dirt and dust as far as possible Wipe the equipment with a clean cloth or blow it with compressed air at low pressure We recommend that you clean the device Clean the equipment regularly with a moist cloth and some soft soap Do not use cleaning agents or solvents these could attack the plastic parts of the equipment Ensure that no water can seep into the device 7 2 Ma...

Отзывы: