background image

#1 – CHANGING THE BLADE

SAWMILL MAINTENANCE

Never attempt the below with the engine running. As a safety precaution, remove the spark plug cap.
Gloves and safety glasses must be worn when changing the blade.

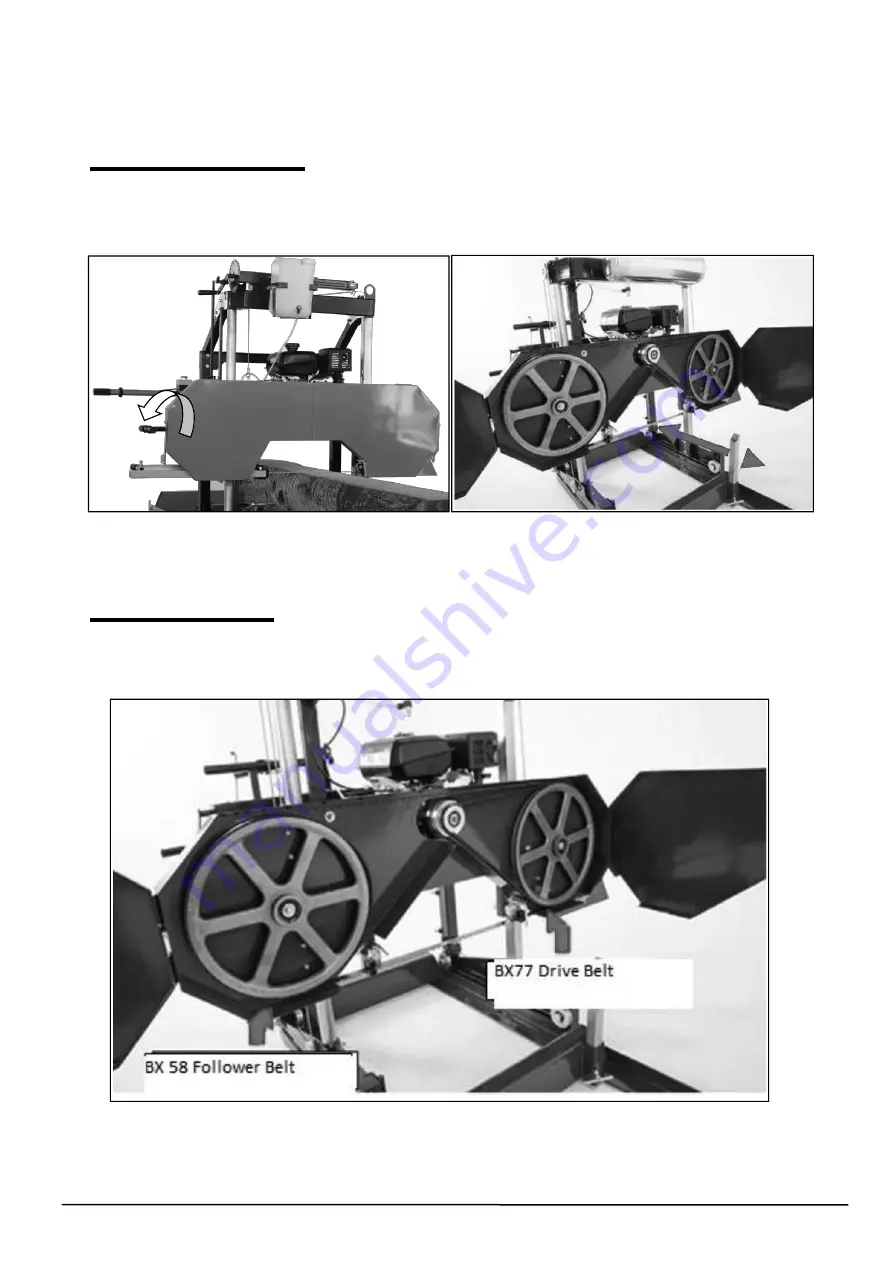
Remove the tension in the blade by turning the “T” handle in the counter-clockwise direction and then
open the blade guard cover. The blade should now be loose and free to pull straight out the front. The
new blade can now be installed, guards closed and proper blade tension set.

#2 – REPLACING BELTS

Never attempt the below with the engine running. As a safety precaution, remove the spark plug cap.
Gloves and safety glasses must be worn when replacing the belts.

There are two rubber “V” belts on the sawmill and they should be replaced as a set. It is not advised

to replace individual belts separately. It is recommended to use a BX77 cogged belt for the drive side

and a BX58 follower belt.

WWW.TMGINDUSTRIAL.COM

P32/43

Toll Free:1-877-761-2819

Содержание Kohler TMG-PSM26

Страница 1: ...ely before assembly Check against the parts list to make sure all parts are received Wear proper safety goggles or other protective gears while in assembly Missing parts or questions on assembly Pleas...

Страница 2: ...s 10 Carriage Assembly 12 Electric Wire Connect 22 Engine 23 SAWMILL SET UP PROCEDURES 24 Belt Tension 24 Blade Tracking 25 Blade Guide Adjustment 29 Blade Tension 30 SAWMILL MAINTENANCE 31 Changing t...

Страница 3: ...INTENDED USE This sawmill is designed for sawing logs while the mill is firmly supported on the ground TECHNICAL SPECIFICATIONS Item Description GENERAL SAFETY RULES WARNING Read and understand all i...

Страница 4: ...special hazards during operation and fueling Read and follow the warning instructions in the engine Owner s Manual and the safety guidelines below Failure to follow the warnings and safety standards c...

Страница 5: ...or muffler while the engine is on or immediately after it has been turned off These areas get hot and may cause burns Always close fuel valve on engines when machine is not being operated Avoid kick b...

Страница 6: ...assistance 3 Ensure guide blocks are tight and track is level 4 Fill the lubrication tank with clean water and washing up detergent 5 Start and operate the engine according to the provided engine man...

Страница 7: ...sts before use with a silicone spray lubricant such as 3 in 1 or Jig A Loo 9 Band Wheel Guards Routinely remove any build up of sawdust that may collect inside the band Wheel guards 10 Lubrication Tan...

Страница 8: ...he track It is ideal to assemble the tracks on a solid and level footing that is a minimum of 4 off of the ground We recommend you attach the leveling legs to sleepers which we discuss later in the in...

Страница 9: ...ten at this stage The bolts will be fully tightened once the head assembly is free to roll on the tracks and provide the correct track width 3 Assemble carriage stops at the ends of the tracks 4 stops...

Страница 10: ...bolted Depending on how many track sections are being used select a log clamp position that will secure the log firmly against the log supports Insert log supports into track cross supports and secure...

Страница 11: ...re the locations of the leveling legs are There are 4pcs per 84in of track 168 in total on the machine On the intermediate bunks the leveling legs alternate We recommend placing the mill leveling legs...

Страница 12: ...m of two people or a mechanical advantage system remove the head assembly from the sawmill crate and place face down on the blanket The head assembly is very heavy proper technique must be used to avo...

Страница 13: ...on both the round and square post to prevent the head from moving when it is stood up in the coming steps Ensure that when activating the cam handles the clamps securely lock on the round and square...

Страница 14: ...in using a minimum of two people set the saw head assembly on the track system ensuring the carriage wheel grooves rest on the L rails The square vertical post should be on the same side as the log su...

Страница 15: ...and cooling box bracket on the beam using wrench to hold the nut tighten the bolt Then put the water tank into the bracket Bolt M10x50 2 Spring Washer 10 2 Nuts M10 4 B o l t s M1 0 X 8 0 9 F l a t W...

Страница 16: ...e sawmill using the two bolts and tighten Slide the scale indicator over the square rod and tighten It is important to alternate tightening of the nuts top then bottom to ensure the black round clamp...

Страница 17: ...ith the throttle lever in the idle position fully open pull the cable tight at the engine and tighten the screw to hold it in place This will take all of the slack out of the cable PLEASE NOTE The idl...

Страница 18: ...WWW TMGINDUSTRIAL COM P18 43 Toll Free 1 877 761 2819 11 Route the cables on both sides as shown in the below image down cable up cable...

Страница 19: ...the copper end in position Do not over tighten or crush the copper end The transparent water pipe connects the water tank to the copper connector Please Note We recommend adding some dishwashing liqui...

Страница 20: ...n Note It is very important to take the tension off of the blade by turning the T handle in the counter clockwise direction when the sawmill is not in use Failure to do so will result in flat spots on...

Страница 21: ...g the entire track system Once the desired width is achieved all nuts and bolts can be tightened to the log bunks 16 Using a tape measure take a measurement from the blade to the top of the log bunk o...

Страница 22: ...cy Stop Switch A and the Microswitch B Step 4 Connect the A 1 and B 1 Step 5 Connect the A 2 and 2 Male Connect the B 2 and 2 Female A 3 and B 3 connect chassis 1 2 2 A 1 A 2 A 3 B 3 B 2 B 1 Microswit...

Страница 23: ...lways cut in the direction shown above The log clamp should always be on the right side of the log and the log supports should always be on the left Failure to cut in this direction can cause the log...

Страница 24: ...should be no more than 1 4 of deflection in both directions 1 2 total If the belt deflects more than this it will need to be tightened as described below To tighten the drive belt start by loosening t...

Страница 25: ...ts Alternatively if the drive belt is too tight the 16mm nut on the horizontal stud can be turned counter clockwise 2 BLADE TRACKING Never attempt the below with the engine running As a safety precaut...

Страница 26: ...l ensure that the guide bearings do not influence tracking of the blade while adjusting Take some tension off of the blade by turning the T handle in the counter clockwise direction one full turn from...

Страница 27: ...n would force the blade to run more forward on the bandwheel Turn the bolt a 1 2 turn and re tension the blade Wearing gloves spin the bandwheel with your hand and observe how the blade has changed tr...

Страница 28: ...eely in the following steps Moving The Blade Forward Using a 16mm wrench hold the horizontal bolt stationary with a wrench and turn the horizontal inside nut counter clockwise a turn Still holding the...

Страница 29: ...ing Measure the distance again and repeat the above step to further compensate if required The ideal measurement is 3 8 Once the blade is tracking true bring the blade guide assemblies back up to the...

Страница 30: ...assembly back in position Using a piece of paper in between the blade and blade guide blocks tighten the allen key bolts 4 BLADE TENSION Proper blade tension is achieved when the blade deflects no mor...

Страница 31: ...esult in the blade being thrown and possibly broken Tracking adjustment bolt out of recess of it looks like this DO NOT start the mill until it is resting back in its recess Tracking adjustment bolt s...

Страница 32: ...to pull straight out the front The new blade can now be installed guards closed and proper blade tension set 2 REPLACING BELTS Never attempt the below with the engine running As a safety precaution re...

Страница 33: ...ockwise direction This will allow the engine to move and will also take the tension off of the belt The old belt can be removed and the new belt can be installed Tension the new belt and refer to the...

Страница 34: ...to page 33 6 Slow feed rate down and push head slower through log Blades are breaking 1 Too many blade sharpenings 2 Inadequate blade tension 3 Improper blade guide set up 4 Improper blade tracking 5...

Страница 35: ...DIAGRAM ENSEMBLE A B C WWW TMGINDUSTRIAL COM P35 43 Toll Free 1 877 761 2819...

Страница 36: ...DIAGRAM A BANDWHEEL HOUSEING WWW TMGINDUSTRIAL COM P36 43 Toll Free 1 877 761 2819...

Страница 37: ...recessed pan head screw M4X12 2 A18 Hexagon head bolt M8X25 1 A52 Flat washer 4 2 A19 Large washers 10 5 A53 Scale plate 1 A20 Hexagon lock nuts with non metallic inserts M8 16 A54 Scale base 1 A21 L...

Страница 38: ...ght saw chuck shaft seat 1 A94 Hex bolt M10 x 20 1 A77 Hexagon bolt M10 x 35 1 A95 Hexagon lock nuts with non metallic insert M12 1 A78 Hexagon head bolt M10X30 2 A96 Hexagon socket head screw M6X16 2...

Страница 39: ...PARTS LIST B CARRIAGE WWW TMGINDUSTRIAL COM P39 43 Toll Free 1 877 761 2819...

Страница 40: ...washer 8 2 B16 Hex nut M10 17 B51 Hexagon head bolt M8X20 2 B17 Flat washer 10 27 B52 Scale 1 B18 Warter Bucket 1 B53 Scale seat 1 B19 Hex nut M12 2 B54 Vertical pipe 1 B20 13 hole handle 1 B55 Cross...

Страница 41: ...re 4 B74 Splint 2 4 B83 Bottom wheel spacer 1 4 B75 60X60 square pipe plug 2 B84 Circlip for hole 42 4 B76 Hexagon lock nuts with non metallic inserts M20 4 B85 Bearings 6004 4 B77 Hexagon head bolt M...

Страница 42: ...DIAGRAM C GUIDE RAIL WWW TMGINDUSTRIAL COM P42 43 Toll Free 1 877 761 2819...

Страница 43: ...f locking nuts M10 48 C16 Screw M10 40 11 C5 Hex nut M16 24 C17 Short slide 2 C6 Leveling Feet M16 12 C18 Slide tube 2 C7 Slide 2 2 C19 Sliding tube base welding 4 C8 Telescopic tube welding 2 C20 Fou...

Отзывы: