


Chapter 11 LI6BM and the Databook Case
LI6BM User’s Manual
105
3-3. Install the thin I/O panel plate inside the case. Be careful not to
cut yourself in doing so. The thin metal plate has six protruding clips
that should be inserted to their respective hole on the back panel.
3-4. Install the CPU retention module onto the LI6BM
motherboard.
3-5. Install the motherboard into the case.
3-6. Install the game port cable onto the motherboard (J22 header)
and screw the connector onto the case.
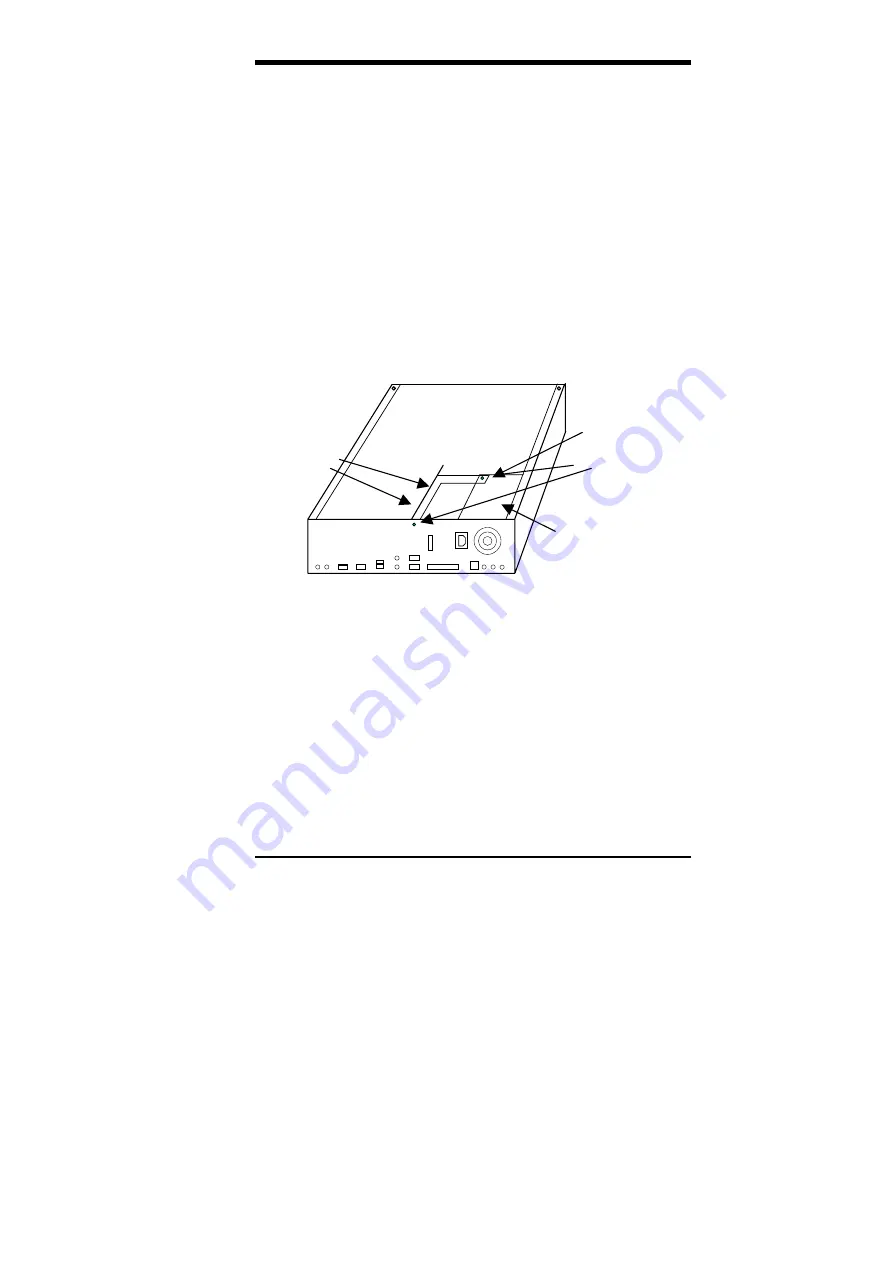
3-7. Install the power supply onto the case.
3-8. Remove the power supply top screw diagonally opposite the
corner of the case. This screw will be used to fix the riser card metal
support.
3-9. Insert the BL21PI Riser Card onto the motherboard. Screw the
card onto the riser card metal support.
3-10. Screw the metal support to the power supply. Use the screw
that was remove from the power supply as mentioned in 3-8.
3-11. Screw the FDD plastic siding onto the left side of the floppy
disk drive. Refer to the figure on the next page. Note that the FDD
plastic siding has six holes on it while the HDD plastic siding has
two holes.
Make sure to use the small-thread ‘mm’ screws for
the FDD and CD-ROM drives and use the big-thread ‘inch’
screws for HDD drive to avoid damage to the drives.
3-12. Install the floppy disk drive into the front panel unit.
Back Panel
3-9 Screw the
riser card to
the metal
support.
3-7 Install the power
supply into the
case.
3-8 Remove this
screw.
3-10 Screw here
to attach the
riser card
support.
Содержание LI6BM
Страница 1: ...LI6BM Pentium II III 440BX Apollo Pro Plus JumperFree Motherboard User s Manual Version 1 0...
Страница 10: ...Chapter 2 Specifications 6 LI6BM User s Manual This page was intentionally left blank...
Страница 12: ...Chapter 3 Hardware Description 8 LI6BM User s Manual Figure 1 Layout of the LI6BM Motherboard...
Страница 20: ...Chapter 4 Configuring the Motherboard 16 LI6BM User s Manual Figure 2 Jumper Location on the LI6BM...
Страница 24: ...Chapter 5 Installation 20 LI6BM User s Manual Figure 3 Connector Location on the LI6BM...
Страница 69: ...Chapter 7 Audio Driver Installation Guide LI6BM User s Manual 65 3 Click Device Manager...
Страница 71: ...Chapter 7 Audio Driver Installation Guide LI6BM User s Manual 67 Confirm the remove command by clicking OK...
Страница 72: ...Chapter 7 Audio Driver Installation Guide 68 LI6BM User s Manual 6 Click Close...
Страница 74: ...Chapter 7 Audio Driver Installation Guide 70 LI6BM User s Manual 8 Click Creative Labs 1373 and then Install...
Страница 86: ...Chapter 9 LAN Driver Installation Guide 82 LI6BM User s Manual 2 Click System 3 Click Device Manager...
Страница 88: ...Chapter 9 LAN Driver Installation Guide 84 LI6BM User s Manual 6 Click Driver 1...
Страница 89: ...Chapter 9 LAN Driver Installation Guide LI6BM User s Manual 85 7 Click Update Driver...
Страница 91: ...Chapter 9 LAN Driver Installation Guide LI6BM User s Manual 87 10 Click OK 11 Type A then click OK 12 Click OK...
Страница 98: ...Chapter 9 LAN Driver Installation Guide 94 LI6BM User s Manual This page was intentionally left blank...
Страница 101: ...Chapter 10 System Monitor Utility User s Guide LI6BM User s Manual 97 2 Power displays the current voltage status...
Страница 102: ...Chapter 10 System Monitor Utility User s Guide 98 LI6BM User s Manual 3 Memory displays the current memory usage status...
Страница 106: ...Chapter 10 System Monitor Utility User s Guide 102 LI6BM User s Manual This page was intentionally left blank...


