background image


10 

  (iii)  Connect passenger side safety lock air line 

(5/32” blue tubing) 

to “T” fitting from accessory  

         box.  Connect driver side safety lock air line 

(5/32” blue tubing) 

to “T” fitting.   Connect “T”  

         fitting to air solenoid in console using 

5/32”

 blue tubing from accessory box. 

 (iv)  Connect rolling air/hydraulic jacks air line from lift to console 

(if optional rolling jacks were purchased) 

            (rolling jacks must be installed with air lines connected to the lift before turning on the air) 


 NOTE : All electrical wiring other than low voltage (24 volts or less) should be  

              performed by a certified electrician. 


  (v)  Low Voltage Linear Transducer Connections 

– 1

 cable from runway #1 and 1 cable from runway #2  


Do not proceed with low voltage electrical connections at this time

. The lift  

 must first be cycled up and down several times 

(step #11) 

to remove air pockets before  

 connecting these cables.  Low voltage electrical connection is step #16. 

7.   Fill oil reservoir with hydraulic oil 

(ISO 32)

8.   Connect operator console or control pendant to electrical service 
     

 (should be performed by a certified electrician).


9 .  Lift operation controls on the console perform the following functions: 

       - "RAISE" button raises the lift. "LOWER" button lowers the lift. Note: Pressing the "lower" button 

          will first raise the lift slightly to clear the safety locks and then proceed down to desired height. 

       - "ALIGNMENT LEVEL" button lowers the lift into safety locks for alignment purposes.  Note: The    

 "alignment level" button and the "lower" button must be pressed at the same time to lower  

  and level the  lift on the safety locks. 

       - "EMERGENCY STOP" button


stops the lift from being raised or lowered. 


Note

:  Always lock both slip plates and turnplates following alignment adjustments and before  

        removing vehicle from the lift. 

10.  Press the "UP" button and raise the lift 18 inches from the floor.  Press the "DOWN"        
       button and lower the lift down to the floor.  Check hydraulic oil level in operator console 
       reservoir and top up if required.  Check all hydraulic and air lines to insure no leaks. 

11.  Press the "UP" button and raise the lift 36 inches from the floor.  Press the "DOWN"  
      button and lower the lift down to the floor.  Press the "UP" button and raise the lift  
      60 inches from the floor.  Insure the safety locks under both runway assemblies are 

      engaging properly when the lift is being raised.   
12.  

Important: Before proceeding, confirm that all safety locks are totally engaged. 

      Dependable performance and accurate alignment results require a precisely leveled lift.   

      Take special care to complete the following leveling process: Check both base frames with 
      a 4 ft. level and identify the highest point.  The leveling process will raise lower points on  
      both base frames to match 

(or be level with)

 the high point you identify.  Using preinstalled  

      adjustment bolts located at the front and rear of each base frame, proceed to raise the  

      low points on each base frame to match 

(or be level with)

 the highest point you identified.  


(reference diagram #9 for correct level measurement sequence)


Note: adjustment bolts cannot be used to support the lift when in use.  They  

       are only used during the leveling process. 
       

After the base frame has been leveled, 

c

onfirm that both raised runway surfaces are also  

      level front to back and side to side. 

      Grout thickness 

(measured from the floor to the bottom edge of a base frame) 

cannot exceed 

      1½  inches.  Confirm this maximum limit is not exceeded by taking measurements at one 
      foot intervals around both base frames. If you measure a distance greater than 1½  inches 
      stop the installation and call the manufacturer at 1 - 866 - 799 - LIFT 

(5438).


      The manufacturer will advise you how to proceed 

(grout installation is step #14)


                                                                            Installation Instructions continued on page 11

Содержание TLSS16ALORR1

Страница 1: ...SCISSOR LIFT Model TLSS16ALORR1 READ the Manual T horoughly Before Installing Operating Servicing or Maintaining the Lift SAVE this MANUAL and ALL INSTRUCTIONS Total Automotive Lifting Solutions Inc 2...

Страница 2: ...vel concrete floors with a minimum of 4 inches 102mm and 3000 psi 20 7MPa concrete that has been aged a minimum of 30 days Please consult a qualified individual if any doubt exists concerning proper i...

Страница 3: ...ory and Hardware Box see list below Optional Accessories included only if ordered Rolling Air Hydraulic Jacks 1 jack per box c w coiled air line Turnplates 1 turnplate per box c w retainer brackets Ac...

Страница 4: ...s the right to change specifications designs or add improvements to its product line without incurring any obligation to make such changes to products sold previously IMPORTANT SAFETY INSTRUCTIONS Whe...

Страница 5: ...plates and turn plates have all lock mechanisms securely in position Also insure that the lift and lift area is clear of all debris and that all oil and grease has been cleaned from runway surfaces 6...

Страница 6: ...on daily with all lift operators LIFT SAFETY and LIFT MAINTENANCE MUST BE PART OF YOUR DAILY ROUTINE IMPORTANT Insure Safety Instruction Decals and Hang Card are affixed to the lift console or operato...

Страница 7: ...provements may change specifications listed in this manual without notice Lift should only be installed on level concrete floors with a minimum of 4 inches 102mm and 3000 psi 20 7MPa concrete that has...

Страница 8: ...for IMPORTANT DO NOT CUT THE SHIPPING STRAPS HOLDING EACH RUNWAY ASSEMBLY TOGETHER UNTIL INSTRUCTED TO DO SO step 3 page 9 1 Identify bay center line near the front and mark the floor Also mark the c...

Страница 9: ...stallation process pages 14 28 Use these diagrams and parts lists together with the following written instructions Insure the lift installation complies with ANSI ALI ALIS Safety Requirements for Inst...

Страница 10: ...ft 10 Press the UP button and raise the lift 18 inches from the floor Press the DOWN button and lower the lift down to the floor Check hydraulic oil level in operator console reservoir and top up if r...

Страница 11: ...2 Connect the three wires in each cable as follows both Red wires to Pin 19 the White Wire from runway 1 to Pin 22 the White wire from runway 2 to Pin 21 both Black wires to Pin 20 17 Install both fro...

Страница 12: ...er the lift when raising or lowering Always insure mechanical safety locks are completely engaged on both sides of the lift before proceeding under the lift or a vehicle Lift operating controls are lo...

Страница 13: ...on Inspection and Maintenance ALOIM guidelines EVERY TWO YEARS Change and replace hydraulic oil in cylinders and console reservoir Lubrication Specifications where grease is required use a multi purpo...

Страница 14: ...ulty lowering solenoid valve 2 Obstruction under lift or in roller tracks 1 Replace valve 2 Carefully remove obstruction Lift Will Not Hold Pressure 1 Contamination in system 2 Internal Cylinder leaks...

Страница 15: ...rt reference SAVE this MANUAL and ALL INSTRUCTIONS Part Number D SLSM 14 Issue 0 13 E ective December 15 2010 Supersedes Issue 0 12 April 15 200 9 Total Automotive Lifting Solutions Inc 2300 Speers Rd...

Страница 16: ...re these lift diagrams and parts lists are kept in a secure place for quick reference Diagram Number Diagram Description includes Part List Page Number 1 Operator Console Locations 17 2 Main Component...

Страница 17: ...17 Diagram 1 OPERATOR CONSOLE LOCATIONS...

Страница 18: ...5 41140033 Main Hydraulic Cylinder 1 6 21140006 Main Cylinder Rod Weldment 1 7 41140021 Safety Locking Claw System 1 8 41140032 Top Support Slider 1 9 41140005 Deck Assembly 1 10 41140015 Wheelstop As...

Страница 19: ...24 14 31140051 ID 1 5 x OD 1 75 x 1 1 8 LG BRONZE BUSHING OIL 4 15 21140026 ROLLER 1 5 DIA PIN ASSEMBLY BOTTOM TOP 4 16 3C140029 5 16 SPRING WASHER LW 0 3125 4 17 3C140035 5 16 NC x 1 BOLT 4 18 11140...

Страница 20: ...er 2 2 41140011 Assist Cylinder 2 3 11140033 Main Cylinder Mounting Pin 2 4 31140013 GF 641 Hydraulic Grease Fitting 1 4 20 UNC 10 5 3C140039 1 x 3 5 L Hex Bolt 2 6 3C140031 1 2 Spring Lock Washer 4 7...

Страница 21: ...y Tube For 1 8 Oil Return Fitting 2 18 3C140049 Ext Clip Ring For 1 1 4 DIA Shaft 4 19 11140034 Center Hinge Pin 4 20 31140012 1 4 DIA x 2 1 2 L Spring Pin slotted SPS 0 25x2 5 4 Diagram 5 CONSOLE HYD...

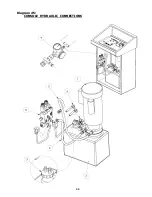
Страница 22: ...22 Diagram 5 CONSOLE HYDRAULIC CONNECTIONS...

Страница 23: ...AT WASH 1 3 31140023 3 8 SWIVEL ELBOW CAMOZZI 6520 06 4 2 4 31140018 5 32 POLY TUBE FOR BREATH 1 8 ELBOW FITING 10 Long 2 5 31140021 NYLON 3 8 COILED HOSE N14 12B 3 6 31140028 3 8 BLACK POLYURETHANE T...

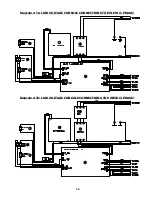
Страница 24: ...24 Diagram 7a LOW VOLTAGE CONSOLE CONNECTIONS TOP VIEW 1 PHASE Diagram 7b LOW VOLTAGE CONSOLE CONNECTIONS TOP VIEW 3 PHASE...

Страница 25: ...IFOLD 1 7 61140024 3 8 HYDRAULIC HOSE 21 LENGTH Link PUMP and MANIFOLD 1 8 61140021 HYDRAULIC DRIVE MOTOR 3HP LEESON 1 9 31140047 FLOW RETURN INLET 5 32 POLYURETHANE TUBING WITH FITTINGS 2 10 31140024...

Страница 26: ...26 Diagram 8 CONSOLE COMPONENTS AND CONNECTIONS...

Страница 27: ...9 LEVELING PROCEDURE Example 2 leveling start point if highest point on both base frames is here 6 7 9 3 5 2 1 4 8 Example 1 leveling start point if highest point on both base frames is here 6 7 9 3...

Страница 28: ...4 5 3C140048 EXT Clip Ring For 3 4 DIA Shaft 4 6 11140126 Roller 4 Diagram 10 WHEEL STOP and REAR APPROACH RAMP INSTALLATION PARTS LIST Front Wheel Stops PARTS LIST Rear Approach Ramps Item Part Numbe...

Страница 29: ...29 Diagram 11 SAFETY DECAL APPLICATION LIFT SAFETY and LIFT MAINTENANCE MUST BE PART OF YOUR DAILY ROUTINE...

Страница 30: ...30 The above information will assist you with purchasing grout material from a local source The grout material you purchase should meet or exceed these specifications...

Отзывы: