2. Upper looper
a. Preparatory work
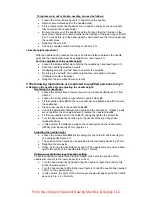
In order to replace the upper looper, the cover and some other parts have to be
removed. We strongly advise to proceed as follows:
•
Loosen the two screws 25833V and remove the protective plate (25833).
•
Release the pressure on the pressure foot.
•
Loosen the two screws 25556V and remove the needle (7713/230T).
•
Loosen the two screws 25558V and remove the needle plate (25558).
•
Loosen the screw 25804VL and remove the threader unit (25804).
•
Loosen the screw 25655V and remove the lower blade (25655).
•
Loosen the screw 25744V and remove the feed dog (25744).
•
Loosen the two screws 25700V and remove the upper looper (25705).
b. Replacing the upper looper
•
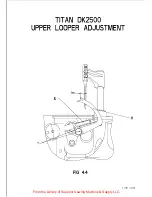
Turn the handwheel by hand and push the lower looper to its furthermost
backward position. This action will give the operator access to the screws
T
(FIG 4.4).
•
Unscrew these and replace the worn out upper looper with a new one (25705).
•
Retighten the screws
T
.
•
Turn the hand-wheel by hand for the upper looper to reach its top of its stroke.
•
Make sure the outer end of the upper looper extends for 5mm beyond the edge
of the needle, as illustrated in figure 4.4.
If this is not the case, adjust correct position via the screws
T
as in figure 4.4.
c. Upper looper fine adjustment
Our sewing machines are factory-set to sewing medium quality carpets with medium
quality yarns.
When using thicker/finer yarns deviating from the factory-set typical yarn thickness,
we recommend that the position of the upper looper be adjusted as follows:
Loosen the T screws (figure 4.4) and turn the hand-wheel by hand for the upper
looper to reach the top of its stroke (highest position).
In the event of thick yarns, move the point of the upper looper a little to the left
(0,5mm maximum), so that the distance between the outer end of the upper looper
and the edge of the needle is 5,5mm.
In the event of fine yarns, move the outer end of the upper looper a little to the right
(0,5mm maximum), so that the distance between the outer end of the upper looper
and the edge of the needle is 4,5mm.
Note:
With every change of the upper looper, check the following points while turning
the hand-wheel by hand:
When the upper looper
V
and the lower looper
S
(figure 4.5) cross one another on the
upper looper upward stroke, the end of the upper looper
S
must travel right in the
centre of the recess of the lower looper
S
.
On its upward stroke towards the needle, the end of the upper looper
V
, must not
touch the lower looper
S
and needle (no contact is allowed). Should this occur
anyway, follow the steps below. After having adjusted the upper looper, put back all
parts and put back again the pressure on the pressure foot.
From the Library of Superior Sewing Machine & Supply LLC


