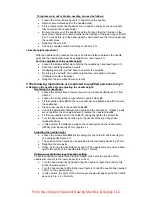
To replace worn out or broken needles, proceed as follows:
•
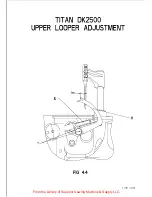
Loosen the screw
H
(see figure 4.1) and remove the needle.
•
Remove accumulated dust in the needle-holder.
•
Fit in a replacement needle. Make sure to position and push the new needle
fully home into the needle-holder.
•
Be sure the groove of the needle faces the front and that the flat side on the
back of the needle is mounted parallel to the flat face of the lower looper
S
(FIG
4.2). To check this, turn the hand-wheel by hand and have the lower looper and
the needle cross
.
•
Retighten the screw
H
.
•
Check the needle position according to chapter 4.1c .
c. Needle height adjustment
With the needle having reached the top of its stroke, distance between the needle
point and the needle plate must be exactly 23 mm (see figure 4.1).
For fine adjustment of the needle height:
•
Loosen the screws
H
first while holding the needles by hand (see figure 4.1).
•
Push the needle against the screw
F.
•
If adapting screw
F,
you first have to unscrew the screw
G
.
•
By turning the screw
F
, the needle height will be increased or reduced
(clockwise/counter-clockwise).
•
Retighten the screw
G
and also screw
H
!! The following instructions are restricted to qualified personnel only !!
d. Replacing the needle bar and adjusting the needle height.
Replacing the needle bar
•
Loosen the screws
A
and remove the worn out needle bar
B
(figure 4.1) from
clamp C.
•
Loosen the screw
X
and recuperate the needle holder
W
.
•
Fit the needle holder
W
into the new needle bar and tighten screw
X
to secure
the needle bar.
•
Place a new needle in the needle holder
W
.
•
Check the parallelism between the needle and the needle bar. If these 2 parts
are not parallel, it is strongly advised to replace the needle holder
W
•
Fit the new needle bar into the holder
C
and lightly tighten the screws
A
.
•
Turn the hand-wheel by hand to place the needle at the top of its stroke
(highest position).
•
In this position, the distance between the needle point and the needle plate
(25558) must be exactly 23 mm (figure 4.1).
Adjusting the needle height
•
Loosen the screws
A in FIG 4.1
. By doing this, the holder
C
will loose its grip
on needle bar
B
(figure 4.1).
•
The position of the needle can be adjusted to the top dead point being 23 mm.
•
Retighten the screws
A
.
•
Verify, by turning the hand-wheel by hand, if the needle is moving up and down
right in the centre of the needle plate (Fig.4.1 Detail).
Optimum needle thread loop formation setting
To achieve optimum needle thread loop formation, make sure the position of the
needle with respect to the lower looper
S
, is correct.
•
Turn the hand-wheel by hand and bring the needle to reach the bottom of its
stroke (lowest position)
•
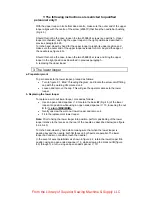
Turn the hand-wheel a little further (see figure 4.3) until the needle has travelled
1,2mm on the upward stroke.
•
In this position, the point of the lower looper should just pass behind the needle
as seen in Fig. 4.3 + Detail A.
From the Library of Superior Sewing Machine & Supply LLC


