© Titan Tool Inc. All rights reserved.
17
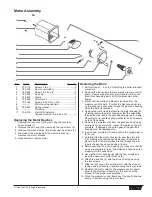
Motor Assembly
1
3
3
4
5
7
8
9
10
6
2
11
Item
Part #
Description
Quantity
1
700-716
Screws, 1/4 x 1” ......................................4
2
700-128
Rear cover w/label ..................................1
3
700-063
Screws, 8/16 x 3/4” .................................4
4
700-632
End cap...................................................1
5
700-039
Clamp......................................................2
6
700-040
Motor brush.............................................2
7
700-766
Screws 8-32 UN x 1.125.........................4
8
----------
Motor housing and field ..........................1
9
700-640
Spring washer .........................................1
10
----------
Armature .................................................1
11
700-070
Motor Kit Complete
(includes items 3–6,8,9, and 10).............1
Replacing the Motor Brushes
1. Remove the rear cover (2) by removing the four rear
cover screws (1).
2. Remove the end cap (4) by removing the two screws (3).
3. Remove the brush clamps (5) by loosening the screws (3).
4. Disconnect the wire leads to the motor brushes (6).
Remove the motor brushes.
5. Reassemble in reverse order.
Replacing the Motor
1. Perform steps 1 – 3 of the “Replacing the Motor Brushes”
procedure.
2. Remove the four screws that secure the pressure control
board. Remove the pressure control board (refer to the
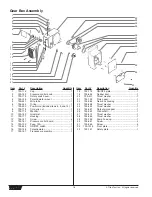
(Gear Box Assembly parts list for the pressure control
board).
3. Disconnect the white and black motor wires from the
pressure control board. Position the disconnected wires
so that they can easily slide through the gear box housing
when the motor is removed.
4. Remove the four screws that secure the motor housing (8).
Carefully remove the motor housing so that the wires slide
through the wire tube in the gear box housing one at a time.
Be careful not to lose the spring washer (9) as it sits loosely
on top of the bearing.
5. Remove the armature (10) from the gear box housing by
pulling up on the armature. Inspect the pinion on the old
armature. If damaged, the pinion gear in the gear box
housing must be replaced also.
6. Insert a new armature (10) and position the spring washer
(9) on top.
7. Carefully slide the motor housing (8) over the armature
(10), making sure that the spring washer (9) remains in
place, and that the motor wires are fed through the wire
tube in the gear box housing one at a time.
8. Before securing the motor housing (8), make sure that the
wires are completely free of the motor and have been fed
properly into the switch box.
9. Secure the motor housing (8) with the four screws and
insert the new set of motor brushes (6).
10. Attach the end cap (4) with the air vent facing up using
the two screws.
11. Slide the rear cover (2) over the motor with the air vent
facing down and secure in position using the four screws,
12. Reattach the motor wires to the pressure control board
(refer to the electrical schematic in this section of the
manual for the proper wire positions).
13. Place the pressure control board over the switch box and
secure in position using the four screws.


