background image

TW 160PH

OPERATING INSTRUCTIONS

8 / 51

C190-0013

11.04.2019

(a)

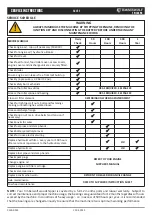
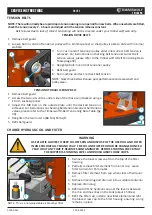
SAFE TRANSPORTATION

When the chipper is unhitched it should be secured
before starting work by using the wheel chocks and
lowering the prop stand and jockey wheel (b).

When hitched to a vehicle the prop stand and
jockey wheel should be stored in the towing
position (a).

Ensure the chipper will not roll away after being

disconnected from the vehicle.  Use the chocks
provided if in doubt.

Disconnect the electrical cable from the vehicle

socket.

Release breakaway cable.

Release the jockey wheel assembly clamp.

Lower the jockey wheel assembly fully.

Retighten the jockey wheel assembly clamp.

Wind the jockey wheel assembly anticlockwise until it

starts to take the weight of the chipper.

Grasp the handle and release the catch with your

thumb.

Continue to wind the jockey wheel anticlockwise.  This

should lift the tow head clear of the ball hitch.

Drive the vehicle clear of the chipper.

Wind the jockey wheel assembly to a suitable point

where the chipper is level.

The chipper is now fully detached from the vehicle.

When towing a chipper the maximum speed limit is 60

mph.

On rough or bumpy road surfaces reduce speed

accordingly to protect your machine from unnecessary
vibration.

When towing off road be aware of objects that may

catch the chipper undergear.

When towing off road ensure inclination is not

excessive.

Avoid excessively pot holed ground.

When reversing the chipper the short wheel base will

react quickly to steering.

Always check the discharge is tight before moving.

Keep tyre pressures inflated to 2.2 bar or 32 psi.

Check wheel nuts are tightened to 90nm or 65 lbs ft.

Clear loose chippings and debris from the machine

before departing.

Ensure feed funnel is closed and the catch is properly

engaged before departing.

(b)

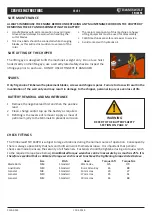
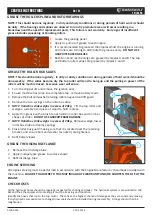
STABILISING THE CHIPPER

UNHITCHING THE CHIPPER

HITCHING ONTO THE TOW BALL

Check ball head is well greased.

Wind jockey wheel assembly anticlockwise until the

tow head is above the height of the ball hitch on the
vehicle.

Reverse vehicle so the ball hitch is directly below the

tow head.

Attach breakaway cable to a strong point on the

vehicle, not the ball hitch.

Grasp handle on tow head and push back catch with

thumb.

Wind jockey wheel assembly clockwise, to lower the

tow head onto the ball hitch.

Release handle and continue to wind jockey wheel

clockwise.  The tow head should snap into place on

the ball hitch.  If it doesn't, repeat previous 2 steps.

Wind jockey wheel up until fully retracted and the

jockey wheel frame is seated in its notch on the stem.
The chipper weight should be fully on the vehicle. 

Release jockey wheel clamp and slide the jockey

wheel assembly fully up.

Tighten clamp on jockey wheel assembly.

Connect electrical plug to socket on rear of towing

vehicle and check operation of all the trailer and
vehicle lights.

Check the engine ignition switch is covered with the

plug provided.

The chipper is now properly attached to the vehicle.

WARNING

DO NOT RIDE ON THE

CHIPPER WHEN IT IS BEING

TOWED.

Содержание TW 160PH

Страница 1: ...timberwolf uk com INSTRUCTIONMANUAL TW 160PH WOOD CHIPPER...

Страница 2: ...tec Industries Ltd 2015 The content of this publication may not be copied reproduced republished posted broadcast transmitted or used in any way in any medium without the written permission of Entec I...

Страница 3: ...s Before Starting 11 Before Using the Chipper 11 Starting the Engine 11 Stopping the Engine 11 Starting to Chip 12 Chipping 12 Blockages 12 Discharge Controls 12 SERVICE INSTRUCTIONS 13 Service Schedu...

Страница 4: ...d for operating this machine especially in safe working practices Timberwolf s policy of regularly reviewing and improving their products may involve major or minor changes to the chippers or their ac...

Страница 5: ...IMENSIONS 2108 mm 1248 mm with discharge removed 3475mm 2935mm with feed tray folded 1266mm TIMBERWOLF TW 160PH SPECIFICATION Engine type Honda v twin petrol Maximum power 16 4kW 22hp Cooling method A...

Страница 6: ...ETY BAR FEED TRAY FUNNEL ROLLER BOX COVER DISCHARGE BUCKET DISCHARGE TUBE BELT GUARD ROTOR HOUSING DISCHARGE CLAMP NUTS LIGHT BOARD CONTROL BOX Both sides ENGINE REFLECTOR REFLECTORS MANUAL CANNISTER...

Страница 7: ...SEMBLY BATTERY FAN SECTION x4 HYDRAULIC OIL TANK TOW HEAD ROTOR DRIVE PULLEY FUEL TANK HYDRAULIC PUMP HYDRAULIC PUMP BELT ADJUSTER ENGINE SHAFT BELT TENSION ADJUSTER ENGINE PULLEY HYDRAULIC OIL FILTER...

Страница 8: ...he skin This may lead to respiratory problems or even cause serious poisoning Check the material to be chipped before you start Avoid confined spaces and use a face mask if necessary Be aware when the...

Страница 9: ...lways keep clear of the chip discharge tube Foreign objects may be ejected with great force Always ensure protective guarding is in place before commencing work Failure to do so may result in personal...

Страница 10: ...ood quality ear protection Guaranteed Sound Power 117dB A As required by Annex III of Directive 2000 14 EC Noise Emission in the environment by equipment for use outdoors NOISE TEST MACHINE TW 160PH N...

Страница 11: ...ound When reversing the chipper the short wheel base will react quickly to steering Always check the discharge is tight before moving Keep tyre pressures inflated to 2 2 bar or 32 psi Check wheel nuts...

Страница 12: ...ough BLUE BUTTON reverse feed allows you to back material out of the rollers The rollers will only turn in reverse as long as you keep pressing the button All Timberwolf TW 160 machines have a full pr...

Страница 13: ...l out button until it returns to its original position turn the ignition key back to the off position before restarting the machine BLADE WEAR The most important part of using a wood chipper is keepin...

Страница 14: ...ROLLERS SHOULDSTOP PRESS THE GREEN PANEL AGAIN THE ROLLERS SHOULD RUN PRESS THE EMERGENCY RED BUTTON THE ROLLERS SHOULD STOP PRESS THE BLUE PANEL THE ROLLERS SHOULD NOT TURN PULL TO RESET THE RED BUTT...

Страница 15: ...aterial into the feed funnel STARTING TO CHIP ROTATION Slacken nut using 1 integral handle Rotate tube 2 Retighten nut 3 BUCKET ANGLE Adjust the bucket to the desired angle using the handle provided C...

Страница 16: ...otal service and maintenance of Timberwolf wood chippers You are strongly advised to take your chipper to an authorised agent for all but the most routine maintenance and checks Timberwolf accepts no...

Страница 17: ...se the roller box slides OR AS REQUIRED SEE PAGE 20 Grease the roller spline and bearing OR AS REQUIRED SEE PAGE 20 Clean air filter element DEPENDING ON WORKING ENVIRONMENT Check for tightness all nu...

Страница 18: ...to the terminals to prevent corrosion The lifting eye is designed to lift the machine s weight only Do not use hoist hook directly on the lifting eye use a correctly rated safety shackle Inspect the l...

Страница 19: ...rge into drains or rivers In case of fire in combustion the product emits toxic fumes extinguish with alcohol or polymer foam carbon dioxide or dry chemical powder Wear self contained breathing appara...

Страница 20: ...as stopped rising for two hours 5 Maintenance Keep the battery clean and dry Use a moist anti static cloth only to wipe the battery otherwise there is a danger of explosion Do not open the battery Rec...

Страница 21: ...s from the blade Grasp the blade by the flat edges while wearing heavy duty gloves 9 Withdraw the blade from the rotor 10 Clean the back surface of the blade blade bolts and blade area of the 11 rotor...

Страница 22: ...install a new filter element and refit 7 the black screw cap to the filter housing ensuring o ring remains in place 2 1 4 NOTE This is a non adjustable air breather filter 2 3 TENSION HYDRAULIC PUMP...

Страница 23: ...ning 3 and rollers are turning to distribute the grease evenly DO NOT USE GRAPHITE BASED GREASE Both front and rear bearings are greased by nipples A and B The top 4 and bottom roller splines are grea...

Страница 24: ...es come with peace of mind built in Our no nonsense warranty is your guarantee of your Timberwolf wood chipper not letting you down Your warranty statement is included in your manual pack Please ensur...

Страница 25: ...TW 160PH DECLARATION OF CONFORMITY 22 51 C190 0013 11 04 2019...

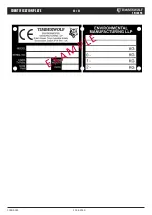
Страница 26: ...TW 160PH IDENTIFICATION PLATE 23 51 C190 0013 11 04 2019 EXAM PLE...

Страница 27: ...instruction manual may lead to death or serious injury Lifting eye is designed to lift the machine s weight only Do not use hoist hook directly on lifting eye Use correctly rated safety shackle only...

Страница 28: ...ed particles Danger Do not use this machine without the discharge unit fitted failure to comply may result in serious inury or damage Danger Autofeed system fitted Rollers may turn without warning Whe...

Страница 29: ...TW 160PH ELECTRICAL PARTS LOCATOR 26 51 C190 0013 11 04 2019 Control Box Switches x 2 Safety Bar Switch Funnel Loom Connector D C V Speed Switch Spark Plug Inductive Sensor...

Страница 30: ...TW 160PH CIRCUIT DIAGRAM 27 51 C190 0013 11 04 2019 CIRCUIT DIAGRAM FOR 160 PETROL VERSION Document no 160 CD Issue 2...

Страница 31: ...TW 160PH CIRCUIT DIAGRAM 28 51 C190 0013 11 04 2019 CIRCUIT DIAGRAM FOR 160 PETROL VERSION Document no 160 CD Issue 2...

Страница 32: ...TW 160PH HYDRAULIC LAYOUT 29 51 C190 0013 11 04 2019 CO73 105 BOTTOM MOTOR PUMP TANK CO73 104 CO73 103 CO73 102 CO73 100 CO73 101 FILTER DCV Hose kit No CO73 106 TOP MOTOR...

Страница 33: ...manual 6 Tension gauges are available from Timberwolf spares quoting part no 18091 Rotor Pulley Engine Pulley Belt Tensioner Rotor Pulley ROTOR BELTS PUMP BELTS TIPS ON BELT TIGHTENING There will norm...

Страница 34: ...very check Inspected by Date Hours Invoice number Signature Next service due Authorised dealer stamp 50 HOUR WARRANTY SERVICE CHECK Date Hours Invoice number Signature Next service due Authorised deal...

Страница 35: ...gnature Next service due Authorised dealer stamp Date Hours Invoice number Signature Next service due Authorised dealer stamp Date Hours Invoice number Signature Next service due Authorised dealer sta...

Страница 36: ...39 ELECTRICAL LAYOUT 40 ENGINE 41 FUNNEL 42 FUEL TANK 43 HYDRAULIC TANK 44 HYDRAULICS 45 ROLLER BOX 46 ROLLER SLIDES 47 ROTOR 48 ROTOR HOUSING 49 DECALS 50 THE FOLLOWING ILLUSTRATIONS ARE FOR PARTS ID...

Страница 37: ...TW 160PH 34 51 C190 0012 11 04 2019...

Страница 38: ...35 51 C190 0012 11 04 2019 TW 160PH...

Страница 39: ...36 51 C190 0012 11 04 2019 TW 160PH...

Страница 40: ...TW 160PH 37 51 C190 0012 11 04 2019...

Страница 41: ...TW 160PH 38 51 C190 0012 11 04 2019...

Страница 42: ...TW 160PH 39 51 C190 0012 11 04 2019...

Страница 43: ...51 C190 0012 11 04 2019 Item Part No Part Name Q ty 1 P2818 Funnel Loom 1 2 P2817 Engine Loom 1 3 1638 No Stress Sensor 1 Item Part No Part Name Q ty 4 P2513 VE Battery Cable 1 5 P2512 VEBattery Cable...

Страница 44: ...TW 160PH 41 51 C190 0012 11 04 2019...

Страница 45: ...TW 160PH 42 51 C190 0012 11 04 2019...

Страница 46: ...TW 160PH 43 51 C190 0012 11 04 2019...

Страница 47: ...TW 160PH 44 51 C190 0012 11 04 2019...

Страница 48: ...TW 160PH 45 51 C190 0012 11 04 2019...

Страница 49: ...TW 160PH 46 51 C190 0012 11 04 2019...

Страница 50: ...TW 160PH 47 51 C190 0012 11 04 2019...

Страница 51: ...TW 160PH 48 51 C190 0012 11 04 2019...

Страница 52: ...TW 160PH 49 51 C190 0012 11 04 2019...

Страница 53: ...TW 160PH 50 51 C190 0012 11 04 2019 670 8 5 0 K G M AX 1849 18393 18438 TIMBERWOLF TW 160PH P652 P637 2949 P650 P2837 2801 2800 1662 P655...

Страница 54: ...TW 160PH 51 51 C190 0012 11 04 2019 C192 0103 3013 1661 2801 x2 P651 1399 P691 P656 P653 P654 616 2800 P2837 TIMBERWOLF TW 160PH 117 dB L WA 95 dB L Aeq P637 3022 1363 4009...

Страница 55: ...timberwolf uk com Timberwolf Wood Chippers Shredders Tomo Industrial Estate Stowmarket Suffolk IP14 5AY United Kingdom T 44 1449 765809 E info timberwolf uk com W timberwolf uk com...

Отзывы: