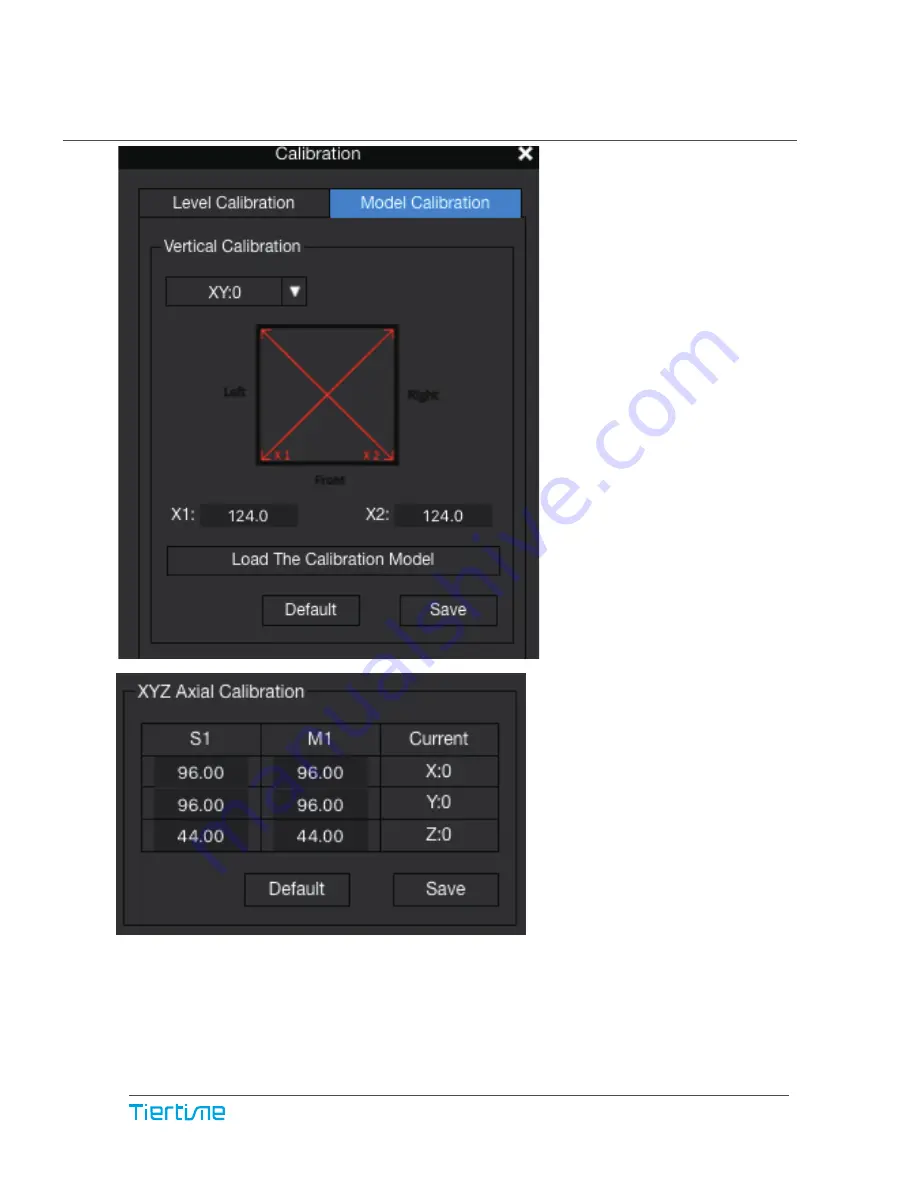
TierTime UP Mini 2 ES Скачать руководство пользователя страница 46

44

Model Calibration

XYZ Axial Calibration is used to improve dimensional accuracy for a specific model. 
When a printed object is found to be deviating from its theoretical dimensions, we can 
use this method to correct it and achieve better precision. 

For detailed instruction, go to www.tiertime.com, Tips and Tricks section. 

Vertical Calibration, its main 
purpose is to ensure all 
three axes are perpendicu-
lar to each other in order to 
guarantee consistent, 
high-quality prints.


Содержание UP Mini 2 ES

Страница 1: ...V 0 1 User Manual Download the full user manual at www tiertime com Support Section ...

Страница 2: ...escription Chapter 2 Prepare for Your First 3D Print Chapter 3 Product Activation Chapter 4 Machine Settings Chapter 5 Print Settings Chapter 6 Calibration and Other Options Chapter 7 Techniques and Troubleshooting Index ...

Страница 3: ...is enough space between print head nozzle and the platform Otherwise the nozzle could be blocked As light odor will be produced during printing please run the printer in a well ventilated environment The UP mini 2 ES s ideal working enironment is temperature between 15 C and 30 C relative humidity between 20 50 and altitude below 2000 meters Printing at temperatures out of this range could cause a...

Страница 4: ...ller Remove the cushioning foams from the inside of the machine before start using it Tiertime reserves the right to determine the validity of all warranty claims Consumables such as nozzles build plates filaments do not have warranty Replacement parts such as Print head heater module and etc have warranty of 90 days Warranty is voided if the product serial number has been altered or removed Warra...

Страница 5: ...r USB Cable Scraper Power Cable Perforated Print Board Perf Board Nozzle If anything is missing please contact your local distributor or at support tiertime com Package Content UP Flex Print Board UP mini 2 ES Spool and Toll Holder Calibration Card Protective Gloves 03 ...

Страница 6: ...oor LCD Touch Screen Back Door Handle Initialization Button Front Side Back Side Product Description Power Switch Power Supply Connector USB B for Computer Back Door Filament Insertion Hole 04 USB A for USB Drive Ethernet Port ...

Страница 7: ...Filament Spool Holder Spool Hold Lid Filament Spool Tool Drawer Filament Filament Guiding Tube 05 ...

Страница 8: ...Installation of Print Board Slide print board into the platform 06 ...

Страница 9: ...Cooling Adjustment knob Nozzle Print Head Installation 2 1 Open front door back door and top covers Print Head Mount Print Head Mounting Plate 07 ...

Страница 10: ...rint Head Installation 2 2 08 The print head must be pushed to the bottom of the mount Notice when installed correctly the red and the blue parts should be at the same level The Correct Installation about Printhead FFC cable for UP mini 2 ...

Страница 11: ...tall UP Studio Obtain UP Studio Go to www tiertime com download the latest software and install it on your computer Minimum hardware requirements Intel Pentium 4 or better CPU 4GB RAM Display card support OpenGL 2 0 09 ...

Страница 12: ...Load File Print Initialize Calibrate Maintenance Model Adjustment Wheel Build Platform Rotate Clip View Move Scale View Angles To Menu 2 Mirror Merge Fix Save Delete Undo Reset Back to Menu 1 Menu 1 Menu 2 View 10 Model Info Print Queue Display Mode More ...

Страница 13: ...ly after initiali zation There are three ways to initial ize your printer 1 Hold the initialization button on the printer 2 Clicking the Initialize option in the software menu shown above 3 When the printer is idle press the initialize button on touch screen Other functions of Initialization Button Stop the current print job 1 During a print press and hold the button 2 Reprint the last job Double ...

Страница 14: ...nt 5 Go to Account section and sign in 7 Restart the printer after the activation 6 You will see the printer that you are using Click Activate to finish the activation 2 If already registered go to step 5 otherwise sign up by filling in the form 4 Connect the UP mini 2 ES to your computer Activation will lift the restriction on the number of prints and provide value added services for UP mini 2 ES...

Страница 15: ...g Wi Fi Printer Info reset to factory and choose language Nozzle Height Detection Initialize the printer Nozzle Temperature Platform Tem perature Wi Fi Status Private setting status Remaining material Touch Screen Control 13 Lorem ipsum 499 34 C 34 C LAN Status Material Type ...

Страница 16: ...omatic nozzle height detection function on the touch screen Press Calibrate buttontoenterNozzle Height setup page Press the Auto button to start the automatic process Or click Edit to imput the height maually During nozzle height detection the print head nozzle will touch the nozzle detector to make measurement Auto 14 Nozzle Height 125 4mm 125 4 mm Edit 499 34 C 34 C ...

Страница 17: ...Front To printer Prepare for Printing Load Filament 2 1 install the lament and guiding tube shown in blue Push the guiding tube into the rubber ring as shown above 15 ...

Страница 18: ...Back Side From spool Filament Guiding Tube insert into the filament entrance Prepare for Printing Load Filament 2 2 16 ...

Страница 19: ... stop automat ically 6 Finally insert the guiding the tube in to the filament entrance and press the tube into the holding clip on the print head mount 2 Choose the printing material as ABS by press the Wheel button to switch between different materials input the filament weight by using the buttons 3 Click Extrude The print head will start to heat up within 3 minutes Its tempera ture will reach 2...

Страница 20: ...Loading a 3D Model Load Model Button 18 ...

Страница 21: ...er through USB Wi Fi go to page 25 for details about Wi Fi settings an ethernet cable and then loaded a model When the UP software is slicing or sending data to the printer progress displayed on the status bar on top of the software interface do not unplug the USB cable as this will disrupt the data transfer and result in a print failure The USB cable can be unplugged after the data transfer is fi...

Страница 22: ...will bring up the detail information of the print job for print 20 History 1 4 499 Next Page Infill Material ABS Layer Thk Quality Normal 0 2 Time Weight 1h10m20s 135g File Name Cube Creator Tiertime 1 Total Time Weight 1h27m30s 200g Date 04 18 12 11 46 Print Delete 499 34 C 34 C Sphere Model 3 Sphere 1 Model 4 Car Cube Model 1 Cylinder History 1 4 499 34 C 34 C Stop Pause Resume Extrude Withdraw 4...

Страница 23: ...s removed insert new filament to the print head as described in page 16 Press the Extrude button to load the new filament Press the resume button to resume printing Change Filament During Printing 21 400 210 C 70 C 1h10m20s Time Remaining File Name ABS 135g Material Cube 30 400 210 C 70 C 1h10m20s Time Remaining File Name ABS 135g Material Cube 30 Press the stop button to stop the printing ...

Страница 24: ...lick Print in the touchscreen Select print job name to view prints settings and then choose print Go to Print Queue Choose the print job Add 400 34 C 34 C Infill Material ABS Layer Thk Quality Normal 0 2 Time Weight 1h10m20s 135g File Name Cube Creator Tiertime 1 Total Time Weight 1h27m30s 200g Date 04 18 12 11 46 Add the print task to current print list to print To view more details of print jobs ...

Страница 25: ... printer status bar on the touchscreen Now your printer connect with ethernet successfully To edit the ethernet details go to Settings click the Printer choose the connect printer choose the i and then toggle on Staic Now you can edit the details of the UP mini 2 ES Click confirm to save editing Information Calibrate Print Material 499 34 C 34 C Initialize Config ...

Страница 26: ...me 04 400 34 C 34 C Connecting to the UP mini 2 ES through Wi Fi requires a Wireless Local Area Net work WLAN Computer and printers must connect to the same WIFI network same SSID before able to communicate In order to acheive stable Wi Fi connection users are recommended to connect under a capacious WIFI environment A crowded network or an area with a large number different networks are known to ...

Страница 27: ...i Please note this is a weak protection that anyone who can access to the printer through USB or touch screen could changet the private password 25 To edit network settings of Wi Fi networks click connnected network s Information button then toggle on the Static button The same steps also apply to ethernet con nection 400 34 C 34 C Mask I P Static Network Gate Tiertime 192 168 7 111 255 255 255 25...

Страница 28: ...Wi Fi Setup 3 1 26 Open UP Studio on your computer make sure it connect to the same Wi Fi network as the printer Then click Settings find Printer section then click Add printer ...

Страница 29: ...s lists then click to add the printer If the printer not shows up click Refresh to reload the list UP mini 2 ES The icon of the printer will show up in Printer Click the printer icon to connect A green tick means the printer is connected to the software successfully ...

Страница 30: ...Wi Fi Setup UP Studio 3 3 28 You can change the Wi Fi Network settings in UP Studio Toggle on Static then to change the IP Mask Gate DNS address Con firm to save and finish ...

Страница 31: ...weight Increase Set Materials Touch Screen Set Materials UP Studio Extrude material Extrude Filament Withdraw Filament Stop All Actions Select Material Input Material weight Change material Withdraw material 29 499g ABS Extrude STOP Withdraw 499 34 C 34 C ...

Страница 32: ...iate the automatic nozzle height de tection process Clicking button will move the platform up and down or user could input a specific value at the text field and click To button the move the platform to a specific height Click save will replace nozzle height value with current platform height Set Nozzle Height UP Studio For setting nozzle height with touch screen please refer to page 16 120 90 30 ...

Страница 33: ...eat switch when turned on for every print job the printer will first preheat 15min before proceed to printing Machine Configuration 31 UP mini 2 ES Preheat Sound Name Private Password 123456 400 34 C 34 C ...

Страница 34: ...ess WLAN MAC Printer s WLAN MAC address Reset The printer s name nozzle height material type to ABS and material weight will be 500g Defult Settings Printer s Name S N Nozzle Height 0mm Material Type ABS Material Weight 500 Language There are two set of languages to choose from Chinese Simplified and English 32 ABCDEFGHIJKL 1 Kg 0 1h 1 2 3 353 252212 UP mini 2 ES Model S N Lan MAC WLAN MAC Total W...

Страница 35: ...Unplug printer and restart Suggested solution in this case Contact support reinitialize the printer Error Prompts Other possible error prompt Error code Error Message 33 Lorem ipsum ...

Страница 36: ... button Choose rotation axis User could input a specific value or choose a preset value for rotation Alternatively user could use the rotation guide to rotate model in real time by hold and drag with mouse Rotating Models UP Studio 34 ...

Страница 37: ...ing factor or choose a preset value Click MM or INCH to convert models to sizes of corresponding units Alternatively user could use the scaling guide on the model User could scale in a specific axis or scale in all directions by hold and drag with mouse Scaling Models UP Studio Choose the model and Click rotate button 35 ...

Страница 38: ...el to move on the X Y plane or a single direction by hold and drag with mouse Choose the the direction of movement User could input a specific value or choose a preset value for distance of movement Move Model UP Studio Choose the model and click the Move button 36 ...

Страница 39: ...ring up the menu and select copy number 1 If the model contains defective surfac es the software will highlight the surfaces in red Click the more button to reach second level menu 2 Click the x button the repair the mod el The red defective surfaces will resume a normal color when repaired 37 ...

Страница 40: ...Ctrl CMD click all the models on the build plate 2 The Merge button on the second level of the adjustment wheel will become avail able click to merge the models 3 Click the save button to save the merged models to comptuer 38 ...

Страница 41: ...t to be printed Dense Choose the number of dense layers between support and supported surfaces Angle Determine the angle which support and dense layer to generated Area Determine the minimal area of surface that will be supported area less than this vaule will not be supported Space Determine how desne the support will be the larger the value the less dense of the support 2 1 39 ...

Страница 42: ...port structure will be stronger but less easy to be removed Unsolide Model The software will autofix nonsolid models Thin Wall The Software will detect wall thickness that is too thin to print and expand the feature to a printable size Keep Heating The platform will be heated after print job is completed 40 ...

Страница 43: ... support structure ensures that the surface being supported retains its shape and surface finish Infill The inner structure of the printed object The density of the infill can be adjusted Raft The thick structure that assists with the adhesion of the object to the platform Surface The top and bottom layers of the printed object 41 ...

Страница 44: ...p base on the com pensa tion value Moves the platform up down click the buttons to move the platform up and down For sending the platform to a specif ic height input the value in the text eld between and and then click Move button Click Set button user want to save currently platform height as nozzle height So if user click the 9 buttons the printhead will move to corresponding position and platfo...

Страница 45: ...1 Initialize the printer 2 Put a Calibration Card on the plat form 3 Follow the instrudtions 43 Manual Calibration ...

Страница 46: ...to be deviating from its theoretical dimensions we can use this method to correct it and achieve better precision For detailed instruction go to www tiertime com Tips and Tricks section Vertical Calibration its main purpose is to ensure all three axes are perpendicu lar to each other in order to guarantee consistent high quality prints ...

Страница 47: ...king the small button on the top left hand corner of the connected printer icon Information including printer type serial number and firm ware version will be displayed User could also set a custom name for the printer at the name field 45 UP mini 2 ES ...

Страница 48: ...ck the update button Also you can tick Remind of new versions that you will get notification when new version aviliable In Mac operating systesm go to UP Stuio then click About Up Studio The window pops up will show current software verions number To update the software go to the app store to check the latest release Windows macOS Add png ...

Страница 49: ...Model Height determine the contrast of the finally print The convert negative button will reverse the pixel intensity so that user could choose the picture to be protruding from or sunken into the base Convert Picture Into 3D Model Click add picture button and select a picture 2 1 47 ...

Страница 50: ...odel button This button will convert the modi fied picture on the left to a 3D rendering on the right OK button send the 3D rendering to the 3D printing interface for printing Convert Picture Into 3D Model 2 2 48 ...

Страница 51: ... warping 3 The airflow on print head is adjustable slide the air flow adjustment knob to change the amount of cooling of print ed object Generally the more cooling provided the better the print quality Cooling also help separate from support and raft However cooling also encourage wrapping especially for ABS To generalize PLA can take strong cooling without prob lem while ABS should avoid cooling ...

Страница 52: ...A Filter Front View Turn anti clockwise to open the cap Printer Maintenance Air Filter Replacement Change air filter for air filatraton unit It is recommmended to change the filter for every 300 hours of usage or 6 months 50 ...

Страница 53: ... extrude function in maintenace interface Nozzle could be removed by using the nozzle wrench provided User does not need to remove printhead cover in order to remove nozzle The printhead cover could be removed after unscrew 2 bolts Print Head Maintenance 51 ...

Страница 54: ...Remove the 3 screws and FFC cable clip on the mainboard cover Mainboard CPU Printer Maintenance remove motherboard cover 52 ...

Страница 55: ...Beijing Tiertime Technology Co Ltd youtube com tiertime facebook com tiertime instagram com tiertime twitter com tiertime Support email support tiertime com Web www tiertime com ...

Отзывы: