background image

7

BINDING PROCESS

 安全校頻配對步驟

6

A binding feature is included in the ACE RC Cougar 2.4GHz spread spectrum system to ensure the transmitter and receiver 

bind properly and prevent interference from other controllers. 

To manually bind Tx/Rx, please proceed as per the following steps:

a.  

Press and hold the “Binding SW” button on the back side of the transmitter while turning on the transmitter.

b. 

Release the “Binding SW” button after the green LED flashes indicating the transmitter is binding.

c. 

Press and hold the bind button on the receiver while turning on the receiver. Binding process will then start automatically.  

The LED will turn green/red flash on the receiver.

d. 

Release the “Binding SW” button.  Successful binding is confirmed by the binding LED changing from a quick blinking and 

then remain solid on the transmitter. The LED will turn green on the receiver. Once binding is complete, the system will 

automatically connect.

     Note: Binding process may take 3~10 seconds to execute. If binding fails, the LED on the receiver will turn red. 

Please turn off the power and repeat the steps from a~d.

ACE RC Cougar P3 

採用最先進的專用

3

2.4GHz

無線展頻遙控系統。這個系統結合發射與接收可以互動溝通模式,跳動頻道搜

尋,使得整體無線遙控系統的傳輸展現精準穩定的特性同時也無須擔心頻率干擾的問題。如發現無法操控情形發生,需要重新校
頻配對,請依照下列步驟重新進行校頻配對程序:

a.  

打開發射機電源時,同時持續按壓發射機背面之

"Binding SW"

按鈕。

b.  

直到按鈕旁之

LED

綠燈快速閃爍,再放開

"Binding SW"

按鈕,表示發射機正在進行自動搜尋校頻,此時請不要關閉發射機電

源。

c.  

然後按壓接收機上之

"Binding SW"

按鈕並同時開啟接收機電源,此時接收機將自動進行校頻配對程序。接收機

LED

燈號為紅綠

快速閃爍。

d.  

放開

"Binding SW"

,一旦完成配對程序,發射機

LED

燈號會從綠色快速閃爍轉換成持續綠色燈號,接收機

LED

燈號將從紅色轉

換為綠色。此時表示接收機與發射機已完成配對溝通,可以進行操控。

   注意:遙控系統校頻配對可能需要

3~10

秒執行程序。如果程序執行錯誤,發射及接收模組的

LED

燈號將持續呈現紅色。請關

閉電源再依

a ~d

的順序重新操作配對程序。

Step

步驟

a

b

c

d

No Action

無須動作

No Action

_

_

無須動作

No Action

TX LED

GREEN FLASH

TX 

燈號:綠燈快速閃爍

RX LED

GREEN/RED FLASH

RX 

燈號:綠

/

紅燈快速閃爍

TX LED

GREEN FLASH-->GREEN SOLID

RX LED

RED SOLID-->GREEN SOLID

TX 

燈號:

綠燈快速閃爍

-->

綠燈恆亮

RX 

燈號:

紅燈恆亮

-->

綠燈恆亮

無須動作

No Action

無須動作

TX Action 

動作

RX Action 

動作

LED 

燈號

Swithch On 

 / Push 

Swithch On 

 / Push 

Release 

放開

Release 

放開

Содержание EB-4 S2.5 6242-F

Страница 1: ...ost of the original kit purchased This warranty does not cover any components damaged by use or modification Part or parts missing from this kit must be reported within 60 days of purchase No part or...

Страница 2: ...ance it is important to make sure all the moveable parts work free without binding 5 Do not operate model products in rain on public roads near crowds near airport or near areas with restricted radio...

Страница 3: ...do not run in confined spaces Do not run where loud noises can disturb others such as hospitals and residential areas Never run indoors There is a high risk of fire and or damage 2 Inspect your model...

Страница 4: ...ly changing Battery strength affects braking power and radio range If voltage drops while running the car you will loose control and destroy your car This is NOT covered under warranty To increase run...

Страница 5: ...hen the charging complete pull on the glow plug igniter lever to unplug the glow igniter Charge the new glow plug igniterfor 16 to 24 hours on the first charge For subsequent charges charge it about 1...

Страница 6: ...Ch1 is steering Ch2 is throttle and Ch3 is for extra function Using the reversing switches as needed Caution Do not run the transmitter s battery flat or you will lose control of the car For additiona...

Страница 7: ...eft or right to adjust the amount of the steering dual rate Right to increase dual rate amount and left to decrease amount 8 AUX Ch Button Additional function for controlling of the model 9 External C...

Страница 8: ...turn green red flash on the receiver d Release the Binding SW button Successful binding is confirmed by the binding LED changing from a quick blinking and then remain solid on the transmitter The LED...

Страница 9: ...osition at Brake first push the trigger to the brake position and hold To set up F S with servo position at Neutral keep the trigger at neutral Caution Always set the throttle trigger to the neutral o...

Страница 10: ...ON 8 a b c OPERATING RADIO THROTTLE BRAKE FUNCTION 9 a Check the radio throttle brake functions With the radio transmitter and receiver on pull the trigger push the stick forward The carburetor should...

Страница 11: ...e details about the engine setting please refer to ENGINE BREAKIN SETTING procedures to properly set the engine c To set the low speed needle The low speed mixture screw is located in the end of the c...

Страница 12: ...widely used fuel in these engines Fuel color is for identification purpose only and is not important to performance or durability of your engine c b a f d e a To start an engine first remove the glow...

Страница 13: ...he glow plug from engine flip the car upside down and pull on the starter to release excess fuel Then reinstall the glow plug and repeat the engine starting procedure a b c 20 35 35 a b c Not pull on...

Страница 14: ...ak c If the exhaust does not reach a high pitch note turn the high speed needle long needle extending from carburetor pointing up 1 4 turn clockwise and repeat step 16b If the exhaust reaches a high p...

Страница 15: ...om the car before you store it c Never use chemicals or any solvents to clean the chassis as it may cause damage to the electronics components and plastic parts as well Use compressed air soft paintbr...

Страница 16: ...n for less steering response e D R b Squeeze the throttle trigger or pull the throttle stick gently and steer the car to left and right b c Squeeze the throttle trigger and release Repeat this action...

Страница 17: ...16 SET UP 22...

Страница 18: ...cool richen fuel mixture see Fuel Mixture section below Carburetor incorrectly adjusted Re adjust carburetor see Fuel Mixture or Factory Carburetor Settings section below Exhaust blocked Check exhaust...

Страница 19: ...18 FRONT ASSEMBLY PD1787 PD1053 PD0432 PD1053 PD1249 PD1787 PD1981 W PD1924 PD08 0017 PD1788 1 PD7020 PD1244 PD0674 PD0561 T 1...

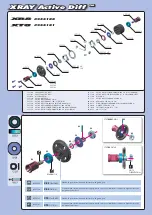
Страница 20: ...19 REAR ASSEMBLY PD08 0017 PD1924 PD1981 W PD1924 PD1981 W PD1244 PD0560 T 1...

Страница 21: ...8114 PD0406 PD0406 PD0423 PD0562 PD0613 PD0593 PD0574 PD0669 PD0668 PD0789 PD1244 PD0673 PD0682 PD1244 PD0423 PD0574 PD0574 PD0662 PD0662 PD0425 PD0884 AD0363 PD0687 PD0581 R PD0425 PD0546 PD0669 AD24...

Страница 22: ...PD0401 PD0980 PD6472 PD7784 PD0974 PD7007 PD6308 PD0470 AD2446 AD2445 AD2538 9708 W PD2001 PD1898 PD0662 PD7199 PD0882 PD0432 PD7020 PD09 0055 PD09 0055 PD09 0055 PD0882 PD1052 PD1895 PD0674 PD8011 21...

Страница 23: ...M MT END COLD TEMP PD0570 TIE END SET AD0343 REAR DRIVE SHAFT AD2413 PIVOT BALL 6 4mm 4mm AD2435 SERVO SAVER BUSHING AD2445 1 8 CLUTCH SPR 3 3 AD2446 1 8 CLUTCH SHOE 3 AD2538 1 8 CLUTCH NUT AR0080 SER...

Страница 24: ...LEAR BODY SET BODY DECAL PD0592 PRESSURE FITTING PD0593 STEEL BRAKE DISC 2 PD0601 R FR SUSP PLATE FR TRANS PD0602 1 8 SHOCK DIAPHRAGM 10 PD0603 RR SHOCK SHAFT 2 PD0604 T FR SHOCK BODY 2 PD0605 T RR SH...

Страница 25: ...FR PD1236 BALL UNIVERSAL BONE CTR RR PD1237 BALL UNIVERSAL BONE FR PD1238 BALL UNIVERSAL BONE RR PD1240 R STEERING SLIDER PD1241 CENTER DRIVESHAFTS FR RR PD1243 HINGE PIN SET PD1261 SERVO TRAY PD1895...

Страница 26: ...15 M3 x 14mm 10 M3 x 16mm 10 M3 x 18mm 10 M3 x 20mm 10 M3 x 22mm 10 M4 x 6mm 5 M3 x 25mm 6 M4 x 14mm 4 M3 x 10mm 5 M3 x 12mm 5 M35 x 10mm 5 M4 x 25mm 5 M3 x 8mm 5 M3 x 8mm 5 M3 x 10mm 10 M3 x 12mm 5...

Страница 27: ...PD0777 2 7mm RR SWAY BAR 2 7mm LT BLUE PD0778 3 0mm RR SWAY BAR 3 0mm LT GREEN PD0766 ERGAL FR PLATERR TRANS 9708 B BLACK 9708 G GREEN 9708 O ORANGE 9708 P PINK 9708 W WHITE 9708 Y YELLOW PD07 0030 1...

Страница 28: ...6 O ORANGE PD1946 P PINK PD1946 W WHITE PD1946 Y YELLOW 5 SPOKE WHL 17mm 1 8 PD6602 B BLACK PD6602 G GREEN PD6602 O ORANGE PD6602 P PINK PD6602 W WHITE PD6602 Y YELLOW VELOCITY WHL 1 8 PD1981 P PINK P...

Страница 29: ...S2 17mm EB K S1 S2 EB K S1 S2 EB K S1 S2 26mm 14T EB K EB K S1 S2 G 7mm MSEALED 8x16x5 M3x6 20 M3x8 20 M3x10 20 M3x12 M3x16 M3x18 PD0675 PD0676 PD0677 PD0678 PD0679 PD0680 PD0681 PD0682 PD0683 PD0684...

Страница 30: ...1 8 1 8 1 8 1 8 EB S1 S2 3x7x3mm 5x8x2 5mm 15T 5x60mm 2 5mm 1 H EB S1 S2 4x52 5x90mm 4x45mm EB4 S1 S2 2 3mm 6x32mm 4x36mm EB K S1 S2 EB K S1 S2 EB K S1 S2 1 7mm 1 8mm 1 7mm 1 8mm A EB K EB K S1 S2 1 6...

Страница 31: ...JD8524...

Отзывы: