background image

24

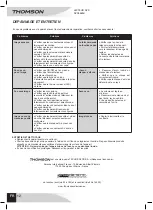
REPAIR AND MAINTENANCE

EN

Problems

solutions

Problems

solutions

Picture without sound

• check that the audio connectors are 

connected properly.

• check that the audio connectors are not 

damaged.

• check that the volume is high in the VOL/

cH section.

• check that the audio parameters have 

been correctly defined for the player.

• check that the audio parameters have 

been set up correctly for your television set.

• check that the sound has not been turned 

off.

The remote control does 

not work

• check that the 

remote control’s 

battery is working.

• point the remote 

control towards the 

player’s infrared 

sensor.

• remove the 

obstacles between 

the remote control 

and the player.

No sound, no picture

• check that ON/OFF is set to ON.

• check that the plug is plugged in 

correctly.

• check that the electrical cable’s plug has 

been plugged into the mains socket. 

• check that the indicator light (LeD) is lit 

up.

“No disk” is displayed

• Make sure that you 

have inserted a disk 

in the player.

• check that the 

disk has been 

inserted correctly.

• check that the 

disk is not deformed, 

dirty or scratched.

sound without picture

• check the connections.

• check that the video cable is connected 

to the video input of the television set (not 

to an audio output).

• check that your television set’s video 

input has been selected correctly.

• check that the video connectors are not 

damaged.

• check that the parameters have been set 

up correctly for your television set.

No sound

• the volume is set 

to the minimum 

level.

• Make sure that 

the disk is not 

dirty, scratched or 

damaged.

• a pair of 

SpeaKerS is 

connected to the 

unit.

Poor  picture  or  sound 

quality

• check that the audio parameters have 

been set up correctly for your television set.

• check that the disk is clean and not 

scratched.

• check that the aV connectors are in a 

good condition.

Picture dark

• adjust the 

brightness and 

contrast

mAINTENANCE ANd ClEANING

• unplug the appliance before cleaning it.

• remove fingerprints and dust with a soft and slightly damp cloth. Do not use abrasive products or solvents that may 

damage the appliance’s surface. 

ATTENTION: Never immerse the appliance in water or in any liquid whatsoever. 

• If it is not used for a long time, unplug the appliance and remove the batteries.

consult the following table if there is a problem with the appliance.

DVD pLayer
DVD3660H


is a trademark of tecHNIcOLOr S.a. used under license by: 

parsons International France - 19 Boulevard albert einstein

77420 champs sur Marne - France

Monday to thursday (from 9 am to 18 pm) and Friday (9 am to 3:30 p.m.) 

N°Azur

(+33)0825 745 770

call rate according to operator

www.thomsonaudiovideo.eu

Содержание DVD3660H

Страница 1: ...FR Lecteur DVD EN DVD player DVD3660H...

Страница 2: ......

Страница 3: ...t rempli de liquide ex vases sur l appareil Ne pas placer l appareil en plein soleil proximit d un appareil de chauffage ou de toute source de chaleur dans un endroit soumis une poussi re excessive ou...

Страница 4: ...onner correctement l appareil doit tre quip des piles pr vues cet effet Seules les piles du type recommand doivent tre utilis es Les piles doivent tre mises en place en respectant le sens de polarit L...

Страница 5: ...24 CLEAR S lectionnez CLEAR et ENTER pour effacer toutes les liste des programmes 25 SLOW Presser successivement sur SLOW pour ralentir la lecture vitesse variable 1 2 1 4 1 6 1 8 26 ZOOM Effectue un...

Страница 6: ...Pb Cb Pr C r 11 Sortie audio stereo G D 12 Sortie Vid o 13 Sortie HDMI 4 6 7 5 10 13 11 9 3 1 2 1 POWER Marche Arr t 2 Compartiment disque 3 R cepteur de t l commande 4 Ecran LED 5 OPEN CLOSE Ouvertu...

Страница 7: ...io vid o connectez les c bles l entr e audio vid o d un t l viseur Sortie Peritel connectez la la prise p ritel du t l viseur Sortie HDMI connectez cette sortie l entr e HDMI de votre appareil pour ob...

Страница 8: ...our le doublage int gr au DVD Les langues disponibles d pendent du disque utilis Menu DVD d finit les options de langue pour le menu du DVD Menu Vid o Format d image Choisir le format d affichage rapp...

Страница 9: ...ermer la bo te de recherche sans effectuer de choix Acc s au menu racine Presser MENU pour acc der au menu racine liste des chapitres Utiliser les touches directionnelles a ou d pour s lectionner un c...

Страница 10: ...le diff rent Si l indicateur d angle appara t l cran pendant un instant il est possible de s lectionner un angle de cam ra diff rent en pressant sur ANGLE Ecoute d une bande son diff rente Durant la l...

Страница 11: ...ers l avant Presser plusieurs fois pour augmenter la vitesse de d placement x2 x4 x8 x16 Presser 1 pour reprendre la lecture Note la 5 me pression sur 5 ou 6 permet galement de reprendre la lecture S...

Страница 12: ...dans le dossier choisi Note Pour passer le diaporama en boucle s lectionner l option R p ter dans la liste de droite l aide de la touche s puis presser successivement ENTER pour s lectionner le mode d...

Страница 13: ...270 pas de rotation retour l orientation initiale SPECIFICATIONS TECHNIQUES Mode de lecture PAL NTSC AUTO Mode Disque DVD MPEG 4 MP3 CD R solution Vid o 520 lignes ou plus Sortie HDMI avec 576p 720p...

Страница 14: ...le c ble vid o est bien raccord l entr e vid o du t l viseur et pas une sortie audio V rifier que l entr e vid o de votre t l viseur soit correctement s lectionn e V rifier que les connecteurs vid o n...

Страница 15: ...merse the appliance in water or in any liquid whatsoever Do not place any object containing water e g vases etc on the appliance Do not place the appliance in full sunlight close to heating equipment...

Страница 16: ...a long time If there is a thunderstorm If it isn t working properly If the cable is damaged it must be replaced by the manufacturer the manufacturer s after sales service department or a similarly qu...

Страница 17: ...TER to eliminate all program lists 25 SLOW Press SLOW in succession to slow the playback speed 1 2 1 4 1 6 1 8 26 ZOOM For zooming the picture 27 PBC The PBC Play Back Control function allows you to u...

Страница 18: ...ponent output 11 Video output 12 Stereo audio output L R 13 HDMI output 1 POWER On Off 2 Disk compartment 3 Remote control receiver unit 4 LED screen 5 OPEN CLOSE Open close the disk compartment 6 PLA...

Страница 19: ...ral connection choices are possible Audio video output connect the cables to the audio video input of a TV SCART output connect it to the peritel socket of a TV HDMI Output connect to the TV HDMI inpu...

Страница 20: ...Available subtitles depend on the source DVD DVD Menu Select a language for the DVD menu Video menu Image size Choose the display mode aspect ratio that best suits the size of the TV 4 3 for TVs that...

Страница 21: ...e selected of the value entered is valid Press GOTO again to close the search window without making any selection Accessing room menu Press MENU to access root menu folder list Use navigation buttons...

Страница 22: ...n to normal speed press a navigation button five times Modifying viewing angle If the angle indicator appears on the screen for a moment it is possible to select a different camera angle by pressing A...

Страница 23: ...ough the currently played track forward backward Press repeatedly to speed up playback x2 x4 x8 x16 Press 1 to resume playback Note Press a button 5 times to resume playback Selecting another track du...

Страница 24: ...ss 1 or ENTER The selected picture will be displayed on the TV screen and then the rest of the pictures of the selected file will be displayed in slide show Note You can select Repeat on the list on t...

Страница 25: ...to original orientation TECHNICAL SPECIFICATIONS Play mode PAL NTSC AUTO Disk mode DVD MPEG 4 MP3 CD Video resolution 520 lines or more HDMI out which 576p 720p 1080p output Video S N 56dB 96KHz fs f...

Страница 26: ...not to an audio output Check that your television set s video input has been selected correctly Check that the video connectors are not damaged Check that the parameters have been set up correctly for...

Страница 27: ......

Страница 28: ......

Отзывы: