background image

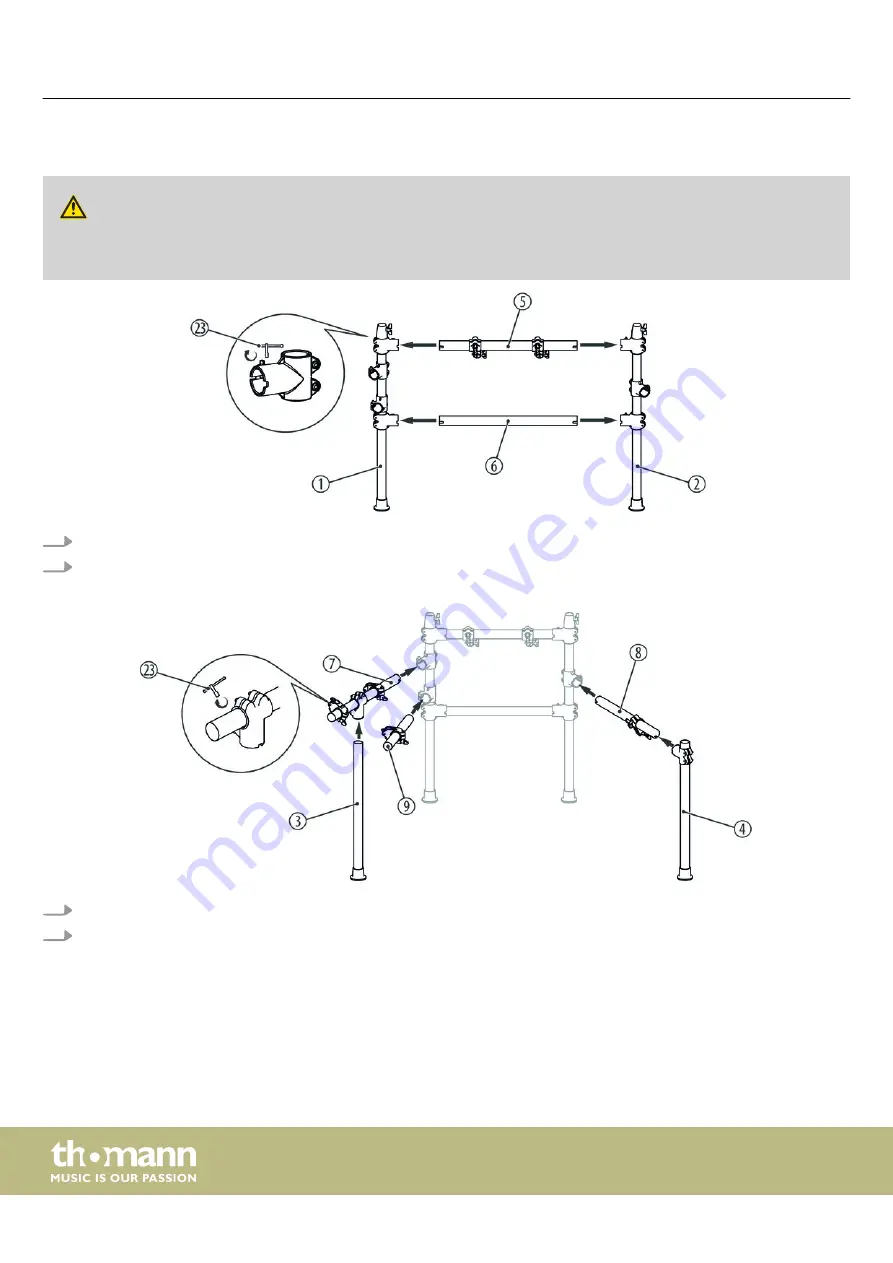
Assembling the rack

 CAUTION!

Danger of cuts on hands and fingers
When connecting the parts, take care for sharp edges on the metal tubes, screws etc.

1.

Attach the horizontal connection tubes (5, 6) to the lateral support tubes (1, 2).

2.

Then tighten the mounting screws with the drum key (23).

1.

Attach the three side crossbeams of the rack (7, 8, 9) in the provided mounting clamps.

2.

Attach the support tubes (3, 4) for the crossbeams to the provided mounting clamps. Make sure that the ends of the sup‐

port tubes (3, 4) are resting on the floor.

Assembly


e-drum set

8

Содержание Millenium MPS-450

Страница 1: ...MPS 450 e drum set assembly instructions...

Страница 2: ...Musikhaus Thomann Thomann GmbH Hans Thomann Stra e 1 96138 Burgebrach Germany Telephone 49 0 9546 9223 0 E mail info thomann de Internet www thomann de 25 03 2019 ID 454253...

Страница 3: ...Table of contents 1 Safety instructions 4 2 Scope of delivery 5 3 Assembly 7 4 Protecting the environment 13 Table of contents MPS 450 3...

Страница 4: ...sed of properly and are not within reach of babies and young children Choking hazard Ensure that children do not detach any small parts e g knobs or the like from the unit They could swallow the piece...

Страница 5: ...e 10 2 Cymbal brackets Crash and Ride 11 1 Hi hat holder 12 1 Hi hat pad 10 inch 13 2 Crash 12 inch with Choke function Ride 12 inch with Choke function 14 3 Tom pad 1 8 inch Mesh Head Tom pad 2 8 inc...

Страница 6: ...Item Qty 27 1 Assembly instructions e drum set 28 1 Plug in power supply Scope of delivery e drum set 6...

Страница 7: ...specified sequence The final positions of the components are shown in the illustration below 12 Hi hat pad 10 inch 13 Crash 12 inch Ride 12 inch 14 Tom pad 1 8 inch tom pad 2 8 inch 15 Snare pad 10 i...

Страница 8: ...nnection tubes 5 6 to the lateral support tubes 1 2 2 Then tighten the mounting screws with the drum key 23 1 Attach the three side crossbeams of the rack 7 8 9 in the provided mounting clamps 2 Attac...

Страница 9: ...Ride and the Hi hat into the provided mounting clamps on the rack Fasten the brackets using the mounting screws at the desired height 2 Loosen the retaining screws on the bracket joints and turn the...

Страница 10: ...r needs then tighten the wing nuts of the brackets and the wing nuts of the pads evenly Mounting cymbals on the rack 1 Unscrew the wing nuts from the cymbal holders 10 and take the felt washers off th...

Страница 11: ...ut on the holder Setting up the bass drum pedal 1 Engage the bolt of the foot machine 17 into the provided hole on the bass drum pad 16 2 Place the beater 18 into the hole provided on the rotary head...

Страница 12: ...e and tighten the wing nut of the bracket Position bass drum and hi hat pedal 1 Place the pedal with the bass drum pad centred under the rack Position the bass drum pedal centred in front of the pad 2...

Страница 13: ...ollected for recycling Please follow the notes and markings on the packaging Disposal of your old device This product is subject to the European Waste Electrical and Electronic Equipment Directive WEE...

Страница 14: ...Notes e drum set 14...

Страница 15: ......

Страница 16: ...Musikhaus Thomann Hans Thomann Stra e 1 96138 Burgebrach Germany www thomann de...

Отзывы: