ThinkPad Helix 20CG Скачать руководство пользователя страница 26

• Enroll and use a different finger for authentication.

• If your hands are dry, apply lotion to them.

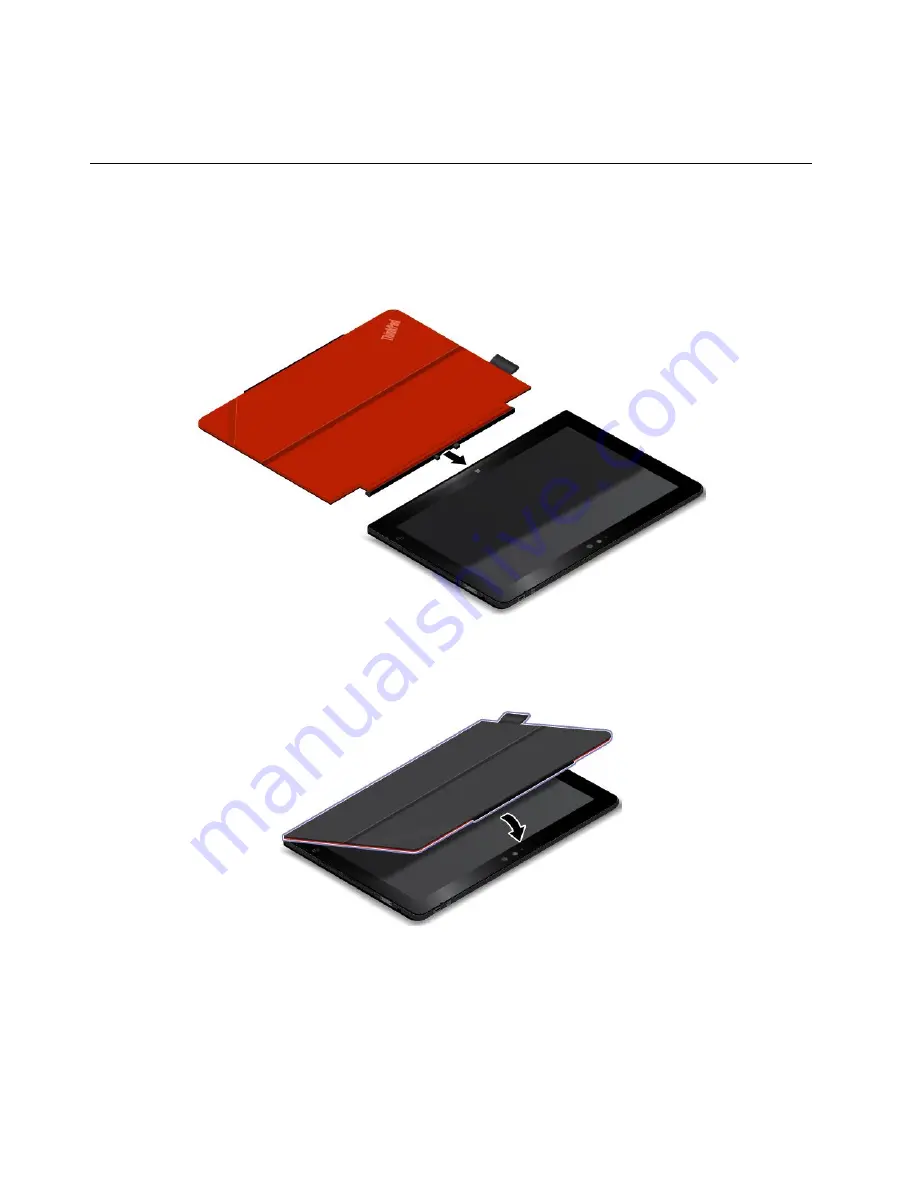
Using the ThinkPad Helix Quickshot Cover

Depending on the model, your tablet might come with a ThinkPad Helix Quickshot Cover (hereafter called
the cover). This topic provides instructions on how to use the cover.

To use the cover, attach the cover to the tablet first as shown. The cover will be attached to the tablet
magnetically.

Put the tablet into sleep mode or wake up the tablet

If the cover is open and the tablet is on, the tablet, by default, enters sleep mode automatically after you
close the cover.

18

ThinkPad Helix User Guide

Содержание Helix 20CG

Страница 1: ...ThinkPad Helix User Guide 20CG and 20CH...

Страница 2: ...n page 109 The latest Safety Warranty and Setup Guide and the Regulatory Notice are available on the Lenovo Support Web site at http www lenovo com UserManuals First Edition November 2014 Copyright Le...

Страница 3: ...network 29 Connecting to a mobile network 30 Sharing your Internet connection 31 Using Bluetooth devices 31 Using the NFC connection 32 Chapter 4 You and your tablet 37 Comfort and accessibility 37 U...

Страница 4: ...9 European Union Compliance to the Electromagnetic Compatibility Directive 100 German Class B compliance statement 100 Korea Class B compliance statement 101 Japanese VCCI Class B statement 101 Japan...

Страница 5: ...s dropped on a hard surface is the subject of a high impact or is crushed by a heavy object If the glass chips or cracks do not touch the broken glass or attempt to remove it from the tablet Stop usin...

Страница 6: ...tions Notice for non rechargeable coin cell battery DANGER If the coin cell battery is incorrectly replaced there is danger of an explosion The battery contains a small amount of harmful substance Do...

Страница 7: ...with EN 50332 2 Sub clause 7 This specification limits the tablet s maximum wide band true RMS output voltage to 150 mV To help protect against hearing loss ensure that the headphones or earphones you...

Страница 8: ...d the data on the tablet Be aware of heat generated by your tablet When your tablet is turned on or the battery is charging some parts might become hot The temperature that they reach depends on the a...

Страница 9: ...et Front view and side view Note Your tablet might look slightly different from the following illustration 1 Microphones 2 Camera status indicator 3 Front facing camera 4 Ambient light sensor 5 NFC to...

Страница 10: ...32 6 Windows Start screen control Tap the Windows Start screen control to go to the Start screen 7 Screen rotation lock button Press the button to enable or disable the screen auto rotation function...

Страница 11: ...rface HDMI connector which is a digital audio and video interface that can connect a compatible digital audio device or video display such as a high definition television HDTV For more information see...

Страница 12: ...et works as a system status indicator Blinks three times The tablet is connected to a power source On The tablet is on and in use Off The tablet is off in sleep mode or in hibernation mode 4 Speakers...

Страница 13: ...in a natural manner and perform other operations without tapping the screen with your finger For more information see Using the Tablet Digitizer Pen on page 14 For more information about other options...

Страница 14: ...els Wireless features Bluetooth 4 0 Wireless LAN Wireless WAN on some models NFC on some models Global Positioning System GPS satellite receiver on some models Security features Fingerprint reader on...

Страница 15: ...ed program The following table provides a brief introduction to some Lenovo programs that might be preinstalled on your tablet Note Preinstalled Lenovo programs vary by geographic locations and are su...

Страница 16: ...tests system information collection security status and support information along with hints and tips for maximum system performance Lenovo Support Register your tablet with Lenovo view user manuals f...

Страница 17: ...ect the power connector of the ac power adapter to the power connector on the tablet 2 2 Plug the power cord into a standard ac power outlet 3 3 Press and release the power button to turn on the table...

Страница 18: ...might look different from the following illustrations Tap Tap on the screen to open an app or perform an action on an open app such as Copy Save and Delete depending on the app Slide Slide leftward o...

Страница 19: ...p edge to the bottom Swipe in from the top edge to of the screen the bottom to close the current app Tips on using the multi touch screen The multi touch screen is a glass panel covered with a plastic...

Страница 20: ...with the tablet to charge the tablet battery as shown If your tablet comes with a ThinkPad Helix Ultrabook Pro Keyboard use the ThinkPad Helix Ultrabook Pro Keyboard and the ac power adapter shipped...

Страница 21: ...brightness level of the screen do the following 1 Swipe in from the right edge of the screen to display the charms 2 Tap Settings Brightness 3 Slide the control down to lower the brightness Enter slee...

Страница 22: ...he display for one second and then lift the pen from the display Press and hold the click button 2 and tap the tip on the display For more instructions about using the pen with ThinkPad Helix Ultraboo...

Страница 23: ...startup screen select When I sign in or close all apps on a screen go to the desktop instead of Start so a check is visible To set the Start screen as your default startup screen remove the check fro...

Страница 24: ...fingerprint Note It is recommended that you enroll more than one fingerprint in case of any injuries to your fingers Swiping your finger over the fingerprint reader To swipe your finger over the finge...

Страница 25: ...an the surface of the reader with a dry soft lint free cloth The surface of the reader is dirty or stained The surface of the reader is wet The reader often fails to enroll or authenticate your finger...

Страница 26: ...ot Cover hereafter called the cover This topic provides instructions on how to use the cover To use the cover attach the cover to the tablet first as shown The cover will be attached to the tablet mag...

Страница 27: ...ngs Control Panel Hardware and Sound Power Options 3 In the navigation panel tap Choose what closing the lid does 4 Follow the instructions on the screen to choose an option according to your preferen...

Страница 28: ...Lenovo Settings Camera 2 In the View section select Front facing camera or Rear facing camera from the Select a camera drop down list box to switch the cameras You also can use the camera with other a...

Страница 29: ...nting toward the tablet 3 Insert the card into the micro SD card slot The card might stop before it is completely installed into the card reader Ensure that you insert the card firmly until you hear a...

Страница 30: ...rovides information on how to use the smart card Generally smart cards can provide authentication data storage and application processing Smart cards also might provide strong security authentication...

Страница 31: ...et into sleep or hibernation mode before the data transfer finishes otherwise your data could become damaged To install a smart card do the following 1 Position your tablet as shown and ensure that th...

Страница 32: ...you must remove it first then insert it again Using HDMI devices Your tablet has a micro HDMI connector that you can use to connect an external display for video output To locate the micro HDMI conne...

Страница 33: ...find your current location get directions to your destination and find other location based information Note By default the GPS satellite receiver is enabled For a longer battery life disable the GPS...

Страница 34: ...26 ThinkPad Helix User Guide...

Страница 35: ...ving the micro SIM card If the tablet supports mobile network connection it might require a micro SIM card to connect to a mobile network The micro SIM card is shipped with some tablet models only and...

Страница 36: ...t firmly into the micro SIM card slot as shown until you hear a click 4 Close the protective cover and turn on your tablet To remove the micro SIM card do the following 1 Turn off the tablet 2 Open th...

Страница 37: ...name is displayed Connecting to a Wi Fi network Wi Fi is a wireless networking technology that provides network access at distances of up to 100 meters 328 feet depending on the Wi Fi router and your...

Страница 38: ...ntifier or SSID you must add that Wi Fi network before you can connect to it To add a Wi Fi network do the following 1 Swipe in from the right edge of the screen to display the charms 2 Tap the Settin...

Страница 39: ...ver metered connections feature do the following 1 Swipe in from the right edge of the screen to display the charms 2 Tap Settings Change PC settings 3 In the navigation panel tap PC and devices Devic...

Страница 40: ...e NFC feature you can find the NFC icon on the tablet By default the NFC feature is enabled If the NFC feature of your tablet is disabled do the following to enable the NFC feature 1 Swipe in from the...

Страница 41: ...n your tablet as shown and ensure that the front side of the card is facing upward Align the left side edge of the card with the NFC logo on the tablet 2 Move the card left and right within 5 mm 0 20...

Страница 42: ...ion 1 Position your tablet as shown and ensure that the screen of the smartphone is facing upward Align the left side edge of the smartphone with the NFC logo on the tablet 2 Move the smartphone left...

Страница 43: ...and right within 5 mm 0 20 inch as shown Then hold the smartphone for about one second until you are prompted that the smartphone has been successfully detected by the tablet Then you can transfer dat...

Страница 44: ...36 ThinkPad Helix User Guide...

Страница 45: ...o help you modify and expand your tablet to best suit your needs Access the Web site http www lenovo com essentials to view some of these options Explore your options for docking solutions and externa...

Страница 46: ...com jaws hq asp Using the NVDA screen reader http www nvaccess org Speech Recognition Speech Recognition enables you to control your tablet by voice Using only your voice you can start programs open m...

Страница 47: ...fier on page 38 Zoom on page 39 On Screen Keyboard On Screen Keyboard displays a visual keyboard with all the standard keys To open On Screen Keyboard do the following 1 Swipe in from the right edge o...

Страница 48: ...rough the x ray machines at airport security stations it is important to keep your eyes on the tablet at all times to prevent theft Put your tablet in a protective case when not in use to prevent dama...

Страница 49: ...product for a long time Cleaning your tablet To clean your tablet unplug all cables and turn off the tablet by pressing and holding the power button for a few seconds Then wipe the tablet screen with...

Страница 50: ...42 ThinkPad Helix User Guide...

Страница 51: ...troduces the ThinkPad Helix Ultrabook Keyboard hardware features to give you the basic information you need to start using it 1 2 Tablet Digitizer Pen slot cover and Tablet Digitizer Pen slot Some mod...

Страница 52: ...on When you attach a USB cable to this USB connector ensure that the USB mark is facing upward Otherwise the connector might be damaged Using the ThinkPad Helix Ultrabook Keyboard To use the ThinkPad...

Страница 53: ...on some models To remove the pen from the slot press the pen gently into the slot 1 to release it then pull the pen out 2 Note The pen contains pressure sensors Do not push the tip of the pen for an...

Страница 54: ...Fn key and the corresponding function key When the Fn Lock function is enabled The Fn Lock indicator turns on To input F1 F12 press the corresponding function key directly To initiate the special func...

Страница 55: ...site or apps Carrying or storing the tablet together with the ThinkPad Helix Ultrabook Keyboard Sometimes you do not need to use the keys on the ThinkPad Helix Ultrabook Keyboard but you would like to...

Страница 56: ...kPad Helix Ultrabook Keyboard is disabled in this situation For more information refer to the documentation that came with the ThinkPad Helix Ultrabook Keyboard ThinkPad Helix Ultrabook Pro Keyboard T...

Страница 57: ...tion parallel to the keyboard Then you can move the pointer But the pointing stick itself does not move The speed at which the pointer moves depends on the pressure you apply to the pointing stick The...

Страница 58: ...ThinkPad Helix Ultrabook Pro Keyboard and the tablet when the battery power is low For more information see Charging the battery on page 12 10 Ejection button Press the ejection button to release you...

Страница 59: ...2 Pivot up the tablet To remove the tablet from the keyboard do the following 1 Press the eject button on the right side of the keyboard Chapter 5 ThinkPad Helix options 51...

Страница 60: ...erwise the ThinkPad Helix Ultrabook Pro Keyboard will be disabled The next time you want to reinstall the tablet align the hook hole on the bottom of the tablet with the keyboard hook Then insert the...

Страница 61: ...lock to the keyboard do the following 1 Secure the chain on the lock to a stationary object Refer to the instructions shipped with the mechanical lock 2 Insert the security cable lock into the securi...

Страница 62: ...Insert the pen holder into the pen holder slot 3 Insert the pen into the pen holder in the direction as shown by the arrow To remove the pen from the slot do the following 54 ThinkPad Helix User Guid...

Страница 63: ...push the tip of the pen for an extended period of time Do not subject the pen to shock or vibration For more information about using the pen see Using the Tablet Digitizer Pen on page 14 Using the sp...

Страница 64: ...ss the corresponding function key directly To initiate the special function of each key press the Fn key and the corresponding function key Function key combinations Fn Spacebar Controls the keyboard...

Страница 65: ...wipe Put four fingers on the touch pad and move them downward to show the desktop Swipe from the top edge From the Start screen or the current app swipe in from the top edge of the touch pad with one...

Страница 66: ...lix Ultrabook Pro Keyboard with the tablet screen facing upward To achieve this do the following 1 Position the tablet with the tablet screen facing upward 2 Align the hook hole on the bottom of the t...

Страница 67: ...ds your tablet in an upright position and frees your hands to do other tasks The dock also provides you with easy access to connectors for USB devices file transfers charging audio input audio output...

Страница 68: ...nect headphones or a headset to listen to stereo sound from the tablet You also can connect a headset to record audio or make calls Rear view of the dock 1 USB 3 0 connectors Used to connect devices t...

Страница 69: ...he following 1 Position your tablet with the dock connector side facing downward 2 Align the dock connector on the tablet with the one on the dock 3 Gently slide your tablet into the dock until it is...

Страница 70: ...using an external USB keyboard Connect the dock to your personal USB storage device with the supplied USB cable to transfer files Connect the dock to a stereo system or speakers using a stereo audio...

Страница 71: ...password Note To return to the icon press F1 again Passwords and sleep mode If you have set a Windows password and you put your tablet into sleep mode you will be prompted to enter the password when r...

Страница 72: ...se is required and a fee will be charged for parts and service 6 Save configuration changes and exit Supervisor password If you have set a supervisor password in the ThinkPad Tablet Setup program you...

Страница 73: ...t no master hard disk password has been the user must enter the user hard disk password to access files and applications on the hard disk drive Master hard disk password The master hard disk password...

Страница 74: ...password in the Confirm New Password field and press Enter 3 A Setup Notice window is displayed Press Enter again to continue The user hard disk password is changed Note The hard disk password cannot...

Страница 75: ...d disk passwords on page 65 For security a longer password is recommended To provide reliable security for the UEFI BIOS use the security chip and a security application with a Trusted Platform Module...

Страница 76: ...menu provides the following items for you to configure the embedded security chip You can find the Security Chip menu from the Security menu of the ThinkPad Tablet Setup program Security Chip Selecti...

Страница 77: ...lp you detect and eliminate viruses Lenovo provides a full version of antivirus software on your tablet with a free 30 day subscription After 30 days you must renew the license to continue receiving t...

Страница 78: ...70 ThinkPad Helix User Guide...

Страница 79: ...visor password For more information refer to Using passwords on page 63 If you tablet is attached to a supported keyboard restart the tablet When the ThinkPad logo is displayed press F1 The ThinkPad T...

Страница 80: ...is the first interface you see after you enter the ThinkPad Tablet Setup program It displays the following configuration of your tablet System Information UEFI BIOS Version UEFI BIOS Date Year Month...

Страница 81: ...irst Enable or disable Network Stack for PXE Boot USB UEFI BIOS Support Disabled Enabled Enable or disable boot support for USB storage devices Always On USB Disabled Enabled If you select Enabled the...

Страница 82: ...device that is to be activated at boot time This selection is effective for boot time password prompt and ThinkPad Tablet Setup Digital on ThinkPad is the Mini DisplayPort connector on your tablet Dis...

Страница 83: ...f you select Disabled the system is not powered on nor resumed when the ac power adapter is attached Intel Rapid Start Technology Disabled Enabled Enter after Immediately 1 minute 2 minutes 5 minutes...

Страница 84: ...f you select Enabled Intel AMT Active Management Technology is configured and additional setup items are provided in MEBx Management Engine BIOS Extension Setup If you select Permanently Disabled you...

Страница 85: ...default value to show selectable options and tap a desired option Some items are displayed on the menu only if the tablet supports the corresponding features Table 2 Security menu items Menu item Subm...

Страница 86: ...s set this option is used to specify whether the Security password must be entered to display the F12 boot device list Select Enabled to prompt for the Security password Select Disabled to proceed wit...

Страница 87: ...Boot Restore Factory Keys Enter This option is used to restore all keys and certificates in Secure Boot databases to factory defaults Any customized Secure Boot settings will be erased and the defaul...

Страница 88: ...for Intel Virtualization Technology for Directed I O When enabled a VMM can utilize the platform infrastructure for I O virtualization Wireless LAN On Off If you select On you can use the wireless LAN...

Страница 89: ...tel TXT Feature On Off Enable or disable Intel Trusted Execution Technology Notes This item is displayed only if you have selected Active or Enabled for the Security Chip option This is set to disable...

Страница 90: ...rface to activate the computrace module Computrace is an optional monitoring service from Absolute Software Note If you set the computrace module activation to Permanently Disabled you will be unable...

Страница 91: ...er by dragging and dropping the icon Network Adapter On Off Change the Boot order by dragging and dropping the icon Restart menu If you want to close the ThinkPad Tablet Setup program and restart the...

Страница 92: ...d installing software Once the tablet is configured and operational you can manage it by use of software and manageability features already integrated into the client system and the network System man...

Страница 93: ...the log files when you speak to a Lenovo technical support representative Troubleshooting The problems and solutions described in this section are meant only as a guide They are not definitive problem...

Страница 94: ...ablet and then turn it on again 2 If you still see only the pointer on the screen use the recovery solutions to restore the system to the factory state If the problem persists have the tablet serviced...

Страница 95: ...ew and side view on page 1 If you still encounter the same problem after you restart your tablet reset your tablet and restart it again you can perform a factory data reset operation For more informat...

Страница 96: ...er are invalid Have the tablet serviced Message 2201 Machine UUID is invalid Solution Machine UUID is invalid Have the tablet serviced Message Fan error Solution Cooling fan has failed Shut down the t...

Страница 97: ...and recovery Recovery 4 In the Refresh your PC without affecting your files section tap Get started 5 Follow the instructions on the screen to refresh your tablet Resetting your tablet to the factory...

Страница 98: ...the screen Note Ensure that your tablet is connected to ac power during the recovery process Creating and using recovery media You can create recovery media as backups for the Windows recovery environ...

Страница 99: ...y image will not be stored in your tablet anymore and you will need the recovery media to refresh or reset your tablet 9 Remove the USB drive The recovery media are created successfully Using recovery...

Страница 100: ...92 ThinkPad Helix User Guide...

Страница 101: ...deral Communications Commission FCC ID and IC Certification label Locating the MTM number and the serial number When calling for technical assistance you are requested to provide the MTM number and th...

Страница 102: ...f a recall or other severe problems After you register your tablet with Lenovo you will receive quicker service when you call Lenovo for help In addition some locations offer extended privileges and s...

Страница 103: ...ms Lenovo provides user forums on the World Wide Web to provide you with a place to search the community knowledge base for information about your tablet share information with other users make sugges...

Страница 104: ...96 ThinkPad Helix User Guide...

Страница 105: ...teroperable with any Bluetooth product that is compliant to Bluetooth Specification 4 0 as defined by the Bluetooth SIG The following profiles are supported by your Bluetooth card Note Depending on th...

Страница 106: ...ions and areas might for example include Using the integrated wireless cards onboard of airplanes in hospitals or near petrol stations blasting areas with electro explosive devices medical implants or...

Страница 107: ...tee that interference will not occur in a particular installation If this equipment does cause harmful interference to radio or television reception which can be determined by turning the equipment of...

Страница 108: ...sicherzustellen sind die Ger te wie in den Handb chern beschrieben zu installieren und zu betreiben Des Weiteren d rfen auch nur von der Lenovo empfohlene Kabel angeschlossen werden Lenovo bernimmt k...

Страница 109: ...EAC Brazil regulatory notice Ouvir sons com mais de 85 decib is por longos per odos pode provocar danos ao sistema auditivo Mexico regulatory notice Advertencia En Mexico la operaci n de este equipo...

Страница 110: ...102 ThinkPad Helix User Guide...

Страница 111: ...er put in the established collective systems for reclaiming these end of life products Users of electrical and electronic equipment EEE with the WEEE marking must not dispose of end of life EEE as uns...

Страница 112: ...sposal operator and follow their instructions Disposal of a lithium battery must comply with local ordinances and regulations Disposing of a disused battery pack from Lenovo notebook computers Your Le...

Страница 113: ...e per this Directive In accordance with the European Directive 2006 66 EC batteries and accumulators are labeled to indicate that they are to be collected separately and recycled at end of life The la...

Страница 114: ...China recycling information for Waste Electrical and Electronic Equipment WEEE 106 ThinkPad Helix User Guide...

Страница 115: ...zardous substances in electrical and electronic equipment RoHS recast or RoHS 2 For more information about Lenovo progress on RoHS go to http www lenovo com social_responsibility us en RoHS_Communicat...

Страница 116: ...Ukraine RoHS India RoHS RoHS compliant as per E Waste Management Handling Rules 2011 108 ThinkPad Helix User Guide...

Страница 117: ...blication Lenovo might make improvements and or changes in the product s and or the program s described in this publication at any time without notice The products described in this document are not i...

Страница 118: ...ration in the U S and or other countries Mini DisplayPort mDP is a trademark of the Video Electronics Standards Association iPhone is a trademark of Apple Inc registered in the U S and other countries...

Страница 119: ......

Страница 120: ......

Отзывы: